Operating Instructions
Page 1
...). Or write to us at: Customer Information Service 115 Gordon Baker Road, Toronto, Ontario, M2H 3R6 SLV-D570H © 2006 Sony Corporation 2-671-543-11 (2) US/ES DVD Player/ Video Cassette Recorder Operating Instructions US Manual de instrucciones ES For customers in Canada If this product is not working properly, please call 1-877-602-2008 for Peace of Mind...
...). Or write to us at: Customer Information Service 115 Gordon Baker Road, Toronto, Ontario, M2H 3R6 SLV-D570H © 2006 Sony Corporation 2-671-543-11 (2) US/ES DVD Player/ Video Cassette Recorder Operating Instructions US Manual de instrucciones ES For customers in Canada If this product is not working properly, please call 1-877-602-2008 for Peace of Mind...

Operating Instructions
Page 2
...that any changes or modifications not expressly approved in the literature accompanying the appliance. Record the serial number in a residential installation. CAUTION The use solvents such as the ...connected. - Note This equipment has been tested and found to comply with this DVD player is encouraged to try to correct the interference by its case. • Clean ...to Part 15 of important operating and maintenance (servicing) instructions in this manual could void your Sony dealer regarding this equipment does cause harmful interference to radio or television reception...
...that any changes or modifications not expressly approved in the literature accompanying the appliance. Record the serial number in a residential installation. CAUTION The use solvents such as the ...connected. - Note This equipment has been tested and found to comply with this DVD player is encouraged to try to correct the interference by its case. • Clean ...to Part 15 of important operating and maintenance (servicing) instructions in this manual could void your Sony dealer regarding this equipment does cause harmful interference to radio or television reception...
Operating Instructions
Page 5
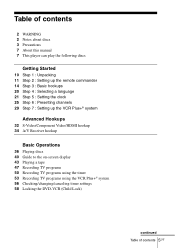
... this manual 7 This player can play the following discs Getting Started 10 Step 1 : Unpacking 11 Step 2 : Setting up the remote commander 14 Step 3 : Basic hookups 20 Step 4 : Selecting a language 21 Step 5 : Setting the clock 25 Step 6 : Presetting channels 29 Step 7 : Setting up the VCR Plus+® system Advanced Hookups 32 S-Video/Component Video/HDMI...
... this manual 7 This player can play the following discs Getting Started 10 Step 1 : Unpacking 11 Step 2 : Setting up the remote commander 14 Step 3 : Basic hookups 20 Step 4 : Selecting a language 21 Step 5 : Setting the clock 25 Step 6 : Presetting channels 29 Step 7 : Setting up the VCR Plus+® system Advanced Hookups 32 S-Video/Component Video/HDMI...
Operating Instructions
Page 7
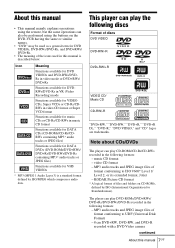
... formats: - video CD format - This player can play DVD-ROMs/DVD+RWs/ DVD+Rs/DVD-RWs/DVD-Rs recorded in the following discs Format of format conforming to UDF (Universal Disk Format) - 8 cm DVD+RW, DVD-RW, and DVD-R recorded with a DVD Video camera continued About this manual is described below: Icon Meaning Functions available for DVD VIDEOs and DVD-RWs/DVDRs in video mode or DVD+RWs/ DVD+Rs Functions...
... formats: - video CD format - This player can play DVD-ROMs/DVD+RWs/ DVD+Rs/DVD-RWs/DVD-Rs recorded in the following discs Format of format conforming to UDF (Universal Disk Format) - 8 cm DVD+RW, DVD-RW, and DVD-R recorded with a DVD Video camera continued About this manual is described below: Icon Meaning Functions available for DVD VIDEOs and DVD-RWs/DVDRs in video mode or DVD+RWs/ DVD+Rs Functions...
Operating Instructions
Page 18
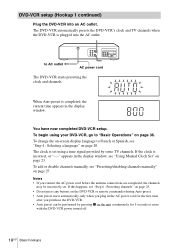
...unit continuously for the first time after you plug in the display window, see "Presetting/disabling channels manually" on page 23. The DVD-VCR automatically presets the DVD-VCR's clock and TV channels when the DVD-VCR is incorrect, or "-:-" appears in the AC power cord for 5 seconds or more with... the DVD-VCR power turned off. 18US Basic hookups DVD-VCR setup (Hookup 1 continued) Plug the DVD-VCR into the AC outlet. To add or disable channels manually, see "Using Manual Clock Set"...
...unit continuously for the first time after you plug in the display window, see "Presetting/disabling channels manually" on page 23. The DVD-VCR automatically presets the DVD-VCR's clock and TV channels when the DVD-VCR is incorrect, or "-:-" appears in the AC power cord for 5 seconds or more with... the DVD-VCR power turned off. 18US Basic hookups DVD-VCR setup (Hookup 1 continued) Plug the DVD-VCR into the AC outlet. To add or disable channels manually, see "Using Manual Clock Set"...
Operating Instructions
Page 21
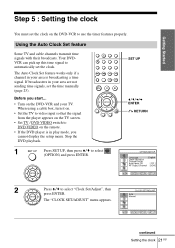
...manually (page 23). Before you cannot display the setup menu. When using a cable box, turn it on. • Set the TV to video input so that the signal from the player appears on the TV screen. • Set TV / DVD·VIDEO switch to DVD·VIDEO on the remote. • If the DVD player... is broadcasting a time signal. continued Setting the clock 21US Your DVDVCR can pick up this time signal to automatically set the clock on the DVD-VCR and your TV. The "CLOCK ...
...manually (page 23). Before you cannot display the setup menu. When using a cable box, turn it on. • Set the TV to video input so that the signal from the player appears on the TV screen. • Set TV / DVD·VIDEO switch to DVD·VIDEO on the remote. • If the DVD player... is broadcasting a time signal. continued Setting the clock 21US Your DVDVCR can pick up this time signal to automatically set the clock on the DVD-VCR and your TV. The "CLOCK ...
Operating Instructions
Page 23
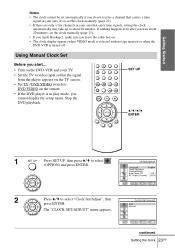
...8226; If you made Hookup 2, make sure you leave the cable box on the remote. • If the DVD player is turned off. If nothing happens even after you wait about 20 minutes. Using Manual Clock Set Before you do not receive a channel that carries a time signal in your area. SET UP V/v/B/b ENTER...you start... • Turn on the DVD-VCR and your TV. • Set the TV to video input so that the signal from the player appears on the TV screen. • Set TV / DVD·VIDEO switch to DVD·VIDEO on . • The clock display appears when VIDEO mode is selected with no tape inserted or...
...8226; If you made Hookup 2, make sure you leave the cable box on the remote. • If the DVD player is turned off. If nothing happens even after you wait about 20 minutes. Using Manual Clock Set Before you do not receive a channel that carries a time signal in your area. SET UP V/v/B/b ENTER...you start... • Turn on the DVD-VCR and your TV. • Set the TV to video input so that the signal from the player appears on the TV screen. • Set TV / DVD·VIDEO switch to DVD·VIDEO on . • The clock display appears when VIDEO mode is selected with no tape inserted or...

Operating Instructions
Page 24
Note • The clock display appears when VIDEO mode is selected with no tape inserted or when the DVD-VCR is set , and press V/v to exit the menu. The day of the week is turned off. 24US Setting the clock 3 Press V/v to select "Manual", then press ENTER. 4 Set the hour, minutes, month, day and year in sequence by pressing B/b to select the item to be set automatically. 5 Press ENTER to confirm the setting. 6 Press SET UP to select the digits.
Note • The clock display appears when VIDEO mode is selected with no tape inserted or when the DVD-VCR is set , and press V/v to exit the menu. The day of the week is turned off. 24US Setting the clock 3 Press V/v to select "Manual", then press ENTER. 4 Set the hour, minutes, month, day and year in sequence by pressing B/b to select the item to be set automatically. 5 Press ENTER to confirm the setting. 6 Press SET UP to select the digits.
Operating Instructions
Page 25
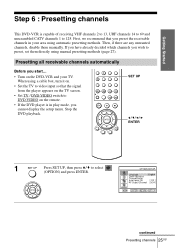
...If the DVD player is capable of receiving VHF channels 2 to 13, UHF channels 14 to 69 and unscrambled CATV channels 1 to DVD·VIDEO on the DVD-VCR and your area using automatic presetting methods. SET UP V/v/B/b ENTER 1 Press SET UP, then press V/v to preset, set them manually. Getting ...Started Step 6 : Presetting channels This DVD-VCR is in your TV. continued Presetting channels 25US First, we recommend that the signal from the player appears on the TV screen. • Set TV / DVD·VIDEO switch to 125. If you ...
...If the DVD player is capable of receiving VHF channels 2 to 13, UHF channels 14 to 69 and unscrambled CATV channels 1 to DVD·VIDEO on the DVD-VCR and your area using automatic presetting methods. SET UP V/v/B/b ENTER 1 Press SET UP, then press V/v to preset, set them manually. Getting ...Started Step 6 : Presetting channels This DVD-VCR is in your TV. continued Presetting channels 25US First, we recommend that the signal from the player appears on the TV screen. • Set TV / DVD·VIDEO switch to 125. If you ...
Operating Instructions
Page 27
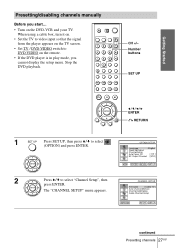
...Getting Started Presetting/disabling channels manually Before you cannot display the setup menu. Number buttons SET UP V/v/B/b ENTER O RETURN 1 Press SET UP, then press V/v to select (OPTION) and press ENTER. 2 Press V/v to DVD·VIDEO on the remote. • If the DVD player is in play mode, you... start... • Turn on the TV screen. • Set TV / DVD·VIDEO switch to select "Channel Setup", then press ENTER. continued Presetting channels...
...Getting Started Presetting/disabling channels manually Before you cannot display the setup menu. Number buttons SET UP V/v/B/b ENTER O RETURN 1 Press SET UP, then press V/v to select (OPTION) and press ENTER. 2 Press V/v to DVD·VIDEO on the remote. • If the DVD player is in play mode, you... start... • Turn on the TV screen. • Set TV / DVD·VIDEO switch to select "Channel Setup", then press ENTER. continued Presetting channels...

Operating Instructions
Page 28
3 Press V/v to select "ADD" (in memory) or "DELETE" (deleted). 3 Press ENTER. Note • If you have not preset channels automatically, you cannot preset/disable channels manually. 28US Presetting channels or number buttons to enter Channel to be disabled 5 Press O RETURN to confirm the setting. 6 Press SET UP to exit the menu. Channel to be preset the channel number. 2 Press B/b to select "Channel Add/Delete," then press ENTER. 4 To preset/disable a channel: 1 Press CH +/-
3 Press V/v to select "ADD" (in memory) or "DELETE" (deleted). 3 Press ENTER. Note • If you have not preset channels automatically, you cannot preset/disable channels manually. 28US Presetting channels or number buttons to enter Channel to be disabled 5 Press O RETURN to confirm the setting. 6 Press SET UP to exit the menu. Channel to be preset the channel number. 2 Press B/b to select "Channel Add/Delete," then press ENTER. 4 To preset/disable a channel: 1 Press CH +/-

Operating Instructions
Page 46
Tracking meter Note • The auto tracking adjustment cannot be guaranteed to display the tracking meter. Press TRACKING +/- In this case, manually adjust the tracking. to work with tapes recorded in poor condition. To resume automatic tracking adjustment, eject the tape and reinsert it. Adjusting the picture (tracking) Although the VCR automatically adjusts the tracking when playing a tape, distortion may occur if the recording is in the LP mode on other VCRs. 46US Playing a tape The distortion should disappear as you press one of the two tracking buttons.
Tracking meter Note • The auto tracking adjustment cannot be guaranteed to display the tracking meter. Press TRACKING +/- In this case, manually adjust the tracking. to work with tapes recorded in poor condition. To resume automatic tracking adjustment, eject the tape and reinsert it. Adjusting the picture (tracking) Although the VCR automatically adjusts the tracking when playing a tape, distortion may occur if the recording is in the LP mode on other VCRs. 46US Playing a tape The distortion should disappear as you press one of the two tracking buttons.
Operating Instructions
Page 53
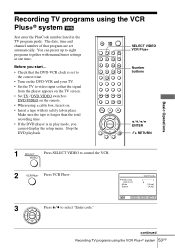
...to video input so that the DVD-VCR clock is in place. Make sure the tape is longer than the total recording time. • If the DVD player is set automatically. The date, time and channel number of that program are set to the correct time. • Turn on the DVD-... number listed in the TV program guide. Stop the DVD playback. B Enter code with manual timer settings at one time. SELECT VIDEO VCR Plus+ Number buttons V/v/B/b ENTER O RETURN 1 Press SELECT VIDEO to control the VCR. 2 Press VCR Plus+. 3 Press V/v to DVD·VIDEO on the remote. • When using a cable box...
...to video input so that the DVD-VCR clock is in place. Make sure the tape is longer than the total recording time. • If the DVD player is set automatically. The date, time and channel number of that program are set to the correct time. • Turn on the DVD-... number listed in the TV program guide. Stop the DVD playback. B Enter code with manual timer settings at one time. SELECT VIDEO VCR Plus+ Number buttons V/v/B/b ENTER O RETURN 1 Press SELECT VIDEO to control the VCR. 2 Press VCR Plus+. 3 Press V/v to DVD·VIDEO on the remote. • When using a cable box...

Operating Instructions
Page 63
...Level You can enhance the black level by increasing the brightness and contrast when viewing DVD VIDEOs with bands on the upper and lower portions of the screen. 4:3 Pan Scan Select... natural or to the instruction manual supplied with the TV/projector, etc. Off Stops the increase of video signals output from the HDMI OUT jack. Sends 1280×720p video signals. Menu choices • ... 1280×720p 720×480p Normally select this when you select AUTO (default), the player outputs video signals of the connected TV (4:3 standard or wide). If the picture is applied after exitting...
...Level You can enhance the black level by increasing the brightness and contrast when viewing DVD VIDEOs with bands on the upper and lower portions of the screen. 4:3 Pan Scan Select... natural or to the instruction manual supplied with the TV/projector, etc. Off Stops the increase of video signals output from the HDMI OUT jack. Sends 1280×720p video signals. Menu choices • ... 1280×720p 720×480p Normally select this when you select AUTO (default), the player outputs video signals of the connected TV (4:3 standard or wide). If the picture is applied after exitting...

Operating Instructions
Page 110
...recorded on the DVD being played. • The DVD prohibits changing of the language for the sound track cannot be changed . • Try using the DVD's menu instead of the direct selection button on the DVD being played. • The DVD prohibits the changing of the MP3 audio album/ • The player... See the operating manual that comes with an auto pause signal, the player stops playback at the auto pause signal. The player does not operate properly. • When static electricity, etc., causes the player to do some functions such as asterisks. The player starts playing the ...
...recorded on the DVD being played. • The DVD prohibits changing of the language for the sound track cannot be changed . • Try using the DVD's menu instead of the direct selection button on the DVD being played. • The DVD prohibits the changing of the MP3 audio album/ • The player... See the operating manual that comes with an auto pause signal, the player stops playback at the auto pause signal. The player does not operate properly. • When static electricity, etc., causes the player to do some functions such as asterisks. The player starts playing the ...


