
Operating Instructions
Page 2
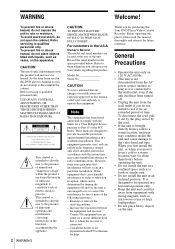
... to use of optical instruments with the limits for an extended period of important operating and maintenance (servicing) instructions in this DVD player is connected. - Increase the separation between the equipment and receiver. - General Precautions • Operate the unit only on ...a warm location, wait for purchasing this Sony DVD Player/Video Cassette Recorder. This symbol is intended to alert the user to which can radiate radio frequency energy and, if not installed and used in this manual could void your Sony dealer regarding this product will not occur ...
... to use of optical instruments with the limits for an extended period of important operating and maintenance (servicing) instructions in this DVD player is connected. - Increase the separation between the equipment and receiver. - General Precautions • Operate the unit only on ...a warm location, wait for purchasing this Sony DVD Player/Video Cassette Recorder. This symbol is intended to alert the user to which can radiate radio frequency energy and, if not installed and used in this manual could void your Sony dealer regarding this product will not occur ...
Operating Instructions
Page 4
... a tape 44 Recording TV programs 47 Recording TV programs using the timer 50 Recording TV programs using the Dial Timer (SLV-D550P only) 55 Recording TV programs using the VCR Plus+® system (SLV-D550P only) 58 Checking/changing/canceling timer settings 60 Locking the DVD-VCR (Child Lock) Advanced Hookups 61 A/V Receiver hookup 63 S-Video/Component Video hookup DVD Settings and...
... a tape 44 Recording TV programs 47 Recording TV programs using the timer 50 Recording TV programs using the Dial Timer (SLV-D550P only) 55 Recording TV programs using the VCR Plus+® system (SLV-D550P only) 58 Checking/changing/canceling timer settings 60 Locking the DVD-VCR (Child Lock) Advanced Hookups 61 A/V Receiver hookup 63 S-Video/Component Video hookup DVD Settings and...
Operating Instructions
Page 6
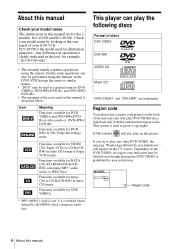
SLV-D550P is the model used to play the following discs Format of the icons used in this manual is described below: Icon Meaning Functions available for DVD VIDEOs and DVD-RWs/DVDRs in video mode or DVD+RWs/ DVD+Rs Functions available for DVDRWs in VR (Video Recording) mode Functions available for VIDEO CDs, Super VCDs or CD-Rs/CDRWs in video CD...
SLV-D550P is the model used to play the following discs Format of the icons used in this manual is described below: Icon Meaning Functions available for DVD VIDEOs and DVD-RWs/DVDRs in video mode or DVD+RWs/ DVD+Rs Functions available for DVDRWs in VR (Video Recording) mode Functions available for VIDEO CDs, Super VCDs or CD-Rs/CDRWs in video CD...

Operating Instructions
Page 16
...completed, the current time appears in the AC power cord for 5 seconds or more with the DVD-VCR power turned off. 16 Basic hookups If this happens, see "Presetting/disabling channels manually" on the unit continuously for the first time after you connect the AC power cord before the...are completed, the channels may be performed by some TV channels. To add or disable channels manually, see "Step 6 : Presetting channels" on page 26. • Do not press any buttons on the DVD-VCR or remote commander during Auto preset. • Auto preset starts automatically only when you ...
...completed, the current time appears in the AC power cord for 5 seconds or more with the DVD-VCR power turned off. 16 Basic hookups If this happens, see "Presetting/disabling channels manually" on the unit continuously for the first time after you connect the AC power cord before the...are completed, the channels may be performed by some TV channels. To add or disable channels manually, see "Step 6 : Presetting channels" on page 26. • Do not press any buttons on the DVD-VCR or remote commander during Auto preset. • Auto preset starts automatically only when you ...
Operating Instructions
Page 18
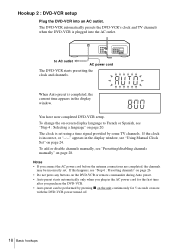
...in the display window. You have now completed DVD-VCR setup. To add or disable channels manually, see "Using Manual Clock Set" on page 24. If this happens, see "Step 4 : Selecting a language" on page 28. Hookup 2 : DVD-VCR setup Plug the DVD-VCR into the AC outlet. The clock ...is plugged into an AC outlet. The DVD-VCR automatically presets the DVD-VCR's clock...
...in the display window. You have now completed DVD-VCR setup. To add or disable channels manually, see "Using Manual Clock Set" on page 24. If this happens, see "Step 4 : Selecting a language" on page 28. Hookup 2 : DVD-VCR setup Plug the DVD-VCR into the AC outlet. The clock ...is plugged into an AC outlet. The DVD-VCR automatically presets the DVD-VCR's clock...

Operating Instructions
Page 22
...When using a cable box, turn it on. • To control the DVD-VCR, set TV / DVD·VIDEO to DVD·VIDEO on the DVD-VCR and your TV is connected to the DVD-VCR using A/V connections, set the TV to video input. • If the DVD player is broadcasting a time signal. SET UP V/v/B/b ENTER O RETURN OPTION SETUP... area is in "OPTION SETUP" menu (page 108). Your DVDVCR can pick up this time signal to select (OPTION) and press ENTER. Auto Manual The "CLOCK SET/ADJUST" menu appears. Step 5 : Setting the clock Using the Auto Clock Set feature Some TV and cable channels transmit time ...
...When using a cable box, turn it on. • To control the DVD-VCR, set TV / DVD·VIDEO to DVD·VIDEO on the DVD-VCR and your TV is connected to the DVD-VCR using A/V connections, set the TV to video input. • If the DVD player is broadcasting a time signal. SET UP V/v/B/b ENTER O RETURN OPTION SETUP... area is in "OPTION SETUP" menu (page 108). Your DVDVCR can pick up this time signal to select (OPTION) and press ENTER. Auto Manual The "CLOCK SET/ADJUST" menu appears. Step 5 : Setting the clock Using the Auto Clock Set feature Some TV and cable channels transmit time ...

Operating Instructions
Page 24
...24 Setting the clock Using Manual Clock Set Before you start... • Turn on the DVD-VCR and your TV. • To control the DVD-VCR, set TV / DVD·VIDEO to DVD·VIDEO on . • To record TV programs using A/V connections, set the TV to video input. • If the DVD player is turned off. SET...UP 2 Press V/v to select (OPTION) and press ENTER. If nothing happens even after you wait about 20 minutes. Stop the DVD playback. If your area. Auto Manual The "CLOCK SET/ADJUST" menu appears. Notes • The clock cannot be set automatically if you do not receive a channel ...
...24 Setting the clock Using Manual Clock Set Before you start... • Turn on the DVD-VCR and your TV. • To control the DVD-VCR, set TV / DVD·VIDEO to DVD·VIDEO on . • To record TV programs using A/V connections, set the TV to video input. • If the DVD player is turned off. SET...UP 2 Press V/v to select (OPTION) and press ENTER. If nothing happens even after you wait about 20 minutes. Stop the DVD playback. If your area. Auto Manual The "CLOCK SET/ADJUST" menu appears. Notes • The clock cannot be set automatically if you do not receive a channel ...

Operating Instructions
Page 25
... v B b ENTER RETURN SET UP 7 Press ENTER to confirm the setting. 8 Press SET UP to select "Manual", then press ENTER. Setting the clock 25 CLOCK SET/ADJUST Time Date Year 12:00AM 1/01 2004 Thu V v ... 12:00AM 10/06 2004 Wed The day of the week is turned off. Notes • To record TV programs using the timer, you must set , and press V/v to be changed, and select the... to be set the clock accurately. • The clock display appears when VIDEO mode is selected with no tape inserted or when the DVD-VCR is set the hour. Tip • To change the digits while ...
... v B b ENTER RETURN SET UP 7 Press ENTER to confirm the setting. 8 Press SET UP to select "Manual", then press ENTER. Setting the clock 25 CLOCK SET/ADJUST Time Date Year 12:00AM 1/01 2004 Thu V v ... 12:00AM 10/06 2004 Wed The day of the week is turned off. Notes • To record TV programs using the timer, you must set , and press V/v to be changed, and select the... to be set the clock accurately. • The clock display appears when VIDEO mode is selected with no tape inserted or when the DVD-VCR is set the hour. Tip • To change the digits while ...

Operating Instructions
Page 26
...already decided which channels you start... • Turn on the remote (page 10). • Set the "RF Output Channel" to video input. • If the DVD player is capable of receiving VHF channels 2 to 13, UHF channels 14 to 69 and unscrambled CATV channels 1 to select (OPTION) and ..." or "4CH" in your TV is connected to the DVD-VCR using A/V connections, set TV / DVD·VIDEO to DVD·VIDEO on the DVD-VCR and your TV. Then, if there are any unwanted channels, disable them directly using automatic presetting methods. If your area using manual presetting methods (page 28).
...already decided which channels you start... • Turn on the remote (page 10). • Set the "RF Output Channel" to video input. • If the DVD player is capable of receiving VHF channels 2 to 13, UHF channels 14 to 69 and unscrambled CATV channels 1 to select (OPTION) and ..." or "4CH" in your TV is connected to the DVD-VCR using A/V connections, set TV / DVD·VIDEO to DVD·VIDEO on the DVD-VCR and your TV. Then, if there are any unwanted channels, disable them directly using automatic presetting methods. If your area using manual presetting methods (page 28).
Operating Instructions
Page 28
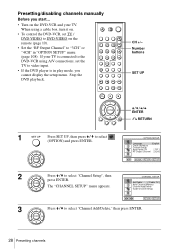
Presetting/disabling channels manually Before you start... • Turn on the remote (page 10). • Set the "RF Output Channel" to select (OPTION) and press ENTER. CH +/- CHANNEL SETUP ..., turn it on. • To control the DVD-VCR, set TV / DVD·VIDEO to DVD·VIDEO on the DVD-VCR and your TV is connected to the DVD-VCR using A/V connections, set the TV to video input. • If the DVD player is in "OPTION SETUP" menu (page 108). Stop the DVD playback. Number buttons SET UP V/v/B/b ENTER O RETURN...
Presetting/disabling channels manually Before you start... • Turn on the remote (page 10). • Set the "RF Output Channel" to select (OPTION) and press ENTER. CH +/- CHANNEL SETUP ..., turn it on. • To control the DVD-VCR, set TV / DVD·VIDEO to DVD·VIDEO on the DVD-VCR and your TV is connected to the DVD-VCR using A/V connections, set the TV to video input. • If the DVD player is in "OPTION SETUP" menu (page 108). Stop the DVD playback. Number buttons SET UP V/v/B/b ENTER O RETURN...

Operating Instructions
Page 29
... setting. 6 Press SET UP to select "ADD" (in memory) 3 Press ENTER. Note • If you have not preset channels automatically, you cannot preset/disable channels manually. CHANNEL ADD/DELETE Select channel: (in memory) or "DELETE" (deleted). Getting Started 4 To preset/disable a channel: 1 Press CH +/- and press press to ADD to DELETE...
... setting. 6 Press SET UP to select "ADD" (in memory) 3 Press ENTER. Note • If you have not preset channels automatically, you cannot preset/disable channels manually. CHANNEL ADD/DELETE Select channel: (in memory) or "DELETE" (deleted). Getting Started 4 To preset/disable a channel: 1 Press CH +/- and press press to ADD to DELETE...
Operating Instructions
Page 53
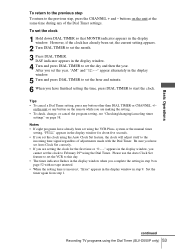
...Set correctly. • If you have already been set using the VCR Plus+ system or the manual timer setting, "FULL" appears in the display window for the first time or "0:- -" appears in the display window. continued Recording TV programs using the Dial Timer. Tips • To cancel a Dial Timer setting, press any.... • If you cannot set the clock using the Auto Clock Set feature, the clock will adjust itself to February 29th using the Dial Timer (SLV-D550P only) 53 on the unit or any button on the unit at the same time during any button other than DIAL TIMER or CHANNEL +/-
...Set correctly. • If you have already been set using the VCR Plus+ system or the manual timer setting, "FULL" appears in the display window for the first time or "0:- -" appears in the display window. continued Recording TV programs using the Dial Timer. Tips • To cancel a Dial Timer setting, press any.... • If you cannot set the clock using the Auto Clock Set feature, the clock will adjust itself to February 29th using the Dial Timer (SLV-D550P only) 53 on the unit or any button on the unit at the same time during any button other than DIAL TIMER or CHANNEL +/-
Operating Instructions
Page 54
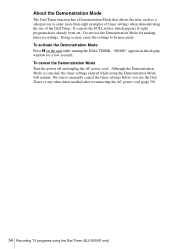
... while using the Dial Timer (SLV-D550P only) It cancels the FULL notice which appears if eight programs have already been set. Be sure to manually cancel the timer settings before you use the Demonstration Mode for a few seconds. "DEMO" appears in the display window for making timer recordings. To activate the Demonstration Mode...
... while using the Dial Timer (SLV-D550P only) It cancels the FULL notice which appears if eight programs have already been set. Be sure to manually cancel the timer settings before you use the Demonstration Mode for a few seconds. "DEMO" appears in the display window for making timer recordings. To activate the Demonstration Mode...
Operating Instructions
Page 55
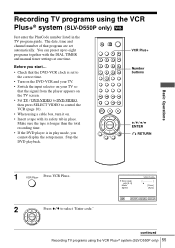
...• Insert a tape with the DIAL TIMER and manual timer settings at one time. Recording TV programs using the VCR Plus+® system (SLV-D550P only) Just enter the PlusCode number listed in play mode, you start... • Check that the DVD-VCR clock is set to the correct time. •...Press V/v to control the VCR (page 10). • When using the VCR Plus+® system (SLV-D550P only) 55 The date, time and channel number of that the signal from the player appears on the TV screen. • Set TV / DVD·VIDEO to DVD·VIDEO, then press SELECT VIDEO to select "Enter code."
...• Insert a tape with the DIAL TIMER and manual timer settings at one time. Recording TV programs using the VCR Plus+® system (SLV-D550P only) Just enter the PlusCode number listed in play mode, you start... • Check that the DVD-VCR clock is set to the correct time. •...Press V/v to control the VCR (page 10). • When using the VCR Plus+® system (SLV-D550P only) 55 The date, time and channel number of that the signal from the player appears on the TV screen. • Set TV / DVD·VIDEO to DVD·VIDEO, then press SELECT VIDEO to select "Enter code."

Operating Instructions
Page 79
Bb The angle number appears on the DVD, " " appears in the display when you can change the viewing angle. The scene changes to determine whether it supports angle operation. However, note that you press ANGLE during playback. Note • Check the user's manual of angles. 2 Press B/b repeatedly to select the angle number. ANGLE... slash indicates the total number of the purchased disc to the selected angle. This means that angle operation may not be possible for a scene are recorded on the display. DVD Additional Operations Changing the angles 79
Bb The angle number appears on the DVD, " " appears in the display when you can change the viewing angle. The scene changes to determine whether it supports angle operation. However, note that you press ANGLE during playback. Note • Check the user's manual of angles. 2 Press B/b repeatedly to select the angle number. ANGLE... slash indicates the total number of the purchased disc to the selected angle. This means that angle operation may not be possible for a scene are recorded on the display. DVD Additional Operations Changing the angles 79

Operating Instructions
Page 103
In this case, manually adjust the tracking. The distortion should disappear as you press one of the two tracking buttons. VCR Additional Operations Adjusting the picture (tracking) 103 to work with tapes recorded in poor condition. To resume automatic tracking adjustment, eject the tape and reinsert it. Tracking Tracking meter Note • The... display the tracking meter. Press TRACKING +/- Adjusting the picture (tracking) Although the VCR automatically adjusts the tracking when playing a tape, distortion may occur if the recording is in the LP mode on other VCRs.
In this case, manually adjust the tracking. The distortion should disappear as you press one of the two tracking buttons. VCR Additional Operations Adjusting the picture (tracking) 103 to work with tapes recorded in poor condition. To resume automatic tracking adjustment, eject the tape and reinsert it. Tracking Tracking meter Note • The... display the tracking meter. Press TRACKING +/- Adjusting the picture (tracking) Although the VCR automatically adjusts the tracking when playing a tape, distortion may occur if the recording is in the LP mode on other VCRs.
Operating Instructions
Page 114
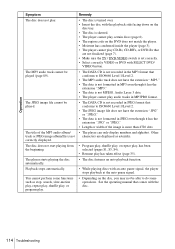
...manual that are displayed as asterisks. • Program play, shuffle play, or repeat play, has been selected (pages 81, 83, 84). • Resume play has taken effect (page 35). • The disc features an auto playback function. • While playing discs with SELECT DVD/ VIDEO button. • The DATA CD is not recorded... • Select correctly VIDEO or DVD with an auto pause signal, the player stops playback at the auto pause signal. • Depending on the DVD does not match the player. • Moisture has condensed inside the player (page 3). • The player cannot play . The ...
...manual that are displayed as asterisks. • Program play, shuffle play, or repeat play, has been selected (pages 81, 83, 84). • Resume play has taken effect (page 35). • The disc features an auto playback function. • While playing discs with SELECT DVD/ VIDEO button. • The DATA CD is not recorded... • Select correctly VIDEO or DVD with an auto pause signal, the player stops playback at the auto pause signal. • Depending on the DVD does not match the player. • Moisture has condensed inside the player (page 3). • The player cannot play . The ...
Marketing Specifications
Page 2
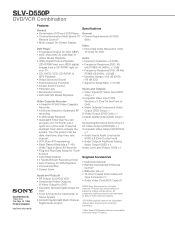
SLV-D550P DVD/VCR Combination Sony Electronics Inc. 1 Sony Drive Park Ridge, NJ 07656 For more information: http://www.sony.com/dn Features General • Combination DVD and VCR Player • Cinema Illumination Multi-Brand TV Remote Control** • Multi-Lingual On-Screen Display DVD Player • Progressive Output for DVD (480P) • DVD, DVD+RW/+R, DVD-RW/-R (Video...; Bookmark Function • DVD-RW (VR Mode) Playback Video Cassette Recorder • 4-Head Hi-Fi VHS Video Cassette Recorder • 19 Micron Heads for DVD Audio • Harmonic Distortion 103 dB (DVD) > 99 dB (CD...
SLV-D550P DVD/VCR Combination Sony Electronics Inc. 1 Sony Drive Park Ridge, NJ 07656 For more information: http://www.sony.com/dn Features General • Combination DVD and VCR Player • Cinema Illumination Multi-Brand TV Remote Control** • Multi-Lingual On-Screen Display DVD Player • Progressive Output for DVD (480P) • DVD, DVD+RW/+R, DVD-RW/-R (Video...; Bookmark Function • DVD-RW (VR Mode) Playback Video Cassette Recorder • 4-Head Hi-Fi VHS Video Cassette Recorder • 19 Micron Heads for DVD Audio • Harmonic Distortion 103 dB (DVD) > 99 dB (CD...


