
Operating Instructions
Page 2
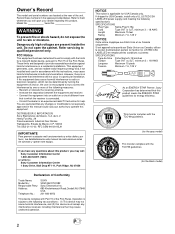
... Drop #T1-11, Park Ridge, NJ 07656 Declaration of Conformity Trade Name: Model No.: Responsible Party: Address: Telephone No.: SONY SDM-X52/X72/X82 Sony Electronics Inc. 680 Kinderkamack Road,Oradell,NJ 07649 USA 201-930-6972 This device complies with the TCO'95 guidelines. (for a... present inside the unit. Refer servicing to Part 15 of the unit. Increase the separation between the equipment and receiver. - This monitor complies with the TCO'99 guidelines. (for the gray model) This monitor complies with Part 15 of the following specifications: SPECIFICATIONS Plug Type Nema-Plug...
... Drop #T1-11, Park Ridge, NJ 07656 Declaration of Conformity Trade Name: Model No.: Responsible Party: Address: Telephone No.: SONY SDM-X52/X72/X82 Sony Electronics Inc. 680 Kinderkamack Road,Oradell,NJ 07649 USA 201-930-6972 This device complies with the TCO'95 guidelines. (for a... present inside the unit. Refer servicing to Part 15 of the unit. Increase the separation between the equipment and receiver. - This monitor complies with the TCO'99 guidelines. (for the gray model) This monitor complies with Part 15 of the following specifications: SPECIFICATIONS Plug Type Nema-Plug...
Operating Instructions
Page 3
... and height 10 Selecting the input signal (INPUT button 11 Customizing Your Monitor 12 Navigating the menu 12 US BACKLIGHT 12 CONTRAST 12 BRIGHTNESS 12 SCREEN (analog RGB signal only 13 COLOR 14 GAMMA 15 ZOOM (SDM-X72/X82 only 15 SMOOTHING 15 Additional settings 16 Technical Features 17 Controlling the volume 17 Power saving...
... and height 10 Selecting the input signal (INPUT button 11 Customizing Your Monitor 12 Navigating the menu 12 US BACKLIGHT 12 CONTRAST 12 BRIGHTNESS 12 SCREEN (analog RGB signal only 13 COLOR 14 GAMMA 15 ZOOM (SDM-X72/X82 only 15 SMOOTHING 15 Additional settings 16 Technical Features 17 Controlling the volume 17 Power saving...
Operating Instructions
Page 4
... cord, be installed near a heating vent, could occur. Do not use any type of this monitor will eventually disappear. • The LCD panel becomes warm during operation. Disposal of the monitor • Do not dispose of cleaner containing an anti-static solution or similar additive as alcohol or... For the customers in the UK If you use the original carton and packing materials. Note on the LCD screen. If you do not use the appropriate cord, this monitor with a soft cloth. Transportation • Disconnect all cables from the power outlet before cleaning your local ...
... cord, be installed near a heating vent, could occur. Do not use any type of this monitor will eventually disappear. • The LCD panel becomes warm during operation. Disposal of the monitor • Do not dispose of cleaner containing an anti-static solution or similar additive as alcohol or... For the customers in the UK If you use the original carton and packing materials. Note on the LCD screen. If you do not use the appropriate cord, this monitor with a soft cloth. Transportation • Disconnect all cables from the power outlet before cleaning your local ...
Operating Instructions
Page 5
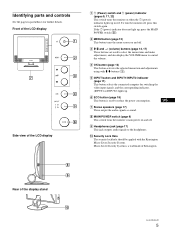
... computer for further details. Identifying parts and controls See the pages in red. Rear of the LCD display 1 1 (Power) switch and 1 (power) indicator (pages 9, 17, 22) This switch turns the monitor on when the 1 (power) indicator lights up in parentheses for switching the video input signals,... the selected menu item and adjustments using with the Kensington Micro Saver Security System. Front of the LCD display Side view of the display stand (continued) 5 To turn the monitor off, press this switch again. Micro Saver Security System is used to select the menu items and...
... computer for further details. Identifying parts and controls See the pages in red. Rear of the LCD display 1 1 (Power) switch and 1 (power) indicator (pages 9, 17, 22) This switch turns the monitor on when the 1 (power) indicator lights up in parentheses for switching the video input signals,... the selected menu item and adjustments using with the Kensington Micro Saver Security System. Front of the LCD display Side view of the display stand (continued) 5 To turn the monitor off, press this switch again. Micro Saver Security System is used to select the menu items and...

Operating Instructions
Page 6
qg Audio input jack for INPUT2 (page 8) This jack inputs audio signals when connected to the monitor. 6 qj AC IN connector (page 8) Connect the power cord (supplied). ql Cable holder (page 9) This part secures cables and cords to the audio output jack ... HD15 input connector (analog RGB) for INPUT1 (page 8) This jack inputs audio signals when connected to bundle connecting cords and cables. Rear of the LCD display SDM-X72/X82 SDM-X52 qa Back cover (page 7) Remove this cover to the audio output jack of a computer or other audio equipment. qs Audio input jack for...
qg Audio input jack for INPUT2 (page 8) This jack inputs audio signals when connected to the monitor. 6 qj AC IN connector (page 8) Connect the power cord (supplied). ql Cable holder (page 9) This part secures cables and cords to the audio output jack ... HD15 input connector (analog RGB) for INPUT1 (page 8) This jack inputs audio signals when connected to bundle connecting cords and cables. Rear of the LCD display SDM-X72/X82 SDM-X52 qa Back cover (page 7) Remove this cover to the audio output jack of a computer or other audio equipment. qs Audio input jack for...

Operating Instructions
Page 7
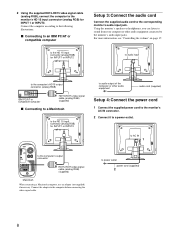
... might bend the pins. 1 Remove the back cover. 2 Using the supplied DVI-D video signal cable (digital RGB), connect the computer to the monitor's DVI-D input connector (digital RGB) for INPUT1 to the computer's DVI output connector (digital RGB) DVI-D video signal cable (digital RGB) (...the back cover. (continued) 7 to the DVI-D input connector (digital RGB) for INPUT1. Setup Before using your monitor, check that the following items are included in your carton: • LCD display • Power cord • HD15-HD15 video signal cable (analog RGB) • DVI-D video signal cable...
... might bend the pins. 1 Remove the back cover. 2 Using the supplied DVI-D video signal cable (digital RGB), connect the computer to the monitor's DVI-D input connector (digital RGB) for INPUT1 to the computer's DVI output connector (digital RGB) DVI-D video signal cable (digital RGB) (...the back cover. (continued) 7 to the DVI-D input connector (digital RGB) for INPUT1. Setup Before using your monitor, check that the following items are included in your carton: • LCD display • Power cord • HD15-HD15 video signal cable (analog RGB) • DVI-D video signal cable...
Operating Instructions
Page 8
... HD15-HD15 video signal cable (analog RGB) (supplied) x Connecting to a Macintosh to the HD 15 input connector (analog RGB) for INPUT 1 or INPUT2. to AC IN 1 to the monitor's HD 15 input connector (analog RGB) for INPUT1 or INPUT2 to audio output of the computer or other audio ... (analog RGB) (supplied) Macintosh When connecting a Macintosh computer, use an adapter (not supplied) if necessary. Connect the adapter to the corresponding monitor's audio input jack. x Connecting to an IBM PC/AT or compatible computer Setup 3:Connect the audio cord Connect the supplied audio cord to the...
... HD15-HD15 video signal cable (analog RGB) (supplied) x Connecting to a Macintosh to the HD 15 input connector (analog RGB) for INPUT 1 or INPUT2. to AC IN 1 to the monitor's HD 15 input connector (analog RGB) for INPUT1 or INPUT2 to audio output of the computer or other audio ... (analog RGB) (supplied) Macintosh When connecting a Macintosh computer, use an adapter (not supplied) if necessary. Connect the adapter to the corresponding monitor's audio input jack. x Connecting to an IBM PC/AT or compatible computer Setup 3:Connect the audio cord Connect the supplied audio cord to the...

Operating Instructions
Page 9
...in the direction of [. US 3 Note If you cannot bundle all of your monitor is complete. The 1 (power) indicator lights up in red 2 Press the 1 (power) switch on the... front right of the monitor. The 1 (power) indicator lights up and the picture appears on the screen. Setup 5: Bundle the... Bundle the cords and cables inside the stand, leave them hanging down outside the stand. If necessary, use the monitor's controls to adjust the picture (page 12). (continued) 9 The installation of the cords and cables inside of ...
...in the direction of [. US 3 Note If you cannot bundle all of your monitor is complete. The 1 (power) indicator lights up in red 2 Press the 1 (power) switch on the... front right of the monitor. The 1 (power) indicator lights up and the picture appears on the screen. Setup 5: Bundle the... Bundle the cords and cables inside the stand, leave them hanging down outside the stand. If necessary, use the monitor's controls to adjust the picture (page 12). (continued) 9 The installation of the cords and cables inside of ...

Operating Instructions
Page 10
... with the "DDC" Plug & Play standard and automatically detects all the monitor's information. The Plug & Play monitor is automatically selected so that the video signal cable is in the following ranges. SDM-X52 SDM-X72/X82 Horizontal frequency 28 - 61 kHz 28 - 92 kHz Vertical frequency 56 - 75 Hz 56 - 85 Hz Resolution 1024 ×...
... with the "DDC" Plug & Play standard and automatically detects all the monitor's information. The Plug & Play monitor is automatically selected so that the video signal cable is in the following ranges. SDM-X52 SDM-X72/X82 Horizontal frequency 28 - 61 kHz 28 - 92 kHz Vertical frequency 56 - 75 Hz 56 - 85 Hz Resolution 1024 ×...
Operating Instructions
Page 11
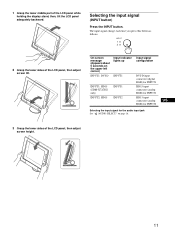
... while holding the display stand, then, tilt the LCD panel adequately backward. On-screen message (Appears about 5 seconds on the upper left corner.) Input indicator lights up Input signal configuration INPUT1: DVI-D INPUT1 DVI-D input connector (digital RGB) for INPUT1 INPUT1: HD15 (SDM-X72/X82 only) INPUT1 HD15 input connector (analog RGB...
... while holding the display stand, then, tilt the LCD panel adequately backward. On-screen message (Appears about 5 seconds on the upper left corner.) Input indicator lights up Input signal configuration INPUT1: DVI-D INPUT1 DVI-D input connector (digital RGB) for INPUT1 INPUT1: HD15 (SDM-X72/X82 only) INPUT1 HD15 input connector (analog RGB...
Operating Instructions
Page 12
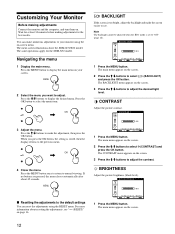
...Resetting the adjustments to display the main menu on the screen. 2 Press the M/m buttons to normal viewing. The main menu appears on your monitor using the RESET menu. The main menu appears on -screen menu. Press the MENU button once to return to select (BACKLIGHT) and press... , 3 Adjust the menu. For more information about 45 seconds. BRIGHTNESS Adjust the picture brightness (black level). The same operations apply for the SDM-X52 model. Press the M/m buttons to make numerous adjustments to "ON" (page 18). If no buttons are pressed, the menu closes automatically after ...
...Resetting the adjustments to display the main menu on the screen. 2 Press the M/m buttons to normal viewing. The main menu appears on your monitor using the RESET menu. The main menu appears on -screen menu. Press the MENU button once to return to select (BACKLIGHT) and press... , 3 Adjust the menu. For more information about 45 seconds. BRIGHTNESS Adjust the picture brightness (black level). The same operations apply for the SDM-X52 model. Press the M/m buttons to make numerous adjustments to "ON" (page 18). If no buttons are pressed, the menu closes automatically after ...
Operating Instructions
Page 13
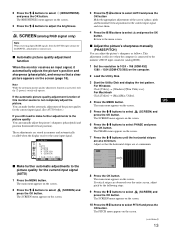
.... 9 Press the M/m buttons to select (SCREEN) and press the OK button. Note While the automatic picture quality adjustment function is connected to the monitor's HD15 input connector (analog RGB). 1 Set the resolution to select (SCREEN) and press the OK button. and press the OK x Adjust the picture...can adjust the picture's sharpness as follows. The main menu appears on the screen. 2 Press the M/m buttons to 1024 × 768 (SDM-X52) 1280 × 1024 (SDM-X72/X82) on the screen. 3 Press the M/m buttons to select (SCREEN) and press the OK button. The SCREEN menu appears on the...
.... 9 Press the M/m buttons to select (SCREEN) and press the OK button. Note While the automatic picture quality adjustment function is connected to the monitor's HD15 input connector (analog RGB). 1 Set the resolution to select (SCREEN) and press the OK button. and press the OK x Adjust the picture...can adjust the picture's sharpness as follows. The main menu appears on the screen. 2 Press the M/m buttons to 1024 × 768 (SDM-X52) 1280 × 1024 (SDM-X72/X82) on the screen. 3 Press the M/m buttons to select (SCREEN) and press the OK button. The SCREEN menu appears on the...
Operating Instructions
Page 14
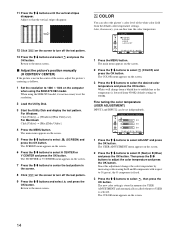
Return to the menu screen. When using the SDM-X72/X82 model. Return to the menu screen. COLOR 9300K 6500K USER ADJUST 1280 x1024 / 60Hz EX I T 1 Press the M/m buttons to turn off the test ... is stored in memory for USER ADJUSTMENT and automatically recalled whenever USER is not in the screen. 8 Click [END] on the computer when using the SDM-X52 model, it is fixed. 3 Press the M/m buttons to set independently.
Return to the menu screen. When using the SDM-X72/X82 model. Return to the menu screen. COLOR 9300K 6500K USER ADJUST 1280 x1024 / 60Hz EX I T 1 Press the M/m buttons to turn off the test ... is stored in memory for USER ADJUSTMENT and automatically recalled whenever USER is not in the screen. 8 Click [END] on the computer when using the SDM-X52 model, it is fixed. 3 Press the M/m buttons to set independently.
Operating Instructions
Page 15
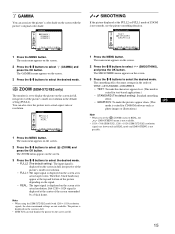
... in the default setting (FULL2). The SMOOTHING menu appears on the screen. 2 Press the M/m buttons to select the desired mode. ZOOM (SDM-X72/X82 only) The monitor is set the (ZOOM) menu to select the desired mode. • FULL2 (The default setting): The input signal is displayed on the ... picture depending on the signal. • REAL: The input signal is not possible. 15 ZOOM FULL2 FULL1 REAL 1280 x1024 / 60Hz EX I T 1 Press the MENU button. The main menu appears on the screen in full. • SDM-X52 can only display the picture on the screen. 2 Press the M/m buttons to display...
... in the default setting (FULL2). The SMOOTHING menu appears on the screen. 2 Press the M/m buttons to select the desired mode. ZOOM (SDM-X72/X82 only) The monitor is set the (ZOOM) menu to select the desired mode. • FULL2 (The default setting): The input signal is displayed on the ... picture depending on the signal. • REAL: The input signal is not possible. 15 ZOOM FULL2 FULL1 REAL 1280 x1024 / 60Hz EX I T 1 Press the MENU button. The main menu appears on the screen in full. • SDM-X52 can only display the picture on the screen. 2 Press the M/m buttons to display...
Operating Instructions
Page 16
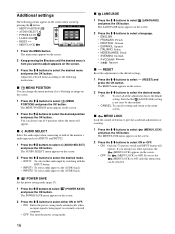
... RESET menu appears on the screen. 1 Press the M/m buttons to select (AUDIO SELECT) and press the OK button. x MENU LOCK Lock the control of the monitor's audio input jacks for INPUT1 and INPUT2. 1 Press the M/m buttons to select (MENU POSITION) and press the OK button.
... RESET menu appears on the screen. 1 Press the M/m buttons to select (AUDIO SELECT) and press the OK button. x MENU LOCK Lock the control of the monitor's audio input jacks for INPUT1 and INPUT2. 1 Press the M/m buttons to select (MENU POSITION) and press the OK button.
Operating Instructions
Page 17
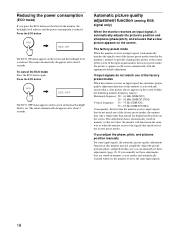
...)** 1 (power) off 1 W red main power off 0 W off SDM-X82 Power mode Power consumption 1 (power) indicator normal operation 58 W (max.) green active off* 3 W (max.) (deep sleep)** orange 1 (power) off 1 W red main power off 0 W off * When your computer or other audio equipment connected to the monitor's audio input jack. The menu automatically disappears after...
...)** 1 (power) off 1 W red main power off 0 W off SDM-X82 Power mode Power consumption 1 (power) indicator normal operation 58 W (max.) green active off* 3 W (max.) (deep sleep)** orange 1 (power) off 1 W red main power off 0 W off * When your computer or other audio equipment connected to the monitor's audio input jack. The menu automatically disappears after...
Operating Instructions
Page 18
... menu appears on the screen (within the following monitor frequency ranges): Horizontal frequency: 28 - 61 kHz (SDM-X52) 28 - 92 kHz (SDM-X72/X82) Vertical frequency: 56 - 75 Hz (SDM-X52) 56 - 85 Hz (SDM-X72/X82) Consequently, the first time the monitor receives input signals that do not match one of... the factory preset modes, the monitor may not completely adjust the picture ...
... menu appears on the screen (within the following monitor frequency ranges): Horizontal frequency: 28 - 61 kHz (SDM-X52) 28 - 92 kHz (SDM-X72/X82) Vertical frequency: 56 - 75 Hz (SDM-X52) 56 - 85 Hz (SDM-X72/X82) Consequently, the first time the monitor receives input signals that do not match one of... the factory preset modes, the monitor may not completely adjust the picture ...
Operating Instructions
Page 19
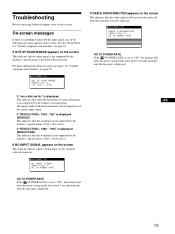
... T I ON OUT OF SCAN RANGE I NPUT 1 : DV I - If "RESOLUTION > 1024 × 768" is displayed (SDM-X52) This indicates that the resolution is not supported by the monitor's specifications (1024 × 768 or less). D GO TO POWER SAVE GO TO POWER SAVE If the ZZ... (POWER SAVE) is... T I ON NO I NPUT S I GNA L I NPUT 1 : DV I - If "RESOLUTION > 1280 × 1024" is displayed (SDM-X72/X82) This indicates that the resolution is not supported by the monitor's specifications (1280 × 1024 or less). xz If CABLE DISCONNECTED appears on the screen This indicates that the video...
... T I ON OUT OF SCAN RANGE I NPUT 1 : DV I - If "RESOLUTION > 1024 × 768" is displayed (SDM-X52) This indicates that the resolution is not supported by the monitor's specifications (1024 × 768 or less). D GO TO POWER SAVE GO TO POWER SAVE If the ZZ... (POWER SAVE) is... T I ON NO I NPUT S I GNA L I NPUT 1 : DV I - If "RESOLUTION > 1280 × 1024" is displayed (SDM-X72/X82) This indicates that the resolution is not supported by the monitor's specifications (1280 × 1024 or less). xz If CABLE DISCONNECTED appears on the screen This indicates that the video...
Operating Instructions
Page 20
... if the frequency is attached to sync correctly. • This monitor does not process the interlace signals. Select "SONY" from the "Manufacturers" list and select "SDM-X52" or "SDMX72" or "SDM-X82" from power lines or place a magnetic shield near the monitor. • Try plugging the monitor into a different AC outlet, preferably on the screen (page 19...
... if the frequency is attached to sync correctly. • This monitor does not process the interlace signals. Select "SONY" from the "Manufacturers" list and select "SDM-X52" or "SDMX72" or "SDM-X82" from power lines or place a magnetic shield near the monitor. • Try plugging the monitor into a different AC outlet, preferably on the screen (page 19...
Operating Instructions
Page 21
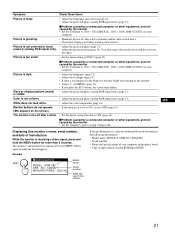
...• Set the zoom setting to FULL2 (page 15). xProblem caused by a connected computer or other equipment, and not caused by the monitor • Set the resolution to 1024 × 768 (SDM-X52), 1280 × 1024 (SDM-X72/X82) on your computer. properly (analog RGB ...monitor turns off . Displaying this monitor's name, serial number, and date of your computer. NO : 1234567 MANUFACTURED : 2002-40 Model name Serial number Week and year of manufacture If any problem persists, call your authorized Sony dealer and give the following information: • Model name: SDM-X52, SDM-X72, SDM...
...• Set the zoom setting to FULL2 (page 15). xProblem caused by a connected computer or other equipment, and not caused by the monitor • Set the resolution to 1024 × 768 (SDM-X52), 1280 × 1024 (SDM-X72/X82) on your computer. properly (analog RGB ...monitor turns off . Displaying this monitor's name, serial number, and date of your computer. NO : 1234567 MANUFACTURED : 2002-40 Model name Serial number Week and year of manufacture If any problem persists, call your authorized Sony dealer and give the following information: • Model name: SDM-X52, SDM-X72, SDM...