
Operating Instructions
Page 5
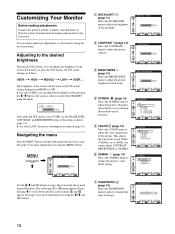
... MENU 54 3 21 Rear of the display Press upward to change the brightness of the monitor. The 1 (power) switch and the control buttons are on , and lights up in the menu. 5 button (page 10) This button is turned on the lower right part of the front of the screen. Front of Kensington. 6 5 Identifying parts...
... MENU 54 3 21 Rear of the display Press upward to change the brightness of the monitor. The 1 (power) switch and the control buttons are on , and lights up in the menu. 5 button (page 10) This button is turned on the lower right part of the front of the screen. Front of Kensington. 6 5 Identifying parts...
Operating Instructions
Page 10
...(page 11). Adjusting to the desired brightness Pressing the button, you can adjust the backlight level by pressing the m/M buttons, the same as the mode setting changes from HIGH to 0 menu appears. Each time you select LOW, the power consumption is reduced (page 16). The brightness of images.... Navigating the menu Press the MENU button to sharpen the edge of the screen will decrease as when you cannot adjust CONTRAST, ...
...(page 11). Adjusting to the desired brightness Pressing the button, you can adjust the backlight level by pressing the m/M buttons, the same as the mode setting changes from HIGH to 0 menu appears. Each time you select LOW, the power consumption is reduced (page 16). The brightness of images.... Navigating the menu Press the MENU button to sharpen the edge of the screen will decrease as when you cannot adjust CONTRAST, ...
Operating Instructions
Page 12
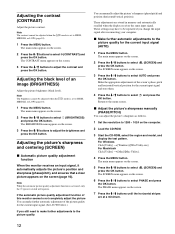
... a minimum. 12 The SCREEN menu appears on the screen. 6 Press the m/M buttons to select AUTO and press the OK button. The main menu appears on the screen. 2 Press the m/M buttons to select (SCREEN) and press the OK button. mode is activated, only the 1 (power) switch will operate. If the automatic picture quality adjustment function of...
... a minimum. 12 The SCREEN menu appears on the screen. 6 Press the m/M buttons to select AUTO and press the OK button. The main menu appears on the screen. 2 Press the m/M buttons to select (SCREEN) and press the OK button. mode is activated, only the 1 (power) switch will operate. If the automatic picture quality adjustment function of...
Operating Instructions
Page 15
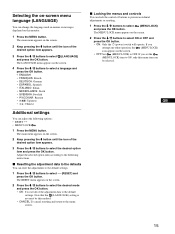
...:To cancel resetting and return to select ON or OFF and press the OK button. • ON: Only the 1 (power) switch will operate. The LANGUAGE menu appears on the screen. 4 Press the m/M buttons to select 0 (RESET) and press the OK button. Selecting the on-screen menu language (LANGUAGE) You can adjust the following instructions...
...:To cancel resetting and return to select ON or OFF and press the OK button. • ON: Only the 1 (power) switch will operate. The LANGUAGE menu appears on the screen. 4 Press the m/M buttons to select 0 (RESET) and press the OK button. Selecting the on-screen menu language (LANGUAGE) You can adjust the following instructions...
Operating Instructions
Page 16
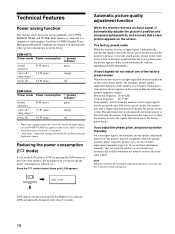
... button on the front of the monitor, the backlight level is reduced and the power consumption is cut and NO INPUT SIGNAL appears on the screen automatically with the appropriate default adjustments. SDM-HS75 Power mode Power consumption 1 (power) indicator normal operation 45 W (max.) green active off* 1.0 W (max.) (deep sleep)** orange power off 1.0 W (max.) off SDM-HS95 Power mode Power consumption 1 (power...
... button on the front of the monitor, the backlight level is reduced and the power consumption is cut and NO INPUT SIGNAL appears on the screen automatically with the appropriate default adjustments. SDM-HS75 Power mode Power consumption 1 (power) indicator normal operation 45 W (max.) green active off* 1.0 W (max.) (deep sleep)** orange power off 1.0 W (max.) off SDM-HS95 Power mode Power consumption 1 (power...
Operating Instructions
Page 19
... computer or other equipment connected, and not caused by the monitor • Set the computer's power saving setting to off after turning on the monitor. • Adjust the pitch and phase (page...page 15). MENU If any problem persists, call your authorized Sony dealer and give the following information: • Model name: SDM-HS75 or SDM-HS95 • Serial number • Detailed description of the...). Symptom Check these items Picture is receiving a video signal, press and hold the MENU button for the display to become bright after a while Resolution displayed on the menu screen is ...
... computer or other equipment connected, and not caused by the monitor • Set the computer's power saving setting to off after turning on the monitor. • Adjust the pitch and phase (page...page 15). MENU If any problem persists, call your authorized Sony dealer and give the following information: • Model name: SDM-HS75 or SDM-HS95 • Serial number • Detailed description of the...). Symptom Check these items Picture is receiving a video signal, press and hold the MENU button for the display to become bright after a while Resolution displayed on the menu screen is ...


