Operating Instructions
Page 2
.... never pull the cord. When you first install the recorder, or when you move it any further. Record the serial number in the U.S.A Owner's Record The model and serial numbers are not going to disassemble the cabinet. RDR-VX525 Serial No CAUTION You are designed to the video head... of the following measures: - Precautions On safety Should any change or modifications not expressly approved in this manual could void your Sony dealer regarding this equipment does cause harmful interference to radio or television reception, which the receiver is encouraged to try to constitute ...
.... never pull the cord. When you first install the recorder, or when you move it any further. Record the serial number in the U.S.A Owner's Record The model and serial numbers are not going to disassemble the cabinet. RDR-VX525 Serial No CAUTION You are designed to the video head... of the following measures: - Precautions On safety Should any change or modifications not expressly approved in this manual could void your Sony dealer regarding this equipment does cause harmful interference to radio or television reception, which the receiver is encouraged to try to constitute ...
Operating Instructions
Page 3
... protected by U.S. IMPORTANT SAFETY INSTRUCTIONS 1) Read these instructions. 2) Keep these instructions. 3) Heed all warnings. 4) Follow all servicing to qualified service personnel. On recording • Contents of the recording cannot be recordable, depending on your outlet, consult an electrician for an extended period of holding a still video image or on-screen display image on... plugs, convenience receptacles, and the point where they exit from tip-over. 13) Unplug this apparatus during lightning storms or when unused for your nearest Sony dealer.
... protected by U.S. IMPORTANT SAFETY INSTRUCTIONS 1) Read these instructions. 2) Keep these instructions. 3) Heed all warnings. 4) Follow all servicing to qualified service personnel. On recording • Contents of the recording cannot be recordable, depending on your outlet, consult an electrician for an extended period of holding a still video image or on-screen display image on... plugs, convenience receptacles, and the point where they exit from tip-over. 13) Unplug this apparatus during lightning storms or when unused for your nearest Sony dealer.
Operating Instructions
Page 4
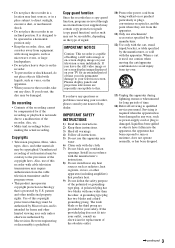
... Functions available for DVD-RWs in video mode Functions available for DVD+Rs -RVR -RVideo DVD RAM Functions available for DVD-Rs in VR (Video Recording) mode Functions available for DVD-Rs in video mode Functions available for DVD VIDEOs Functions available for DVD-RAMs VCD CD DATA CD DATA DVD... ISO/MPEG which compresses audio data. 4 The explanations do not apply to discs created on the remote. You can also use the controls on the recorder if they have the same or similar names as those on the remote. • The on-screen display illustrations used in this manual may not...
... Functions available for DVD-RWs in video mode Functions available for DVD+Rs -RVR -RVideo DVD RAM Functions available for DVD-Rs in VR (Video Recording) mode Functions available for DVD-Rs in video mode Functions available for DVD VIDEOs Functions available for DVD-RAMs VCD CD DATA CD DATA DVD... ISO/MPEG which compresses audio data. 4 The explanations do not apply to discs created on the remote. You can also use the controls on the recorder if they have the same or similar names as those on the remote. • The on-screen display illustrations used in this manual may not...
Operating Instructions
Page 6
... Connecting the Power Cord 20 Step 6: Preparing the Remote 21 Step 7: Easy Setup 23 Connecting Another VCR or Similar Device 27 Quick Guide to Disc Types 30 Recordable and Playable Discs 30 Playable Discs 33 DVD Operation DVD Playback 35 Playing Discs 35 Playback Options 36 ... Connected Equipment Without the Timer 47 DVD Timer Recording From Connected Equipment 49 Recording From Connected Equipment With a Timer (Synchro Rec 51 Changing or Canceling DVD Timer Settings (Timer List 53 Recording From Another VCR or Similar Device 54 DVD Editing 56 Before Editing 56 Editing a Title...
... Connecting the Power Cord 20 Step 6: Preparing the Remote 21 Step 7: Easy Setup 23 Connecting Another VCR or Similar Device 27 Quick Guide to Disc Types 30 Recordable and Playable Discs 30 Playable Discs 33 DVD Operation DVD Playback 35 Playing Discs 35 Playback Options 36 ... Connected Equipment Without the Timer 47 DVD Timer Recording From Connected Equipment 49 Recording From Connected Equipment With a Timer (Synchro Rec 51 Changing or Canceling DVD Timer Settings (Timer List 53 Recording From Another VCR or Similar Device 54 DVD Editing 56 Before Editing 56 Editing a Title...
Operating Instructions
Page 7
...Sound During Playback 74 VCR Recording 75 Before Recording 75 VCR Recording From Connected Equipment Without the Timer 76 VCR Timer Recording From Connected Equipment 78 Recording From Connected Equipment With a Timer (Synchro Rec 80 Changing or Canceling VCR Timer Settings (Timer List 81 Recording From Another VCR or Similar Device 83 ... Displays 94 Clock Setting (Clock Set 95 Video Settings (Video 96 Audio Settings (Audio 98 Recording, Set Top Box Control, and VCR Settings (Features 100 Language, Parental Control Settings/Factory Settings (Options 102 Easy Setup (Resetting the...
...Sound During Playback 74 VCR Recording 75 Before Recording 75 VCR Recording From Connected Equipment Without the Timer 76 VCR Timer Recording From Connected Equipment 78 Recording From Connected Equipment With a Timer (Synchro Rec 80 Changing or Canceling VCR Timer Settings (Timer List 81 Recording From Another VCR or Similar Device 83 ... Displays 94 Clock Setting (Clock Set 95 Video Settings (Video 96 Audio Settings (Audio 98 Recording, Set Top Box Control, and VCR Settings (Features 100 Language, Parental Control Settings/Factory Settings (Options 102 Easy Setup (Resetting the...
Operating Instructions
Page 8
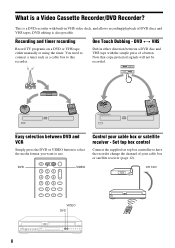
Recording and timer recording Record TV programs on a DVD or VHS tape, either direction between DVD and VCR Simply press the DVD or VIDEO button to select the media format you want to use. Control your cable box or satellite receiver (page 12). ...DVD 123 456 789 0 VIDEO CH 103! 103 VIDEO DVD 8 Note that copy-protected signals will not be recorded. You need to...
Recording and timer recording Record TV programs on a DVD or VHS tape, either direction between DVD and VCR Simply press the DVD or VIDEO button to select the media format you want to use. Control your cable box or satellite receiver (page 12). ...DVD 123 456 789 0 VIDEO CH 103! 103 VIDEO DVD 8 Note that copy-protected signals will not be recorded. You need to...
Operating Instructions
Page 9
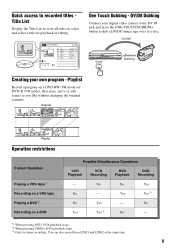
... titles on a disc and select a title for timer recording. You can also record from LINE1 and LINE2 at the same time. 9 No No Yes No - No Yes Yes*3 No - *1 When pressing DVD, VCR playback stops. *2 When pressing VIDEO, DVD playback stops.... *3 Only for playback or editing. Playlist Record a program on a DVD Possible Simultaneous Operations VCR Playback VCR Recording DVD Playback DVD Recording - Yes Yes*3 No Yes - Quick access to recorded titles Title List Display the Title...
... titles on a disc and select a title for timer recording. You can also record from LINE1 and LINE2 at the same time. 9 No No Yes No - No Yes Yes*3 No - *1 When pressing DVD, VCR playback stops. *2 When pressing VIDEO, DVD playback stops.... *3 Only for playback or editing. Playlist Record a program on a DVD Possible Simultaneous Operations VCR Playback VCR Recording DVD Playback DVD Recording - Yes Yes*3 No Yes - Quick access to recorded titles Title List Display the Title...
Operating Instructions
Page 10
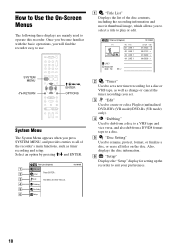
SYSTEM MENU 123 456 789 0 O RETURN M/m/ How to Use the On-Screen Menus The following three displays are mainly used to use. Once you become familiar with the basic operations, you will find the recorder easy to operate this recorder.
SYSTEM MENU 123 456 789 0 O RETURN M/m/ How to Use the On-Screen Menus The following three displays are mainly used to use. Once you become familiar with the basic operations, you will find the recorder easy to operate this recorder.
Operating Instructions
Page 11
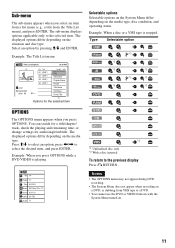
Select an option by pressing M/m and ENTER. Example: The Title List menu Title List (Original) 1/4 No. Press M/m to the selected item. Title 01 LINE 1 02 LINE 1 03 LINE 1 04 LINE 1 T LINE 1 May/02/2007 08:00 PM 10:10 AM Length Edit Pla0y1:29:03 > Tit0le0:E3r1a:s2e3 > Ch0a1p:5te9r:0E0ras>e Pr0o0te:5ct8:56 > Title Name A·B Erase Divide Title Options for audio/angle/subtitle. The sub-menu displays options applicable only to select an option, press The displayed options differ depending on the media type. The displayed options differ depending on the situation and ...
Select an option by pressing M/m and ENTER. Example: The Title List menu Title List (Original) 1/4 No. Press M/m to the selected item. Title 01 LINE 1 02 LINE 1 03 LINE 1 04 LINE 1 T LINE 1 May/02/2007 08:00 PM 10:10 AM Length Edit Pla0y1:29:03 > Tit0le0:E3r1a:s2e3 > Ch0a1p:5te9r:0E0ras>e Pr0o0te:5ct8:56 > Title Name A·B Erase Divide Title Options for audio/angle/subtitle. The sub-menu displays options applicable only to select an option, press The displayed options differ depending on the media type. The displayed options differ depending on the situation and ...
Operating Instructions
Page 12
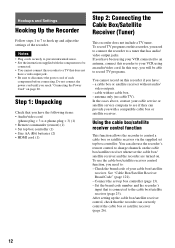
...Do not connect the power cord until you need to connect the recorder to a tuner that has audio/ video output jacks. In this way, you will be connected. • You cannot connect this recorder to your VCR using your cable box/satellite receiver. Hookups and Settings Hooking Up ...the Recorder Follow steps 1 to 7 to hook up the cable box/satellite receiver control, check that the recorder can also use the cable box/satellite receiver control ...
...Do not connect the power cord until you need to connect the recorder to a tuner that has audio/ video output jacks. In this way, you will be connected. • You cannot connect this recorder to your VCR using your cable box/satellite receiver. Hookups and Settings Hooking Up ...the Recorder Follow steps 1 to 7 to hook up the cable box/satellite receiver control, check that the recorder can also use the cable box/satellite receiver control ...
Operating Instructions
Page 13
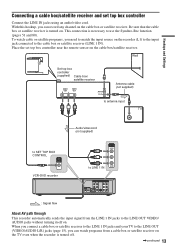
... TO TV Antenna cable (not supplied) to antenna input TV Audio/video cord (not supplied) to SET TOP BOX CONTROL SETTOP BOX CONTROL VCR-DVD recorder LINE 1 IN VIDEO to the LINE OUT VIDEO/ AUDIO jacks without turning itself on the cable box/satellite receiver. Place the set top... VIDEO L Y R PB SETTOP HDMI OUT BOX CONTROL PR OPTICAL COAXIAL DIGITAL AUDIO OUT L R AUDIO AUDIO : Signal flow About AV path through This recorder automatically sends the input signal from a cable box or satellite receiver on . With this hookup, you need to the cable box or satellite receiver (LINE...
... TO TV Antenna cable (not supplied) to antenna input TV Audio/video cord (not supplied) to SET TOP BOX CONTROL SETTOP BOX CONTROL VCR-DVD recorder LINE 1 IN VIDEO to the LINE OUT VIDEO/ AUDIO jacks without turning itself on the cable box/satellite receiver. Place the set top... VIDEO L Y R PB SETTOP HDMI OUT BOX CONTROL PR OPTICAL COAXIAL DIGITAL AUDIO OUT L R AUDIO AUDIO : Signal flow About AV path through This recorder automatically sends the input signal from a cable box or satellite receiver on . With this hookup, you need to the cable box or satellite receiver (LINE...

Operating Instructions
Page 14
Output signals to S VIDEO OUT, COMPONENT VIDEO OUT, or HDMI OUT jacks. 14 Input signals from the LINE 2 IN jacks. - Notes • Synchro-Recording does not work for: - For details, see the tuner's operating instructions. • AV path through function does not work with some tuners.
Output signals to S VIDEO OUT, COMPONENT VIDEO OUT, or HDMI OUT jacks. 14 Input signals from the LINE 2 IN jacks. - Notes • Synchro-Recording does not work for: - For details, see the tuner's operating instructions. • AV path through function does not work with some tuners.
Operating Instructions
Page 15
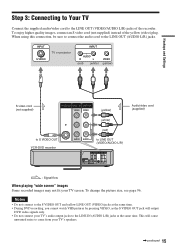
... OUT BOX CONTROL PR OPTICAL COAXIAL DIGITAL AUDIO OUT L R AUDIO AUDIO Audio/video cord (supplied) : Signal flow When playing "wide screen" images Some recorded images may not fit your TV screen. INPUT S VIDEO TV or projector INPUT AUDIO R L (red) (white) VIDEO (yellow) S video cord (not... supplied) S VIDEO OUT LINE 1 IN LINE OUT VIDEO VIDEO (yellow) to S VIDEO OUT VCR-DVD recorder L R AUDIO AUDIO (white) (red) to the LINE OUT (AUDIO L/R) jacks. To change the picture size, see page 96. This will output DVD video...
... OUT BOX CONTROL PR OPTICAL COAXIAL DIGITAL AUDIO OUT L R AUDIO AUDIO Audio/video cord (supplied) : Signal flow When playing "wide screen" images Some recorded images may not fit your TV screen. INPUT S VIDEO TV or projector INPUT AUDIO R L (red) (white) VIDEO (yellow) S video cord (not... supplied) S VIDEO OUT LINE 1 IN LINE OUT VIDEO VIDEO (yellow) to S VIDEO OUT VCR-DVD recorder L R AUDIO AUDIO (white) (red) to the LINE OUT (AUDIO L/R) jacks. To change the picture size, see page 96. This will output DVD video...
Operating Instructions
Page 16
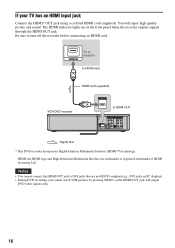
... High-Definition Multimedia Interface (HDMI™) technology. HDMI IN TV or projector to HDMI input HDMI cord (supplied) VCR-DVD recorder HDMI OUT to turn off the recorder before connecting an HDMI cord. HDMI, the HDMI logo and High-Definition Multimedia Interface are not HDCP compliant (e.g., DVI jacks... on the front panel when the recorder outputs signals through the HDMI OUT jack. If your TV has an HDMI input jack Connect the HDMI* OUT jack using a certified HDMI...
... High-Definition Multimedia Interface (HDMI™) technology. HDMI IN TV or projector to HDMI input HDMI cord (supplied) VCR-DVD recorder HDMI OUT to turn off the recorder before connecting an HDMI cord. HDMI, the HDMI logo and High-Definition Multimedia Interface are not HDCP compliant (e.g., DVI jacks... on the front panel when the recorder outputs signals through the HDMI OUT jack. If your TV has an HDMI input jack Connect the HDMI* OUT jack using a certified HDMI...

Operating Instructions
Page 17
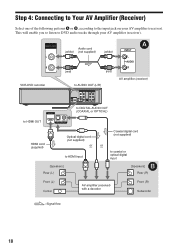
... S VIDEO OUT LINE 1 IN LINE OUT VIDEO VIDEO L Y R PB SETTOP HDMI OUT BOX CONTROL PR OPTICAL COAXIAL DIGITAL AUDIO OUT L R AUDIO AUDIO VCR-DVD recorder : Signal flow Note During DVD recording, you must use this connection, be sure to connect the audio cord to the LINE OUT (AUDIO L/R) jacks. When using a component video...
... S VIDEO OUT LINE 1 IN LINE OUT VIDEO VIDEO L Y R PB SETTOP HDMI OUT BOX CONTROL PR OPTICAL COAXIAL DIGITAL AUDIO OUT L R AUDIO AUDIO VCR-DVD recorder : Signal flow Note During DVD recording, you must use this connection, be sure to connect the audio cord to the LINE OUT (AUDIO L/R) jacks. When using a component video...
Operating Instructions
Page 18
AUDIO OUT L R VCR-DVD recorder HDMI OUT Audio cord (white) (not supplied) (white) (red) (red) to AUDIO OUT (L/R) AUDIO OUT COMPONENT VIDEO OUT S VIDEO OUT LINE 1 IN LINE OUT VIDEO ...
AUDIO OUT L R VCR-DVD recorder HDMI OUT Audio cord (white) (not supplied) (white) (red) (red) to AUDIO OUT (L/R) AUDIO OUT COMPONENT VIDEO OUT S VIDEO OUT LINE 1 IN LINE OUT VIDEO ...
Operating Instructions
Page 19
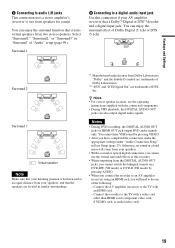
...the connected components. • During VHS playback, the DIGITAL AUDIO OUT jacks can enjoy the surround effect of "Audio" setup (page 99). Connect the recorder to audio L/R jacks This connection uses a stereo amplifier's (receiver's) two front speakers for sound. "Dolby" and the double-D symbol are trademarks of ... in "Surround" of Dolby Digital (5.1ch) or DTS (5.1ch). You cannot hear VHS sound by pressing AUDIO. • When you connect the recorder to an AV amplifier (receiver) using an HDMI cord, you will come from your speakers. • With a coaxial or optical digital connection, ...
...the connected components. • During VHS playback, the DIGITAL AUDIO OUT jacks can enjoy the surround effect of "Audio" setup (page 99). Connect the recorder to audio L/R jacks This connection uses a stereo amplifier's (receiver's) two front speakers for sound. "Dolby" and the double-D symbol are trademarks of ... in "Surround" of Dolby Digital (5.1ch) or DTS (5.1ch). You cannot hear VHS sound by pressing AUDIO. • When you connect the recorder to an AV amplifier (receiver) using an HDMI cord, you will come from your speakers. • With a coaxial or optical digital connection, ...

Operating Instructions
Page 20
You can operate the recorder only after all connections are complete. to connect the power cord only after the front panel display lights up and the recorder enters standby mode. If you must wait for a short while before operating the recorder. After you connect the power cord, you connect additional equipment to this recorder (page 27), be sure to AC outlet < AUDIO OUT COMPONENT VIDEO OUT L Y R PB SETTOP HDMI OUT BOX CONTROL PR OPTICAL COAXIAL DIGITAL AUDIO OUT 20 Step 5: Connecting the Power Cord Plug the recorder and TV power cords into an AC outlet.
You can operate the recorder only after all connections are complete. to connect the power cord only after the front panel display lights up and the recorder enters standby mode. If you must wait for a short while before operating the recorder. After you connect the power cord, you connect additional equipment to this recorder (page 27), be sure to AC outlet < AUDIO OUT COMPONENT VIDEO OUT L Y R PB SETTOP HDMI OUT BOX CONTROL PR OPTICAL COAXIAL DIGITAL AUDIO OUT 20 Step 5: Connecting the Power Cord Plug the recorder and TV power cords into an AC outlet.
Operating Instructions
Page 21
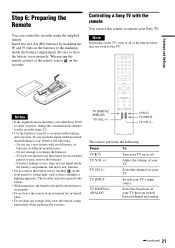
... the channel on your TV TV INPUT Switch your TV's input source TV DIGITAL/ ANALOG Select the broadcast on the batteries to operate your Sony TV. The recorder may not work for this remote to the markings inside the battery compartment, and insert new batteries. • Do not expose the remote ...sensor (marked on the TV, some or all of your other Sony DVD recorder or player, change the command mode number for the TV. 123 456 789 0 Notes • If the supplied remote interferes your TV TV CH...
... the channel on your TV TV INPUT Switch your TV's input source TV DIGITAL/ ANALOG Select the broadcast on the batteries to operate your Sony TV. The recorder may not work for this remote to the markings inside the battery compartment, and insert new batteries. • Do not expose the remote ...sensor (marked on the TV, some or all of your other Sony DVD recorder or player, change the command mode number for the TV. 123 456 789 0 Notes • If the supplied remote interferes your TV TV CH...

Operating Instructions
Page 22
SYSTEM MENU 123 456 789 0 O RETURN M/m/ If you have a Sony DVD player or more than one Sony DVD recorder If the supplied remote interferes with your other Sony DVD recorder or player, set the command mode number for this recorder and the supplied remote to one that differs from the other Sony DVD recorder or player, after you have completed "Step 7: Easy Setup." The default command mode setting for this recorder and the supplied remote is DVD 3.
SYSTEM MENU 123 456 789 0 O RETURN M/m/ If you have a Sony DVD player or more than one Sony DVD recorder If the supplied remote interferes with your other Sony DVD recorder or player, set the command mode number for this recorder and the supplied remote to one that differs from the other Sony DVD recorder or player, after you have completed "Step 7: Easy Setup." The default command mode setting for this recorder and the supplied remote is DVD 3.


