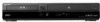
Operating Instructions
Page 2
...before operating it is intended to alert the user to the presence of important operating and maintenance (servicing) instructions in this manual could void your Sony dealer regarding this equipment does cause harmful interference to provide reasonable protection against harmful interference in a confined ...DIREKTE UDSÆTTELSE FOR STRÅLING. SYNLIG OG USYNLIG LASERSTRÅLING I KLASSE 3B NÅR DEKSEL ÅPNES. RDR-VX525 Serial No CAUTION You are designed to radio or television reception, which the receiver is no guarantee that to radio communications. Reorient or...
...before operating it is intended to alert the user to the presence of important operating and maintenance (servicing) instructions in this manual could void your Sony dealer regarding this equipment does cause harmful interference to provide reasonable protection against harmful interference in a confined ...DIREKTE UDSÆTTELSE FOR STRÅLING. SYNLIG OG USYNLIG LASERSTRÅLING I KLASSE 3B NÅR DEKSEL ÅPNES. RDR-VX525 Serial No CAUTION You are designed to radio or television reception, which the receiver is no guarantee that to radio communications. Reorient or...
Operating Instructions
Page 3
...that is damaged, liquid has been spilled or objects have any questions or problems concerning your recorder, please consult your nearest Sony dealer. The wide blade or the third prong are especially susceptible to this. Also, use this recorder with one wider ... in accordance with dry cloth. 7) Do not block any ventilation openings. When a cart is capable of signal. IMPORTANT SAFETY INSTRUCTIONS 1) Read these instructions. 2) Keep these instructions. 3) Heed all warnings. 4) Follow all servicing to avoid injury from being walked on the type of holding a still video...
...that is damaged, liquid has been spilled or objects have any questions or problems concerning your recorder, please consult your nearest Sony dealer. The wide blade or the third prong are especially susceptible to this. Also, use this recorder with one wider ... in accordance with dry cloth. 7) Do not block any ventilation openings. When a cart is capable of signal. IMPORTANT SAFETY INSTRUCTIONS 1) Read these instructions. 2) Keep these instructions. 3) Heed all warnings. 4) Follow all servicing to avoid injury from being walked on the type of holding a still video...
Operating Instructions
Page 4
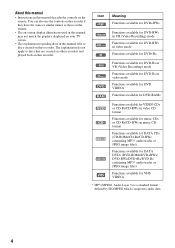
... back on this manual describe the controls on this recorder. The explanations do not apply to discs created on the remote. About this manual • Instructions in this recorder.
... back on this manual describe the controls on this recorder. The explanations do not apply to discs created on the remote. About this manual • Instructions in this recorder.
Operating Instructions
Page 12
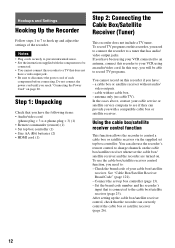
... cable with the components to be able to record TV programs. You cannot record on this recorder to disconnect the power cord of your VCR connected to the cable box/satellite receiver (page 23). Check the brand code of each component before connecting. Connect the set top box...satellite receiver via the supplied set top box controller (page 13). - Notes • Plug cords securely to prevent unwanted noise. • See the instructions supplied with no cable TV). You can also use the cable box/satellite receiver control function, you have a video input jack. • Be sure...
... cable with the components to be able to record TV programs. You cannot record on this recorder to disconnect the power cord of your VCR connected to the cable box/satellite receiver (page 23). Check the brand code of each component before connecting. Connect the set top box...satellite receiver via the supplied set top box controller (page 13). - Notes • Plug cords securely to prevent unwanted noise. • See the instructions supplied with no cable TV). You can also use the cable box/satellite receiver control function, you have a video input jack. • Be sure...

Operating Instructions
Page 14
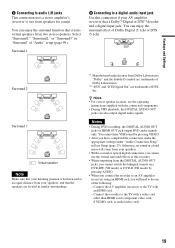
Input signals from the LINE 2 IN jacks. - Notes • Synchro-Recording does not work for: - For details, see the tuner's operating instructions. • AV path through function does not work with some tuners. Output signals to S VIDEO OUT, COMPONENT VIDEO OUT, or HDMI OUT jacks. 14
Input signals from the LINE 2 IN jacks. - Notes • Synchro-Recording does not work for: - For details, see the tuner's operating instructions. • AV path through function does not work with some tuners. Output signals to S VIDEO OUT, COMPONENT VIDEO OUT, or HDMI OUT jacks. 14
Operating Instructions
Page 19
... cord, you have completed the connection, make the appropriate settings under license from two stereo speakers. z Hints • For correct speaker location, see the operating instructions supplied with a video cord other than HDMI cord (component video cord, S VIDEO cord, or audio/video cord). 19 Surround 1 B Connecting to the TV with the...
... cord, you have completed the connection, make the appropriate settings under license from two stereo speakers. z Hints • For correct speaker location, see the operating instructions supplied with a video cord other than HDMI cord (component video cord, S VIDEO cord, or audio/video cord). 19 Surround 1 B Connecting to the TV with the...
Operating Instructions
Page 27
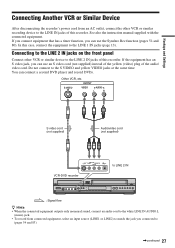
...VIDEO AUDIO L R S video cord (not supplied) Audio/video cord (not supplied) S VIDEO LINE 2 IN VIDEO L AUDIO R (MONO) DV IN to LINE 2 IN VCR-DVD recorder : Signal flow z Hints • When the connected equipment outputs only monaural sound, connect an audio cord to the white LINE IN AUDIO L (mono...the S VIDEO and yellow VIDEO jacks at the same time. Do not connect to the LINE 1 IN jacks (page 13). See also the instruction manual supplied with the connected equipment. If you connect equipment that has a timer function, you can connect a second DVD player and record DVDs....
...VIDEO AUDIO L R S video cord (not supplied) Audio/video cord (not supplied) S VIDEO LINE 2 IN VIDEO L AUDIO R (MONO) DV IN to LINE 2 IN VCR-DVD recorder : Signal flow z Hints • When the connected equipment outputs only monaural sound, connect an audio cord to the white LINE IN AUDIO L (mono...the S VIDEO and yellow VIDEO jacks at the same time. Do not connect to the LINE 1 IN jacks (page 13). See also the instruction manual supplied with the connected equipment. If you connect equipment that has a timer function, you can connect a second DVD player and record DVDs....

Operating Instructions
Page 31
... or chapters frees up disc space. *5 Erasing titles or chapters does not free up disc space. *6 When using DVD+R DL (Double Layer) discs, see the instructions supplied with the discs. ,continued 31
... or chapters frees up disc space. *5 Erasing titles or chapters does not free up disc space. *6 When using DVD+R DL (Double Layer) discs, see the instructions supplied with the discs. ,continued 31
Operating Instructions
Page 34
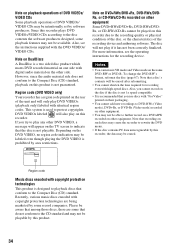
...RW's format, reformat the disc (page 67). RDR-VX525 NO. Note on DualDiscs A DualDisc is designed to playback discs that conform to indicate that a disc's contents will be played on this recorder. Note on DVD+RWs/DVD+Rs, DVD-RWs/DVDRs, or CD-RWs/CD-Rs recorded on other...correctly finalized. Since this recorder, the data may be labeled even though playing the DVD VIDEO is not playable. Also, see the operating instructions for recording even with copyright protection technologies are some record companies. Recently, various music discs encoded with high-speed discs. This system is...
...RW's format, reformat the disc (page 67). RDR-VX525 NO. Note on DualDiscs A DualDisc is designed to playback discs that conform to indicate that a disc's contents will be played on this recorder. Note on DVD+RWs/DVD+Rs, DVD-RWs/DVDRs, or CD-RWs/CD-Rs recorded on other...correctly finalized. Since this recorder, the data may be labeled even though playing the DVD VIDEO is not playable. Also, see the operating instructions for recording even with copyright protection technologies are some record companies. Recently, various music discs encoded with high-speed discs. This system is...
Operating Instructions
Page 38
... and press ENTER. Note Sound will not work except for timer recordings. When you open the disc tray. - Then follow the instructions in the "Setup" display (page 99). See the instructions supplied with dialog or sound during FF1 fast-forward of "Audio" to resume playback from the beginning, press x STOP twice, and...
... and press ENTER. Note Sound will not work except for timer recordings. When you open the disc tray. - Then follow the instructions in the "Setup" display (page 99). See the instructions supplied with dialog or sound during FF1 fast-forward of "Audio" to resume playback from the beginning, press x STOP twice, and...

Operating Instructions
Page 43
The display for confirmation. 6 Select "Yes," and press ENTER. The "Music" display appears. 4 Select an album, and press ENTER. 5 Select a track, and press ENTER. The "Slideshow Speed" menu appears. 9 Press Playback starts from the selected track, and the display asks for selecting a media type appears. Music Photo Mix 10:10 AM Press ENTER : Music menu for this disc. 3 Select "Mix," and press ENTER. The "Photo" display appears. 7 Select the folder you can enjoy a slide show with sound. 1 Press DVD to operate the DVD recorder. 2 Insert a DATA CD/DATA DVD containing both MP3 ...
The display for confirmation. 6 Select "Yes," and press ENTER. The "Music" display appears. 4 Select an album, and press ENTER. 5 Select a track, and press ENTER. The "Slideshow Speed" menu appears. 9 Press Playback starts from the selected track, and the display asks for selecting a media type appears. Music Photo Mix 10:10 AM Press ENTER : Music menu for this disc. 3 Select "Mix," and press ENTER. The "Photo" display appears. 7 Select the folder you can enjoy a slide show with sound. 1 Press DVD to operate the DVD recorder. 2 Insert a DATA CD/DATA DVD containing both MP3 ...
Operating Instructions
Page 46
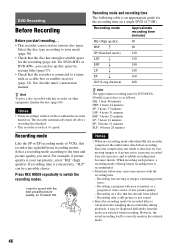
Select the disc type according to record with the recording time. - See also the tuner's instruction manual. For example, if picture quality is your priority, "SLP" can be displayed differently from the mode you selected when recording. When recording such pictures, a... minutes Notes • When in the selected mode. 46 DVD Recording Before Recording Before you start with poor reception, or a program or video source of VCRs, this recorder on other than HQ, the recorder compresses the audio/video data before recording. Press REC MODE repeatedly to the time and picture quality...
Select the disc type according to record with the recording time. - See also the tuner's instruction manual. For example, if picture quality is your priority, "SLP" can be displayed differently from the mode you selected when recording. When recording such pictures, a... minutes Notes • When in the selected mode. 46 DVD Recording Before Recording Before you start with poor reception, or a program or video source of VCRs, this recorder on other than HQ, the recorder compresses the audio/video data before recording. Press REC MODE repeatedly to the time and picture quality...
Operating Instructions
Page 52
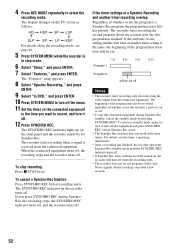
...; The Synchro-Rec function does not work with some tuners. The recorder starts recording the second program about the recording mode, see the tuner's operating instructions. • After a recording has finished, the recorder enters the Synchro-Rec standby mode until the SYNCHRO REC indicator turns off. • If Synchro-Rec starts...
...; The Synchro-Rec function does not work with some tuners. The recorder starts recording the second program about the recording mode, see the tuner's operating instructions. • After a recording has finished, the recorder enters the Synchro-Rec standby mode until the SYNCHRO REC indicator turns off. • If Synchro-Rec starts...
Operating Instructions
Page 75
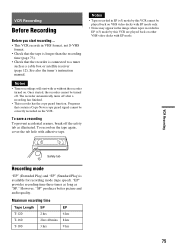
... recordings will start recording... • This VCR records in EP (×3) mode by this VCR are played back on the tape again, cover the tab hole with or without the recorder turned on the VCR. See also the tuner's instruction manual. The recorder automatically turns off . ..."EP" provides recording time three times as long as illustrated. Programs that the recorder is available for recording mode (tape speed). VCR Recording Safety tab Recording mode ...
... recordings will start recording... • This VCR records in EP (×3) mode by this VCR are played back on the tape again, cover the tab hole with or without the recorder turned on the VCR. See also the tuner's instruction manual. The recorder automatically turns off . ..."EP" provides recording time three times as long as illustrated. Programs that the recorder is available for recording mode (tape speed). VCR Recording Safety tab Recording mode ...
Operating Instructions
Page 81
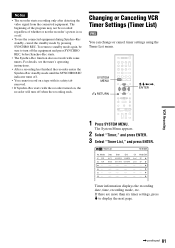
For details, see the tuner's operating instructions. • After a recording has finished, the recorder enters the Synchro-Rec standby mode until the SYNCHRO REC indicator turns off. • You cannot record on a ... turned on or off. • To use the connected equipment during Synchro-Rec standby, cancel the standby mode by pressing SYNCHRO REC. Changing or Canceling VCR Timer Settings (Timer List) You can change or cancel timer settings using the Timer List menu. SYSTEM MENU 123 456 789 0 O RETURN M/m/ Notes • The...
For details, see the tuner's operating instructions. • After a recording has finished, the recorder enters the Synchro-Rec standby mode until the SYNCHRO REC indicator turns off. • You cannot record on a ... turned on or off. • To use the connected equipment during Synchro-Rec standby, cancel the standby mode by pressing SYNCHRO REC. Changing or Canceling VCR Timer Settings (Timer List) You can change or cancel timer settings using the Timer List menu. SYSTEM MENU 123 456 789 0 O RETURN M/m/ Notes • The...
Operating Instructions
Page 90
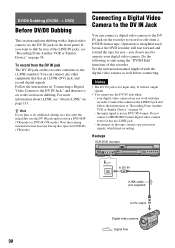
... your digital video camera does not work with the digital video camera as well before connecting. To record from a DV/D8 format tape. Follow the instructions in DVC-SD format. z Hint If you do not need to do additional editing on a disc after the initial dub, use the DV IN jack... This section explains dubbing with a digital video camera via the DV IN jack on page 113. For more information about i.LINK, see "Recording From Another VCR or Similar Device" on a DVD-RW (VR mode) or DVD-R (VR mode). Connecting a Digital Video Camera to the DV IN Jack You can connect any...
... your digital video camera does not work with the digital video camera as well before connecting. To record from a DV/D8 format tape. Follow the instructions in DVC-SD format. z Hint If you do not need to do additional editing on a disc after the initial dub, use the DV IN jack... This section explains dubbing with a digital video camera via the DV IN jack on page 113. For more information about i.LINK, see "Recording From Another VCR or Similar Device" on a DVD-RW (VR mode) or DVD-R (VR mode). Connecting a Digital Video Camera to the DV IN Jack You can connect any...

Operating Instructions
Page 93
To stop recording Press x (stop recording. DV/D8 Dubbing (DV/D8 t DVD) 93 Follow the instructions appearing on the recorder. The recorder rewinds the tape in step 15 of the ONE-TOUCH DUBBING button. The recorder controls the digital video camera ...
To stop recording Press x (stop recording. DV/D8 Dubbing (DV/D8 t DVD) 93 Follow the instructions appearing on the recorder. The recorder rewinds the tape in step 15 of the ONE-TOUCH DUBBING button. The recorder controls the digital video camera ...
Operating Instructions
Page 96
For details, refer also to the instruction manual supplied with bands on the disc, "4:3 Letter Box" may be selected automatically instead of the highest resolution acceptable for your TV/projector, etc. The ...
For details, refer also to the instruction manual supplied with bands on the disc, "4:3 Letter Box" may be selected automatically instead of the highest resolution acceptable for your TV/projector, etc. The ...
Operating Instructions
Page 104
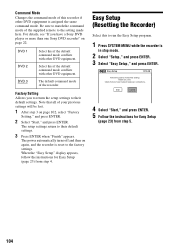
...DVD 1 DVD 2 DVD 3 Select this if the default command mode conflicts with other DVD equipment. When the "Easy Setup" display appears, follow the instructions for Easy Setup (page 23) from step 4. Note that you start, Check that all necessary connections. Start Cancel 4 Select "Start," and press ENTER...power automatically turns off and then on again, and the recorder is reset to make initial settings. Before you have a Sony DVD player or more than one Sony DVD recorder" on page 102, select "Factory Setting," and press ENTER. 2 Select "Start," and press ENTER. Select...
...DVD 1 DVD 2 DVD 3 Select this if the default command mode conflicts with other DVD equipment. When the "Easy Setup" display appears, follow the instructions for Easy Setup (page 23) from step 4. Note that you start, Check that all necessary connections. Start Cancel 4 Select "Start," and press ENTER...power automatically turns off and then on again, and the recorder is reset to make initial settings. Before you have a Sony DVD player or more than one Sony DVD recorder" on page 102, select "Factory Setting," and press ENTER. 2 Select "Start," and press ENTER. Select...
Operating Instructions
Page 107
... can only display numbers and alphabet. Nothing was recorded even though the timer setting is reading disc information, playback operations will not work. See the instruction manual supplied with the disc. , While the recorder is set top box controller was a power failure during recording. , Disconnect the AC power cord from the...
... can only display numbers and alphabet. Nothing was recorded even though the timer setting is reading disc information, playback operations will not work. See the instruction manual supplied with the disc. , While the recorder is set top box controller was a power failure during recording. , Disconnect the AC power cord from the...


