Operating Instructions
Page 5
... Settings (Video 87 Audio Settings (Audio 89 Recording and Parental Control Settings (Features 91 Disc and Remote Control Settings/Factory Settings (Options 94 Easy Setup (Resetting the Recorder 95 Additional Information 96 Troubleshooting 96 Self-diagnosis Function (When letters/numbers appear in the display 101 Notes About This Recorder 101 Specifications...
... Settings (Video 87 Audio Settings (Audio 89 Recording and Parental Control Settings (Features 91 Disc and Remote Control Settings/Factory Settings (Options 94 Easy Setup (Resetting the Recorder 95 Additional Information 96 Troubleshooting 96 Self-diagnosis Function (When letters/numbers appear in the display 101 Notes About This Recorder 101 Specifications...
Operating Instructions
Page 22
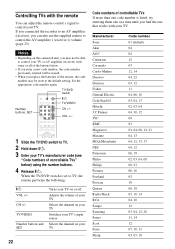
... performs the following: [/1 VOL +/- VOL +/- 1 Slide the TV/DVD switch to control the AV amplifier's (receiver's) volume (page 23). Manufacturer Sony Akai AOC Centurion Coronado Curtis-Mathes Daewoo Daytron Fisher General Electric Gold Star/LG Hitachi J.C.Penney JVC KMC Magnavox Marantz MGA/Mitsubishi NEC Panasonic Philco... your TV Selects the channel on your TV Switches your TV's input source Selects the channel on the connected unit, you may not be reset to control your TV. Controlling TVs with some or all of the buttons below ) using the number buttons. 4 Release [/1. If you...
... performs the following: [/1 VOL +/- VOL +/- 1 Slide the TV/DVD switch to control the AV amplifier's (receiver's) volume (page 23). Manufacturer Sony Akai AOC Centurion Coronado Curtis-Mathes Daewoo Daytron Fisher General Electric Gold Star/LG Hitachi J.C.Penney JVC KMC Magnavox Marantz MGA/Mitsubishi NEC Panasonic Philco... your TV Selects the channel on your TV Switches your TV's input source Selects the channel on the connected unit, you may not be reset to control your TV. Controlling TVs with some or all of the buttons below ) using the number buttons. 4 Release [/1. If you...
Operating Instructions
Page 66
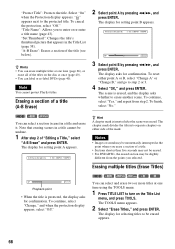
... TOOLS. The TOOLS menu appears. 2 Select "Erase Titles," and press ENTER. z Hints • You can select a section (scene) in the Title List (page 38). To reset either side of the title (see below). "Title Name": Allows you to be slightly different from step 2. HDD +RW -RWVR You can erase multiple titles...
... TOOLS. The TOOLS menu appears. 2 Select "Erase Titles," and press ENTER. z Hints • You can select a section (scene) in the Title List (page 38). To reset either side of the title (see below). "Title Name": Allows you to be slightly different from step 2. HDD +RW -RWVR You can erase multiple titles...

Operating Instructions
Page 67
... DVD-RW (Video mode), the recorder searches for confirmation. The Disc Map appears. Erase Titles Select the titles to select all of check marks, select "Reset All." To cancel, select "Close." 4 Repeat step 3 to erase. 1 2ch 2 5ch 1:00PM - 2:00PM 8:00PM - 9:00PM 3 12ch 9:00AM - 9:30AM 4 3ch 5 25ch 8:...00PM - 8:30PM 8:00PM - 8:30PM 9/15 9/17 9/25 9/25 10/15 OK Cancel Reset All • When the title is protected, the display asks for the largest open space, select the space by using Disc Map, and erase titles...
... DVD-RW (Video mode), the recorder searches for confirmation. The Disc Map appears. Erase Titles Select the titles to select all of check marks, select "Reset All." To cancel, select "Close." 4 Repeat step 3 to erase. 1 2ch 2 5ch 1:00PM - 2:00PM 8:00PM - 9:00PM 3 12ch 9:00AM - 9:30AM 4 3ch 5 25ch 8:...00PM - 8:30PM 8:00PM - 8:30PM 9/15 9/17 9/25 9/25 10/15 OK Cancel Reset All • When the title is protected, the display asks for the largest open space, select the space by using Disc Map, and erase titles...

Operating Instructions
Page 69
.... To view the selected scene, select "Preview." 10Select "OK," and ENTER. The Scene List menu appears with all of the check marks, select "Reset All." 5 Select "OK," and press ENTER. "Erase": Erases the scene. The selection is captured as a scene, and the display asks whether you...9:00AM - 9:30AM 4 3ch 5 25ch 8:00PM - 8:30PM 8:00PM - 8:30PM 6 L2 9:00PM - 9:30PM 9/15 9/17 9/25 9/25 10/15 10/19 OK Cancel Select All Reset All 4 Repeat step 3 to add more " and press ENTER. The display asks for setting the start capturing. 1 2ch 2 5ch 1:00PM - 2:00PM 9/15 8:00PM - 9:00PM 9/17...
.... To view the selected scene, select "Preview." 10Select "OK," and ENTER. The Scene List menu appears with all of the check marks, select "Reset All." 5 Select "OK," and press ENTER. "Erase": Erases the scene. The selection is captured as a scene, and the display asks whether you...9:00AM - 9:30AM 4 3ch 5 25ch 8:00PM - 8:30PM 8:00PM - 8:30PM 6 L2 9:00PM - 9:30PM 9/15 9/17 9/25 9/25 10/15 10/19 OK Cancel Select All Reset All 4 Repeat step 3 to add more " and press ENTER. The display asks for setting the start capturing. 1 2ch 2 5ch 1:00PM - 2:00PM 9/15 8:00PM - 9:00PM 9/17...

Operating Instructions
Page 71
... to combine. 1 1 2ch 2 5ch 3 2ch 4 2ch 1:00PM - 2:00PM 8:00PM - 9:00PM 1:00PM - 2:00PM 1:00PM - 2:00PM 9/15 9/17 9/28 10/ 5 OK Cancel Reset All Editing 4 Repeat step 3 to select all of the titles you selected the title appears. To enter a new name, select "Enter Text," and follow the... Titles," and press ENTER. The display for selecting titles appears. 3 Select a title, and press ENTER. To cancel all of the selections, select "Reset All." 5 Select "OK," and press ENTER. The titles are combined. 71 The list of titles to combine. To cancel the selection, press ENTER ...
... to combine. 1 1 2ch 2 5ch 3 2ch 4 2ch 1:00PM - 2:00PM 8:00PM - 9:00PM 1:00PM - 2:00PM 1:00PM - 2:00PM 9/15 9/17 9/28 10/ 5 OK Cancel Reset All Editing 4 Repeat step 3 to select all of the titles you selected the title appears. To enter a new name, select "Enter Text," and follow the... Titles," and press ENTER. The display for selecting titles appears. 3 Select a title, and press ENTER. To cancel all of the selections, select "Reset All." 5 Select "OK," and press ENTER. The titles are combined. 71 The list of titles to combine. To cancel the selection, press ENTER ...
Operating Instructions
Page 74
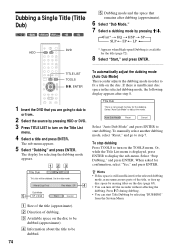
... Select "Auto Dub Mode" and press ENTER to start Title Dubbing by pressing M/m. To manually select another dubbing mode, select "Reset," and go to step 7. When asked for selecting the dubbing mode appears. TITLE LIST TOOLS M/m, ENTER To automatically adjust the dubbing mode (Auto Dub Mode) ...
... Select "Auto Dub Mode" and press ENTER to start Title Dubbing by pressing M/m. To manually select another dubbing mode, select "Reset," and go to step 7. When asked for selecting the dubbing mode appears. TITLE LIST TOOLS M/m, ENTER To automatically adjust the dubbing mode (Auto Dub Mode) ...

Operating Instructions
Page 75
... 123 456 789 0 DVD TITLE LIST TOOLS M/m, ENTER 1 Insert the DVD that you want to dub, and press ENTER. Asia 3 6/20 Settings 6/25 Reset 6 Select titles in the order you want to dub. Asia 3 6/25 Rec Mode: SP Dub Mode: Fast 0.3GB Change 4 World Cup Final 6/20 ... space on the Title List menu. 4 Press TOOLS. To make detailed settings for the dubbing here. 1 World Tour - To cancel all of the selections, select "Reset," and go to be dubbed (approximate). The TOOLS menu appears. 5 Select "Dub Selected Titles," and press ENTER. Asia 2 6/11 Cancel 6/18 3 World Cup ...
... 123 456 789 0 DVD TITLE LIST TOOLS M/m, ENTER 1 Insert the DVD that you want to dub, and press ENTER. Asia 3 6/20 Settings 6/25 Reset 6 Select titles in the order you want to dub. Asia 3 6/25 Rec Mode: SP Dub Mode: Fast 0.3GB Change 4 World Cup Final 6/20 ... space on the Title List menu. 4 Press TOOLS. To make detailed settings for the dubbing here. 1 World Tour - To cancel all of the selections, select "Reset," and go to be dubbed (approximate). The TOOLS menu appears. 5 Select "Dub Selected Titles," and press ENTER. Asia 2 6/11 Cancel 6/18 3 World Cup ...

Operating Instructions
Page 80
... scenes, the recorder will do the following: Connect your digital video camera and prepare for dubbing. Program Edit HDD +RW -RWVR -RWVideo +R -R You can also reset, erase, or change the order of the scenes. The recorder only remembers the IN and OUT points of your choice. To use this point, the...
... scenes, the recorder will do the following: Connect your digital video camera and prepare for dubbing. Program Edit HDD +RW -RWVR -RWVideo +R -R You can also reset, erase, or change the order of the scenes. The recorder only remembers the IN and OUT points of your choice. To use this point, the...

Operating Instructions
Page 81
... confirmation, select "OK." DV10/11/02 1:30PM - 11/12/02 4:46PM OK Enter 9 Select "OK," and press ENTER. Select scene (Set OUT point) Controlling... To reset either the IN or OUT point, select "Change IN" or "Change OUT," and repeat from step 4. When asked for entering the title name appears. Repeat...
... confirmation, select "OK." DV10/11/02 1:30PM - 11/12/02 4:46PM OK Enter 9 Select "OK," and press ENTER. Select scene (Set OUT point) Controlling... To reset either the IN or OUT point, select "Change IN" or "Change OUT," and repeat from step 4. When asked for entering the title name appears. Repeat...
Operating Instructions
Page 82
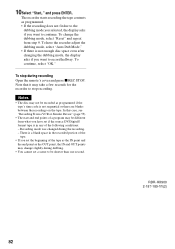
... take a few seconds for the recorder to be shorter than one second. 82 RDR-HX900 2-187-189-11(2) There is in the recorded portion of the following conditions: - Notes • The disc may change the dubbing mode, select "Reset" and repeat from what you have the recorder adjust the dubbing mode, select "Auto...
... take a few seconds for the recorder to be shorter than one second. 82 RDR-HX900 2-187-189-11(2) There is in the recorded portion of the following conditions: - Notes • The disc may change the dubbing mode, select "Reset" and repeat from what you have the recorder adjust the dubbing mode, select "Auto...

Operating Instructions
Page 92
... blocked or replaced with different scenes. 1 After step 3 above, select "Parental Control," and press ENTER. • If you select "Others," press the number buttons to reset it by selecting "Parental Control" under "Factory Setup" in the table (see below). Features -
... blocked or replaced with different scenes. 1 After step 3 above, select "Parental Control," and press ENTER. • If you select "Others," press the number buttons to reset it by selecting "Parental Control" under "Factory Setup" in the table (see below). Features -

Operating Instructions
Page 95
Easy Setup (Resetting the Recorder) Select this to run the Easy Setup program. 1 Press SYSTEM MENU while the recorder is in stop mode. 2 Select "SETUP," and press ENTER. 3 Select "Easy Setup," and press ENTER. Settings and Adjustments 95 SETUP Settings Video Audio Features Options Easy Setup Easy Setup 4 Press ENTER. 5 Select "Start," and press ENTER. 6 Follow the instructions for Easy Setup (page 24) from step 5.
Easy Setup (Resetting the Recorder) Select this to run the Easy Setup program. 1 Press SYSTEM MENU while the recorder is in stop mode. 2 Select "SETUP," and press ENTER. 3 Select "Easy Setup," and press ENTER. Settings and Adjustments 95 SETUP Settings Video Audio Features Options Easy Setup Easy Setup 4 Press ENTER. 5 Select "Start," and press ENTER. 6 Follow the instructions for Easy Setup (page 24) from step 5.
Operating Instructions
Page 99
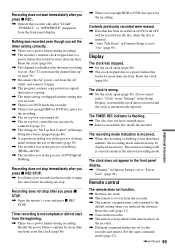
...Nothing was recorded even though you press x REC STOP. , It will be displayed incorrectly. The actual recording itself is less than one hour. Reset the clock (page 86). Set the same command mode (page 23). ,continued 99 Additional Information Recording does not stop immediately after you set ... , The clock stopped due to a power failure that lasted for the recorder to a power failure that lasted for the recorder and remote. Reset the clock (page 86). , The channel was hidden after the timer recording was set top box controller was incorrectly connected (page 13). , ...
...Nothing was recorded even though you press x REC STOP. , It will be displayed incorrectly. The actual recording itself is less than one hour. Reset the clock (page 86). Set the same command mode (page 23). ,continued 99 Additional Information Recording does not stop immediately after you set ... , The clock stopped due to a power failure that lasted for the recorder to a power failure that lasted for the recorder and remote. Reset the clock (page 86). , The channel was hidden after the timer recording was set top box controller was incorrectly connected (page 13). , ...
Operating Instructions
Page 118
..., 45, 52 Recording picture quality 51 Recording picture size 51 Recording time 45, 52 RECOVERY 100 Region code 11 Remaining time 42 Remote 21, 106 Resetting 95 Resume Play 54
..., 45, 52 Recording picture quality 51 Recording picture size 51 Recording time 45, 52 RECOVERY 100 Region code 11 Remaining time 42 Remote 21, 106 Resetting 95 Resume Play 54


