Operating Instructions
Page 7
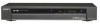
... Settings (Features 81 Language, Parental Control Settings/Factory Settings (Options 83 Easy Setup (Resetting the Recorder 85 Additional Information 86 Troubleshooting 86 Notes About This Recorder 90 Specifications 91 About i.LINK 93 Guide to Parts and Controls 94 Glossary 97 DVD Audio/Subtitle Language 99 Cable Box/Satellite Receiver Brand Code 100 Index 105 7
... Settings (Features 81 Language, Parental Control Settings/Factory Settings (Options 83 Easy Setup (Resetting the Recorder 85 Additional Information 86 Troubleshooting 86 Notes About This Recorder 90 Specifications 91 About i.LINK 93 Guide to Parts and Controls 94 Glossary 97 DVD Audio/Subtitle Language 99 Cable Box/Satellite Receiver Brand Code 100 Index 105 7
Operating Instructions
Page 21
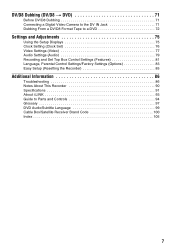
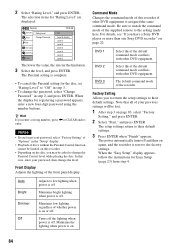
Controlling TVs with your TV. Press TV "/1 TV VOL +/- Notes • Depending on a Sony TV that works with the remote You can switch between digital and analog Hookups and Settings Code numbers of the remote. Do not press "/1 at a ... number may be erased. • When you enter a new code number, the code number previously entered will be reset to control your TV's manufacturer code (see below may not work for TV. Manufacturer Sony Akai AOC Centurion Coronado Curtis-Mathes Daewoo Daytron Fisher General Electric Hitachi J.C.Penney JVC KMC LG/Gold Star...
Controlling TVs with your TV. Press TV "/1 TV VOL +/- Notes • Depending on a Sony TV that works with the remote You can switch between digital and analog Hookups and Settings Code numbers of the remote. Do not press "/1 at a ... number may be erased. • When you enter a new code number, the code number previously entered will be reset to control your TV's manufacturer code (see below may not work for TV. Manufacturer Sony Akai AOC Centurion Coronado Curtis-Mathes Daewoo Daytron Fisher General Electric Hitachi J.C.Penney JVC KMC LG/Gold Star...

Operating Instructions
Page 59
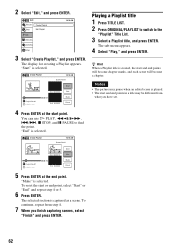
...• Sections shorter than five seconds may be erased (point A). To continue, repeat from step 4 or 5. 6 Press ENTER. When editing a DVD-RW (VR mode) or DVD-R (VR mode), press ORIGINAL/ PLAYLIST to switch to the "Title List (Original)," if necessary. 2 Select a title, and press ENTER. Divide Title... for setting point A and B appears. "Erase" is selected. The scene is also erased. To finish, select "Finish," and press ENTER. To reset the start or end point, select "Start" or "End" and repeat from step 4. The sub-menu appears. 3 Select "A-B Erase," and press...
...• Sections shorter than five seconds may be erased (point A). To continue, repeat from step 4 or 5. 6 Press ENTER. When editing a DVD-RW (VR mode) or DVD-R (VR mode), press ORIGINAL/ PLAYLIST to switch to the "Title List (Original)," if necessary. 2 Select a title, and press ENTER. Divide Title... for setting point A and B appears. "Erase" is selected. The scene is also erased. To finish, select "Finish," and press ENTER. To reset the start or end point, select "Start" or "End" and repeat from step 4. The sub-menu appears. 3 Select "A-B Erase," and press...

Operating Instructions
Page 60
... is selected. Changing the Name of a Title +RW -RWVR -RWVideo +R -RVR -RVideo You can use the same name as Title List may be divided. To reset the dividing point, select "No" and press ENTER, then repeat from step 4. 6 Select "Yes," and press ENTER. The display asks whether to 32 characters.
... is selected. Changing the Name of a Title +RW -RWVR -RWVideo +R -RVR -RVideo You can use the same name as Title List may be divided. To reset the dividing point, select "No" and press ENTER, then repeat from step 4. 6 Select "Yes," and press ENTER. The display asks whether to 32 characters.
Operating Instructions
Page 62
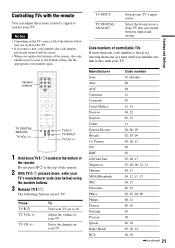
To reset the start and end points in a title may pause when an edited scene is captured as a scene. Playing a Playlist title 1 Press TITLE LIST. 2 Press ORIGINAL/...
To reset the start and end points in a title may pause when an edited scene is captured as a scene. Playing a Playlist title 1 Press TITLE LIST. 2 Press ORIGINAL/...

Operating Instructions
Page 65
... 00:00:00 End Change Cancel 5 Press ENTER at the start or end point, select "Start" or "End" and repeat step 4 or 5. 6 Press ENTER. To reset the start point. To modify other scenes, repeat from what you have set. Note The start and end point of "Editing a Playlist" (page 63). The...
... 00:00:00 End Change Cancel 5 Press ENTER at the start or end point, select "Start" or "End" and repeat step 4 or 5. 6 Press ENTER. To reset the start point. To modify other scenes, repeat from what you have set. Note The start and end point of "Editing a Playlist" (page 63). The...

Operating Instructions
Page 66
...:07 T Playlist No. 01 May/02/2007 03:25 PM End 00:00:00 Start End Add Cancel 4 Press ENTER at the end point. To reset the start point. The selected section is selected. The "Edit Scene" display appears. 2 Select the scene you want to copy, and press ENTER. 3 Select "Copy...
...:07 T Playlist No. 01 May/02/2007 03:25 PM End 00:00:00 Start End Add Cancel 4 Press ENTER at the end point. To reset the start point. The selected section is selected. The "Edit Scene" display appears. 2 Select the scene you want to copy, and press ENTER. 3 Select "Copy...
Operating Instructions
Page 84
.... • Playback of discs without the Parental Control function cannot be limited on this recorder. • Depending on the disc, you have a Sony DVD player or more than one Sony DVD recorder" on again, and the recorder is complete. • To cancel the Parental setting for "Rating Level" are displayed....Maintains low lighting regardless of the supplied remote to the factory settings. The Parental setting is reset to the setting made here. Front Display Adjusts the lighting of the recorder. Note that all of this case, enter your previous settings will be asked to their...
.... • Playback of discs without the Parental Control function cannot be limited on this recorder. • Depending on the disc, you have a Sony DVD player or more than one Sony DVD recorder" on again, and the recorder is complete. • To cancel the Parental setting for "Rating Level" are displayed....Maintains low lighting regardless of the supplied remote to the factory settings. The Parental setting is reset to the setting made here. Front Display Adjusts the lighting of the recorder. Note that all of this case, enter your previous settings will be asked to their...

Operating Instructions
Page 85
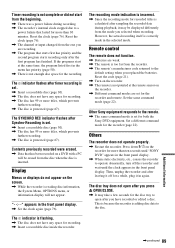
Start Cancel 4 Select "Start," and press ENTER. 5 Follow the instructions for Easy Setup (page 23) from step 5. Settings and Adjustments 85 Before you start, Check that you have made all necessary connections. Easy Setup (Resetting the Recorder) Select this to make initial settings. Easy Setup 10:10 AM Follow the guide to run the Easy Setup program. 1 Press SYSTEM MENU while the recorder is in stop mode. 2 Select "Setup," and press ENTER. 3 Select "Easy Setup," and press ENTER.
Start Cancel 4 Select "Start," and press ENTER. 5 Follow the instructions for Easy Setup (page 23) from step 5. Settings and Adjustments 85 Before you start, Check that you have made all necessary connections. Easy Setup (Resetting the Recorder) Select this to make initial settings. Easy Setup 10:10 AM Follow the guide to run the Easy Setup program. 1 Press SYSTEM MENU while the recorder is in stop mode. 2 Select "Setup," and press ENTER. 3 Select "Easy Setup," and press ENTER.
Operating Instructions
Page 89
... tray does not open after the first program has finished. This is because the recorder is calculated after leaving it off the recorder and wait until "SONY DVD" appears in the front panel display. , When static electricity, etc., causes the recorder to the disc. Reset the clock (page 76). , The channel or input changed from the...
... tray does not open after the first program has finished. This is because the recorder is calculated after leaving it off the recorder and wait until "SONY DVD" appears in the front panel display. , When static electricity, etc., causes the recorder to the disc. Reset the clock (page 76). , The channel or input changed from the...
Operating Instructions
Page 106
..." 58 Q Quick Timer 48 R Rear panel 96 REC 48 106 REC MODE 48 Recording 46 recordable discs 30 recording format 30 recording mode 46 Recording mode 46 Recording time 46, 49 Region code 34 Remaining time 44 Remote 20, 95 REPLAY 36 Resetting 85 Resume Play 38 Rotate 42 S Satellite receiver 13 Satellite receiver brand code 103... (HDMI)" 77 VIDEO CD 33 Video mode 30 Video settings 77 VR mode 30 Z Zoom 42 T TIME/TEXT 45 TIMER 50 Timer List 53 Timer recording 49 change or cancel 53 Title 98 "Title Erase" 58, 63 TITLE LIST 39, 57 Title List 39 "Title Name" 58, 63
..." 58 Q Quick Timer 48 R Rear panel 96 REC 48 106 REC MODE 48 Recording 46 recordable discs 30 recording format 30 recording mode 46 Recording mode 46 Recording time 46, 49 Region code 34 Remaining time 44 Remote 20, 95 REPLAY 36 Resetting 85 Resume Play 38 Rotate 42 S Satellite receiver 13 Satellite receiver brand code 103... (HDMI)" 77 VIDEO CD 33 Video mode 30 Video settings 77 VR mode 30 Z Zoom 42 T TIME/TEXT 45 TIMER 50 Timer List 53 Timer recording 49 change or cancel 53 Title 98 "Title Erase" 58, 63 TITLE LIST 39, 57 Title List 39 "Title Name" 58, 63
