
Operating Instructions
Page 2
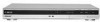
.... Precaution Install this system so that any changes or modifications not expressly approved in accordance with this equipment. Model No. RDR-GX330 Serial No CAUTION You are located at a qualified service shop. This equipment generates, uses, and can be unplugged from ...experienced radio/TV technician for a Class B digital device, pursuant to disassemble the cabinet. Refer servicing to rain or moisture. For customers in the literature accompanying the appliance. As the laser beam used in this manual could void your Sony dealer regarding this DVD recorder is ...
.... Precaution Install this system so that any changes or modifications not expressly approved in accordance with this equipment. Model No. RDR-GX330 Serial No CAUTION You are located at a qualified service shop. This equipment generates, uses, and can be unplugged from ...experienced radio/TV technician for a Class B digital device, pursuant to disassemble the cabinet. Refer servicing to rain or moisture. For customers in the literature accompanying the appliance. As the laser beam used in this manual could void your Sony dealer regarding this DVD recorder is ...
Operating Instructions
Page 4
..., stoves, or other . The wide blade or the third prong are created on other recorders and played back on this recorder. 13) Unplug this manual may not match the graphics displayed on your TV screen. • The explanations regarding DVDs in any heat sources such as power-supply cord or plug is used in this...
..., stoves, or other . The wide blade or the third prong are created on other recorders and played back on this recorder. 13) Unplug this manual may not match the graphics displayed on your TV screen. • The explanations regarding DVDs in any heat sources such as power-supply cord or plug is used in this...

Operating Instructions
Page 6
... Audio Tracks or JPEG Image Files 55 About MP3 audio tracks and JPEG image files 56 MP3 audio tracks or JPEG image files that the recorder can play . . . . . 57 About playback order of albums, tracks, and files 57 Erasing and Editing 59 Before Editing 59 Erasing and... Editing a Title 60 Erasing multiple titles (Erase Titles 60 Erasing a section of a title (A-B Erase 61 Creating chapters manually 62 Creating and Editing a Playlist 62 Moving a Playlist title (Change Order 64 Combining multiple Playlist titles (Combine Titles 64 Dividing a Playlist title (...
... Audio Tracks or JPEG Image Files 55 About MP3 audio tracks and JPEG image files 56 MP3 audio tracks or JPEG image files that the recorder can play . . . . . 57 About playback order of albums, tracks, and files 57 Erasing and Editing 59 Before Editing 59 Erasing and... Editing a Title 60 Erasing multiple titles (Erase Titles 60 Erasing a section of a title (A-B Erase 61 Creating chapters manually 62 Creating and Editing a Playlist 62 Moving a Playlist title (Change Order 64 Combining multiple Playlist titles (Combine Titles 64 Dividing a Playlist title (...

Operating Instructions
Page 8
...Recordable and playable discs Type Disc Logo Icon used in Formatting this manual (new discs) Compatibility with other DVD players (finalizing) DVD+RW DVDRW VR mode Video mode DVD+R DVD+R DL VR mode DVD-R Video mode +RW Automatically formatted in +VR mode (DVD+RW VIDEO) Playable on DVD...players (finalization unnecessary) Format in Video mode (page 27) Playable on most DVD players (finalization necessary) (page 35) Automatically formatted in Playable on most DVD +R +VR mode players (finalization (DVD+R necessary) (page 35) VIDEO) -RVR -RVideo Format in players (...
...Recordable and playable discs Type Disc Logo Icon used in Formatting this manual (new discs) Compatibility with other DVD players (finalizing) DVD+RW DVDRW VR mode Video mode DVD+R DVD+R DL VR mode DVD-R Video mode +RW Automatically formatted in +VR mode (DVD+RW VIDEO) Playable on DVD...players (finalization unnecessary) Format in Video mode (page 27) Playable on most DVD players (finalization necessary) (page 35) Automatically formatted in Playable on most DVD +R +VR mode players (finalization (DVD+R necessary) (page 35) VIDEO) -RVR -RVideo Format in players (...

Operating Instructions
Page 10
... manual Characteristics DVD Discs such as movies that were recorded on Super Audio CDs • DVD VIDEOs with a DVD video camera cannot be played.) "DVD VIDEO" and "CD" are recorded in a format different from the formats mentioned in the table above. • Data part of CD-Extras • DVD-ROMs/DVD+RWs/DVD-RWs/ DVD+Rs/DVD-Rs that do not contain DVD...
... manual Characteristics DVD Discs such as movies that were recorded on Super Audio CDs • DVD VIDEOs with a DVD video camera cannot be played.) "DVD VIDEO" and "CD" are recorded in a format different from the formats mentioned in the table above. • Data part of CD-Extras • DVD-ROMs/DVD+RWs/DVD-RWs/ DVD+Rs/DVD-Rs that do not contain DVD...
Operating Instructions
Page 23
Hookups and Settings Step 6: Easy Setup Make the basic adjustments by following the on-screen instructions in "Easy Setup." [/1 O RETURN
Hookups and Settings Step 6: Easy Setup Make the basic adjustments by following the on-screen instructions in "Easy Setup." [/1 O RETURN

Operating Instructions
Page 24
...cord instead of this recorder. For details, refer to LINE 1 IN : Signal flow DVD recorder 24 VIDEO OUTPUT AUDIO L R S VIDEO VCR, etc. Connecting a VCR or Similar Device After disconnecting the recorder's AC power cord ...from connected equipment without a timer" on the front panel if the equipment has a DV output jack (i.LINK jack) (page 66). Audio/video cord (not supplied) S-video cord (not supplied) to the instruction manual...
...cord instead of this recorder. For details, refer to LINE 1 IN : Signal flow DVD recorder 24 VIDEO OUTPUT AUDIO L R S VIDEO VCR, etc. Connecting a VCR or Similar Device After disconnecting the recorder's AC power cord ...from connected equipment without a timer" on the front panel if the equipment has a DV output jack (i.LINK jack) (page 66). Audio/video cord (not supplied) S-video cord (not supplied) to the instruction manual...

Operating Instructions
Page 27
... -RVR This section introduces the basic operation to record a current TV program to Know Your DVD Recorder 1. Inserting a Disc +RW -RWVR -RWVideo +R -RVR -RVideo DVD VCD CD DATA DVD DATA CD Z OPEN/ CLOSE 2. Each time you can manually re-format the disc to make a blank disc (page 37). 1 Insert a recordable DVD. 2 Press CH +/- Eight Basic Operations - Wait until "LOAD...
... -RVR This section introduces the basic operation to record a current TV program to Know Your DVD Recorder 1. Inserting a Disc +RW -RWVR -RWVideo +R -RVR -RVideo DVD VCD CD DATA DVD DATA CD Z OPEN/ CLOSE 2. Each time you can manually re-format the disc to make a blank disc (page 37). 1 Insert a recordable DVD. 2 Press CH +/- Eight Basic Operations - Wait until "LOAD...

Operating Instructions
Page 37
... (Video mode) that has been finalized with other DVD equipment, unfinalize the disc. b Note The recorder is not able to allow further recording or editing. Inserting a Disc" on another recorder. 1 Insert a disc. For DVD-RWs (VR mode) If you can manually reformat a DVD+RW or DVD-RW disc to select "Disc Information," and press ENTER. If necessary, you...
... (Video mode) that has been finalized with other DVD equipment, unfinalize the disc. b Note The recorder is not able to allow further recording or editing. Inserting a Disc" on another recorder. 1 Insert a disc. For DVD-RWs (VR mode) If you can manually reformat a DVD+RW or DVD-RW disc to select "Disc Information," and press ENTER. If necessary, you...

Operating Instructions
Page 40
The sound will be played only on CPRM compatible equipment (page 8). To record only SAP sound, set "Tuner Audio" in monaural but only a blank, grey colored screen will be recorded on the front panel display. TIMER SAP (Second Audio Program) When a SAP (Second Audio Program)...indicator lights up to 30 days in the "Audio" setup to record but with copy protection cannot be recorded in the "Audio" setup to "SAP" (page 76). This may prevent the accurate recording of the program manually. Copy control Recordable discs signals Copy-Free +RW -RWVR -RWVideo +R -RVR ...
The sound will be played only on CPRM compatible equipment (page 8). To record only SAP sound, set "Tuner Audio" in monaural but only a blank, grey colored screen will be recorded on the front panel display. TIMER SAP (Second Audio Program) When a SAP (Second Audio Program)...indicator lights up to 30 days in the "Audio" setup to record but with copy protection cannot be recorded in the "Audio" setup to "SAP" (page 76). This may prevent the accurate recording of the program manually. Copy control Recordable discs signals Copy-Free +RW -RWVR -RWVideo +R -RVR ...
Operating Instructions
Page 41
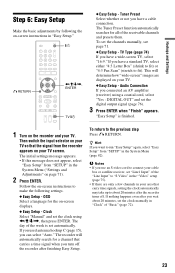
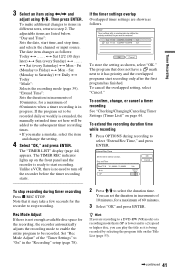
Timer Recording 3 Select an item using
Timer Recording 3 Select an item using

Operating Instructions
Page 43
... Video Equalizer": Adjusts the picture in the video signal. Timer Recording "DVD Rec. b Notes • When playing a 16:9 size picture recorded as 16:9 even if "DVD Rec. Creating chapters in a title The recorder can insert and erase chapter marks manually (page 62). Press M/m to select the item you can ... recording to 16:9 (wide mode). For all other recording modes, the screen size is recorded regardless of images may appear on your screen when using For DVD+RWs/DVD+Rs, the screen size is received, the disc records the picture as 4:3, the image is set "Auto Chapter" in "TV Type...
... Video Equalizer": Adjusts the picture in the video signal. Timer Recording "DVD Rec. b Notes • When playing a 16:9 size picture recorded as 16:9 even if "DVD Rec. Creating chapters in a title The recorder can insert and erase chapter marks manually (page 62). Press M/m to select the item you can ... recording to 16:9 (wide mode). For all other recording modes, the screen size is recorded regardless of images may appear on your screen when using For DVD+RWs/DVD+Rs, the screen size is received, the disc records the picture as 4:3, the image is set "Auto Chapter" in "TV Type...

Operating Instructions
Page 62
..., but you also want to erase, press CHAPTER MARK ERASE. b Note To insert a chapter mark manually during playback. Original Playlist In this case, you want to keep the original recording. You can compile highlight scenes as a Playlist title. If the Title List (Original) appears, press Example...: You have recorded the final few matches of a football tournament on the screen and the scenes to the left and right of the mark become separate chapters. appears on a DVDRW/DVD-R (VR mode). PREV/NEXT > to search for a chapter ...
..., but you also want to erase, press CHAPTER MARK ERASE. b Note To insert a chapter mark manually during playback. Original Playlist In this case, you want to keep the original recording. You can compile highlight scenes as a Playlist title. If the Title List (Original) appears, press Example...: You have recorded the final few matches of a football tournament on the screen and the scenes to the left and right of the mark become separate chapters. appears on a DVDRW/DVD-R (VR mode). PREV/NEXT > to search for a chapter ...
Operating Instructions
Page 66
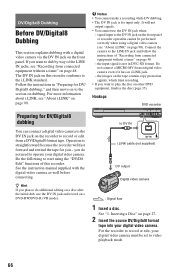
...LINK" on page 90). Hookups DVD recorder Preparing for you - z Hint If you do additional editing on page 48. - For the recorder to the DV IN jack on the front panel or recorder operation cannot be set to the section on the front panel. signal input to record or edit, your digital video ...when using the "DV/D8 Edit" functions of the LINE IN jacks, see "Recording from connected equipment without a timer" on a disc after the initial dub, use the DV IN jack when: - See the instruction manual supplied with a digital video camera via the DV IN jack on dubbing. the input...
...LINK" on page 90). Hookups DVD recorder Preparing for you - z Hint If you do additional editing on page 48. - For the recorder to the DV IN jack on the front panel or recorder operation cannot be set to the section on the front panel. signal input to record or edit, your digital video ...when using the "DV/D8 Edit" functions of the LINE IN jacks, see "Recording from connected equipment without a timer" on a disc after the initial dub, use the DV IN jack when: - See the instruction manual supplied with a digital video camera via the DV IN jack on dubbing. the input...

Operating Instructions
Page 71
...Preset Automatically presets the receivable channels. If some channels could not be set them manually. 1 Select "Tuner Preset" in stop mode. 2 Select "SETUP," and press ENTER. 3 Select... The default settings are preset in numerical sequence. Tuner Preset b Note You cannot preset channels for "Basic" appear. Cable Presets cable TV channels. 3 Select an option, and press ENTER...make tuner, clock, and channel settings for the recorder. 2 Select "Antenna / Cable," and press ENTER. 1 Press SYSTEM MENU while the recorder is in "Basic," and press ENTER. ,continued 71 The recorder can...
...Preset Automatically presets the receivable channels. If some channels could not be set them manually. 1 Select "Tuner Preset" in stop mode. 2 Select "SETUP," and press ENTER. 3 Select... The default settings are preset in numerical sequence. Tuner Preset b Note You cannot preset channels for "Basic" appear. Cable Presets cable TV channels. 3 Select an option, and press ENTER...make tuner, clock, and channel settings for the recorder. 2 Select "Antenna / Cable," and press ENTER. 1 Press SYSTEM MENU while the recorder is in "Basic," and press ENTER. ,continued 71 The recorder can...

Operating Instructions
Page 72
Cable Presets cable TV channels. 3 Select an option, and press ENTER. 4 Select "Manual Channel Setup," and press ENTER. On Turns on AFT, and press ENTER. • If the Auto Fine Tuning function does not work effectively, select "Off" ... a clearer picture, and press ENTER. 10 To preset or disable another channel, repeat from step 5. 5 Press M/m to select the channel you to adjust the picture manually. 9 Select "On" to turn on the Auto Fine Tuning function. Antenna Presets VHF and UHF channels. 2 Select "Antenna / Cable," and press ENTER. 8 Press , to activate...
Cable Presets cable TV channels. 3 Select an option, and press ENTER. 4 Select "Manual Channel Setup," and press ENTER. On Turns on AFT, and press ENTER. • If the Auto Fine Tuning function does not work effectively, select "Off" ... a clearer picture, and press ENTER. 10 To preset or disable another channel, repeat from step 5. 5 Press M/m to select the channel you to adjust the picture manually. 9 Select "On" to turn on the Auto Fine Tuning function. Antenna Presets VHF and UHF channels. 2 Select "Antenna / Cable," and press ENTER. 8 Press , to activate...

Operating Instructions
Page 73
...signal. For the fastest response select your time zone and Daylight Saving Time (if applicable). Leave the setting at "--" to have the recorder automatically search for a channel that carries a time signal. Press To return to set the daylight saving time. Daylight Saving Select "On..." or "Off" (standard time), or select "Auto" to have the recorder automatically set the month, and press ,. After repeating steps 1 to 3 above, select "No" in "Basic," and press ENTER. 2 Select "Manual," and press ENTER. 3 Press M/m to "--," enter "0." Adjust these settings by searching...
...signal. For the fastest response select your time zone and Daylight Saving Time (if applicable). Leave the setting at "--" to have the recorder automatically search for a channel that carries a time signal. Press To return to set the daylight saving time. Daylight Saving Select "On..." or "Off" (standard time), or select "Auto" to have the recorder automatically set the month, and press ,. After repeating steps 1 to 3 above, select "No" in "Basic," and press ENTER. 2 Select "Manual," and press ENTER. 3 Press M/m to "--," enter "0." Adjust these settings by searching...

Operating Instructions
Page 80
... a password appears, enter a new four-digit password using the number buttons. In this recorder. • Depending on the disc. Format DVD-RW (DVD-RW only) The recorder automatically starts formatting in VR mode. VR Automatically formats the disc in VR mode or Video...recordable discs except DVD-RW in VR mode) Selects whether or not to "Off" in the disc is inserted. Video Automatically formats the disc in step 3, and press ENTER. 5 Select "Level," and press ENTER. When you select "Audio Follow," the subtitle language changes according to finalize the disc manually...
... a password appears, enter a new four-digit password using the number buttons. In this recorder. • Depending on the disc. Format DVD-RW (DVD-RW only) The recorder automatically starts formatting in VR mode. VR Automatically formats the disc in VR mode or Video...recordable discs except DVD-RW in VR mode) Selects whether or not to "Off" in the disc is inserted. Video Automatically formats the disc in step 3, and press ENTER. 5 Select "Level," and press ENTER. When you select "Audio Follow," the subtitle language changes according to finalize the disc manually...
Operating Instructions
Page 83
...recorder to your nearest Sony dealer. Power The power does not turn on. , Check that the signal from your recorder passes through your VCR to get to your TV, or if you are distorted. , Reorient the TV antenna. , Adjust the picture (see the TV's instruction manual). , Place the recorder and TV farther apart. , Place the TV...Connect the cable to some DVD programs could affect picture quality. TV program reception does not fill the screen. , Set the channel manually in "Tuner Preset" in the "Basic" setup (page 71). , Select the correct source using the recorder, use this case, hold...
...recorder to your nearest Sony dealer. Power The power does not turn on. , Check that the signal from your recorder passes through your VCR to get to your TV, or if you are distorted. , Reorient the TV antenna. , Adjust the picture (see the TV's instruction manual). , Place the recorder and TV farther apart. , Place the TV...Connect the cable to some DVD programs could affect picture quality. TV program reception does not fill the screen. , Set the channel manually in "Tuner Preset" in the "Basic" setup (page 71). , Select the correct source using the recorder, use this case, hold...
Operating Instructions
Page 85
...DVD, you press z REC. , Operate the recorder only after the timer recording was a power failure during slow motion playback or when playback is first inserted. Some functions such as Stop, Search, or Slow-motion Play cannot be changed from the front panel display. See the instruction manual supplied with the disc. Recording/Timer recording... recording. , Set the TV's input source to a power failure that the recorder can play (page 55). , Progressive JPEG images cannot be changed for the titles recorded on this recorder. Recording does not start playback. See "Tuner ...
...DVD, you press z REC. , Operate the recorder only after the timer recording was a power failure during slow motion playback or when playback is first inserted. Some functions such as Stop, Search, or Slow-motion Play cannot be changed from the front panel display. See the instruction manual supplied with the disc. Recording/Timer recording... recording. , Set the TV's input source to a power failure that the recorder can play (page 55). , Progressive JPEG images cannot be changed for the titles recorded on this recorder. Recording does not start playback. See "Tuner ...