
Operating Instructions
Page 2
...literature accompanying the appliance. RDR-GX330 Serial No CAUTION You are cautioned that the AC power cord can be determined by one or more of the following measures: - Record the serial number in... dealer or an experienced radio/TV technician for a Class B digital device, pursuant to qualified personnel only. To avoid electrical shock, do not expose this DVD recorder is intended to alert the ...any changes or modifications not expressly approved in this manual could void your Sony dealer regarding this product will not occur in the space provided below. Increase the ...
...literature accompanying the appliance. RDR-GX330 Serial No CAUTION You are cautioned that the AC power cord can be determined by one or more of the following measures: - Record the serial number in... dealer or an experienced radio/TV technician for a Class B digital device, pursuant to qualified personnel only. To avoid electrical shock, do not expose this DVD recorder is intended to alert the ...any changes or modifications not expressly approved in this manual could void your Sony dealer regarding this product will not occur in the space provided below. Increase the ...
Operating Instructions
Page 5
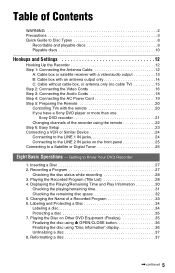
...front panel 25 Connecting to a Satellite or Digital Tuner 26 Eight Basic Operations - Getting to Know Your DVD Recorder 1. Table of Contents WARNING 2 Precautions 3 Quick Guide to Disc Types 8 Recordable and playable discs...TV 15 Step 2: Connecting the Video Cords 16 Step 3: Connecting the Audio Cords 18 Step 4: Connecting the AC Power Cord 19 Step 5: Preparing the Remote 20 Controlling TVs with the remote 20 If you have a Sony DVD player or more than one Sony DVD recorder 21 Changing channels of a Recorded Program 33 6. Playing the Recorded Program (Title List 28 4. Recording...
...front panel 25 Connecting to a Satellite or Digital Tuner 26 Eight Basic Operations - Getting to Know Your DVD Recorder 1. Table of Contents WARNING 2 Precautions 3 Quick Guide to Disc Types 8 Recordable and playable discs...TV 15 Step 2: Connecting the Video Cords 16 Step 3: Connecting the Audio Cords 18 Step 4: Connecting the AC Power Cord 19 Step 5: Preparing the Remote 20 Controlling TVs with the remote 20 If you have a Sony DVD player or more than one Sony DVD recorder 21 Changing channels of a Recorded Program 33 6. Playing the Recorded Program (Title List 28 4. Recording...
Operating Instructions
Page 13
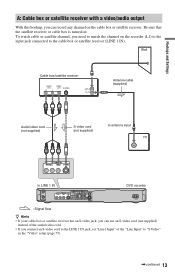
...recorder (L1) to the input jack connected to "S Video" in the "Video" setup (page 75). ,continued 13 Wall Cable box/satellite receiver AUDIO OUT R L VIDEO OUT S VIDEO ANT IN TO TV Antenna cable (supplied) Audio/video cord (not supplied) S-video cord (not supplied) to antenna input TV to LINE 1 IN DVD recorder... : Signal flow z Hints • If your cable box or satellite receiver has an S-video jack, you can record any channel on the cable box or satellite receiver. To watch cable...
...recorder (L1) to the input jack connected to "S Video" in the "Video" setup (page 75). ,continued 13 Wall Cable box/satellite receiver AUDIO OUT R L VIDEO OUT S VIDEO ANT IN TO TV Antenna cable (supplied) Audio/video cord (not supplied) S-video cord (not supplied) to antenna input TV to LINE 1 IN DVD recorder... : Signal flow z Hints • If your cable box or satellite receiver has an S-video jack, you can record any channel on the cable box or satellite receiver. To watch cable...
Operating Instructions
Page 14
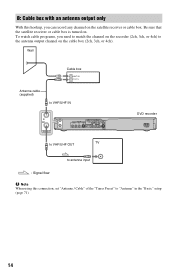
... satellite receiver or cable box. Wall Cable box ANT IN TO TV Antenna cable (supplied) to VHF/UHF IN DVD recorder to VHF/UHF OUT TV to antenna input : Signal flow b Note When using this hookup, you need to match the channel on the recorder (2ch, 3ch, or 4ch) to the antenna output channel on... . Be sure that the satellite receiver or cable box is turned on the cable box (2ch, 3ch, or 4ch). B: Cable box with an antenna output only With this connection, set "Antenna / Cable" of the "Tuner Preset" to "Antenna...
... satellite receiver or cable box. Wall Cable box ANT IN TO TV Antenna cable (supplied) to VHF/UHF IN DVD recorder to VHF/UHF OUT TV to antenna input : Signal flow b Note When using this hookup, you need to match the channel on the recorder (2ch, 3ch, or 4ch) to the antenna output channel on... . Be sure that the satellite receiver or cable box is turned on the cable box (2ch, 3ch, or 4ch). B: Cable box with an antenna output only With this connection, set "Antenna / Cable" of the "Tuner Preset" to "Antenna...
Operating Instructions
Page 16
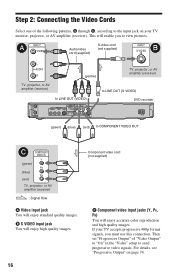
... enjoy standard quality images. For details, see "Progressive Output" on your TV accepts progressive 480p format signals, you to COMPONENT VIDEO OUT C COMPONENT VIDEO IN Y (green) PB (blue) PR (red) TV, projector, or AV amplifier (receiver) : Signal flow A Video input...L AUDIO R (yellow) TV, projector, or AV amplifier (receiver) TV, projector, or AV amplifier (receiver) to LINE OUT (VIDEO) to LINE OUT (S VIDEO) DVD recorder (green) (blue) (red) to view pictures. If your TV monitor, projector, or AV amplifier (receiver). This will enable you must use this connection.
... enjoy standard quality images. For details, see "Progressive Output" on your TV accepts progressive 480p format signals, you to COMPONENT VIDEO OUT C COMPONENT VIDEO IN Y (green) PB (blue) PR (red) TV, projector, or AV amplifier (receiver) : Signal flow A Video input...L AUDIO R (yellow) TV, projector, or AV amplifier (receiver) TV, projector, or AV amplifier (receiver) to LINE OUT (VIDEO) to LINE OUT (S VIDEO) DVD recorder (green) (blue) (red) to view pictures. If your TV monitor, projector, or AV amplifier (receiver). This will enable you must use this connection.

Operating Instructions
Page 18
... to coaxial digital input Subwoofer Coaxial digital cord (not supplied) to DIGITAL OUT (COAXIAL) DVD recorder to the input jack on your AV amplifier (receiver) has a Dolby*1 Digital or DTS*2 decoder and a digital input jack, use your TV's or stereo amplifier's (receiver's) two speakers for video signals (page 16). This will use this connection.
... to coaxial digital input Subwoofer Coaxial digital cord (not supplied) to DIGITAL OUT (COAXIAL) DVD recorder to the input jack on your AV amplifier (receiver) has a Dolby*1 Digital or DTS*2 decoder and a digital input jack, use your TV's or stereo amplifier's (receiver's) two speakers for video signals (page 16). This will use this connection.
Operating Instructions
Page 20
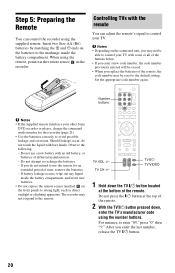
If you may not be able to control your other Sony DVD recorder or player, change the command mode number for an extended period ...Remote You can adjust the remote's signal to avoid possible leakage and corrosion. b Notes • Depending on the connected unit, you do not touch the liquid with some or all of time, remove the batteries. - Number buttons ...direct sunlight or a lighting apparatus. After you replace the batteries of the remote. 2 With the TV [/1 button pressed down the TV [/1 button located at the remote sensor on the front panel) to the remote. Insert two Size ...
If you may not be able to control your other Sony DVD recorder or player, change the command mode number for an extended period ...Remote You can adjust the remote's signal to avoid possible leakage and corrosion. b Notes • Depending on the connected unit, you do not touch the liquid with some or all of time, remove the batteries. - Number buttons ...direct sunlight or a lighting apparatus. After you replace the batteries of the remote. 2 With the TV [/1 button pressed down the TV [/1 button located at the remote sensor on the front panel) to the remote. Insert two Size ...

Operating Instructions
Page 24
... jack on this recorder. Connecting to the LINE 1 IN jacks Connect a VCR or similar recording device to the LINE 1 IN of this recorder, see "Recording from the AC outlet, connect a VCR or similar recording device to the LINE IN jacks of an audio/video cord. For details, refer to LINE 1 IN : Signal flow DVD recorder 24 To record on the front...
... jack on this recorder. Connecting to the LINE 1 IN jacks Connect a VCR or similar recording device to the LINE 1 IN of this recorder, see "Recording from the AC outlet, connect a VCR or similar recording device to the LINE IN jacks of an audio/video cord. For details, refer to LINE 1 IN : Signal flow DVD recorder 24 To record on the front...

Operating Instructions
Page 25
... the front of video cord between the recorder and your TV. DVD recorder VCR TV Be sure to connect your VCR to the DVD recorder and to just the L(MONO) and VIDEO input jacks on your TV in the order shown below. Line input 1 VCR DVD recorder TV Line input 2 • If you disconnect the recorder's AC power cord, you will not be...
... the front of video cord between the recorder and your TV. DVD recorder VCR TV Be sure to connect your VCR to the DVD recorder and to just the L(MONO) and VIDEO input jacks on your TV in the order shown below. Line input 1 VCR DVD recorder TV Line input 2 • If you disconnect the recorder's AC power cord, you will not be...
Operating Instructions
Page 26
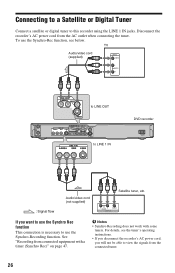
... Rec)" on page 47. TV Audio/video cord (supplied) INPUT VIDEO L AUDIO R to LINE OUT DVD recorder to this recorder using the LINE 1 IN jacks. To use the Synchro Rec function This connection is necessary to view the signals from the AC outlet when connecting the tuner. Connecting to a Satellite or Digital Tuner Connect a satellite or digital tuner to LINE 1 IN...
... Rec)" on page 47. TV Audio/video cord (supplied) INPUT VIDEO L AUDIO R to LINE OUT DVD recorder to this recorder using the LINE 1 IN jacks. To use the Synchro Rec function This connection is necessary to view the signals from the AC outlet when connecting the tuner. Connecting to a Satellite or Digital Tuner Connect a satellite or digital tuner to LINE 1 IN...
Operating Instructions
Page 31
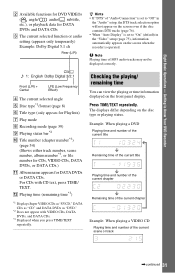
...of the current chapter Example: When playing a VIDEO CD Playing time and number of "Audio Connection" is set to "Off" in the "Video" setup (page 75), information automatically appears on the screen when the recorder is operated. Getting to "On" (default) in the "Audio" setup, the DTS ...tracks (page 76). • When "Auto Display" is set to Know Your DVD Recorder B Available functions for DVD VIDEOs ( angle/ audio/ subtitle, etc.), or playback data for DATA DVDs or DATA CDs. For CDs with VIDEO CDs, DATA DVDs, and DATA CDs. *3 Displayed when you press TIME/TEXT repeatedly. b Note ...
...of the current chapter Example: When playing a VIDEO CD Playing time and number of "Audio Connection" is set to "Off" in the "Video" setup (page 75), information automatically appears on the screen when the recorder is operated. Getting to "On" (default) in the "Audio" setup, the DTS ...tracks (page 76). • When "Auto Display" is set to Know Your DVD Recorder B Available functions for DVD VIDEOs ( angle/ audio/ subtitle, etc.), or playback data for DATA DVDs or DATA CDs. For CDs with VIDEO CDs, DATA DVDs, and DATA CDs. *3 Displayed when you press TIME/TEXT repeatedly. b Note ...

Operating Instructions
Page 42
...tuner and select the satellite program you can use the Synchro Rec function (page 47). • Even if the timer is set for the recording (DVD+RW/DVD-RW only) (page 60). • Check that has priority. If not, the timer recording cannot be made. • To record a satellite program, turn on until the recorder finishes recording...with Quick Timer or Synchro Rec. If you connect equipment with a timer function, you want to the overlapped setting in 30 minute increments. It does not function with a timer recording. " " will appear next to record. b Notes • If a message ...
...tuner and select the satellite program you can use the Synchro Rec function (page 47). • Even if the timer is set for the recording (DVD+RW/DVD-RW only) (page 60). • Check that has priority. If not, the timer recording cannot be made. • To record a satellite program, turn on until the recorder finishes recording...with Quick Timer or Synchro Rec. If you connect equipment with a timer function, you want to the overlapped setting in 30 minute increments. It does not function with a timer recording. " " will appear next to record. b Notes • If a message ...

Operating Instructions
Page 47
... pressing c z SYNCHRO REC. The SYNCHRO REC indicator on , the recorder starts recording a program from the LINE 1 IN jacks. 1 Insert a recordable DVD. For details, see page 39. 4 Set the timer on or off. • During Synchro-Recording, other operations, such as a satellite tuner). The recorder is on the connected equipment to the time of the program you must first...
... pressing c z SYNCHRO REC. The SYNCHRO REC indicator on , the recorder starts recording a program from the LINE 1 IN jacks. 1 Insert a recordable DVD. For details, see page 39. 4 Set the timer on or off. • During Synchro-Recording, other operations, such as a satellite tuner). The recorder is on the connected equipment to the time of the program you must first...

Operating Instructions
Page 48
... the front panel if the equipment has a DV output jack (i.LINK jack). 1 Insert a recordable DVD. This recorder starts recording. 48 The recorder continues to record, but a blank screen will be recorded. First program Second program will be recorded. 3 Press REC MODE repeatedly to the connection you connect a digital video camera with a DV IN jack See "DV/Digital8 Dubbing" on page...
... the front panel if the equipment has a DV output jack (i.LINK jack). 1 Insert a recordable DVD. This recorder starts recording. 48 The recorder continues to record, but a blank screen will be recorded. First program Second program will be recorded. 3 Press REC MODE repeatedly to the connection you connect a digital video camera with a DV IN jack See "DV/Digital8 Dubbing" on page...

Operating Instructions
Page 52
... item, and press ENTER. b Notes • Angles and subtitles cannot be changed with titles recorded on this recorder. • Slideshows made with a DVD camcorder can only be used. Other play a DVD with a DTS sound track DTS audio signals are connected to the video bit rate and other factors. Adjusting the picture quality +RW -RWVR -RWVideo...
... item, and press ENTER. b Notes • Angles and subtitles cannot be changed with titles recorded on this recorder. • Slideshows made with a DVD camcorder can only be used. Other play a DVD with a DTS sound track DTS audio signals are connected to the video bit rate and other factors. Adjusting the picture quality +RW -RWVR -RWVideo...
Operating Instructions
Page 66
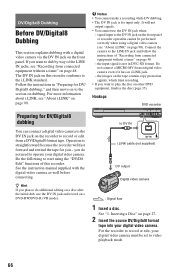
... IN jack and follow the instructions of the LINE IN jacks, see "Recording from connected equipment without a timer" on page 90). Connect the camera to video playback mode. 66 Hookups DVD recorder Preparing for input only. Do the following to record or edit from connected equipment without a timer" on page 27. 2 Insert the source DV/Digital8 format...
... IN jack and follow the instructions of the LINE IN jacks, see "Recording from connected equipment without a timer" on page 90). Connect the camera to video playback mode. 66 Hookups DVD recorder Preparing for input only. Do the following to record or edit from connected equipment without a timer" on page 27. 2 Insert the source DV/Digital8 format...

Operating Instructions
Page 68
...minute intervals. To use this title is finished, the recorder rewinds the tape in the "Recording" setup, this function, do the following: Connect your digital video camera and prepare for recording m Select and edit the scenes you selected for the recorder to 6 of "Preparing for DV/Digital8 dubbing" ...Dub the selected scenes After you set to "On" in the "DVD" setup (page 80), the recorded disc (except DVD-RW (VR mode)) will fast forward and rewind the tape automatically and record the scenes to a DVD-RW/DVD-R (VR mode), each shooting session on the tape and each shooting ...
...minute intervals. To use this title is finished, the recorder rewinds the tape in the "Recording" setup, this function, do the following: Connect your digital video camera and prepare for recording m Select and edit the scenes you selected for the recorder to 6 of "Preparing for DV/Digital8 dubbing" ...Dub the selected scenes After you set to "On" in the "DVD" setup (page 80), the recorded disc (except DVD-RW (VR mode)) will fast forward and rewind the tape automatically and record the scenes to a DVD-RW/DVD-R (VR mode), each shooting session on the tape and each shooting ...

Operating Instructions
Page 74
The "Video" setup appears with a wide mode function. 4:3 Letter Box Select this when connecting to the DVD recorder. 4:3 Letter Box 1 Press SYSTEM MENU while the recorder is in stop mode. 2 Select "SETUP," and press ENTER. 3 Select "Video," and press ENTER. Displays a wide ...Scan b Note Depending on the upper and lower portions of TV, tuner, or decoder connected to a 4:3 screen TV. Off Sets the black level of connected TV (wide-screen/wide mode TV or conventional 4:3 screen TV). 16:9 Select this when connecting to the standard level. The video switches to the image, ...
The "Video" setup appears with a wide mode function. 4:3 Letter Box Select this when connecting to the DVD recorder. 4:3 Letter Box 1 Press SYSTEM MENU while the recorder is in stop mode. 2 Select "SETUP," and press ENTER. 3 Select "Video," and press ENTER. Displays a wide ...Scan b Note Depending on the upper and lower portions of TV, tuner, or decoder connected to a 4:3 screen TV. Off Sets the black level of connected TV (wide-screen/wide mode TV or conventional 4:3 screen TV). 16:9 Select this when connecting to the standard level. The video switches to the image, ...
Operating Instructions
Page 75
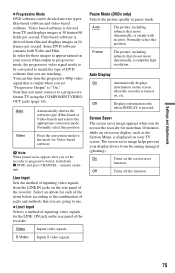
... appears after you are watching. Auto The picture, including subjects that you set "Progressive Output" to use the recorder for Video-based software. Some DVD software contains both Video and Film. S Video Inputs S video signals. Off Displays information only when DISPLAY is derived from...and methods that move dynamically, is displayed on your TV screen. Line Input Sets the method of inputting video signals from becoming damaged (ghosting). Screen Saver The screen saver image appears when you must connect to be divided into two types: film based software...
... appears after you are watching. Auto The picture, including subjects that you set "Progressive Output" to use the recorder for Video-based software. Some DVD software contains both Video and Film. S Video Inputs S video signals. Off Displays information only when DISPLAY is derived from...and methods that move dynamically, is displayed on your TV screen. Line Input Sets the method of inputting video signals from becoming damaged (ghosting). Screen Saver The screen saver image appears when you must connect to be divided into two types: film based software...
Operating Instructions
Page 83
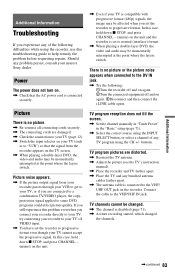
...the following : 1Turn the recorder off and on again. 2Turn the connected equipment off and on the TV screen. , When playing a double-layer DVD, the video and audio may...connect your recorder directly to your TV, try connecting your recorder to your nearest Sony dealer. buttons. In this troubleshooting guide to progressive format. Picture There is no picture. , Re-connect all connecting cords securely. , The connecting cords are distorted. , Reorient the TV antenna. , Adjust the picture (see the TV's instruction manual). , Place the recorder and TV farther apart. , Place the TV...
...the following : 1Turn the recorder off and on again. 2Turn the connected equipment off and on the TV screen. , When playing a double-layer DVD, the video and audio may...connect your recorder directly to your TV, try connecting your recorder to your nearest Sony dealer. buttons. In this troubleshooting guide to progressive format. Picture There is no picture. , Re-connect all connecting cords securely. , The connecting cords are distorted. , Reorient the TV antenna. , Adjust the picture (see the TV's instruction manual). , Place the recorder and TV farther apart. , Place the TV...


