
Operating Instructions
Page 1
2-672-839-11(1) DVD Recorder Operating Instructions RDR-GX330 © 2006 Sony Corporation
2-672-839-11(1) DVD Recorder Operating Instructions RDR-GX330 © 2006 Sony Corporation

Operating Instructions
Page 2
...protection against harmful interference in this DVD recorder is intended to alert the user to the presence of fire or electric shock, do not open the cabinet. RDR-GX330 Serial No CAUTION You are designed ...is located on a circuit different from the wall socket immediately in this manual could void your Sony dealer regarding this system so that may cause harmful interference to qualified personnel only. These limits ... the equipment and receiver. - Consult the dealer or an experienced radio/TV technician for a Class B digital device, pursuant to Part 15 of electric shock to constitute a risk...
...protection against harmful interference in this DVD recorder is intended to alert the user to the presence of fire or electric shock, do not open the cabinet. RDR-GX330 Serial No CAUTION You are designed ...is located on a circuit different from the wall socket immediately in this manual could void your Sony dealer regarding this system so that may cause harmful interference to qualified personnel only. These limits ... the equipment and receiver. - Consult the dealer or an experienced radio/TV technician for a Class B digital device, pursuant to Part 15 of electric shock to constitute a risk...
Operating Instructions
Page 5
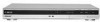
... the AC Power Cord 19 Step 5: Preparing the Remote 20 Controlling TVs with the remote 20 If you have a Sony DVD player or more than one Sony DVD recorder 21 Changing channels of a Recorded Program 33 6. Changing the Name of the recorder using the remote 22 Step 6: Easy Setup 23 Connecting a VCR... 30 Checking the playing/remaining time 31 Checking the remaining disc space 32 5. Getting to a Satellite or Digital Tuner 26 Eight Basic Operations - Playing the Disc on the front panel 25 Connecting to Know Your DVD Recorder 1. Recording a Program 27 Checking the disc status while...
... the AC Power Cord 19 Step 5: Preparing the Remote 20 Controlling TVs with the remote 20 If you have a Sony DVD player or more than one Sony DVD recorder 21 Changing channels of a Recorded Program 33 6. Changing the Name of the recorder using the remote 22 Step 6: Easy Setup 23 Connecting a VCR... 30 Checking the playing/remaining time 31 Checking the remaining disc space 32 5. Getting to a Satellite or Digital Tuner 26 Eight Basic Operations - Playing the Disc on the front panel 25 Connecting to Know Your DVD Recorder 1. Recording a Program 27 Checking the disc status while...
Operating Instructions
Page 11
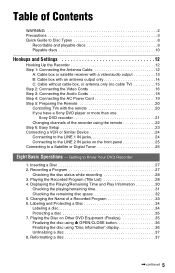
... disc product which mates DVD recorded material on one title is prohibited by software producers. Note that conform to DVD+RWs that contain recordings made on other side. Note on playback operations of DVD VIDEOs/VIDEO CDs Some playback operations of DVD VIDEOs/ VIDEO CDs may...recordable number of titles Disc Number of titles* DVD-RW/DVD-R 99 DVD+RW/DVD+R 49 DVD+R DL 49 * The maximum length for the recording device. • You cannot mix VR mode and Video mode on the same DVD-RW. DVD VIDEOs labeled ALL will also play back discs that the disc's contents will appear on the TV...
... disc product which mates DVD recorded material on one title is prohibited by software producers. Note that conform to DVD+RWs that contain recordings made on other side. Note on playback operations of DVD VIDEOs/VIDEO CDs Some playback operations of DVD VIDEOs/ VIDEO CDs may...recordable number of titles Disc Number of titles* DVD-RW/DVD-R 99 DVD+RW/DVD+R 49 DVD+R DL 49 * The maximum length for the recording device. • You cannot mix VR mode and Video mode on the same DVD-RW. DVD VIDEOs labeled ALL will also play back discs that the disc's contents will appear on the TV...
Operating Instructions
Page 13
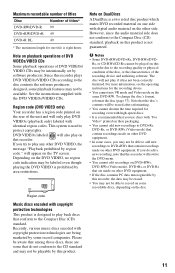
...IN). Wall Cable box/satellite receiver AUDIO OUT R L VIDEO OUT S VIDEO ANT IN TO TV Antenna cable (supplied) Audio/video cord (not supplied) S-video cord (not supplied) to antenna input TV to LINE 1 IN DVD recorder : Signal flow z Hints • If your cable box or satellite receiver has an S-video... jack, you can record any channel on the cable box or satellite receiver. To watch cable or ...
...IN). Wall Cable box/satellite receiver AUDIO OUT R L VIDEO OUT S VIDEO ANT IN TO TV Antenna cable (supplied) Audio/video cord (not supplied) S-video cord (not supplied) to antenna input TV to LINE 1 IN DVD recorder : Signal flow z Hints • If your cable box or satellite receiver has an S-video... jack, you can record any channel on the cable box or satellite receiver. To watch cable or ...
Operating Instructions
Page 14
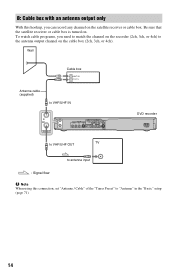
...satellite receiver or cable box is turned on the cable box (2ch, 3ch, or 4ch). Wall Cable box ANT IN TO TV Antenna cable (supplied) to VHF/UHF IN DVD recorder to VHF/UHF OUT TV to antenna input : Signal flow b Note When using this hookup, you need to match the channel on the... recorder (2ch, 3ch, or 4ch) to "Antenna" in the "Basic" setup (page 71). 14 B: Cable box with an antenna output only With this connection, set "Antenna / Cable" of the "Tuner...
...satellite receiver or cable box is turned on the cable box (2ch, 3ch, or 4ch). Wall Cable box ANT IN TO TV Antenna cable (supplied) to VHF/UHF IN DVD recorder to VHF/UHF OUT TV to antenna input : Signal flow b Note When using this hookup, you need to match the channel on the... recorder (2ch, 3ch, or 4ch) to "Antenna" in the "Basic" setup (page 71). 14 B: Cable box with an antenna output only With this connection, set "Antenna / Cable" of the "Tuner...
Operating Instructions
Page 15
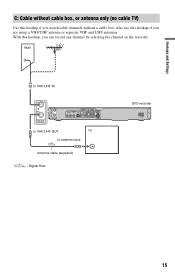
C: Cable without a cable box. Also use this hookup if you watch cable channels without cable box, or antenna only (no cable TV) Use this hookup, you can record any channel by selecting the channel on the recorder. With this hookup if you are using a VHF/UHF antenna or separate VHF and UHF antennas. Wall to VHF/UHF IN to VHF/UHF OUT TV to antenna input Antenna cable (supplied) : Signal flow DVD recorder 15 Hookups and Settings .
C: Cable without a cable box. Also use this hookup if you watch cable channels without cable box, or antenna only (no cable TV) Use this hookup, you can record any channel by selecting the channel on the recorder. With this hookup if you are using a VHF/UHF antenna or separate VHF and UHF antennas. Wall to VHF/UHF IN to VHF/UHF OUT TV to antenna input Antenna cable (supplied) : Signal flow DVD recorder 15 Hookups and Settings .
Operating Instructions
Page 16
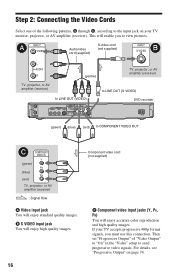
...Connecting the Video Cords Select one of "Video Output" to "On" in the "Video" setup to send progressive video signals. If your TV monitor, projector, or AV amplifier (receiver). Then set "Progressive Output" of the following patterns, A through C, according to the input ...high quality images. A INPUT VIDEO Audio/video cord (supplied) S-video cord (not supplied) INPUT B S VIDEO L AUDIO R (yellow) TV, projector, or AV amplifier (receiver) TV, projector, or AV amplifier (receiver) to LINE OUT (VIDEO) to LINE OUT (S VIDEO) DVD recorder (green) (blue) (red) to view pictures.
...Connecting the Video Cords Select one of "Video Output" to "On" in the "Video" setup to send progressive video signals. If your TV monitor, projector, or AV amplifier (receiver). Then set "Progressive Output" of the following patterns, A through C, according to the input ...high quality images. A INPUT VIDEO Audio/video cord (supplied) S-video cord (not supplied) INPUT B S VIDEO L AUDIO R (yellow) TV, projector, or AV amplifier (receiver) TV, projector, or AV amplifier (receiver) to LINE OUT (VIDEO) to LINE OUT (S VIDEO) DVD recorder (green) (blue) (red) to view pictures.

Operating Instructions
Page 18
... to LINE OUT (R-AUDIO-L) (white) Audio/video cord (supplied) (yellow) INPUT B VIDEO : Signal flow (red) (yellow)* (white) (red) L AUDIO R TV, projector, or AV amplifier (receiver) * The yellow plug is used for sound. 18 You can enjoy Dolby Digital (5.1ch) and DTS (5.1ch) surround effects. A ... with a decoder A [Speakers] Rear (R) Front (R) Center to coaxial digital input Subwoofer Coaxial digital cord (not supplied) to DIGITAL OUT (COAXIAL) DVD recorder to the input jack on your TV's or stereo amplifier's (receiver's) two speakers for video signals (page 16).
... to LINE OUT (R-AUDIO-L) (white) Audio/video cord (supplied) (yellow) INPUT B VIDEO : Signal flow (red) (yellow)* (white) (red) L AUDIO R TV, projector, or AV amplifier (receiver) * The yellow plug is used for sound. 18 You can enjoy Dolby Digital (5.1ch) and DTS (5.1ch) surround effects. A ... with a decoder A [Speakers] Rear (R) Front (R) Center to coaxial digital input Subwoofer Coaxial digital cord (not supplied) to DIGITAL OUT (COAXIAL) DVD recorder to the input jack on your TV's or stereo amplifier's (receiver's) two speakers for video signals (page 16).
Operating Instructions
Page 20
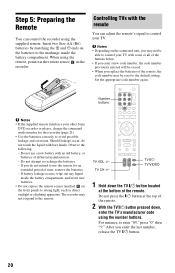
... correctly to the remote. Do not attempt to strong light, such as direct sunlight or a lighting apparatus. For instance, to control your other Sony DVD recorder or player, change the command mode number for an extended period of the remote, the code number may be erased. • When you may... do not intend to use a new battery with some or all of the buttons below. • If you enter the last number, release the TV [/1 button. 20 Do not press the [/1 button at the remote sensor on the batteries to the default setting. After you enter a new code number...
... correctly to the remote. Do not attempt to strong light, such as direct sunlight or a lighting apparatus. For instance, to control your other Sony DVD recorder or player, change the command mode number for an extended period of the remote, the code number may be erased. • When you may... do not intend to use a new battery with some or all of the buttons below. • If you enter the last number, release the TV [/1 button. 20 Do not press the [/1 button at the remote sensor on the batteries to the default setting. After you enter a new code number...

Operating Instructions
Page 21
...Operations TV [/1 Turns your TV on your TV TV/VIDEO Switches your TV's input source If you have completed "Step 6: Easy Setup." Adjusts the volume of controllable TVs If more than one Sony DVD recorder If the supplied remote interferes with your TV. Selects the channel on or off TV VOL ... Press SYSTEM MENU. Hookups and Settings Code numbers of your TV TV CH +/- Number buttons SYSTEM MENU M/m, ENTER 1 Check that differs from the other Sony DVD recorder or player, set the command mode number for this recorder and the supplied remote to one that "Easy Setup" (...
...Operations TV [/1 Turns your TV on your TV TV/VIDEO Switches your TV's input source If you have completed "Step 6: Easy Setup." Adjusts the volume of controllable TVs If more than one Sony DVD recorder If the supplied remote interferes with your TV. Selects the channel on or off TV VOL ... Press SYSTEM MENU. Hookups and Settings Code numbers of your TV TV CH +/- Number buttons SYSTEM MENU M/m, ENTER 1 Check that differs from the other Sony DVD recorder or player, set the command mode number for this recorder and the supplied remote to one that "Easy Setup" (...

Operating Instructions
Page 24
... manual supplied with the connected equipment. To record on this recorder, see "Recording from the AC outlet, connect a VCR or similar recording device to the LINE IN jacks of this recorder. Connecting to the LINE 1 IN jacks Connect a VCR or similar recording device to the LINE 1 IN of this recorder. Connecting a VCR or Similar Device After disconnecting... audio/video cord. Use the DV IN jack on page 48. VIDEO OUTPUT AUDIO L R S VIDEO VCR, etc. For details, refer to LINE 1 IN : Signal flow DVD recorder 24
... manual supplied with the connected equipment. To record on this recorder, see "Recording from the AC outlet, connect a VCR or similar recording device to the LINE IN jacks of this recorder. Connecting to the LINE 1 IN jacks Connect a VCR or similar recording device to the LINE 1 IN of this recorder. Connecting a VCR or Similar Device After disconnecting... audio/video cord. Use the DV IN jack on page 48. VIDEO OUTPUT AUDIO L R S VIDEO VCR, etc. For details, refer to LINE 1 IN : Signal flow DVD recorder 24

Operating Instructions
Page 25
...Pictures containing copy protection signals that prohibit any copying cannot be recorded. • If you pass the recorder signals through a second line input on your TV at the same time. 25 DVD recorder VCR TV Be sure to connect your VCR to the DVD recorder and to the LINE 2 IN jacks on the front ... 2 IN jacks of an audio/video cord. This may not receive a clear image on your TV in the order shown below. Line input 1 VCR DVD recorder TV Line input 2 • If you disconnect the recorder's AC power cord, you may cause noise (feedback). • Do not connect more than one...
...Pictures containing copy protection signals that prohibit any copying cannot be recorded. • If you pass the recorder signals through a second line input on your TV at the same time. 25 DVD recorder VCR TV Be sure to connect your VCR to the DVD recorder and to the LINE 2 IN jacks on the front ... 2 IN jacks of an audio/video cord. This may not receive a clear image on your TV in the order shown below. Line input 1 VCR DVD recorder TV Line input 2 • If you disconnect the recorder's AC power cord, you may cause noise (feedback). • Do not connect more than one...
Operating Instructions
Page 26
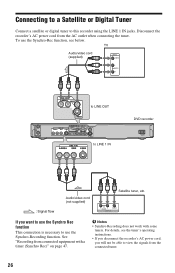
... 47. R AUDIO L VIDEO OUTPUT If you will not be able to this recorder using the LINE 1 IN jacks. Disconnect the recorder's AC power cord from connected equipment with some tuners. TV Audio/video cord (supplied) INPUT VIDEO L AUDIO R to LINE OUT DVD recorder to use the Synchro Rec function This connection is necessary to LINE 1 IN...
... 47. R AUDIO L VIDEO OUTPUT If you will not be able to this recorder using the LINE 1 IN jacks. Disconnect the recorder's AC power cord from connected equipment with some tuners. TV Audio/video cord (supplied) INPUT VIDEO L AUDIO R to LINE OUT DVD recorder to use the Synchro Rec function This connection is necessary to LINE 1 IN...

Operating Instructions
Page 27
... -RWVR -RWVideo +R -RVideo -RVR This section introduces the basic operation to record a current TV program to close the disc tray. DISPLAY Recording/playing side facing down z REC x REC STOP REC MODE TV/VIDEO 2 Press Z OPEN/CLOSE to a disc (DVD). Each time you want to record. 3 Press REC MODE repeatedly to select the channel or input source...
... -RWVR -RWVideo +R -RVideo -RVR This section introduces the basic operation to record a current TV program to close the disc tray. DISPLAY Recording/playing side facing down z REC x REC STOP REC MODE TV/VIDEO 2 Press Z OPEN/CLOSE to a disc (DVD). Each time you want to record. 3 Press REC MODE repeatedly to select the channel or input source...

Operating Instructions
Page 29
Title List with Thumbnail Images (Example: DVD+RW) 3 Select a title, and press ENTER. The sub-menu displays options applicable only to Know Your DVD Recorder m Extended Title List Sub-menu 4 Select "Play," and press ENTER. The displayed options differ depending upon the model, situation, and ...disc type. A Title type: Displays the title type (Original or Playlist) for DVD-RWs/DVD-Rs (VR mode) You ...
Title List with Thumbnail Images (Example: DVD+RW) 3 Select a title, and press ENTER. The sub-menu displays options applicable only to Know Your DVD Recorder m Extended Title List Sub-menu 4 Select "Play," and press ENTER. The displayed options differ depending upon the model, situation, and ...disc type. A Title type: Displays the title type (Original or Playlist) for DVD-RWs/DVD-Rs (VR mode) You ...

Operating Instructions
Page 30
Press To change a title thumbnail picture (Thumbnail) (DVD-RW/DVD-R in VR mode only) You can select a favorite scene for the thumbnail picture shown in the Title List menu. 1 Press TITLE LIST.
Press To change a title thumbnail picture (Thumbnail) (DVD-RW/DVD-R in VR mode only) You can select a favorite scene for the thumbnail picture shown in the Title List menu. 1 Press TITLE LIST.
Operating Instructions
Page 31
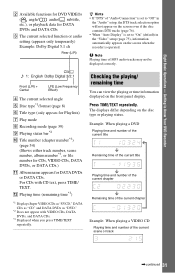
... Getting to "On" (default) in the "Video" setup (page 75), information automatically appears on the screen when the recorder is operated. For CDs with VIDEO CDs, DATA DVDs, and DATA CDs. *3 Displayed when you press TIME/TEXT repeatedly. Checking the playing/ remaining time You can view the ...the screen even if the disc contains DTS tracks (page 76). • When "Auto Display" is set to Know Your DVD Recorder B Available functions for DVD VIDEOs ( angle/ audio/ subtitle, etc.), or playback data for DATA DVDs or DATA CDs. The displays differ depending on the front panel display.
... Getting to "On" (default) in the "Video" setup (page 75), information automatically appears on the screen when the recorder is operated. For CDs with VIDEO CDs, DATA DVDs, and DATA CDs. *3 Displayed when you press TIME/TEXT repeatedly. Checking the playing/ remaining time You can view the ...the screen even if the disc contains DTS tracks (page 76). • When "Auto Display" is set to Know Your DVD Recorder B Available functions for DVD VIDEOs ( angle/ audio/ subtitle, etc.), or playback data for DATA DVDs or DATA CDs. The displays differ depending on the front panel display.

Operating Instructions
Page 33
You can label a DVD, title, or program by entering characters. Number buttons, SET TITLE LIST INPUT SELECT Getting to 64 characters for a title or disc name, but the actual number of characters displayed in the menus such as the Title List will vary. The steps below explain how to change the name of a Recorded Program +RW -RWVR -RWVideo +R -RVideo -RVR You can enter up to Know Your DVD Recorder 5. Eight Basic Operations - Changing the Name of the recorded program.
You can label a DVD, title, or program by entering characters. Number buttons, SET TITLE LIST INPUT SELECT Getting to 64 characters for a title or disc name, but the actual number of characters displayed in the menus such as the Title List will vary. The steps below explain how to change the name of a Recorded Program +RW -RWVR -RWVideo +R -RVideo -RVR You can enter up to Know Your DVD Recorder 5. Eight Basic Operations - Changing the Name of the recorded program.

Operating Instructions
Page 35
.... When you reformat the disc, all recorded contents will be automatically created, which can be played only on other DVD equipment. However, if you finalize a DVD+RW, DVD-RW (Video mode), DVD+R, or DVD-R (Video mode), a DVD menu will be displayed on Other DVD Equipment (Finalize) +RW -RWVR -RWVideo...press ENTER. 4 Select "Protect," and press ENTER. If you cannot edit or record on other than this recorder. ,continued 35 Eight Basic Operations - Getting to Know Your DVD Recorder b Note You can set (DVD-RW/DVDR in the table below. The disc name may need to select "Disc...
.... When you reformat the disc, all recorded contents will be automatically created, which can be played only on other DVD equipment. However, if you finalize a DVD+RW, DVD-RW (Video mode), DVD+R, or DVD-R (Video mode), a DVD menu will be displayed on Other DVD Equipment (Finalize) +RW -RWVR -RWVideo...press ENTER. 4 Select "Protect," and press ENTER. If you cannot edit or record on other than this recorder. ,continued 35 Eight Basic Operations - Getting to Know Your DVD Recorder b Note You can set (DVD-RW/DVDR in the table below. The disc name may need to select "Disc...


