Operating Instructions
Page 1
3-876-081-12(1) DVD Recorder Operating Instructions RDR-GX257 © 2008 Sony Corporation
3-876-081-12(1) DVD Recorder Operating Instructions RDR-GX257 © 2008 Sony Corporation
Operating Instructions
Page 2
...ÅLNING NÄR DENNA DEL ÄR ÖPPNAD. This symbol is connected. - RDR-GX257 Serial No CAUTION You are designed to the presence of the FCC Rules. Precaution Install this DVD recorder is located on a soft surface such as a bookshelf or similar unit. • Do ...not place the recorder in a location near heat sources, or in this manual could void your Sony dealer regarding this equipment. Refer servicing to qualified personnel only. Refer servicing to qualified personnel only. ...
...ÅLNING NÄR DENNA DEL ÄR ÖPPNAD. This symbol is connected. - RDR-GX257 Serial No CAUTION You are designed to the presence of the FCC Rules. Precaution Install this DVD recorder is located on a soft surface such as a bookshelf or similar unit. • Do ...not place the recorder in a location near heat sources, or in this manual could void your Sony dealer regarding this equipment. Refer servicing to qualified personnel only. Refer servicing to qualified personnel only. ...
Operating Instructions
Page 3
... the obsolete outlet. 10) Protect the power cord from the cable television transmitter and/or program owner. • Recording equipment should be recordable, depending on page 74. • Instructions in this recorder. 3 Plasma display panels and projection televisions are lost recordings Sony is damaged, liquid has been spilled or objects have fallen into your nearest...
... the obsolete outlet. 10) Protect the power cord from the cable television transmitter and/or program owner. • Recording equipment should be recordable, depending on page 74. • Instructions in this recorder. 3 Plasma display panels and projection televisions are lost recordings Sony is damaged, liquid has been spilled or objects have fallen into your nearest...
Operating Instructions
Page 4
... the System Menu 25 Inserting and Formatting a Disc 26 Recording a Program to a Disc 27 Viewing the Recorded Program (Title List 28 Checking the Playback Information and Playing Time 30 Changing the Name of a Recorded Program (Title Input 31 Labeling and Protecting a Disc 32... Playing a DVD on Other Equipment (Finalize 33 Recording 35 Before Recording 35 Timer Recording From Connected Equipment 36 Checking/Changing/Canceling Timer Settings (Timer List 37 Recording Without the Timer 39 Recording From a VCR or Similar Device 41 Playback 42 Playing 42 Searching ...
... the System Menu 25 Inserting and Formatting a Disc 26 Recording a Program to a Disc 27 Viewing the Recorded Program (Title List 28 Checking the Playback Information and Playing Time 30 Changing the Name of a Recorded Program (Title Input 31 Labeling and Protecting a Disc 32... Playing a DVD on Other Equipment (Finalize 33 Recording 35 Before Recording 35 Timer Recording From Connected Equipment 36 Checking/Changing/Canceling Timer Settings (Timer List 37 Recording Without the Timer 39 Recording From a VCR or Similar Device 41 Playback 42 Playing 42 Searching ...
Operating Instructions
Page 5
... 60 Settings and Adjustments 62 Using the Setup Displays 62 Recorder Settings (General 63 Language Settings 64 Audio Settings 65 Parental Control Settings (Lock 66 Recording Settings (Video 67 Disc Settings 68 Resetting the Recorder (Factory Set 69 Additional Information 70 Troubleshooting 70 Recordable and Playable Discs 74 Playable Discs 76 Language Code List...
... 60 Settings and Adjustments 62 Using the Setup Displays 62 Recorder Settings (General 63 Language Settings 64 Audio Settings 65 Parental Control Settings (Lock 66 Recording Settings (Video 67 Disc Settings 68 Resetting the Recorder (Factory Set 69 Additional Information 70 Troubleshooting 70 Recordable and Playable Discs 74 Playable Discs 76 Language Code List...
Operating Instructions
Page 6
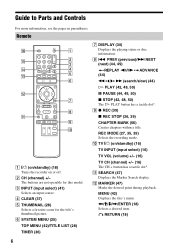
.... C INPUT (input select) (41) Selects an input source. MENU (42) Displays the disc's menu. Remote 123 456 789 0 A [/1 (on/standby) (18) Turns the recorder on /standby) (16) TV INPUT (input select) (16) TV VOL (volume) +/- (16) TV CH (channel) +/- (16) The CH + button has a tactile dot*.... within a title. B CH (channel) +/- The buttons are not operable for the title's thumbnail picture. REC MODE (27, 35, 39) Selects the recording mode. K SEARCH (47) Displays the Marker Search display. Guide to Parts and Controls For more information, see the pages in parentheses. D CLEAR (37)...
.... C INPUT (input select) (41) Selects an input source. MENU (42) Displays the disc's menu. Remote 123 456 789 0 A [/1 (on/standby) (18) Turns the recorder on /standby) (16) TV INPUT (input select) (16) TV VOL (volume) +/- (16) TV CH (channel) +/- (16) The CH + button has a tactile dot*.... within a title. B CH (channel) +/- The buttons are not operable for the title's thumbnail picture. REC MODE (27, 35, 39) Selects the recording mode. K SEARCH (47) Displays the Marker Search display. Guide to Parts and Controls For more information, see the pages in parentheses. D CLEAR (37)...

Operating Instructions
Page 7
N AUDIO (44) The AUDIO button has a tactile dot*. PLAY MODE (46, 49) ZOOM (45) Zooms an image during slideshow. O Number buttons (46) The number 5 button has a tactile dot*. ANGLE (44) Changes the angles or rotates an image during playback or pause mode. P Z OPEN/CLOSE (26) Opens or closes the disc tray. * Use the tactile dot as a reference when operating the recorder. ,continued 7 M SUBTITLE (44) Selects a subtitle language.
N AUDIO (44) The AUDIO button has a tactile dot*. PLAY MODE (46, 49) ZOOM (45) Zooms an image during slideshow. O Number buttons (46) The number 5 button has a tactile dot*. ANGLE (44) Changes the angles or rotates an image during playback or pause mode. P Z OPEN/CLOSE (26) Opens or closes the disc tray. * Use the tactile dot as a reference when operating the recorder. ,continued 7 M SUBTITLE (44) Selects a subtitle language.
Operating Instructions
Page 8
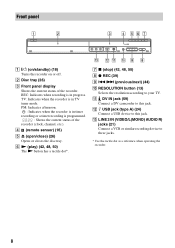
...jacks. * Use the tactile dot as a reference when operating the recorder. 8 REC: Indicates when recording is programmed. : Shows the current status of the recorder. M LINE 2 IN (VIDEO/L(MONO) AUDIO R) jacks (21) Connect a VCR or similar recording device to your TV. B Disc tray (26) C Front panel..., channel, etc.). L USB jack (type A) (24) Connect a USB device to this jack. PM: Indicates afternoon. : Indicates when the recorder is in timer recording or a timer recording is in TV tuner mode. K DV IN jack (59) Connect a DV camcorder to this jack. D (remote sensor) (16) E Z ...
...jacks. * Use the tactile dot as a reference when operating the recorder. 8 REC: Indicates when recording is programmed. : Shows the current status of the recorder. M LINE 2 IN (VIDEO/L(MONO) AUDIO R) jacks (21) Connect a VCR or similar recording device to your TV. B Disc tray (26) C Front panel..., channel, etc.). L USB jack (type A) (24) Connect a USB device to this jack. PM: Indicates afternoon. : Indicates when the recorder is in timer recording or a timer recording is in TV tuner mode. K DV IN jack (59) Connect a DV camcorder to this jack. D (remote sensor) (16) E Z ...
Operating Instructions
Page 10
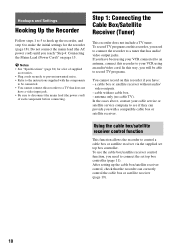
... connecting. In the cases above, contact your cable service or satellite service company to your VCR connected to an antenna, connect this recorder to see if they can correctly control the cable box or satellite receiver (page 19). 10 a cable box or satellite receiver without... audio/ video outputs. - Using the cable box/satellite receiver control function This function allows the recorder to disconnect the mains lead (the power cord) of supplied accessories. • Plug cords securely to prevent unwanted noise. • Refer to ...
... connecting. In the cases above, contact your cable service or satellite service company to your VCR connected to an antenna, connect this recorder to see if they can correctly control the cable box or satellite receiver (page 19). 10 a cable box or satellite receiver without... audio/ video outputs. - Using the cable box/satellite receiver control function This function allows the recorder to disconnect the mains lead (the power cord) of supplied accessories. • Plug cords securely to prevent unwanted noise. • Refer to ...
Operating Instructions
Page 11
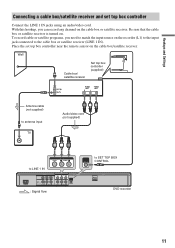
... the LINE 1 IN jacks using an audio/video cord. AUDIO - AUDIO - Be sure that the cable box or satellite receiver is turned on the recorder (L1) to the input jack connected to the cable box or satellite receiver (LINE 1 IN). R LINE OUT : Signal flow SET TOP BOX CONTROL... 1 IN ~AC IN COMPONENT Y VIDEO OUT PB PR PCM/DTS/ MPEG/ DOLBY DIGITAL COAXIAL DIGITAL OUT L - R to SET TOP BOX CONTROL HDMI OUT DVD recorder 11 R AUDIO OUT VIDEO LINE 1 IN L - AUDIO - Wall Cable box/ satellite receiver Set top box controller (supplied) Antenna cable (not supplied) to match ...
... the LINE 1 IN jacks using an audio/video cord. AUDIO - AUDIO - Be sure that the cable box or satellite receiver is turned on the recorder (L1) to the input jack connected to the cable box or satellite receiver (LINE 1 IN). R LINE OUT : Signal flow SET TOP BOX CONTROL... 1 IN ~AC IN COMPONENT Y VIDEO OUT PB PR PCM/DTS/ MPEG/ DOLBY DIGITAL COAXIAL DIGITAL OUT L - R to SET TOP BOX CONTROL HDMI OUT DVD recorder 11 R AUDIO OUT VIDEO LINE 1 IN L - AUDIO - Wall Cable box/ satellite receiver Set top box controller (supplied) Antenna cable (not supplied) to match ...

Operating Instructions
Page 12
... audio component : Signal flow HDMI cord (not supplied) C TV, projector, or audio component 12 AUDIO - AUDIO - R LINE OUT to COMPONENT VIDEO OUT (blue) (red) DVD recorder HDMI OUT to view pictures. Step 2: Connecting the Video Cords/HDMI Cord Select one of the following patterns, A through C, according to LINE OUT (VIDEO) ~AC...
... audio component : Signal flow HDMI cord (not supplied) C TV, projector, or audio component 12 AUDIO - AUDIO - R LINE OUT to COMPONENT VIDEO OUT (blue) (red) DVD recorder HDMI OUT to view pictures. Step 2: Connecting the Video Cords/HDMI Cord Select one of the following patterns, A through C, according to LINE OUT (VIDEO) ~AC...
Operating Instructions
Page 13
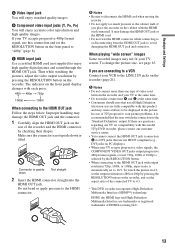
...avoid damaging the HDMI OUT jack and connector. Do not bend or apply pressure to the LINE 2 IN jacks on the recorder. If you place the recorder on the recorder, and set to 16:9. The indicator on the front panel to the HDMI OUT jack Follow the steps below. To ... HDMI cord. • Do not twist the HDMI connector while connecting to or disconnecting from the HDMI OUT jack to 4:3. * This DVD recorder incorporates High-Definition Multimedia Interface (HDMI™) technology. If there are questions regarding our TV set the RESOLUTION button on the front panel display ...
...avoid damaging the HDMI OUT jack and connector. Do not bend or apply pressure to the LINE 2 IN jacks on the recorder. If you place the recorder on the recorder, and set to 16:9. The indicator on the front panel to the HDMI OUT jack Follow the steps below. To ... HDMI cord. • Do not twist the HDMI connector while connecting to or disconnecting from the HDMI OUT jack to 4:3. * This DVD recorder incorporates High-Definition Multimedia Interface (HDMI™) technology. If there are questions regarding our TV set the RESOLUTION button on the front panel display ...
Operating Instructions
Page 14
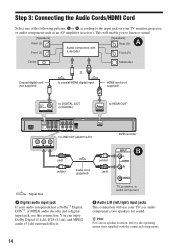
.../DTS/ MPEG/ DOLBY DIGITAL COAXIAL DIGITAL OUT to DIGITAL OUT (COAXIAL) HDMI OUT to LINE OUT (AUDIO L/R) HDMI OUT VIDEO L - R LINE OUT (red) (white) DVD recorder B (white) Audio cord (supplied) (red) : Signal flow A Digital audio input jack If your audio component has a Dolby*1 Digital, DTS*2, or MPEG audio decoder and a digital...
.../DTS/ MPEG/ DOLBY DIGITAL COAXIAL DIGITAL OUT to DIGITAL OUT (COAXIAL) HDMI OUT to LINE OUT (AUDIO L/R) HDMI OUT VIDEO L - R LINE OUT (red) (white) DVD recorder B (white) Audio cord (supplied) (red) : Signal flow A Digital audio input jack If your audio component has a Dolby*1 Digital, DTS*2, or MPEG audio decoder and a digital...

Operating Instructions
Page 15
... jacks to your TV's audio output jacks to the TV with the HDMI cord, or - Connect the recorder to the LINE 1 IN (AUDIO L/R) jacks at the same time. Then plug the recorder and TV mains leads (AC power cords) into the AC outlet. Connect the audio component to the TV... Hookups and Settings b Notes • Do not connect your TV's audio output jacks at the same time. You can operate the recorder once the front panel display lights up and the recorder enters standby mode. This will come from your TV's speakers. • With connection A, after all connections are complete. ~AC IN...
... jacks to your TV's audio output jacks to the TV with the HDMI cord, or - Connect the recorder to the LINE 1 IN (AUDIO L/R) jacks at the same time. Then plug the recorder and TV mains leads (AC power cords) into the AC outlet. Connect the audio component to the TV... Hookups and Settings b Notes • Do not connect your TV's audio output jacks at the same time. You can operate the recorder once the front panel display lights up and the recorder enters standby mode. This will come from your TV's speakers. • With connection A, after all connections are complete. ~AC IN...
Operating Instructions
Page 16
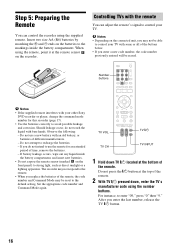
...number and Command Mode again. Step 5: Preparing the Remote You can adjust the remote's signal to control your other Sony DVD recorder or player, change the command mode number for this recorder (page 17). • Use the batteries correctly to use a new battery with bare hands. If battery leakage...CH TV [/1 TV INPUT 1 Hold down , enter the TV's manufacturer code using the supplied remote. Controlling TVs with the remote You can control the recorder using the number buttons. Insert two size AA (R6) batteries by matching the 3 and # ends on the front panel) to enter "09," press...
...number and Command Mode again. Step 5: Preparing the Remote You can adjust the remote's signal to control your other Sony DVD recorder or player, change the command mode number for this recorder (page 17). • Use the batteries correctly to use a new battery with bare hands. If battery leakage...CH TV [/1 TV INPUT 1 Hold down , enter the TV's manufacturer code using the supplied remote. Controlling TVs with the remote You can control the recorder using the number buttons. Insert two size AA (R6) batteries by matching the 3 and # ends on the front panel) to enter "09," press...
Operating Instructions
Page 17
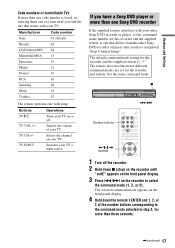
... 3 of controllable TVs If more than one code number is "3." If you have a Sony DVD player or more than one that differs from the other Sony DVD recorder or player, set for this recorder and the supplied remote to select the command mode (1, 2, or 3). The default command ... entering them one at a time until you find the one Sony DVD recorder If the supplied remote interferes with your other Sony DVD recorder or player after you have completed "Step 6: Initial Setup." Manufacturer Sony Hitachi LG/Goldstar/NEC Mitsubishi/MGA Panasonic Philips Pioneer RCA Samsung Sharp...
... 3 of controllable TVs If more than one code number is "3." If you have a Sony DVD player or more than one that differs from the other Sony DVD recorder or player, set for this recorder and the supplied remote to select the command mode (1, 2, or 3). The default command ... entering them one at a time until you find the one Sony DVD recorder If the supplied remote interferes with your other Sony DVD recorder or player after you have completed "Step 6: Initial Setup." Manufacturer Sony Hitachi LG/Goldstar/NEC Mitsubishi/MGA Panasonic Philips Pioneer RCA Samsung Sharp...
Operating Instructions
Page 18
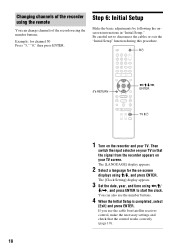
Changing channels of the recorder using the remote You can change channels of the recorder using the number buttons. Be careful not to disconnect the cables or exit the "Initial Setup" function during this procedure. 123 456 789 0 [/1 O RETURN Step 6: Initial Setup Make the basic adjustments by following the onscreen instructions in "Initial Setup." Example: for channel 50 Press "5," "0," then press ENTER.
Changing channels of the recorder using the remote You can change channels of the recorder using the number buttons. Be careful not to disconnect the cables or exit the "Initial Setup" function during this procedure. 123 456 789 0 [/1 O RETURN Step 6: Initial Setup Make the basic adjustments by following the onscreen instructions in "Initial Setup." Example: for channel 50 Press "5," "0," then press ENTER.
Operating Instructions
Page 19
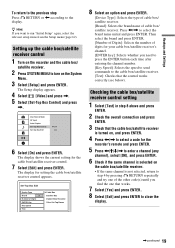
...2 Press SYSTEM MENU to the display. Press The Setup display appears. 4 Select [Video] and press ,. 5 Select [Set-Top Box Control] and press ,. Disc Record Mode DV Input Auto Chapter Set-Top Box Control Off Set-Top Box Edit On 6 Select [On] and press ENTER. Hookups and Settings To return... menu (page 62). Set-Top Box Edit Device Type Brand A Number of Digits ENTER Key Key Speed Test Cable Box Satellite Box Digital Video Recorder Other Set-Top Boxes 8 Select an option and press ENTER. [Device Type]: Selects the type of cable box/ satellite receiver. [Brand]: Selects...
...2 Press SYSTEM MENU to the display. Press The Setup display appears. 4 Select [Video] and press ,. 5 Select [Set-Top Box Control] and press ,. Disc Record Mode DV Input Auto Chapter Set-Top Box Control Off Set-Top Box Edit On 6 Select [On] and press ENTER. Hookups and Settings To return... menu (page 62). Set-Top Box Edit Device Type Brand A Number of Digits ENTER Key Key Speed Test Cable Box Satellite Box Digital Video Recorder Other Set-Top Boxes 8 Select an option and press ENTER. [Device Type]: Selects the type of cable box/ satellite receiver. [Brand]: Selects...
Operating Instructions
Page 20
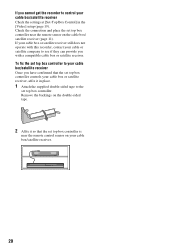
.... 1 Attach the supplied double-sided tape to the set top box controller. If your cable box or satellite receiver still does not operate with this recorder, contact your cable or satellite company to your cable box/satellite receiver. 20 To fix the set top box controller to see if they can...
.... 1 Attach the supplied double-sided tape to the set top box controller. If your cable box or satellite receiver still does not operate with this recorder, contact your cable or satellite company to your cable box/satellite receiver. 20 To fix the set top box controller to see if they can...

Operating Instructions
Page 21
...the connected equipment. Hookups and Settings Connecting a VCR or Similar Device After disconnecting the recorder's mains lead (the power cord) from the AC outlet, connect a VCR or similar recording device to the LINE IN jacks of this recorder. VCR, etc. OUTPUT VIDEO AUDIO L R Audio/video cord (not supplied) ...only monaural sound, use audio cords that distribute monaural sounds to the LINE 2 IN jacks of this recorder. Connecting to the LINE 2 IN jacks Connect a VCR or similar recording device to left/ right channels (not supplied). ,continued 21 Use the DV IN jack on the ...
...the connected equipment. Hookups and Settings Connecting a VCR or Similar Device After disconnecting the recorder's mains lead (the power cord) from the AC outlet, connect a VCR or similar recording device to the LINE IN jacks of this recorder. VCR, etc. OUTPUT VIDEO AUDIO L R Audio/video cord (not supplied) ...only monaural sound, use audio cords that distribute monaural sounds to the LINE 2 IN jacks of this recorder. Connecting to the LINE 2 IN jacks Connect a VCR or similar recording device to left/ right channels (not supplied). ,continued 21 Use the DV IN jack on the ...


