Operating Instructions
Page 2
...the presence of uninsulated "dangerous voltage" within the product's enclosure that the mains lead (the power cord) can be exposed to correct the interference by one or more of the following measures: - RDR-GX257 Serial No CAUTION You are located at the rear of the unit. Reorient or relocate the... attempt to comply with the limits for help. never pull the cord. On recording Make trial recordings before operating it is no guarantee that to prevent heat build-up in this manual could void your Sony dealer regarding this system so that may cause harmful interference to Part...
...the presence of uninsulated "dangerous voltage" within the product's enclosure that the mains lead (the power cord) can be exposed to correct the interference by one or more of the following measures: - RDR-GX257 Serial No CAUTION You are located at the rear of the unit. Reorient or relocate the... attempt to comply with the limits for help. never pull the cord. On recording Make trial recordings before operating it is no guarantee that to prevent heat build-up in this manual could void your Sony dealer regarding this system so that may cause harmful interference to Part...
Operating Instructions
Page 3
...you are making a copy. IMPORTANT NOTICE Caution: This recorder is damaged, liquid has been spilled or objects have fallen into your nearest Sony dealer. Important Safety Instructions 1) Read these instructions. 2) Keep these instructions. 3) Heed all warnings. 4) Follow all servicing to qualified ...or problems concerning your recorder, please consult your outlet, consult an electrician for replacement of the obsolete outlet. 10) Protect the power cord from tip-over. 13) Unplug this recorder. 3 patents and other apparatus (including amplifiers) that are created on other materials may...
...you are making a copy. IMPORTANT NOTICE Caution: This recorder is damaged, liquid has been spilled or objects have fallen into your nearest Sony dealer. Important Safety Instructions 1) Read these instructions. 2) Keep these instructions. 3) Heed all warnings. 4) Follow all servicing to qualified ...or problems concerning your recorder, please consult your outlet, consult an electrician for replacement of the obsolete outlet. 10) Protect the power cord from tip-over. 13) Unplug this recorder. 3 patents and other apparatus (including amplifiers) that are created on other materials may...
Operating Instructions
Page 4
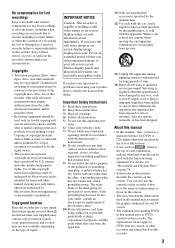
... 10 Hooking Up the Recorder 10 Step 1: Connecting the Cable Box/Satellite Receiver (Tuner 10 Step 2: Connecting the Video Cords/HDMI Cord 12 Step 3: Connecting the Audio Cords/HDMI Cord 14 Step 4: Connecting the Mains Lead (Power Cord 15 Step 5: Preparing the Remote 16 Step 6: Initial Setup 18 Connecting a VCR or Similar Device 21 Connecting to...
... 10 Hooking Up the Recorder 10 Step 1: Connecting the Cable Box/Satellite Receiver (Tuner 10 Step 2: Connecting the Video Cords/HDMI Cord 12 Step 3: Connecting the Audio Cords/HDMI Cord 14 Step 4: Connecting the Mains Lead (Power Cord 15 Step 5: Preparing the Remote 16 Step 6: Initial Setup 18 Connecting a VCR or Similar Device 21 Connecting to...
Operating Instructions
Page 10
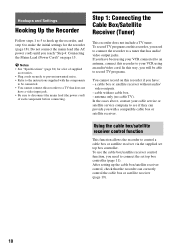
b Notes • See "Specifications" (page 81) for a list of supplied accessories. • Plug cords securely to prevent unwanted noise. • Refer to the instructions supplied with the components to be able to record TV programs. You cannot record .... If you reach "Step 4: Connecting the Mains Lead (Power Cord)" on page 15. Do not connect the mains lead (the AC power cord) until you have been using an audio/video cord. After setting up the recorder, and step 6 to disconnect the mains lead (the power cord) of each component before connecting. Hookups and Settings Hooking...
b Notes • See "Specifications" (page 81) for a list of supplied accessories. • Plug cords securely to prevent unwanted noise. • Refer to the instructions supplied with the components to be able to record TV programs. You cannot record .... If you reach "Step 4: Connecting the Mains Lead (Power Cord)" on page 15. Do not connect the mains lead (the AC power cord) until you have been using an audio/video cord. After setting up the recorder, and step 6 to disconnect the mains lead (the power cord) of each component before connecting. Hookups and Settings Hooking...

Operating Instructions
Page 15
... With connection A, after all connections are complete. ~AC IN *2 1 to AC IN 2 to AC outlet 15 Then plug the recorder and TV mains leads (AC power cords) into the AC outlet. You can operate the recorder once the front panel display lights up and the recorder enters standby mode. If you connect... additional equipment to this recorder (page 21), be sure to connect the mains lead (the power cord) after you have completed the connection, make the appropriate settings in the [Audio] setup (page 65). This will need to do not connect the ...
... With connection A, after all connections are complete. ~AC IN *2 1 to AC IN 2 to AC outlet 15 Then plug the recorder and TV mains leads (AC power cords) into the AC outlet. You can operate the recorder once the front panel display lights up and the recorder enters standby mode. If you connect... additional equipment to this recorder (page 21), be sure to connect the mains lead (the power cord) after you have completed the connection, make the appropriate settings in the [Audio] setup (page 65). This will need to do not connect the ...

Operating Instructions
Page 21
... Connecting a VCR or Similar Device After disconnecting the recorder's mains lead (the power cord) from the AC outlet, connect a VCR or similar recording device to left/ right channels (not supplied). ,continued 21 OUTPUT VIDEO AUDIO L R Audio/video cord (not supplied) to LINE 2 IN : Signal flow DVD recorder z Hint ...When the connected equipment outputs only monaural sound, use audio cords that distribute monaural sounds to the LINE IN jacks of this recorder. See also the operating instructions supplied with the connected ...
... Connecting a VCR or Similar Device After disconnecting the recorder's mains lead (the power cord) from the AC outlet, connect a VCR or similar recording device to left/ right channels (not supplied). ,continued 21 OUTPUT VIDEO AUDIO L R Audio/video cord (not supplied) to LINE 2 IN : Signal flow DVD recorder z Hint ...When the connected equipment outputs only monaural sound, use audio cords that distribute monaural sounds to the LINE IN jacks of this recorder. See also the operating instructions supplied with the connected ...
Operating Instructions
Page 22
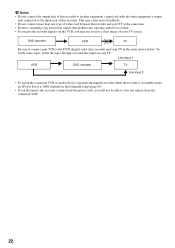
...equipment's output jack connected to [Off] (default) in the [General] setup (page 63). • If you disconnect the recorder's mains lead (the power cord), you may cause noise (feedback). • Do not connect more than one type of this recorder. This may not receive a clear image on your TV...tapes, watch the connected VCR or similar device's pictures through a second line input on your TV in standby mode, set [Power Save] to the input jack of video cord between the recorder and your TV. Line input 1 VCR DVD recorder TV Line input 2 • To watch the tapes ...
...equipment's output jack connected to [Off] (default) in the [General] setup (page 63). • If you disconnect the recorder's mains lead (the power cord), you may cause noise (feedback). • Do not connect more than one type of this recorder. This may not receive a clear image on your TV...tapes, watch the connected VCR or similar device's pictures through a second line input on your TV in standby mode, set [Power Save] to the input jack of video cord between the recorder and your TV. Line input 1 VCR DVD recorder TV Line input 2 • To watch the tapes ...
Operating Instructions
Page 23
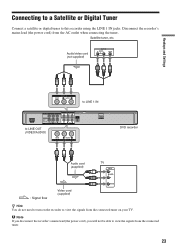
...R SET TOP BOX CONTROL VIDEO L - AUDIO - Satellite tuner, etc. AUDIO - AUDIO - b Note If you disconnect the recorder's mains lead (the power cord), you will not be able to view the signals from the connected tuner on the recorder to LINE 1 IN COMPONENT Y VIDEO OUT PB PR ~AC... IN PCM/DTS/ MPEG/ DOLBY DIGITAL COAXIAL DIGITAL OUT L - Disconnect the recorder's mains lead (the power cord) from the AC outlet when connecting the tuner. R AUDIO OUT to this recorder using the LINE 1 IN jacks. Connecting to a Satellite or Digital...
...R SET TOP BOX CONTROL VIDEO L - AUDIO - Satellite tuner, etc. AUDIO - AUDIO - b Note If you disconnect the recorder's mains lead (the power cord), you will not be able to view the signals from the connected tuner on the recorder to LINE 1 IN COMPONENT Y VIDEO OUT PB PR ~AC... IN PCM/DTS/ MPEG/ DOLBY DIGITAL COAXIAL DIGITAL OUT L - Disconnect the recorder's mains lead (the power cord) from the AC outlet when connecting the tuner. R AUDIO OUT to this recorder using the LINE 1 IN jacks. Connecting to a Satellite or Digital...
Operating Instructions
Page 43
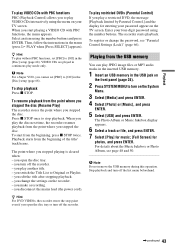
... where you play the disc next time, the recorder resumes playback from the beginning of the title/ track/scene. you disconnect the mains lead (the power cord). b Note For a Super VCD, you to [Off] in the [Disc] setup (page 68). The Photo Album or Music Jukebox display appears. 6 Select a track or file...
... where you play the disc next time, the recorder resumes playback from the beginning of the title/ track/scene. you disconnect the mains lead (the power cord). b Note For a Super VCD, you to [Off] in the [Disc] setup (page 68). The Photo Album or Music Jukebox display appears. 6 Select a track or file...
Operating Instructions
Page 70
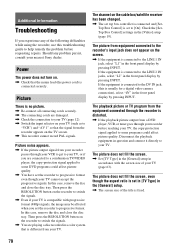
...The picture does not fill the screen. , Set [TV Type] in the [General] setup in a color system that the mains lead (the power cord) is fixed. 70 Additional Information Troubleshooting If you set the recorder to progressive format. Check the [SetTop Box Control] settings in question and connect it... difficulties while using the recorder, use this case, remove the disc and close the disc tray. Then press the RESOLUTION button on your nearest Sony dealer. Then press the RESOLUTION button on the recorder to switch the signals. , You are connected to a combination TV/VIDEO player, the...
...The picture does not fill the screen. , Set [TV Type] in the [General] setup in a color system that the mains lead (the power cord) is fixed. 70 Additional Information Troubleshooting If you set the recorder to progressive format. Check the [SetTop Box Control] settings in question and connect it... difficulties while using the recorder, use this case, remove the disc and close the disc tray. Then press the RESOLUTION button on your nearest Sony dealer. Then press the RESOLUTION button on the recorder to switch the signals. , You are connected to a combination TV/VIDEO player, the...
Operating Instructions
Page 72
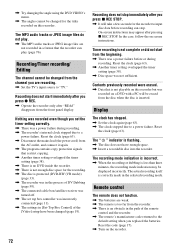
... the batteries. Reset the code (page 17). , Turn on screen instructions. Reset the clock (page 63). , Disconnect the mains lead (the power cord) from the recorder. , There is inserted. On-screen instructions may be displayed incorrectly. The actual recording itself is protected (DVD-RW (VR mode...There is not enough disc space for the recorder to input disc data before or during recording. , The recorder's internal clock stopped due to a power failure. Reset the clock (page 63). , Try changing the angle using the DVD VIDEO's menu. , The angles cannot be changed (page ...
... the batteries. Reset the code (page 17). , Turn on screen instructions. Reset the clock (page 63). , Disconnect the mains lead (the power cord) from the recorder. , There is inserted. On-screen instructions may be displayed incorrectly. The actual recording itself is protected (DVD-RW (VR mode...There is not enough disc space for the recorder to input disc data before or during recording. , The recorder's internal clock stopped due to a power failure. Reset the clock (page 63). , Try changing the angle using the DVD VIDEO's menu. , The angles cannot be changed (page ...

Operating Instructions
Page 82
Supplied accessories: Power cord (1) Video cord (1) Audio cord (1) Remote commander (remote) (1) Size AA (R6) batteries (2) Set top box controller (1) Specifications and design are subject to change without notice. 82
Supplied accessories: Power cord (1) Video cord (1) Audio cord (1) Remote commander (remote) (1) Size AA (R6) batteries (2) Set top box controller (1) Specifications and design are subject to change without notice. 82
Operating Instructions
Page 84
Sony Corporation Printed in Indonesia P Parental Control 43, 66 Parts and controls 6 PBC (Playback Control) 43 PCM 65 Playable discs 74, 76 Playback 42, 44, 48, ... A-B Repeat 46 fast forward 44, 49 fast reverse 44, 49 Repeat Play 46, 49 Resume Play 43 Slow-motion play 45 Playlist 28, 51, 57 Power cord 15 [Protect] 54 [Protect Disc] 33, 68 Q Quick Timer 39 R Rear panel 9 REC 27, 39 REC MODE 35 Rec Mode Adjust 37 Recordable discs 74...
Sony Corporation Printed in Indonesia P Parental Control 43, 66 Parts and controls 6 PBC (Playback Control) 43 PCM 65 Playable discs 74, 76 Playback 42, 44, 48, ... A-B Repeat 46 fast forward 44, 49 fast reverse 44, 49 Repeat Play 46, 49 Resume Play 43 Slow-motion play 45 Playlist 28, 51, 57 Power cord 15 [Protect] 54 [Protect Disc] 33, 68 Q Quick Timer 39 R Rear panel 9 REC 27, 39 REC MODE 35 Rec Mode Adjust 37 Recordable discs 74...


