
Operating Instructions
Page 4
... for music CDs or CD-Rs/CD-RWs in this manual refer to discs that are created on other recorders and played back on the remote. The explanations do not apply to discs created on this recorder. About this manual • Instructions in this manual describe the controls on this recorder.... You can also use the controls on the recorder if they have the same or similar names as those on the remote. • The on-screen display illustrations used in this manual may not match the graphics displayed on your TV screen. • The explanations regarding discs...
... for music CDs or CD-Rs/CD-RWs in this manual refer to discs that are created on other recorders and played back on the remote. The explanations do not apply to discs created on this recorder. About this manual • Instructions in this manual describe the controls on this recorder.... You can also use the controls on the recorder if they have the same or similar names as those on the remote. • The on-screen display illustrations used in this manual may not match the graphics displayed on your TV screen. • The explanations regarding discs...

Operating Instructions
Page 6
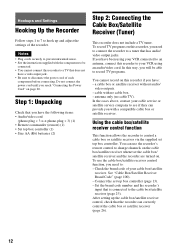
... (Tuner 12 Step 3: Connecting to Your TV 15 Step 4: Connecting to Your AV Amplifier (Receiver 18 Step 5: Connecting the Power Cord 20 Step 6: Preparing the Remote 21 Step 7: Easy Setup 23 Connecting a VCR or Similar Device 27 Quick Guide to Disc Types 30 Recordable and Playable Discs 30 Playable Discs 33...
... (Tuner 12 Step 3: Connecting to Your TV 15 Step 4: Connecting to Your AV Amplifier (Receiver 18 Step 5: Connecting the Power Cord 20 Step 6: Preparing the Remote 21 Step 7: Easy Setup 23 Connecting a VCR or Similar Device 27 Quick Guide to Disc Types 30 Recordable and Playable Discs 30 Playable Discs 33...
Operating Instructions
Page 12
.... cable with a compatible cable box or satellite receiver. Check the brand code of the recorder. To use the recorder's remote control to change channels on the cable box/satellite receiver whenever the cable box/ satellite receiver and the recorder are turned on..., connect this recorder, you have the following items: • Audio/video cord (phono plug × 3 y phono plug × 3) (1) • Remote commander (remote) (1) • Set top box controller (1) • Size AA (R6) batteries (2) Step 2: Connecting the Cable Box/Satellite Receiver (Tuner) This recorder does...
.... cable with a compatible cable box or satellite receiver. Check the brand code of the recorder. To use the recorder's remote control to change channels on the cable box/satellite receiver whenever the cable box/ satellite receiver and the recorder are turned on..., connect this recorder, you have the following items: • Audio/video cord (phono plug × 3 y phono plug × 3) (1) • Remote commander (remote) (1) • Set top box controller (1) • Size AA (R6) batteries (2) Step 2: Connecting the Cable Box/Satellite Receiver (Tuner) This recorder does...

Operating Instructions
Page 13
... your TV to use the Synchro-Rec function (page 51). Hookups and Settings Connecting a cable box/satellite receiver and set top box controller near the remote sensor on the cable box/satellite receiver. Wall Set top box controller (supplied) Cable box/ satellite receiver AUDIO OUT R L VIDEO OUT ANT IN TO TV...
... your TV to use the Synchro-Rec function (page 51). Hookups and Settings Connecting a cable box/satellite receiver and set top box controller near the remote sensor on the cable box/satellite receiver. Wall Set top box controller (supplied) Cable box/ satellite receiver AUDIO OUT R L VIDEO OUT ANT IN TO TV...

Operating Instructions
Page 21
...not intend to avoid possible leakage and corrosion. If battery leakage occurs, wipe out any foreign object into the remote casing, particularly when replacing the batteries. Controlling a Sony TV with bare hands should last about three to close the battery cover properly. Observe the following : Press TV... "/1 TV VOL +/- TV CH +/- When using the supplied remote. TV INPUT TV DIGITAL/ ANALOG To Turn your Sony TV. Insert two size AA (R6) batteries by matching the 3 and # ends on the batteries to operate your...
...not intend to avoid possible leakage and corrosion. If battery leakage occurs, wipe out any foreign object into the remote casing, particularly when replacing the batteries. Controlling a Sony TV with bare hands should last about three to close the battery cover properly. Observe the following : Press TV... "/1 TV VOL +/- TV CH +/- When using the supplied remote. TV INPUT TV DIGITAL/ ANALOG To Turn your Sony TV. Insert two size AA (R6) batteries by matching the 3 and # ends on the batteries to operate your...
Operating Instructions
Page 22
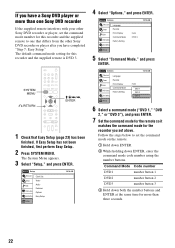
The default command mode setting for this recorder and the supplied remote is DVD 3. If you have a Sony DVD player or more than one Sony DVD recorder If the supplied remote interferes with your other Sony DVD recorder or player, set the command mode number for this recorder and the supplied remote to one that differs from the other Sony DVD recorder or player after you have completed "Step 7: Easy Setup." SYSTEM MENU 123 456 789 0 O RETURN M/m/
The default command mode setting for this recorder and the supplied remote is DVD 3. If you have a Sony DVD player or more than one Sony DVD recorder If the supplied remote interferes with your other Sony DVD recorder or player, set the command mode number for this recorder and the supplied remote to one that differs from the other Sony DVD recorder or player after you have completed "Step 7: Easy Setup." SYSTEM MENU 123 456 789 0 O RETURN M/m/
Operating Instructions
Page 23
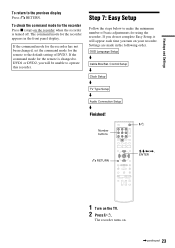
... turned off. Settings are made in the front panel display. If the command mode for the remote to the default setting of basic adjustments for the recorder appears in the following order. Step 7: Easy Setup Follow the steps below to operate this ...
... turned off. Settings are made in the front panel display. If the command mode for the remote to the default setting of basic adjustments for the recorder appears in the following order. Step 7: Easy Setup Follow the steps below to operate this ...
Operating Instructions
Page 26
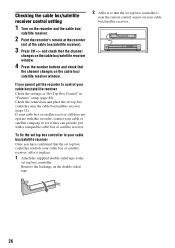
... setting 1 Turn on the cable box/satellite receiver window. 4 Press the number buttons and check that the set top box controller near the remote control sensor on the cable box/ satellite receiver window. If your cable box or satellite receiver still does not operate with this recorder, contact ...box/satellite receiver). 3 Press CH +/- and check that the channel changes on the recorder and the cable box/ satellite receiver. 2 Point the recorder's remote at the recorder (not at "Set Top Box Control" in place. 1 Attach the supplied double-sided tape to see if they can provide you ...
... setting 1 Turn on the cable box/satellite receiver window. 4 Press the number buttons and check that the set top box controller near the remote control sensor on the cable box/ satellite receiver window. If your cable box or satellite receiver still does not operate with this recorder, contact ...box/satellite receiver). 3 Press CH +/- and check that the channel changes on the recorder and the cable box/ satellite receiver. 2 Point the recorder's remote at the recorder (not at "Set Top Box Control" in place. 1 Attach the supplied double-sided tape to see if they can provide you ...
Operating Instructions
Page 37
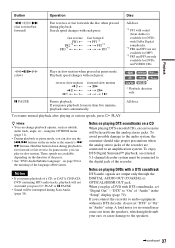
... stereo jacks of the recorder are available, depending on the duration of the press. • See "DVD Audio/Subtitle Language" on the recorder as the remote's m/ M buttons. When you can also use the ./> buttons on page 99 for the meaning of a CD, or DATA CD/DATA DVD containing MP3 audio tracks...
... stereo jacks of the recorder are available, depending on the duration of the press. • See "DVD Audio/Subtitle Language" on the recorder as the remote's m/ M buttons. When you can also use the ./> buttons on page 99 for the meaning of a CD, or DATA CD/DATA DVD containing MP3 audio tracks...
Operating Instructions
Page 48
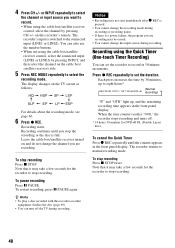
... the channel on other equipment, finalize the disc (page 69). • You can set the duration. z Hints • To play a disc recorded with this recorder's remote. Press z REC repeatedly to set the recorder to select the recording mode. Each press increases the time by 30 minutes, up to normal recording mode...
... the channel on other equipment, finalize the disc (page 69). • You can set the duration. z Hints • To play a disc recorded with this recorder's remote. Press z REC repeatedly to set the recorder to select the recording mode. Each press increases the time by 30 minutes, up to normal recording mode...

Operating Instructions
Page 84
... press ENTER. The selection items for registering a password appears, enter a new four-digit password using the number buttons. z Hint If you have a Sony DVD player or more than one Sony DVD recorder" on page 22. Front Display Adjusts the lighting of whether power is on again, and the recorder is reset to... is complete. • To cancel the Parental setting for Easy Setup (page 23) from step 4. Be sure to match the command mode of the supplied remote to their default settings. Select this recorder. • Depending on . 84
... press ENTER. The selection items for registering a password appears, enter a new four-digit password using the number buttons. z Hint If you have a Sony DVD player or more than one Sony DVD recorder" on page 22. Front Display Adjusts the lighting of whether power is on again, and the recorder is reset to... is complete. • To cancel the Parental setting for Easy Setup (page 23) from step 4. Be sure to match the command mode of the supplied remote to their default settings. Select this recorder. • Depending on . 84

Operating Instructions
Page 89
... function. , Batteries are weak. , The remote is too far from the mode you selected when recording. Then, unplug the recorder and after Synchro-Recording is set. , Insert a recordable disc (page 30). , The disc has 99 or more than 30 minutes. Other Sony equipment responds to open after you press Z... OPEN/CLOSE. , It may be erased from the one you have recorded or edited a disc. Set a different command mode for the disc tray to the remote. , The same command mode is inserted. Timer...
... function. , Batteries are weak. , The remote is too far from the mode you selected when recording. Then, unplug the recorder and after Synchro-Recording is set. , Insert a recordable disc (page 30). , The disc has 99 or more than 30 minutes. Other Sony equipment responds to open after you press Z... OPEN/CLOSE. , It may be erased from the one you have recorded or edited a disc. Set a different command mode for the disc tray to the remote. , The same command mode is inserted. Timer...

Operating Instructions
Page 92
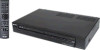
... including projecting parts and controls (w/h/d) Approx. 430 × 70 × 284 mm (Approx. 17 × 2 7/8 × 111/4 inches) Mass Approx. 3.1 kg (Approx. 6.8 lbs) Supplied accessories Remote commander (remote) (1) Size AA (R6) batteries (2) Audio/video cord (1) Set top box controller (1) Design and specifications are subject to change without notice. 92
... including projecting parts and controls (w/h/d) Approx. 430 × 70 × 284 mm (Approx. 17 × 2 7/8 × 111/4 inches) Mass Approx. 3.1 kg (Approx. 6.8 lbs) Supplied accessories Remote commander (remote) (1) Size AA (R6) batteries (2) Audio/video cord (1) Set top box controller (1) Design and specifications are subject to change without notice. 92
Operating Instructions
Page 94
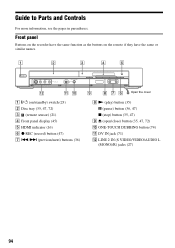
... pages in parentheses. S VIDEO VIDEO L(MONO) AUDIO R LINE-2 IN DV IN ONE-TOUCH DUBBING A "/1 (on the remote if they have the same function as the buttons on /standby) switch (23) B Disc tray (35, 47, 72) C (remote sensor) (21) D Front panel display (45) E HDMI indicator (16) F z REC (record) button (47) G ./> (previous/next) buttons...
... pages in parentheses. S VIDEO VIDEO L(MONO) AUDIO R LINE-2 IN DV IN ONE-TOUCH DUBBING A "/1 (on the remote if they have the same function as the buttons on /standby) switch (23) B Disc tray (35, 47, 72) C (remote sensor) (21) D Front panel display (45) E HDMI indicator (16) F z REC (record) button (47) G ./> (previous/next) buttons...

Operating Instructions
Page 95
Use the tactile dot as a reference. ,continued 95 Additional Information Remote 123 456 789 0 A Z OPEN/CLOSE button (35, 47, 72) B Number buttons* (36) SET button (82) C ANGLE button (36) D TOP MENU button (35) MENU button (35) E ...
Use the tactile dot as a reference. ,continued 95 Additional Information Remote 123 456 789 0 A Z OPEN/CLOSE button (35, 47, 72) B Number buttons* (36) SET button (82) C ANGLE button (36) D TOP MENU button (35) MENU button (35) E ...

Operating Instructions
Page 105
... VIDEO OUT 17 Connecting the cable box/satellite receiver 12 to your AV/amplifier (receiver) 18 to your TV 15 "Connections" 82 Controlling a Sony TV with the remote 21 "Copy" 66 Copy protection 47, 97 Copy-Free 47 Copy-Never 47 Copy-Once 47 CPRM 30 "Create Playlist" 62 Creating chapters 49...
... VIDEO OUT 17 Connecting the cable box/satellite receiver 12 to your AV/amplifier (receiver) 18 to your TV 15 "Connections" 82 Controlling a Sony TV with the remote 21 "Copy" 66 Copy protection 47, 97 Copy-Free 47 Copy-Never 47 Copy-Once 47 CPRM 30 "Create Playlist" 62 Creating chapters 49...
Operating Instructions
Page 106
... Recording 46 recordable discs 30 106 recording format 30 recording mode 46 Recording mode 46 Recording time 46, 49 Region code 34 Remaining time 44 Remote 21, 95 REPLAY 36 Resetting 85 Resume Play 38 Rotate 42 S Satellite receiver 13 Satellite receiver brand code 103 "Scan Audio" 38, 80 Searching for...
... Recording 46 recordable discs 30 106 recording format 30 recording mode 46 Recording mode 46 Recording time 46, 49 Region code 34 Remaining time 44 Remote 21, 95 REPLAY 36 Resetting 85 Resume Play 38 Rotate 42 S Satellite receiver 13 Satellite receiver brand code 103 "Scan Audio" 38, 80 Searching for...
Marketing Specifications
Page 2
RDR-GX255 Features General Background Graphics: Yes Video DVD (VR Mode) Playback: Yes...(s): 1 (Rear) HDMI™ Connection Output(s): 1 (Rear) i.LINK® for DV/Digital8® Video Input(s): 1 (Front)2 Hardware Remote Control: Yes Power Power Requirements: AC 120V, 60Hz Service and Warranty Information Limited Warranty: 1 Year Parts / 1 Year Labor Dimensions Weight: ..., 54MHz Audio Digital-to designate that date, this functionality without written permission is possible with any Sony device having an i.LINK connection for it to receive/record over -the-air broadcasting to switch ...
RDR-GX255 Features General Background Graphics: Yes Video DVD (VR Mode) Playback: Yes...(s): 1 (Rear) HDMI™ Connection Output(s): 1 (Rear) i.LINK® for DV/Digital8® Video Input(s): 1 (Front)2 Hardware Remote Control: Yes Power Power Requirements: AC 120V, 60Hz Service and Warranty Information Limited Warranty: 1 Year Parts / 1 Year Labor Dimensions Weight: ..., 54MHz Audio Digital-to designate that date, this functionality without written permission is possible with any Sony device having an i.LINK connection for it to receive/record over -the-air broadcasting to switch ...


