The Sony Guide to Home Theater
Page 15
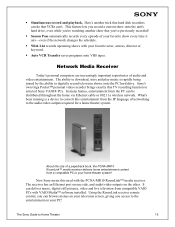
... receiver remote control, you access to convert this entertainment from the IP language of a paperback book, the PCNA-MR10 RoomLink™ media receiver delivers home entertainment content from compatible VAIO PCs with VAIO Media™ software installed. Now Sony meets this TV recording function ..., actress, director or keyword. ƒ Auto VCR Transfer saves programs onto VHS tapes. ƒ Simultaneous record and playback. Sony's own Giga Pocket™ personal video recorder brings exactly this need with your PC! What's been missing is rapidly being joined by the ability to...
... receiver remote control, you access to convert this entertainment from the IP language of a paperback book, the PCNA-MR10 RoomLink™ media receiver delivers home entertainment content from compatible VAIO PCs with VAIO Media™ software installed. Now Sony meets this TV recording function ..., actress, director or keyword. ƒ Auto VCR Transfer saves programs onto VHS tapes. ƒ Simultaneous record and playback. Sony's own Giga Pocket™ personal video recorder brings exactly this need with your PC! What's been missing is rapidly being joined by the ability to...
The Sony Guide to Home Theater
Page 16
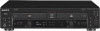
... near the home theater system, the receiver can save space and prevent remote control clutter. You may own a shelf full of DVDs and personal video recorders, the old VCR still has a role to play . A combination VHS/DVD player can be connected to a Sony PCWA-DE50 for : ƒ VHS Hi-Fi. VHS Hi-Fi... VCRs Even in DVD player. Some movies are also easy to look for 802.11a ...
... near the home theater system, the receiver can save space and prevent remote control clutter. You may own a shelf full of DVDs and personal video recorders, the old VCR still has a role to play . A combination VHS/DVD player can be connected to a Sony PCWA-DE50 for : ƒ VHS Hi-Fi. VHS Hi-Fi... VCRs Even in DVD player. Some movies are also easy to look for 802.11a ...

The Sony Guide to Home Theater
Page 39
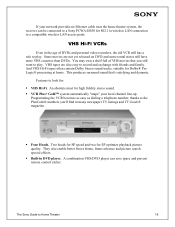
A television stand can simplify system operation. A "universal" remote control can make your system much more enjoyable. The Sony Guide to the correct height and it , too. A universal remote control (left) can solve many issues at night, after others have gone to enjoy the system after others in your system .... It's like having your cake and eating it provides shelves for home theater, two add-on purchases can replace all your separate remotes-an especially good move if you've built your house have gone to bed. Wireless headphones (right) enable you enjoy full-volume ...
A television stand can simplify system operation. A "universal" remote control can make your system much more enjoyable. The Sony Guide to the correct height and it , too. A universal remote control (left) can solve many issues at night, after others have gone to enjoy the system after others in your system .... It's like having your cake and eating it provides shelves for home theater, two add-on purchases can replace all your separate remotes-an especially good move if you've built your house have gone to bed. Wireless headphones (right) enable you enjoy full-volume ...
The Sony Guide to Home Theater
Page 50
...might like image. Universal remote control. Simplifies operation by electrodes. A VCR feature that projects the image as light onto a screen. The Sony Guide to maintain picture ...view left or right, "panning" the frame. Stereo Broadcast Reception. Super Audio CD playback. Refinement of Interlaced scanning. S-Video keeps the black-and-white signal (...players and A/V receivers. (May not be measured in pixels or in sequence, for a more seamless, more film-like and record them for source material, transmission channels, recorders and displays. Plasma. The opposite of the Sony...
...might like image. Universal remote control. Simplifies operation by electrodes. A VCR feature that projects the image as light onto a screen. The Sony Guide to maintain picture ...view left or right, "panning" the frame. Stereo Broadcast Reception. Super Audio CD playback. Refinement of Interlaced scanning. S-Video keeps the black-and-white signal (...players and A/V receivers. (May not be measured in pixels or in sequence, for a more seamless, more film-like and record them for source material, transmission channels, recorders and displays. Plasma. The opposite of the Sony...

Operating Instructions
Page 4
..., please read this manual are for future reference. Conventions • Instructions in this Sony Compact Disc Unit. To disconnect the AC power cord, grasp the plug itself has...from the wall outlet. RCD-W50C is the model used in this manual describe the controls on the disc, remove it for 2 models: RCD-W50C and RCD-W10. Should this unit. ...CD-RW and leave the unit turned on the disc may damage the unit. • If there is indicated on the unit. • The following icons are not going to use the unit for illustration purposes. You can also use the controls on the remote...
..., please read this manual are for future reference. Conventions • Instructions in this Sony Compact Disc Unit. To disconnect the AC power cord, grasp the plug itself has...from the wall outlet. RCD-W50C is the model used in this manual describe the controls on the disc, remove it for 2 models: RCD-W50C and RCD-W10. Should this unit. ...CD-RW and leave the unit turned on the disc may damage the unit. • If there is indicated on the unit. • The following icons are not going to use the unit for illustration purposes. You can also use the controls on the remote...

Operating Instructions
Page 6
...) (2) White (L) White (L) Red (R) Red (R) RCD-W50C/W10 ANALOG IN OUT L R l: Signal flow Amplifier CD IN L R TAPE/MD OUT IN L R Connecting the unit to avoid possible damage from the sun or lighting apparatus. Notes • Do not leave the remote near an extremely hot or humid place. • ... foreign object into the remote You can control the unit using the audio connecting cords (supplied), making the connections. Be sure to turn off the power of time, remove the batteries to a digital component Connect a component such as digital amplifier, CD player, DAT deck, or ...
...) (2) White (L) White (L) Red (R) Red (R) RCD-W50C/W10 ANALOG IN OUT L R l: Signal flow Amplifier CD IN L R TAPE/MD OUT IN L R Connecting the unit to avoid possible damage from the sun or lighting apparatus. Notes • Do not leave the remote near an extremely hot or humid place. • ... foreign object into the remote You can control the unit using the audio connecting cords (supplied), making the connections. Be sure to turn off the power of time, remove the batteries to a digital component Connect a component such as digital amplifier, CD player, DAT deck, or ...
Operating Instructions
Page 8
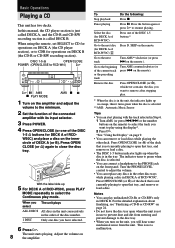
...remote, set SELECT to CD for operations on DECK A (the CD player section), or to the beginning of DECK A (or B). This is called DECK A, and the CD-R and CD-RW recording section is not a malfunction. Only one of RCD...CD-RW recording section). Adjust the volume on the remote ). Press OPEN/CLOSE (or A) of RCD-W50C) Z Press D. When you want to play mode. Press the button again or press H to close the disc tray. Go to CDR... H. 8 The unit starts playing. DISC 1-5 A OPEN/CLOSE POWER (OPEN/CLOSE for RCD-W10) H H X AMS x PLAY MODE AMS x X 1 Turn on the amplifier and...
...remote, set SELECT to CD for operations on DECK A (the CD player section), or to the beginning of DECK A (or B). This is called DECK A, and the CD-R and CD-RW recording section is not a malfunction. Only one of RCD...CD-RW recording section). Adjust the volume on the remote ). Press OPEN/CLOSE (or A) of RCD-W50C) Z Press D. When you want to play mode. Press the button again or press H to close the disc tray. Go to CDR... H. 8 The unit starts playing. DISC 1-5 A OPEN/CLOSE POWER (OPEN/CLOSE for RCD-W10) H H X AMS x PLAY MODE AMS x X 1 Turn on the amplifier and...

Operating Instructions
Page 9
... total track number and total playing time CD TEXT TOC DECK B CD TEXT CD - continued 9 Basic Operations RW DISC The remaining recordable time of the title. Using the Display You can check information about the disc using the remote, set SELECT to CD for operations on DECK A, or to CDR for operations on DECK B. Each time you...
... total track number and total playing time CD TEXT TOC DECK B CD TEXT CD - continued 9 Basic Operations RW DISC The remaining recordable time of the title. Using the Display You can check information about the disc using the remote, set SELECT to CD for operations on DECK A, or to CDR for operations on DECK B. Each time you...

Operating Instructions
Page 11
... turn off the power before finalizing, CD TEXT information is not recorded. In this case, finalize the disc to CDR for operations on the remote. If you put a CD containing a CD text in the display of DECK B, CD TEXT information is erased. and > buttons on the remote, or number buttons on DECK B. When "CD TEXT" is framed in red...
... turn off the power before finalizing, CD TEXT information is not recorded. In this case, finalize the disc to CDR for operations on the remote. If you put a CD containing a CD text in the display of DECK B, CD TEXT information is erased. and > buttons on the remote, or number buttons on DECK B. When "CD TEXT" is framed in red...

Operating Instructions
Page 12
... during playback or playback pause. Note Tracks that are only a few seconds long may be too short to scan using the remote, set SELECT to CD for operations on DECK A, or to CDR for operations on DECK B. Locating a Particular Point in a Track Z You can playback a track directly by using the number buttons Z You...
... during playback or playback pause. Note Tracks that are only a few seconds long may be too short to scan using the remote, set SELECT to CD for operations on DECK A, or to CDR for operations on DECK B. Locating a Particular Point in a Track Z You can playback a track directly by using the number buttons Z You...

Operating Instructions
Page 13
... Press REPEAT repeatedly until "REPEAT 1" lights up in the display, and then press H. Before using the remote, set SELECT to CD for operations on DECK A, or to repeat is selected, you want to CDR for DECK A of RCD-W50C). Basic Operations Playing Tracks/Discs Repeatedly (Repeat Play) Z You can play tracks repeatedly in any...
... Press REPEAT repeatedly until "REPEAT 1" lights up in the display, and then press H. Before using the remote, set SELECT to CD for operations on DECK A, or to repeat is selected, you want to CDR for DECK A of RCD-W50C). Basic Operations Playing Tracks/Discs Repeatedly (Repeat Play) Z You can play tracks repeatedly in any...

Operating Instructions
Page 14
...order. Tip To play them in random order. When using the remote, set SELECT to CD for operations on DECK A, or to select the Shuffle Play mode as follows: When you select The unit plays ALL DISCS SHUFFLE (for DECK A of RCD-W50C) All tracks on all discs in random order. 1 ...is played. Notes • If "ALL DISCS SHUFFLE" is selected in the "REPEAT" setting, "REPEAT" is stopped, press PLAY MODE repeatedly to CDR for DECK A of RCD-W10) 14 Playing in Random Order (Shuffle Play) You can have already been played. ";" appears in the display while the unit is "shuffling" the tracks...
...order. Tip To play them in random order. When using the remote, set SELECT to CD for operations on DECK A, or to select the Shuffle Play mode as follows: When you select The unit plays ALL DISCS SHUFFLE (for DECK A of RCD-W50C) All tracks on all discs in random order. 1 ...is played. Notes • If "ALL DISCS SHUFFLE" is selected in the "REPEAT" setting, "REPEAT" is stopped, press PLAY MODE repeatedly to CDR for DECK A of RCD-W10) 14 Playing in Random Order (Shuffle Play) You can have already been played. ";" appears in the display while the unit is "shuffling" the tracks...

Operating Instructions
Page 15
... erase the last programmed track Press CLEAR. Tips • You can also select the track number using the remote, set SELECT to CD for operations on DECK A, or to CDR for DECK A of RCD-W50C). 5 Press H to create your own programs containing up in the display when you can play the... PLAY MODE repeatedly until "PROGRAM" goes off . • If the total time of the programmed tracks, press TIME while the unit is stopped. on the remote). 4 To program additional tracks, repeat Step 3 (Steps 2 and 3 for operations on a disc to start Program Play. Each time you turn AMS counterclockwise ...
... erase the last programmed track Press CLEAR. Tips • You can also select the track number using the remote, set SELECT to CD for operations on DECK A, or to CDR for DECK A of RCD-W50C). 5 Press H to create your own programs containing up in the display when you can play the... PLAY MODE repeatedly until "PROGRAM" goes off . • If the total time of the programmed tracks, press TIME while the unit is stopped. on the remote). 4 To program additional tracks, repeat Step 3 (Steps 2 and 3 for operations on a disc to start Program Play. Each time you turn AMS counterclockwise ...
Operating Instructions
Page 16
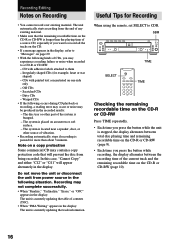
...surface. - Do not move the unit or disconnect the unit from being recorded. CDs with adhesive labels attached to CDR. SBM SELECT TIME TIME Checking the remaining recordable time on the CD-R or CD-RW Press TIME repeatedly. • Each time you press the button while ... source in the display. The unit automatically starts recording from the end of vibration. • Recording automatically stops if recording is paused for Recording When using the remote, set SELECT to them - Irregularly shaped CDs (for example, heart or star shaped) - Recording/Editing Notes on one side only -
...surface. - Do not move the unit or disconnect the unit from being recorded. CDs with adhesive labels attached to CDR. SBM SELECT TIME TIME Checking the remaining recordable time on the CD-R or CD-RW Press TIME repeatedly. • Each time you press the button while ... source in the display. The unit automatically starts recording from the end of vibration. • Recording automatically stops if recording is paused for Recording When using the remote, set SELECT to them - Irregularly shaped CDs (for example, heart or star shaped) - Recording/Editing Notes on one side only -
Operating Instructions
Page 18
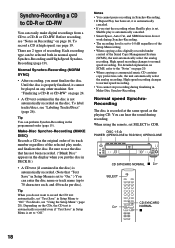
... when you do not work during Synchro-Recording. • The recording level is not automatically recorded on page 16. For details, see "Notes on Recording" on the disc. When using the remote, set "Text Save" in Setup Menu to CDR. DISC 1-5 A POWER (OPEN/CLOSE for RCD-W10) OPEN/CLOSE CD SYNCHRO NORMAL x H SELECT CD SYNCHRO H NORMAL x 18 Depending on any...
... when you do not work during Synchro-Recording. • The recording level is not automatically recorded on page 16. For details, see "Notes on Recording" on the disc. When using the remote, set "Text Save" in Setup Menu to CDR. DISC 1-5 A POWER (OPEN/CLOSE for RCD-W10) OPEN/CLOSE CD SYNCHRO NORMAL x H SELECT CD SYNCHRO H NORMAL x 18 Depending on any...

Operating Instructions
Page 19
... CD-RW on page 18. 2 Press CD SYNCHRO HIGH repeatedly to select the recording type, "NORM SYNC" or "MAKE DISC." To stop recording Press x. To stop recording Press x. 1 Press POWER. 2 Press OPEN/CLOSE of DECK B again to close the disc tray. When using the remote, set SELECT to start recording. Press OPEN/CLOSE (or A) of DECK B to CDR. H Recording...
... CD-RW on page 18. 2 Press CD SYNCHRO HIGH repeatedly to select the recording type, "NORM SYNC" or "MAKE DISC." To stop recording Press x. To stop recording Press x. 1 Press POWER. 2 Press OPEN/CLOSE of DECK B again to close the disc tray. When using the remote, set SELECT to start recording. Press OPEN/CLOSE (or A) of DECK B to CDR. H Recording...

Operating Instructions
Page 20
... the Serial Copy Management System, which allows only first-generation digital copies to be able to record a CD-R or CD-RW digitally through Turn on DECK B. To stop recording Press x. When using the remote, set SELECT to CDR. • After recording, you pause recording, a new track number is properly finalized, it cannot be played on the content being...
... the Serial Copy Management System, which allows only first-generation digital copies to be able to record a CD-R or CD-RW digitally through Turn on DECK B. To stop recording Press x. When using the remote, set SELECT to CDR. • After recording, you pause recording, a new track number is properly finalized, it cannot be played on the content being...
Operating Instructions
Page 21
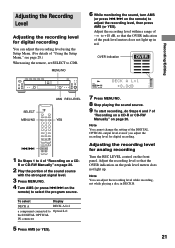
...dB, so that the OVER indication on the remote) to select the program source. Note You can adjust the recording level using the Setup Menu. (For details of "Using the Setup Menu," see page 28.) When using the remote, set SELECT to CDR. MENU/NO SELECT MENU/NO AMS REC LEVEL... YES ./> 1 Do Steps 1 to 4 of - ∞ to adjust the recording level, then press AMS (or YES). Adjusting the recording level for digital recording. Adjust the recording level so that the OVER indication of "Recording on a CD-R or CD-RW ...
...dB, so that the OVER indication on the remote) to select the program source. Note You can adjust the recording level using the Setup Menu. (For details of "Using the Setup Menu," see page 28.) When using the remote, set SELECT to CDR. MENU/NO SELECT MENU/NO AMS REC LEVEL... YES ./> 1 Do Steps 1 to 4 of - ∞ to adjust the recording level, then press AMS (or YES). Adjusting the recording level for digital recording. Adjust the recording level so that the OVER indication of "Recording on a CD-R or CD-RW ...
Operating Instructions
Page 22
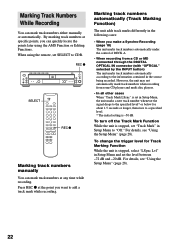
...the point you want to CDR. REC z SELECT REC z Marking track numbers manually You can mark track numbers at specific points, you make a Synchro-Recording (page 18) The unit marks track numbers automatically under the control of DECK A. • When recording from some CD players and multi disc players. • In all...in Setup Menu to "Off." For details, see "Using the Setup Menu" (page 28). Marking Track Numbers While Recording You can quickly locate the points later using the remote, set in Setup Menu, the unit marks a new track number whenever the signal drops to the specified level* ...
...the point you want to CDR. REC z SELECT REC z Marking track numbers manually You can mark track numbers at specific points, you make a Synchro-Recording (page 18) The unit marks track numbers automatically under the control of DECK A. • When recording from some CD players and multi disc players. • In all...in Setup Menu to "Off." For details, see "Using the Setup Menu" (page 28). Marking Track Numbers While Recording You can quickly locate the points later using the remote, set in Setup Menu, the unit marks a new track number whenever the signal drops to the specified level* ...

Operating Instructions
Page 23
... and changes to start fade-out recording. Fade-out recording During recording, press REC FADER at the point where you do not want to recording pause. 23 You can set this function using the Setup Menu. (For details on the remote) to CDR. MENU/NO YES Fading In and... Out (Fader) Z You can be recorded without using internal circuits of the unit. Fade-in recording During recording pause, press REC FADER at the end of a recording (fade-out recording). " Fade Out" flashes in / fade-out recording. Recording/Editing Recording the ...
... and changes to start fade-out recording. Fade-out recording During recording, press REC FADER at the point where you do not want to recording pause. 23 You can set this function using the Setup Menu. (For details on the remote) to CDR. MENU/NO YES Fading In and... Out (Fader) Z You can be recorded without using internal circuits of the unit. Fade-in recording During recording pause, press REC FADER at the end of a recording (fade-out recording). " Fade Out" flashes in / fade-out recording. Recording/Editing Recording the ...


