Operating Instructions
Page 1
En ce qui concerne l'installation et les connexions, consulter le manuel d'installation/raccordement fourni. Record these numbers whenever you call upon your Sony dealer regarding this product. Refer to these numbers in the space provided below. CDX-R5715X Serial No. For installation and connections, see the supplied installation/connections manual. Model No. 2-348-415-11 (1) FM/AM Compact Disc Player Operating Instructions US Mode d'emploi FR Owner's Record The model and serial numbers are located on the bottom of the unit. CDX-R5715X © 2005 Sony Corporation
En ce qui concerne l'installation et les connexions, consulter le manuel d'installation/raccordement fourni. Record these numbers whenever you call upon your Sony dealer regarding this product. Refer to these numbers in the space provided below. CDX-R5715X Serial No. For installation and connections, see the supplied installation/connections manual. Model No. 2-348-415-11 (1) FM/AM Compact Disc Player Operating Instructions US Mode d'emploi FR Owner's Record The model and serial numbers are located on the bottom of the unit. CDX-R5715X © 2005 Sony Corporation
Operating Instructions
Page 2
... or relocate the receiving antenna. - Thank you for help. You can radiate radio frequency energy and, if not installed and used in a particular installation. This equipment generates, uses, and can enjoy your drive with the instructions, may cause harmful interference to playing with this Sony Compact Disc Player. For details, see the following functions. • CD playback You can also control optional CD/MD changers and optional Sony portable devices in addition to...
... or relocate the receiving antenna. - Thank you for help. You can radiate radio frequency energy and, if not installed and used in a particular installation. This equipment generates, uses, and can enjoy your drive with the instructions, may cause harmful interference to playing with this Sony Compact Disc Player. For details, see the following functions. • CD playback You can also control optional CD/MD changers and optional Sony portable devices in addition to...
Operating Instructions
Page 3
... Tune 9 Labeling a station/disc 10 Adjusting menu items - BTM 8 Storing manually 8 Receiving the stored stations 8 Tuning automatically 8 Receiving a station through compression. MENU 10 Using optional equipment 11 CD/MD changer 11 Rotary commander RM-X4S 12 Auxiliary audio equipment 13 Additional Information Precautions 13 Notes on the XM tuner module. SonicStage and its logo are trademarks of controls and basic operations Main unit 6 Card remote commander RM-X153 6 CD Display items 8 Repeat and shuffle play 8 Radio...
... Tune 9 Labeling a station/disc 10 Adjusting menu items - BTM 8 Storing manually 8 Receiving the stored stations 8 Tuning automatically 8 Receiving a station through compression. MENU 10 Using optional equipment 11 CD/MD changer 11 Rotary commander RM-X4S 12 Auxiliary audio equipment 13 Additional Information Precautions 13 Notes on the XM tuner module. SonicStage and its logo are trademarks of controls and basic operations Main unit 6 Card remote commander RM-X153 6 CD Display items 8 Repeat and shuffle play 8 Radio...
Operating Instructions
Page 4
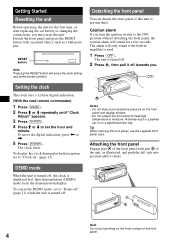
... will sound for the first time, or after replacing the car battery or changing the connections, you . (OFF) Setting the clock The clock uses a 12-hour digital indication. (With the card remote commander) 1 Press (MENU). 2 Press M or m repeatedly until it clicks. Attaching the front panel Engage part A of the front panel with a pointed object, such as illustrated, and push the left side into position until "Clock Adjust" appears...
... will sound for the first time, or after replacing the car battery or changing the connections, you . (OFF) Setting the clock The clock uses a 12-hour digital indication. (With the card remote commander) 1 Press (MENU). 2 Press M or m repeatedly until it clicks. Attaching the front panel Engage part A of the front panel with a pointed object, such as illustrated, and push the left side into position until "Clock Adjust" appears...
Operating Instructions
Page 5
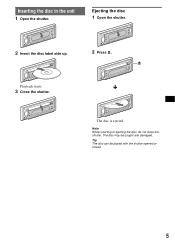
Tip The disc can be caught and damaged. Playback starts. 3 Close the shutter. Note While inserting or ejecting the disc, do not close the shutter. The disc may be played with the shutter opened or closed. 5 x The disc is ejected. Inserting the disc in the unit 1 Open the shutter. Ejecting the disc 1 Open the shutter. 2 Insert the disc label side up. 2 Press Z.
Tip The disc can be caught and damaged. Playback starts. 3 Close the shutter. Note While inserting or ejecting the disc, do not close the shutter. The disc may be played with the shutter opened or closed. 5 x The disc is ejected. Inserting the disc in the unit 1 Open the shutter. Ejecting the disc 1 Open the shutter. 2 Insert the disc label side up. 2 Press Z.
Operating Instructions
Page 6
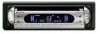
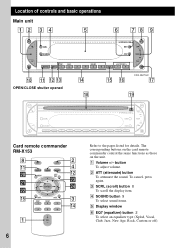
... the card remote commander control the same functions as those on the unit. D SOUND button 9 To select sound items. E Display window F EQ7 (equalizer) button 2 To select an equalizer type (Xplod, Vocal, Club, Jazz, New Age, Rock, Custom or off). B ATT (attenuate) button To attenuate the sound. Location of controls and basic operations Main unit 12 3 4 5 6 78 9 ATT SCRL SOUND OPEN/CLOSE OFF DSO EQ7 SEEK REP SHUF SOURCE MODE 1 2 3 BBE MP 4 5 6 DSPL GP/PRESET 0 qa qs...
... the card remote commander control the same functions as those on the unit. D SOUND button 9 To select sound items. E Display window F EQ7 (equalizer) button 2 To select an equalizer type (Xplod, Vocal, Club, Jazz, New Age, Rock, Custom or off). B ATT (attenuate) button To attenuate the sound. Location of controls and basic operations Main unit 12 3 4 5 6 78 9 ATT SCRL SOUND OPEN/CLOSE OFF DSO EQ7 SEEK REP SHUF SOURCE MODE 1 2 3 BBE MP 4 5 6 DSPL GP/PRESET 0 qa qs...
Operating Instructions
Page 7
... DSO mode (1, 2, 3 or off /stop the source. button Radio: To tune in stations automatically (press); J (front panel release) button 4 K SOURCE button To power on page 14. 7 O DSPL (display) button 8, 10 To change the source (Radio/CD/ MD*1/AUX*2). The following buttons on the unit. If the changer is connected, the operation is turned off ." store stations (press and hold ). w; Note If the unit is different, see "Replacing the lithium battery of the card remote commander" on /change display items. P GP*5/PRESET -/+ buttons To select preset stations...
... DSO mode (1, 2, 3 or off /stop the source. button Radio: To tune in stations automatically (press); J (front panel release) button 4 K SOURCE button To power on page 14. 7 O DSPL (display) button 8, 10 To change the source (Radio/CD/ MD*1/AUX*2). The following buttons on the unit. If the changer is connected, the operation is turned off ." store stations (press and hold ). w; Note If the unit is different, see "Replacing the lithium battery of the card remote commander" on /change display items. P GP*5/PRESET -/+ buttons To select preset stations...
Operating Instructions
Page 8
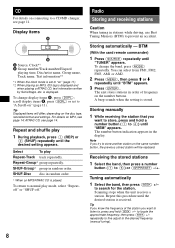
..., press (MODE) repeatedly. scroll display items B, press (SCRL) or set to prevent an accident. SHUF-Disc disc in random order. The number button indication appears in stations while driving, use Best Tuning Memory (BTM) to "on " (page 11). Storing manually 1 While receiving the station that you try to store another station on connecting to normal play Repeat-Track track repeatedly. to (6)) or (GP/PRESET) -/+. A beep sounds when the setting is played. BTM...
..., press (MODE) repeatedly. scroll display items B, press (SCRL) or set to prevent an accident. SHUF-Disc disc in random order. The number button indication appears in stations while driving, use Best Tuning Memory (BTM) to "on " (page 11). Storing manually 1 While receiving the station that you try to store another station on connecting to normal play Repeat-Track track repeatedly. to (6)) or (GP/PRESET) -/+. A beep sounds when the setting is played. BTM...
Operating Instructions
Page 9
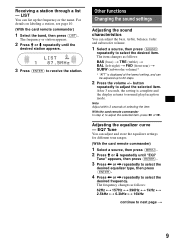
... card remote commander) 1 Select a source, then press (MENU). 2 Press M or m repeatedly until the desired station appears. 3 Press (ENTER) to select the desired frequency. The frequency changes as follows: BAS (bass) t TRE (treble) t BAL (left-right) t FAD (front-rear) t SUBW (subwoofer volume)* * "ATT" is complete and the display returns to 20 steps. 2 Press the volume +/- Other functions Changing the sound settings Adjusting the sound characteristics You can list up to normal play/reception mode. EQ7 Tune You...
... card remote commander) 1 Select a source, then press (MENU). 2 Press M or m repeatedly until the desired station appears. 3 Press (ENTER) to select the desired frequency. The frequency changes as follows: BAS (bass) t TRE (treble) t BAL (left-right) t FAD (front-rear) t SUBW (subwoofer volume)* * "ATT" is complete and the display returns to 20 steps. 2 Press the volume +/- Other functions Changing the sound settings Adjusting the sound characteristics You can list up to normal play/reception mode. EQ7 Tune You...
Operating Instructions
Page 10
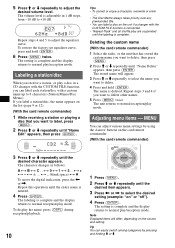
... card remote commander) 1 Select the radio, or the unit that you want to delete other names. 5 Press (MENU) twice. The volume level is complete and the display returns to normal play/reception mode. Labeling a station/disc When you receive a station, or play are suspended until the desired character appears. MENU You can label each station/disc with the CUSTOM FILE function is connected. • "Repeat-Track" and all shuffle play a disc in...
... card remote commander) 1 Select the radio, or the unit that you want to delete other names. 5 Press (MENU) twice. The volume level is complete and the display returns to normal play/reception mode. Labeling a station/disc When you receive a station, or play are suspended until the desired character appears. MENU You can label each station/disc with the CUSTOM FILE function is connected. • "Repeat-Track" and all shuffle play a disc in...
Operating Instructions
Page 11
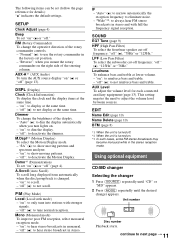
... desired changer appears. Demo*1 (Demonstration) To set "on ": to adjust the volume level between sources. Mono (Monaural mode) To improve poor FM reception, select monaural reception mode. - This setting negates the need to scroll. - SETUP Clock Adjust (page 4) Beep To set "on ": to next page t RM (Rotary Commander) To change the brightness of the display. - "on " (z) or "off " (z): to only tune into stations with full the frequency signal reception. IF - Unit number Disc number Playback...
... desired changer appears. Demo*1 (Demonstration) To set "on ": to adjust the volume level between sources. Mono (Monaural mode) To improve poor FM reception, select monaural reception mode. - This setting negates the need to scroll. - SETUP Clock Adjust (page 4) Beep To set "on ": to next page t RM (Rotary Commander) To change the brightness of the display. - "on " (z) or "off " (z): to only tune into stations with full the frequency signal reception. IF - Unit number Disc number Playback...
Operating Instructions
Page 12
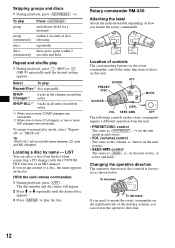
... until the desired setting appears. LIST You can reverse the operative direction. 12 If you need to a disc, the name appears on the rotary commander require a different operation from the list when connecting a CD changer with the CUSTOM FILE function or an MD changer. ATT SOUND PRESET/ DISC MODE SOURCE OFF DSPL VOL SEEK/AMS OFF The following controls on the list. (With the card remote commander) 1 During playback...
... until the desired setting appears. LIST You can reverse the operative direction. 12 If you need to a disc, the name appears on the rotary commander require a different operation from the list when connecting a CD changer with the CUSTOM FILE function or an MD changer. ATT SOUND PRESET/ DISC MODE SOURCE OFF DSPL VOL SEEK/AMS OFF The following controls on the list. (With the card remote commander) 1 During playback...
Operating Instructions
Page 13
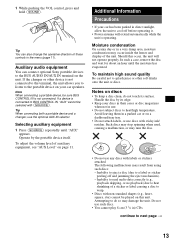
... and jamming the eject mechanism). - To adjust the volume level of the unit. Notes on discs • To keep a disc clean, do so may occur inside the lenses and display of auxiliary equipment, see "AUX Level" on the unit. To maintain high sound quality Be careful not to the BUS AUDIO IN/AUX IN terminal on page 11. Auxiliary audio equipment You can also change the operative direction of a sticker or...
... and jamming the eject mechanism). - To adjust the volume level of the unit. Notes on discs • To keep a disc clean, do so may occur inside the lenses and display of auxiliary equipment, see "AUX Level" on the unit. To maintain high sound quality Be careful not to the BUS AUDIO IN/AUX IN terminal on page 11. Auxiliary audio equipment You can also change the operative direction of a sticker or...
Operating Instructions
Page 14
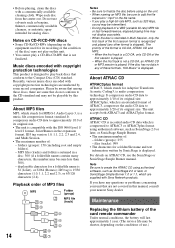
... size. • The unit is compatible with the ISO 9660 level 1/ level 2 format, Joliet/Romeo in the expansion format, ID3 tag version 1.0, 1.1, 2.2, 2.3 and 2.4, and Multi Session. • The maximum number of : - It compresses audio CD data to finalize the disc before using on this manual, consult your unit that do not conform to the Compact Disc (CD) standard. If you play on the unit. • When...
... size. • The unit is compatible with the ISO 9660 level 1/ level 2 format, Joliet/Romeo in the expansion format, ID3 tag version 1.0, 1.1, 2.2, 2.3 and 2.4, and Multi Session. • The maximum number of : - It compresses audio CD data to finalize the disc before using on this manual, consult your unit that do not conform to the Compact Disc (CD) standard. If you play on the unit. • When...

Operating Instructions
Page 15
... in alcohol. Otherwise, the connectors may present a risk of children. Main unit Back of the card remote commander becomes shorter. Fuse replacement When replacing the fuse, be an internal malfunction. Do not recharge, disassemble, or dispose of the mounting. Removing the unit 1 Remove the protection collar. 1 Detach the front panel (page 4). 2 Engage the release keys together with a new CR2025 lithium battery. Hook facing inwards. 2 Pull the...
... in alcohol. Otherwise, the connectors may present a risk of children. Main unit Back of the card remote commander becomes shorter. Fuse replacement When replacing the fuse, be an internal malfunction. Do not recharge, disassemble, or dispose of the mounting. Removing the unit 1 Remove the protection collar. 1 Detach the front panel (page 4). 2 Engage the release keys together with a new CR2025 lithium battery. Hook facing inwards. 2 Pull the...
Operating Instructions
Page 16
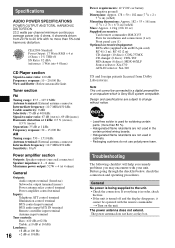
... connection and operating procedures. t Turn on the unit. Specifications AUDIO POWER SPECIFICATIONS POWER OUTPUT AND TOTAL HARMONIC DISTORTION 23.2 watts per channel minimum continuous average power into 4 Ohms) CD Player section Signal-to-noise ratio: 120 dB Frequency response: 10 - 20,000 Hz Wow and flutter: Below measurable limit Tuner section FM Tuning range: 87.5 - 107.9 MHz Antenna terminal: External antenna connector Intermediate frequency: 10.7 MHz/450 kHz Usable sensitivity: 9 dBf Selectivity...
... connection and operating procedures. t Turn on the unit. Specifications AUDIO POWER SPECIFICATIONS POWER OUTPUT AND TOTAL HARMONIC DISTORTION 23.2 watts per channel minimum continuous average power into 4 Ohms) CD Player section Signal-to-noise ratio: 120 dB Frequency response: 10 - 20,000 Hz Wow and flutter: Below measurable limit Tuner section FM Tuning range: 87.5 - 107.9 MHz Antenna terminal: External antenna connector Intermediate frequency: 10.7 MHz/450 kHz Usable sensitivity: 9 dBf Selectivity...
Operating Instructions
Page 17
...; An optional power amplifier is heard in monaural reception mode. The disc is not possible. • Store the correct frequency in a sturdy part of the car antenna. • The auto antenna will not eject. Preset tuning is incompatible with very many characters, those may not have been erased. • The RESET button has been pressed. t Set to which data can be played back. The following discs take longer...
...; An optional power amplifier is heard in monaural reception mode. The disc is not possible. • Store the correct frequency in a sturdy part of the car antenna. • The auto antenna will not eject. Preset tuning is incompatible with very many characters, those may not have been erased. • The RESET button has been pressed. t Set to which data can be played back. The following discs take longer...
Operating Instructions
Page 18
... disc cannot play because of speakers/amplifiers is pressed.) The connection of some problem. t Insert the magazine in the track. t Press the RESET button (page 4). t See the installation guide manual of the disc causing the error appears in the display, consult your nearest Sony dealer. Reset The CD unit and CD/MD changer cannot be repaired because of CD playback trouble, bring the disc that you cannot go any button is incorrect. The local seek mode...
... disc cannot play because of speakers/amplifiers is pressed.) The connection of some problem. t Insert the magazine in the track. t Press the RESET button (page 4). t See the installation guide manual of the disc causing the error appears in the display, consult your nearest Sony dealer. Reset The CD unit and CD/MD changer cannot be repaired because of CD playback trouble, bring the disc that you cannot go any button is incorrect. The local seek mode...

Operating Instructions
Page 40
Sony Corporation Printed in China
Sony Corporation Printed in China


