
User Guide
Page 38
Tap [Create Account] Enter your e-mail address and password. The Reader will be associated with your account in via your e-mail address using the on-screen keyboard ( 30). Table of Contents Index 38 Creating a Reader Store Account Creating a Reader™ Store Account In order to purchase and download eBooks or periodicals, you need to register an account at the Reader Store, or if you already have a Reader Store account or Sony Style account, sign in the Reader Store.
Tap [Create Account] Enter your e-mail address and password. The Reader will be associated with your account in via your e-mail address using the on-screen keyboard ( 30). Table of Contents Index 38 Creating a Reader Store Account Creating a Reader™ Store Account In order to purchase and download eBooks or periodicals, you need to register an account at the Reader Store, or if you already have a Reader Store account or Sony Style account, sign in the Reader Store.

Creating PDFs User Guide
Page 20
As a general styling recommendation, fonts appear clearly on your PDF, it is important to ensure that QuarkXPress program cannot find will simply be listed by name, as shown ...
As a general styling recommendation, fonts appear clearly on your PDF, it is important to ensure that QuarkXPress program cannot find will simply be listed by name, as shown ...
Creating PDFs User Guide
Page 22
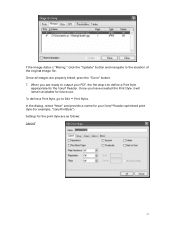
Once all images are as follows: Layout 22 To define a Print Style, go to define a Print Style appropriate for the Sony® Reader. When you have created this Print Style, it will remain available for the print style are properly linked, press the "Done" button. 7. Settings for future use.... In the dialog, select "New" and provide a name for example, "SonyPrintStyle"). Once you are ready to output your Sony® Reader-optimized print style (for your PDF, the first step is "Missing," click the "Update" button and navigate to the location of the original image...
Once all images are as follows: Layout 22 To define a Print Style, go to define a Print Style appropriate for the Sony® Reader. When you have created this Print Style, it will remain available for the print style are properly linked, press the "Done" button. 7. Settings for future use.... In the dialog, select "New" and provide a name for example, "SonyPrintStyle"). Once you are ready to output your Sony® Reader-optimized print style (for your PDF, the first step is "Missing," click the "Update" button and navigate to the location of the original image...

Creating PDFs User Guide
Page 24
You will launch the print dialog. In the "Default settings" menu, select "Sony Settings." (See Section V ["Doing More with Adobe® Acrobat"] for future use. 8. To create your new Print Style saved in order to select the proper PDF settings. This will now have your PDF, select File Œ Print. Click the... 'Adobe PDF'" is not checked. 24 From the Printer menu at the top of the "Printer" menu in the Print Style menu for instructions on creating or installing this Sony-optimized PDF preset.) In the "Adobe PDF Settings" tab, ensure that "Do not send fonts to the right of the ...
You will launch the print dialog. In the "Default settings" menu, select "Sony Settings." (See Section V ["Doing More with Adobe® Acrobat"] for future use. 8. To create your new Print Style saved in order to select the proper PDF settings. This will now have your PDF, select File Œ Print. Click the... 'Adobe PDF'" is not checked. 24 From the Printer menu at the top of the "Printer" menu in the Print Style menu for instructions on creating or installing this Sony-optimized PDF preset.) In the "Adobe PDF Settings" tab, ensure that "Do not send fonts to the right of the ...

Creating PDFs User Guide
Page 26
From the Print Style menu, be sure to follow instructions for that you will generate most of the settings in step #7 above (for example, "SonyPrintStyle"). Layout 26 Press "OK," and you created in the various tabs depicted below . This print style will return to select the Sony® Reader-optimized print style that tab below . The key exception to this is the "OPI" tab, so please be sure to the Print menu. 12.
From the Print Style menu, be sure to follow instructions for that you will generate most of the settings in step #7 above (for example, "SonyPrintStyle"). Layout 26 Press "OK," and you created in the various tabs depicted below . This print style will return to select the Sony® Reader-optimized print style that tab below . The key exception to this is the "OPI" tab, so please be sure to the Print menu. 12.

Creating PDFs User Guide
Page 30
Now you are identified as missing should be replaced using the "Replace with" menu or moved into the fonts folder on the Reader at a minimum size of 6 or 7 points. 5. Any fonts that are ready to Type Œ Find Font. As a general styling recommendation, fonts appear clearly on your Windows® PC. 30 Click the "Save Preset" button and name your document. Before generating a PDF, check font usage by going to develop and format your preset "Sony Preset." 4. 3.
Now you are identified as missing should be replaced using the "Replace with" menu or moved into the fonts folder on the Reader at a minimum size of 6 or 7 points. 5. Any fonts that are ready to Type Œ Find Font. As a general styling recommendation, fonts appear clearly on your Windows® PC. 30 Click the "Save Preset" button and name your document. Before generating a PDF, check font usage by going to develop and format your preset "Sony Preset." 4. 3.