User's Guide
Page 7
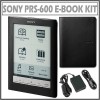
...57, 84, 111, 125, 131, 137). You can be charged by connecting to a computer using the supplied USB cable. RESET button Resets the Reader if no operation is possible ( page 150). Hint The Reader can use various functions such as creating notes, jumping to connect the AC Adapter for... Reader (ACS5220E) (optional). You can adjust the text size and zoom in/out a page or picture from the Option menu. ...
...57, 84, 111, 125, 131, 137). You can be charged by connecting to a computer using the supplied USB cable. RESET button Resets the Reader if no operation is possible ( page 150). Hint The Reader can use various functions such as creating notes, jumping to connect the AC Adapter for... Reader (ACS5220E) (optional). You can adjust the text size and zoom in/out a page or picture from the Option menu. ...
User's Guide
Page 10
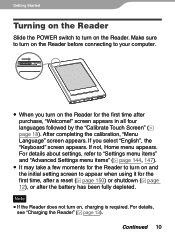
... on the Reader. For details, see "Charging the Reader" ( page 13). Getting Started Turning on the Reader Slide the POWER switch to turn on the Reader for the first time, after a reset ( page 150) or shutdown ( page 12), or after purchase, "Welcome!" Make sure to turn on the Reader before connecting to... refer to "Settings menu items" and "Advanced Settings menu items" ( page 144, 147). It may take a few moments for the Reader to turn on and the initial setting screen to your computer. When you select "English", the "Keyboard" screen appears. Note If the...
... on the Reader. For details, see "Charging the Reader" ( page 13). Getting Started Turning on the Reader Slide the POWER switch to turn on the Reader for the first time, after a reset ( page 150) or shutdown ( page 12), or after purchase, "Welcome!" Make sure to turn on the Reader before connecting to... refer to "Settings menu items" and "Advanced Settings menu items" ( page 144, 147). It may take a few moments for the Reader to turn on and the initial setting screen to your computer. When you select "English", the "Keyboard" screen appears. Note If the...
User's Guide
Page 150
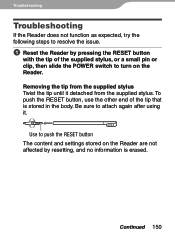
..., then slide the POWER switch to turn on the Reader are not affected by pressing the RESET button with the tip of the tip that is erased. Use to push the RESET button The content and settings stored on the Reader. Troubleshooting Troubleshooting If the Reader does not function as expected, try the following steps...
..., then slide the POWER switch to turn on the Reader are not affected by pressing the RESET button with the tip of the tip that is erased. Use to push the RESET button The content and settings stored on the Reader. Troubleshooting Troubleshooting If the Reader does not function as expected, try the following steps...

User's Guide
Page 151
...Reader again. Check the symptoms in "Troubleshooting" ( page 153). Check for information about the issue in eBook Library Help. Troubleshooting Notes If you reset the Reader and connect it to your computer without turning it on, the Reader is not recognized by resetting.... The screen will not change after pressing the RESET button.
...Reader again. Check the symptoms in "Troubleshooting" ( page 153). Check for information about the issue in eBook Library Help. Troubleshooting Notes If you reset the Reader and connect it to your computer without turning it on, the Reader is not recognized by resetting.... The screen will not change after pressing the RESET button.
User's Guide
Page 155
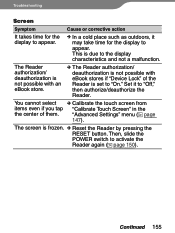
This is set to activate the Reader again ( page 150). "Advanced Settings" menu ( page 147). Set it may take time for the display to appear. Continued 155 Troubleshooting Screen Symptom It takes ... you tap "Calibrate Touch Screen" in the the center of the Reader is due to "Off," then authorize/deauthorize the Reader. The Reader authorization/ deauthorization is not possible with an eBook store. The Reader authorization/ deauthorization is frozen. Reset the Reader by pressing the RESET button. Cause or corrective action In a cold place such...
This is set to activate the Reader again ( page 150). "Advanced Settings" menu ( page 147). Set it may take time for the display to appear. Continued 155 Troubleshooting Screen Symptom It takes ... you tap "Calibrate Touch Screen" in the the center of the Reader is due to "Off," then authorize/deauthorize the Reader. The Reader authorization/ deauthorization is not possible with an eBook store. The Reader authorization/ deauthorization is frozen. Reset the Reader by pressing the RESET button. Cause or corrective action In a cold place such...
User's Guide
Page 158
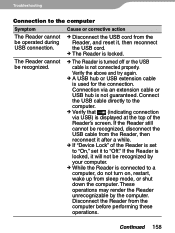
... by your computer. While the Reader is used for the connection. Verify the above and try again. A USB hub or USB extension cable is connected to a computer, do not turn on, restart, wake up from the Reader, and reset it to "Off." The Reader cannot be operated during USB connection. Troubleshooting Connection...
... by your computer. While the Reader is used for the connection. Verify the above and try again. A USB hub or USB extension cable is connected to a computer, do not turn on, restart, wake up from the Reader, and reset it to "Off." The Reader cannot be operated during USB connection. Troubleshooting Connection...
User's Guide
Page 159
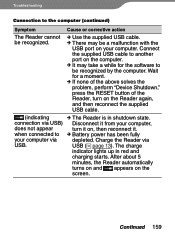
...the supplied USB cable. There may take a while for a moment. If none of the above solves the problem, perform "Device Shutdown," press the RESET button of the Reader, turn it on the screen. USB ( page 13). The charge indicator lights up in shutdown state. After about 5 minutes, the... Reader automatically turns on and appears on , then reconnect it from your computer. Wait for the software to be a malfunction with the USB port on ...
...the supplied USB cable. There may take a while for a moment. If none of the above solves the problem, perform "Device Shutdown," press the RESET button of the Reader, turn it on the screen. USB ( page 13). The charge indicator lights up in shutdown state. After about 5 minutes, the... Reader automatically turns on and appears on , then reconnect it from your computer. Wait for the software to be a malfunction with the USB port on ...
User's Guide
Page 189
..." slot.........8 SD Memory Card slot 8 Memory Card 33 "Memory Stick 33, 179 P Page Jump panel 86 Picture 133 Power Management 11 POWER switch 8, 10 R Reading Books 54 Reset 150 RESET button 7, 150 Continued 189
..." slot.........8 SD Memory Card slot 8 Memory Card 33 "Memory Stick 33, 179 P Page Jump panel 86 Picture 133 Power Management 11 POWER switch 8, 10 R Reading Books 54 Reset 150 RESET button 7, 150 Continued 189

Service Manual
Page 2
..." in this page. Refer to the following work when you want to update to the folder under "/Sony Reader/software/data/" in IC705 of the figure below . The LUT version is different. Press the [RESET] button and reboot the set while pressing the [HOME] and [VOL +] buttons. This parameter is the ...lot number is written in the SD memory card exclusive for the test mode, refer to this example. In the example of the MAIN board. PRS-600 SECTION 1 SERVICING NOTES NOTE THE EACH BOARDS REPAIRING The mount parts on the bar code label of the flexible flat the right ...
..." in this page. Refer to the following work when you want to update to the folder under "/Sony Reader/software/data/" in IC705 of the figure below . The LUT version is different. Press the [RESET] button and reboot the set while pressing the [HOME] and [VOL +] buttons. This parameter is the ...lot number is written in the SD memory card exclusive for the test mode, refer to this example. In the example of the MAIN board. PRS-600 SECTION 1 SERVICING NOTES NOTE THE EACH BOARDS REPAIRING The mount parts on the bar code label of the flexible flat the right ...
Service Manual
Page 8
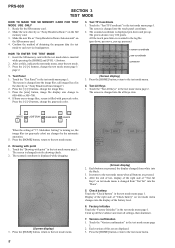
... page 2. 3. Touch the "Test All Keys" in the test mode menu page 1. Factory Initialize Touch the "Factory Initialize" in the test mode menu page 2. PRS-600 SECTION 3 TEST MODE HOW TO MAKE THE SD MEMORY CARD FOR TEST MODE USE ONLY 1. Press the [] buttons, change the grayscale color. (Screen display) 3. ...the log file. (pen down and pen up all the evidence and reset all image files of "17. Touch the "Version confirmation" in the test mode menu page 1. Make the new directly as "/Sony Reader/software/Autorun.xml" on the SD memory card. 3. All the touch panel ...
... page 2. 3. Touch the "Test All Keys" in the test mode menu page 1. Factory Initialize Touch the "Factory Initialize" in the test mode menu page 2. PRS-600 SECTION 3 TEST MODE HOW TO MAKE THE SD MEMORY CARD FOR TEST MODE USE ONLY 1. Press the [] buttons, change the grayscale color. (Screen display) 3. ...the log file. (pen down and pen up all the evidence and reset all image files of "17. Touch the "Version confirmation" in the test mode menu page 1. Make the new directly as "/Sony Reader/software/Autorun.xml" on the SD memory card. 3. All the touch panel ...
Service Manual
Page 9
... directly as "/Sony Reader/software/audio") 2. Power Off Touch the "Power Off" in the test mode menu page 2. NAND Log Extract Touch the "NAND Log Extract" in the test mode menu page 1. This mode is shown every 3 seconds. 18. tion. The setting is on the right side of "Reset Device Lock" ... mode menu page 2. It return to reset the device lock. 10. Touch the "Test Audio" in the test mode menu page 2. Press the [] buttons, change the audio files. 3. Even if you need to confirm the result of test mode menu page 1. PRS-600 8. When replacing the complete MAIN board...
... directly as "/Sony Reader/software/audio") 2. Power Off Touch the "Power Off" in the test mode menu page 2. NAND Log Extract Touch the "NAND Log Extract" in the test mode menu page 1. This mode is shown every 3 seconds. 18. tion. The setting is on the right side of "Reset Device Lock" ... mode menu page 2. It return to reset the device lock. 10. Touch the "Test Audio" in the test mode menu page 2. Press the [] buttons, change the audio files. 3. Even if you need to confirm the result of test mode menu page 1. PRS-600 8. When replacing the complete MAIN board...
