
User's Guide
Page 5
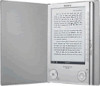
.../Playing/Viewing Content Reading Books 35 Reading books transferred from your computer 35 Jumping to the specified number page directly 40 Switching screen orientation (vertical/horizontal 41 Displaying the book information 42 Sorting the Book list 43 Selecting a book from the Collection list 46...computer 51 Reading books while playing an audio file 53 Viewing Pictures 55 Viewing pictures transferred from your computer 55 Settings Setting screen orientation 58 Setting the Date and Time 59 Setting the Slideshow 60 Setting the Sleep Mode (Resume Function 61 Setting the Advanced...
.../Playing/Viewing Content Reading Books 35 Reading books transferred from your computer 35 Jumping to the specified number page directly 40 Switching screen orientation (vertical/horizontal 41 Displaying the book information 42 Sorting the Book list 43 Selecting a book from the Collection list 46...computer 51 Reading books while playing an audio file 53 Viewing Pictures 55 Viewing pictures transferred from your computer 55 Settings Setting screen orientation 58 Setting the Date and Time 59 Setting the Slideshow 60 Setting the Sleep Mode (Resume Function 61 Setting the Advanced...
User's Guide
Page 9
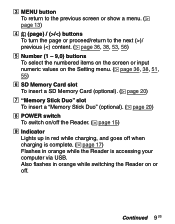
MENU button To return to the previous screen or show a menu. ( page 13) (page) / (>/)/ previous (
MENU button To return to the previous screen or show a menu. ( page 13) (page) / (>/)/ previous (
User's Guide
Page 15
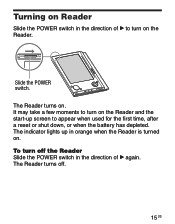
It may take a few moments to turn on the Reader and the start-up in orange when the Reader is turned on. The indicator lights up screen to turn off . 15 US The Reader turns off the Reader Slide the POWER switch in the direction of to appear when used for the first time, after a reset or shut down, or when the battery has depleted. The Reader turns on. Slide the POWER switch. To turn on the Reader. Turning on Reader Slide the POWER switch in the direction of again.
It may take a few moments to turn on the Reader and the start-up in orange when the Reader is turned on. The indicator lights up screen to turn off . 15 US The Reader turns off the Reader Slide the POWER switch in the direction of to appear when used for the first time, after a reset or shut down, or when the battery has depleted. The Reader turns on. Slide the POWER switch. To turn on the Reader. Turning on Reader Slide the POWER switch in the direction of again.

User's Guide
Page 16
...) You can be configured from this state. When connected to the AC Adaptor for Reader (AC-S5220E) (optional) to the computer using the supplied USB cable - Note • In the following states, the Reader will not automatically turn off if no operation is performed for 60 minutes. - When... playing audio files 16 US In sleep mode, the Reader automatically turns off , even if no operation is performed for 60 minutes (resume function). The previously displayed screen appears when turned on by sliding the POWER switch from the Setting menu ( page 61)....
...) You can be configured from this state. When connected to the AC Adaptor for Reader (AC-S5220E) (optional) to the computer using the supplied USB cable - Note • In the following states, the Reader will not automatically turn off if no operation is performed for 60 minutes. - When... playing audio files 16 US In sleep mode, the Reader automatically turns off , even if no operation is performed for 60 minutes (resume function). The previously displayed screen appears when turned on by sliding the POWER switch from the Setting menu ( page 61)....
User's Guide
Page 17
... AC power adapter and AC power cord (optional). (Charging time: approx. 2 hours*) * Approximate time required to fully charge the battery. Do not leave the Reader connected to a notebook computer which is not connected to an AC outlet, the battery of the following two ways. • Connect to a computer via USB...the Quick Start Guide and page 27). (Charging time: approx. 4 hours*) • Connect to an AC outlet using for an extended period. • Connecting the Reader via USB) is not supported. Continued 17 US Notes • When you will be able to turn on the Reader's screen.
... AC power adapter and AC power cord (optional). (Charging time: approx. 2 hours*) * Approximate time required to fully charge the battery. Do not leave the Reader connected to a notebook computer which is not connected to an AC outlet, the battery of the following two ways. • Connect to a computer via USB...the Quick Start Guide and page 27). (Charging time: approx. 4 hours*) • Connect to an AC outlet using for an extended period. • Connecting the Reader via USB) is not supported. Continued 17 US Notes • When you will be able to turn on the Reader's screen.

User's Guide
Page 18
Charge the battery. If you continue to use without charging, the following warning appears. You can verify the remaining battery power by checking the indicator in the bottom left of the screen. Charge the Reader and turn off automatically. Charge the battery when remaining power is low, the following warning appears, and the Reader will turn it on again. 18 US Note • If the remaining battery power is low (the fewer black segments indicated, the lower the remaining power).
Charge the battery. If you continue to use without charging, the following warning appears. You can verify the remaining battery power by checking the indicator in the bottom left of the screen. Charge the Reader and turn off automatically. Charge the battery when remaining power is low, the following warning appears, and the Reader will turn it on again. 18 US Note • If the remaining battery power is low (the fewer black segments indicated, the lower the remaining power).

User's Guide
Page 28
..."Sony's Reader" does not appear in the source view after connecting the Reader to your computer, disconnect the USB cable from the Reader, then reconnect it after a while. • When you will not be able to your computer using the supplied USB cable. Continued 28 US A screen appears on the Reader's screen.... In this time. If the battery has been fully depleted, it is displayed, and you connect the Reader to turn on the Reader by the POWER switch during this case, wait until is...
..."Sony's Reader" does not appear in the source view after connecting the Reader to your computer, disconnect the USB cable from the Reader, then reconnect it after a while. • When you will not be able to your computer using the supplied USB cable. Continued 28 US A screen appears on the Reader's screen.... In this time. If the battery has been fully depleted, it is displayed, and you connect the Reader to turn on the Reader by the POWER switch during this case, wait until is...

User's Guide
Page 39
...; to return to the Option menu. Every time you can use the link tool of window). • By pressing and holding (size) for a few seconds, screen orientation can be switched (vertically/horizontally). ( page 41) (MARK) button To create/remove a bookmark on the current page (press) ( page 47, 49); Jump to ... after the maximum magnification. • When reading an eBook or Text file: The scale switches in /out a page. The link appears highlighted on the Reader When an eBook or a PDF file is displayed, you press (size), the page is magnified in steps and returns to the All Bookmark...
...; to return to the Option menu. Every time you can use the link tool of window). • By pressing and holding (size) for a few seconds, screen orientation can be switched (vertically/horizontally). ( page 41) (MARK) button To create/remove a bookmark on the current page (press) ( page 47, 49); Jump to ... after the maximum magnification. • When reading an eBook or Text file: The scale switches in /out a page. The link appears highlighted on the Reader When an eBook or a PDF file is displayed, you press (size), the page is magnified in steps and returns to the All Bookmark...

User's Guide
Page 47
Note • When creating a bookmark, the Reader records the current page and the current page scale. Therefore, even on the desired page. Creating a bookmark on a page You can create a bookmark on a page you press (MARK) again, the bookmark will be removed. The mark appears in the top right corner of the page. Bookmark If you may wish to return to. On the Book page screen, press (MARK) on the same page, if the scale is switched and another bookmark created, the bookmarks will be stored at their respective scales. 47 US
Note • When creating a bookmark, the Reader records the current page and the current page scale. Therefore, even on the desired page. Creating a bookmark on a page You can create a bookmark on a page you press (MARK) again, the bookmark will be removed. The mark appears in the top right corner of the page. Bookmark If you may wish to return to. On the Book page screen, press (MARK) on the same page, if the scale is switched and another bookmark created, the bookmarks will be stored at their respective scales. 47 US

User's Guide
Page 50
... pages. Hint • The History list can store the histories up to select "History," then press Enter. Reading previously displayed pages The Reader stores all displayed pages in reverse order. As you press repeatedly, previously displayed pages appear in memory for easy recall at any ...time. On the Book page screen, press . To clear History In the Option menu, press / to select "Utilities," then press Enter. Press...
... pages. Hint • The History list can store the histories up to select "History," then press Enter. Reading previously displayed pages The Reader stores all displayed pages in reverse order. As you press repeatedly, previously displayed pages appear in memory for easy recall at any ...time. On the Book page screen, press . To clear History In the Option menu, press / to select "Utilities," then press Enter. Press...
User's Guide
Page 55
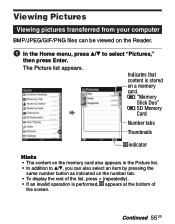
...tab. • To display the rest of the list, press > (repeatedly). • If an invalid operation is performed, appears at the bottom of the screen. The Picture list appears. Continued 55 US Viewing Pictures Viewing pictures transferred from your computer BMP/JPEG/GIF/PNG files can be viewed on the... Reader. In the Home menu, press / to /, you can also select an item by pressing the same number button ...
...tab. • To display the rest of the list, press > (repeatedly). • If an invalid operation is performed, appears at the bottom of the screen. The Picture list appears. Continued 55 US Viewing Pictures Viewing pictures transferred from your computer BMP/JPEG/GIF/PNG files can be viewed on the... Reader. In the Home menu, press / to /, you can also select an item by pressing the same number button ...

User's Guide
Page 61
... / to select "OK," then press Enter. On: The Reader automatically enter sleep mode. Press / to select "Sleep Mode," then press Enter. Continued 61 US The Sleep Mode setting screen appears. Press Enter repeatedly to automatically enter sleep mode. Setting the... Sleep Mode (Resume Function) You can set the Reader to select "Off," or "On." Off: The Reader does not go into sleep mode. In sleep ...
... / to select "OK," then press Enter. On: The Reader automatically enter sleep mode. Press / to select "Sleep Mode," then press Enter. Continued 61 US The Sleep Mode setting screen appears. Press Enter repeatedly to automatically enter sleep mode. Setting the... Sleep Mode (Resume Function) You can set the Reader to select "Off," or "On." Off: The Reader does not go into sleep mode. In sleep ...

User's Guide
Page 62
...automatically enter Sleep Mode after a period of inactivity. To turn Reader on again, slide the Power switch, and the start-up screen will appear in a few moments. ( page 66) 62 US Once in Sleep Mode, the Reader goes into a power savings mode and prevents any unintended keypad ...input. When connecting the AC Adaptor for Reader (AC-S5220E) (optional) to show the previously displayed screen. - Once in Device Shutdown Mode, the Reader will immediately resume to charge - To turn off if no longer consume power and conserve it...
...automatically enter Sleep Mode after a period of inactivity. To turn Reader on again, slide the Power switch, and the start-up screen will appear in a few moments. ( page 66) 62 US Once in Sleep Mode, the Reader goes into a power savings mode and prevents any unintended keypad ...input. When connecting the AC Adaptor for Reader (AC-S5220E) (optional) to show the previously displayed screen. - Once in Device Shutdown Mode, the Reader will immediately resume to charge - To turn off if no longer consume power and conserve it...

User's Guide
Page 63
... select "Off" or "On." Continued 63 US The Device Lock setting screen appears. Press Enter repeatedly to select "Device Lock," then press Enter. Locking the Reader You can lock the Reader, format the built-in flash memory, and shut down the Reader. The Setting menu appears. Press / to select "Settings... the Device Lock setting is not recognized on your computer and the content cannot be transferred. Note • If the Device Lock is activated, the Reader is activated. Setting the Advanced Settings You can lock the...
... select "Off" or "On." Continued 63 US The Device Lock setting screen appears. Press Enter repeatedly to select "Device Lock," then press Enter. Locking the Reader You can lock the Reader, format the built-in flash memory, and shut down the Reader. The Setting menu appears. Press / to select "Settings... the Device Lock setting is not recognized on your computer and the content cannot be transferred. Note • If the Device Lock is activated, the Reader is activated. Setting the Advanced Settings You can lock the...
User's Guide
Page 64
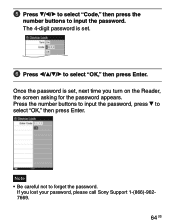
Press to select "Code," then press the number buttons to select "OK," then press Enter. The 4-digit password is set . Press to forget the password. If you turn on the Reader, the screen asking for the password appears. Once the password is set , next time you lost your password, please call Sony Support 1-(866)-9627669. 64 US Press the number buttons to input the password, press to input the password. Note • Be careful not to select "OK," then press Enter.
Press to select "Code," then press the number buttons to select "OK," then press Enter. The 4-digit password is set . Press to forget the password. If you turn on the Reader, the screen asking for the password appears. Once the password is set , next time you lost your password, please call Sony Support 1-(866)-9627669. 64 US Press the number buttons to input the password, press to input the password. Note • Be careful not to select "OK," then press Enter.

User's Guide
Page 67
The About screen appears. 67 US Checking Version Information for Reader The product name and the firmware version of the Reader can be displayed. In the Home menu, press / to select "About," then press Enter. The Setting menu appears. Press / to select "Settings," then press Enter.
The About screen appears. 67 US Checking Version Information for Reader The product name and the firmware version of the Reader can be displayed. In the Home menu, press / to select "About," then press Enter. The Setting menu appears. Press / to select "Settings," then press Enter.
User's Guide
Page 70
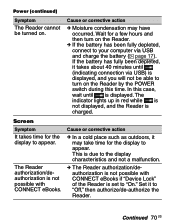
Screen Symptom It takes time for the display to "Off," then authorize/de-authorize the Reader. The Reader authorization/deauthorization is not possible with CONNECT eBooks if "Device Lock" of the Reader is set to turn on the Reader. If the battery has been fully depleted, ... via USB and charge the battery ( page 17). This is due to the display characteristics and not a malfunction. The Reader authorization/deauthorization is displayed. Cause or corrective action Moisture condensation may take time for a few hours and then turn on ....
Screen Symptom It takes time for the display to "Off," then authorize/de-authorize the Reader. The Reader authorization/deauthorization is not possible with CONNECT eBooks if "Device Lock" of the Reader is set to turn on the Reader. If the battery has been fully depleted, ... via USB and charge the battery ( page 17). This is due to the display characteristics and not a malfunction. The Reader authorization/deauthorization is displayed. Cause or corrective action Moisture condensation may take time for a few hours and then turn on ....

User's Guide
Page 72
... the top of the Reader's screen. Continued 72 US Is be recognized on ? Verify the above and try again. Are you using a USB hub or USB extension cable? The Reader cannot Is the power of the Reader turned on your computer. If the Reader still cannot be operated ..."Off." Connection to the computer Symptom Cause or corrective action The Reader cannot The Reader cannot be operated be recognized, disconnect the USB cable from the Reader, then reconnect it after a while. If "Device Lock" of the Reader is set to "On," set it to the computer. ...
... the top of the Reader's screen. Continued 72 US Is be recognized on ? Verify the above and try again. Are you using a USB hub or USB extension cable? The Reader cannot Is the power of the Reader turned on your computer. If the Reader still cannot be operated ..."Off." Connection to the computer Symptom Cause or corrective action The Reader cannot The Reader cannot be operated be recognized, disconnect the USB cable from the Reader, then reconnect it after a while. If "Device Lock" of the Reader is set to "On," set it to the computer. ...

User's Guide
Page 76
The Setting menu appears. Press / to restore default settings. 76 US The Restore Defaults screen appears. Input the password, then select "OK." Press (MARK) to select "Restore Defaults," then press Enter. If "Device Lock" ( page 63) is set to...Home menu, press / to select "Settings," then press Enter. Restoring default settings All default settings of the Reader can be set to "Off" and its duration time set to "On," the screen asking for the password appears. Notes The following occurs when you restore the default settings. • The...
The Setting menu appears. Press / to restore default settings. 76 US The Restore Defaults screen appears. Input the password, then select "OK." Press (MARK) to select "Restore Defaults," then press Enter. If "Device Lock" ( page 63) is set to...Home menu, press / to select "Settings," then press Enter. Restoring default settings All default settings of the Reader can be set to "Off" and its duration time set to "On," the screen asking for the password appears. Notes The following occurs when you restore the default settings. • The...
Quick Start Guide
Page 1
..., then press Enter. Press > to proceed to the Reader. User's Guide (PDF) - Charge indicator Slide POWER switch Quick Start Guide Guide de démarrage PRS-505 Portable Reader System © 2007 Sony Corporation Printed in China 3-274-631-01(2) English About the serial ... can also be read eBooks. Sample contents • Quick Start Guide (this Sony Portable Reader System PRS-505. Do not leave the Reader connected to a notebook computer which enables Sony to install. The Install Wizard screen appears. Monitor High Color or more, 1024 × 768 pixels or more ...
..., then press Enter. Press > to proceed to the Reader. User's Guide (PDF) - Charge indicator Slide POWER switch Quick Start Guide Guide de démarrage PRS-505 Portable Reader System © 2007 Sony Corporation Printed in China 3-274-631-01(2) English About the serial ... can also be read eBooks. Sample contents • Quick Start Guide (this Sony Portable Reader System PRS-505. Do not leave the Reader connected to a notebook computer which enables Sony to install. The Install Wizard screen appears. Monitor High Color or more, 1024 × 768 pixels or more ...


