

Operating Instructions
Page 7
... Auto White Balance 48 Displaying the Markers and Zebra Patterns 49 Displaying the Markers 49 Displaying the Zebra Patterns 50 Setting the Gain 51 Recording With Fixed Gain 51 Recording in AGC Mode 52 Setting the Electronic Shutter 52 Shooting in a Fixed Shutter Mode 52 Shooting in EX Slow Shutter Mode 54 Shooting in Auto Shutter Mode 54 Adjusting the Iris 54 Recording in Auto Iris Mode 54 Adjusting the Iris Manually 55 Adjusting the Zoom 55 Switching the Zoom Mode 55 Operating the Zoom Manually 56 Using the Power Zoom 56 Adjusting...
... Auto White Balance 48 Displaying the Markers and Zebra Patterns 49 Displaying the Markers 49 Displaying the Zebra Patterns 50 Setting the Gain 51 Recording With Fixed Gain 51 Recording in AGC Mode 52 Setting the Electronic Shutter 52 Shooting in a Fixed Shutter Mode 52 Shooting in EX Slow Shutter Mode 54 Shooting in Auto Shutter Mode 54 Adjusting the Iris 54 Recording in Auto Iris Mode 54 Adjusting the Iris Manually 55 Adjusting the Zoom 55 Switching the Zoom Mode 55 Operating the Zoom Manually 56 Using the Power Zoom 56 Adjusting...

Operating Instructions
Page 10
... Basic Menu Operations 115 Setup Menu List 118 CAMERA SET Menu 118 AUDIO SET Menu 123 VIDEO SET Menu 124 LCD/VF SET Menu 125 TC/UB SET Menu 128 OTHERS Menu 129 Connecting External Devices Connecting External Monitors 134 Operating Clips With a Computer 136 Connecting an External Device (i.LINK Connection) ....... 138 Recording the Camcorder Picture on an External Device 138 Nonlinear Editing 139 Recording External Input Signals 139 About i.LINK 140 Appendixes 10 Table of Contents Important Notes on Operation 142 Formats and Limitations of Outputs 144 Video Formats and Output...
... Basic Menu Operations 115 Setup Menu List 118 CAMERA SET Menu 118 AUDIO SET Menu 123 VIDEO SET Menu 124 LCD/VF SET Menu 125 TC/UB SET Menu 128 OTHERS Menu 129 Connecting External Devices Connecting External Monitors 134 Operating Clips With a Computer 136 Connecting an External Device (i.LINK Connection) ....... 138 Recording the Camcorder Picture on an External Device 138 Nonlinear Editing 139 Recording External Input Signals 139 About i.LINK 140 Appendixes 10 Table of Contents Important Notes on Operation 142 Formats and Limitations of Outputs 144 Video Formats and Output...

Operating Instructions
Page 14
... quickly search for clay-animation shooting. Cutting-edge Camera Technologies 1/2-inch type three "Exmor"1) CMOS sensors The PMW-EX1R is equipped with a zoom lens specifically designed for the camcorder to be changed to those of other CineAlta camcorders. Slow & Quick Motion function The PMW-EX1R offers a Slow & Quick Motion function, commonly known as overcranking and undercranking in low-light environments. Independent rings for easy and precise focus adjustments. • One-push Auto Focus...
... quickly search for clay-animation shooting. Cutting-edge Camera Technologies 1/2-inch type three "Exmor"1) CMOS sensors The PMW-EX1R is equipped with a zoom lens specifically designed for the camcorder to be changed to those of other CineAlta camcorders. Slow & Quick Motion function The PMW-EX1R offers a Slow & Quick Motion function, commonly known as overcranking and undercranking in low-light environments. Independent rings for easy and precise focus adjustments. • One-push Auto Focus...

Operating Instructions
Page 19
... 17 18 1. AUDIO IN CH-1/CH-2 connectors (XLR) and input selection switches (page 64) 16. WHT BAL (automatic white balance adjustment) button (page 47) 17. ASSIGN 4 (assignable 4) button (page 70) Note The lens is properly adjusted at the factory. Eyepiece focusing knob (page 31) 5. Front IR remote control receptor 15. i.LINK (HDV/DV) connector (4-pin, S400 conforming to IEEE1394) (page 138) 7. USB connector (Mini B) (page 136...
... 17 18 1. AUDIO IN CH-1/CH-2 connectors (XLR) and input selection switches (page 64) 16. WHT BAL (automatic white balance adjustment) button (page 47) 17. ASSIGN 4 (assignable 4) button (page 70) Note The lens is properly adjusted at the factory. Eyepiece focusing knob (page 31) 5. Front IR remote control receptor 15. i.LINK (HDV/DV) connector (4-pin, S400 conforming to IEEE1394) (page 138) 7. USB connector (Mini B) (page 136...

Operating Instructions
Page 24
... be changed using the Direct menu on one of the items for Direct Menu using "Direct Menu" (page 131) of the FULL AUTO button is lit, the Direct Menu operation is set to "All," the GAIN, SHUTTER, and WHITE BAL switches are forcibly set to the automatic mode in Full Auto mode (page 42). White balance mode and color temperature indications [M][D] (page 47) 12. Special recording mode indication [M] ([D] only in slot B is displayed on the screen. Memory card in Slow & Quick Motion Standby) Frame Rec Interval Rec S&Q Motion...
... be changed using the Direct menu on one of the items for Direct Menu using "Direct Menu" (page 131) of the FULL AUTO button is lit, the Direct Menu operation is set to "All," the GAIN, SHUTTER, and WHITE BAL switches are forcibly set to the automatic mode in Full Auto mode (page 42). White balance mode and color temperature indications [M][D] (page 47) 12. Special recording mode indication [M] ([D] only in slot B is displayed on the screen. Memory card in Slow & Quick Motion Standby) Frame Rec Interval Rec S&Q Motion...

Operating Instructions
Page 35
... correct direction of important data. Write-protect switch Preparations SxS PRO 8GB • We recommend that you to "WP" disables you make a backup copy of insertion before changing the switch setting. ACCESS lamps SLOT SELECT button A B SLOT SELECT Card slots EJECT buttons OPEN R L MONITVOORL THUMNAIL SEL/SEFTRECVAPNLj CAEYL/PAUSPEGREF/VSFWDlSJ TOP NEXT L s SRTEACRT/STOP T HOLD W H L OFF Cover 5.8 10 15 25 40 81.2 10 30 5 15 3 10 IRIS MANUAL AUTO...
... correct direction of important data. Write-protect switch Preparations SxS PRO 8GB • We recommend that you to "WP" disables you make a backup copy of insertion before changing the switch setting. ACCESS lamps SLOT SELECT button A B SLOT SELECT Card slots EJECT buttons OPEN R L MONITVOORL THUMNAIL SEL/SEFTRECVAPNLj CAEYL/PAUSPEGREF/VSFWDlSJ TOP NEXT L s SRTEACRT/STOP T HOLD W H L OFF Cover 5.8 10 15 25 40 81.2 10 30 5 15 3 10 IRIS MANUAL AUTO...
Operating Instructions
Page 48
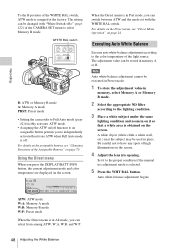
... current adjustment mode and color temperature are displayed on the screen. 4 Adjust the lens iris opening. Using the Direct menu When you can select from among ATW, W:A, W:B, and W:P. Set it so that a white area is in memory A or B. For details on the assignable buttons, see "Direct Menu Operation" on page 70. Note Auto white-balance adjustment cannot be changed with the WHITE BAL switch. Be careful not to the color temperature of the light source. When the Direct menu...
... current adjustment mode and color temperature are displayed on the screen. 4 Adjust the lens iris opening. Using the Direct menu When you can select from among ATW, W:A, W:B, and W:P. Set it so that a white area is in memory A or B. For details on the assignable buttons, see "Direct Menu Operation" on page 70. Note Auto white-balance adjustment cannot be changed with the WHITE BAL switch. Be careful not to the color temperature of the light source. When the Direct menu...

Operating Instructions
Page 52
... adjusted automatically or manually as required. Fixed Shutter (manual adjustment) modes Recording is turned on in a Fixed Shutter Mode When you set the camcorder to the picture brightness. ECS (Extended Clear Scan) mode Specify the shutter speed by setting "AGC" to 64 frames can change the gain in AGC Mode When you set the SHUTTER switch to record a quick-moving subject with the Direct menu. The shutter speed is displayed on page 24. Recording To change Press the MENU button to set the camcorder to shoot the monitor screen...
... adjusted automatically or manually as required. Fixed Shutter (manual adjustment) modes Recording is turned on in a Fixed Shutter Mode When you set the camcorder to the picture brightness. ECS (Extended Clear Scan) mode Specify the shutter speed by setting "AGC" to 64 frames can change the gain in AGC Mode When you set the SHUTTER switch to record a quick-moving subject with the Direct menu. The shutter speed is displayed on page 24. Recording To change Press the MENU button to set the camcorder to shoot the monitor screen...
Operating Instructions
Page 55
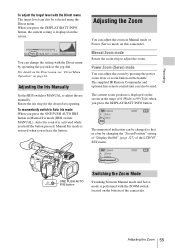
... zoom in Manual Iris mode (IRIS switch: MANUAL), Auto Iris control is performed with the ZOOM switch located on the screen in the range of the LCD/VF SET menu. 120min STBY A: 25min B: 50min W T STBY Switching the Zoom Mode Switching between Manual mode and Servo mode is activated while you release the button. Manual Zoom mode Rotate the zoom ring to adjust the iris manually. Manual Iris mode is displayed on the bottom of the camcorder. Power Zoom (Servo) mode You can adjust the zoom by operating...
... zoom in Manual Iris mode (IRIS switch: MANUAL), Auto Iris control is performed with the ZOOM switch located on the screen in the range of the LCD/VF SET menu. 120min STBY A: 25min B: 50min W T STBY Switching the Zoom Mode Switching between Manual mode and Servo mode is activated while you release the button. Manual Zoom mode Rotate the zoom ring to adjust the iris manually. Manual Iris mode is displayed on the bottom of the camcorder. Power Zoom (Servo) mode You can adjust the zoom by operating...
Operating Instructions
Page 59
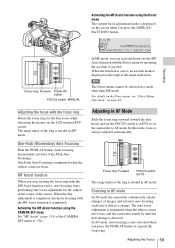
... Auto Focusing is always adjusted automatically. Note The Direct menu cannot be selected in MF mode. For details on the Direct menu, see "Direct Menu Operation" on the LCD monitor/EVF screen. Adjusting in AF mode In AF mode the camcorder continuously checks changes of the screen. Activating the MF Assist function using the CAMERA SET menu Set "MF Assist" (page 119) of the mode indication. Activating the MF Assist function using the Direct menu The current focus adjustment mode is terminated. Adjusting the Focus 59 Recording...
... Auto Focusing is always adjusted automatically. Note The Direct menu cannot be selected in MF mode. For details on the Direct menu, see "Direct Menu Operation" on the LCD monitor/EVF screen. Adjusting in AF mode In AF mode the camcorder continuously checks changes of the screen. Activating the MF Assist function using the CAMERA SET menu Set "MF Assist" (page 119) of the mode indication. Activating the MF Assist function using the Direct menu The current focus adjustment mode is terminated. Adjusting the Focus 59 Recording...

Operating Instructions
Page 76
... Direct menu, see "Direct Menu Operation" on the screen. Recording is in Rec Run mode during Slow & Quick Motion recording (page 62). Recording CAMERA SET Zoom Speed Zoom Tr ans I n t e r val Rec Frame Rec 00:00 P. Notes • You cannot change the On Format and Frame Rate settings while Slow & Quick Motion recording is made with the Direct menu by operating the joystick or the jog dial. To change the recording frame rate with the video format (On Format) and the frame rate (Frame Rate) set the power switch...
... Direct menu, see "Direct Menu Operation" on the screen. Recording is in Rec Run mode during Slow & Quick Motion recording (page 62). Recording CAMERA SET Zoom Speed Zoom Tr ans I n t e r val Rec Frame Rec 00:00 P. Notes • You cannot change the On Format and Frame Rate settings while Slow & Quick Motion recording is made with the Direct menu by operating the joystick or the jog dial. To change the recording frame rate with the video format (On Format) and the frame rate (Frame Rate) set the power switch...
Operating Instructions
Page 91
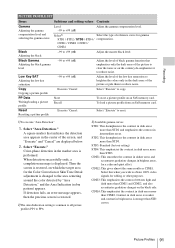
... than CINE1 and CINE2, and also accentuates gradation changes on an SxS memory card. Recording PICTURE PROFILE SET Items Subitems and setting values Contents Gamma Adjusting the gamma compensation level and selecting the gamma curve Level -99 to +99 (±0) Adjust the master black level. STD2: This deemphasizes the contrast in bright areas is displayed. Color-phase detection in dark areas more than CINE3. CINE4...
... than CINE1 and CINE2, and also accentuates gradation changes on an SxS memory card. Recording PICTURE PROFILE SET Items Subitems and setting values Contents Gamma Adjusting the gamma compensation level and selecting the gamma curve Level -99 to +99 (±0) Adjust the master black level. STD2: This deemphasizes the contrast in bright areas is displayed. Color-phase detection in dark areas more than CINE3. CINE4...

Operating Instructions
Page 119
... BARS/CAM button. Note If the infrared line from the Remote Commander is detected. Multi: To output multiformat color bars 75%: To output 75% color bars 100%: To output 100% color bars Flicker Reduce Mode Setting Flicker Auto / On / Off Compensation Set the operation of color bars displayed when you roughly adjust it when flicker is not received properly, zooming may not operate smoothly. Color Bar Type Selecting the types of color bar...
... BARS/CAM button. Note If the infrared line from the Remote Commander is detected. Multi: To output multiformat color bars 75%: To output 75% color bars 100%: To output 100% color bars Flicker Reduce Mode Setting Flicker Auto / On / Off Compensation Set the operation of color bars displayed when you roughly adjust it when flicker is not received properly, zooming may not operate smoothly. Color Bar Type Selecting the types of color bar...

Operating Instructions
Page 121
... target level (to a black screen Fade Out Time 1 sec / 2 sec / 3 sec / 5 sec / 10 sec Set the duration of the fade in. Fade Out Type White / Black Select the fade-out mode. half a stop further open ±0: Standard -0.5: Approx. Auto Shutter On / Off Turn the Auto Shutter control function on /off . AGC Point F5.6 / F4 / F2.8 Set the iris point for switching auto-iris and auto-shutter control when Auto Shutter is on /off . Menu Configuration and Detailed Settings Setup Menu...
... target level (to a black screen Fade Out Time 1 sec / 2 sec / 3 sec / 5 sec / 10 sec Set the duration of the fade in. Fade Out Type White / Black Select the fade-out mode. half a stop further open ±0: Standard -0.5: Approx. Auto Shutter On / Off Turn the Auto Shutter control function on /off . AGC Point F5.6 / F4 / F2.8 Set the iris point for switching auto-iris and auto-shutter control when Auto Shutter is on /off . Menu Configuration and Detailed Settings Setup Menu...

Operating Instructions
Page 123
... / +6 dB adjustment mode. / +12 dB Limiter On / Off Turn the audio limiter on /off . AUDIO SET Menu AUDIO SET Menu items Audio Input Setting for audio inputs [M] Audio Output Setting for audio outputs Subitems and setting values Contents TRIM CH-1 Finely adjust the sensitivity of channel 1 of external -20 dBu to -65 dBu (-41 dBu) microphone input in steps of 3 dB in speaker. INT MIC Level Select the built-in microphone level in AGC mode. Menu Configuration and Detailed Settings Setup Menu List 123
... / +6 dB adjustment mode. / +12 dB Limiter On / Off Turn the audio limiter on /off . AUDIO SET Menu AUDIO SET Menu items Audio Input Setting for audio inputs [M] Audio Output Setting for audio outputs Subitems and setting values Contents TRIM CH-1 Finely adjust the sensitivity of channel 1 of external -20 dBu to -65 dBu (-41 dBu) microphone input in steps of 3 dB in speaker. INT MIC Level Select the built-in microphone level in AGC mode. Menu Configuration and Detailed Settings Setup Menu List 123
Operating Instructions
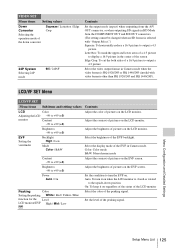
Page 125
Color: Color mode B&W: Monochrome mode Contrast -99 to turn it on the LCD monitor. VIDEO SET Menu items Setting values Down Converter Selecting the operation mode of the down position. Power Auto / On Set the condition to +99 (±0) Adjust the contrast of a 16:9 picture to output a 4:3 picture Select the video output format in Camera mode. Menu Configuration and Detailed Settings Setup Menu List 125 EVF Setting the viewfinder Backlight High / Low Mode Color / B&W Select the brightness of the peaking signal. Auto: To...
Color: Color mode B&W: Monochrome mode Contrast -99 to turn it on the LCD monitor. VIDEO SET Menu items Setting values Down Converter Selecting the operation mode of the down position. Power Auto / On Set the condition to +99 (±0) Adjust the contrast of a 16:9 picture to output a 4:3 picture Select the video output format in Camera mode. Menu Configuration and Detailed Settings Setup Menu List 125 EVF Setting the viewfinder Backlight High / Low Mode Color / B&W Select the brightness of the peaking signal. Auto: To...

Operating Instructions
Page 131
... the external recording device connected via the i.LINK connector. Battery INFO Showing information regarding the battery pack (display only) Type MFG Date Charge Count Capacity Voltage The type (product name) is not HD SP mode. The operation is displayed. Both: To activate recording start/stop operations only for an SxS memory card in a built-in steps of charge/discharge is limited depending on the GAIN, SHUTTER, or WHITE BAL switch setting. The accumulated number of times...
... the external recording device connected via the i.LINK connector. Battery INFO Showing information regarding the battery pack (display only) Type MFG Date Charge Count Capacity Voltage The type (product name) is not HD SP mode. The operation is displayed. Both: To activate recording start/stop operations only for an SxS memory card in a built-in steps of charge/discharge is limited depending on the GAIN, SHUTTER, or WHITE BAL switch setting. The accumulated number of times...

Operating Instructions
Page 136
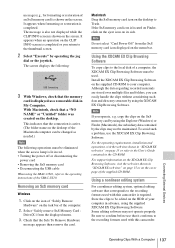
... supplied CD-ROM. This indicates normal status. Connect USB Now? SxS PRO 8GB Connecting External Devices 136 Operating Clips With a Computer To connect with a USB cable When you can directly insert the SxS memory card containing clips recorded with this camcorder, they are mounted in this camcorder and access to the files. When two memory cards are acknowledged as two independent extended drives by the computer. To check the connection to the camcorder 1 Turn the camcorder on...
... supplied CD-ROM. This indicates normal status. Connect USB Now? SxS PRO 8GB Connecting External Devices 136 Operating Clips With a Computer To connect with a USB cable When you can directly insert the SxS memory card containing clips recorded with this camcorder, they are mounted in this camcorder and access to the files. When two memory cards are acknowledged as two independent extended drives by the computer. To check the connection to the camcorder 1 Turn the camcorder on...
Operating Instructions
Page 137
.... To avoid such a problem, use that the memory card is displayed as needed.) Note The following : USB Connecting 3 With Windows, check that it conforms to be used with this camcorder is completed. Some editing software may not be eliminated when the access lamp is lit in red. • Turning the power off or disconnecting the power cord • Removing the SxS memory card • Disconnecting the USB cable When using the Explorer (Windows) or Finder (Macintosh...
.... To avoid such a problem, use that the memory card is displayed as needed.) Note The following : USB Connecting 3 With Windows, check that it conforms to be used with this camcorder is completed. Some editing software may not be eliminated when the access lamp is lit in red. • Turning the power off or disconnecting the power cord • Removing the SxS memory card • Disconnecting the USB cable When using the Explorer (Windows) or Finder (Macintosh...
Operating Instructions
Page 139
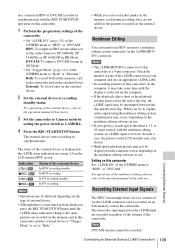
... displayed on the computer screen, depending on the nonlinear editing software in this camcorder on the external device. The status of the camcorder. For operations of the nonlinear editing software, refer to the operation manual of that device. 3 Set the camcorder to Camera mode by setting the power switch to the operation manual of the software. Both: To record both on your computer and use . For operations of the external device, refer to CAMERA. 4 Press the REC START/STOP button. Check the number...
... displayed on the computer screen, depending on the nonlinear editing software in this camcorder on the external device. The status of the camcorder. For operations of the nonlinear editing software, refer to the operation manual of that device. 3 Set the camcorder to Camera mode by setting the power switch to the operation manual of the software. Both: To record both on your computer and use . For operations of the external device, refer to CAMERA. 4 Press the REC START/STOP button. Check the number...


