Primary User Manual
Page 1
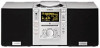
PMC-MD55 Serial No PMC-MD55 ©1999 by Sony Corporation Record the serial number in the space provided below. Refer to these numbers whenever you call upon your Sony dealer regarding this product. Model No. 3-866-600-11(1) Personal MiniDisc System Operating Instructions Owner's Record The model number and the serial number are located on the right side.
PMC-MD55 Serial No PMC-MD55 ©1999 by Sony Corporation Record the serial number in the space provided below. Refer to these numbers whenever you call upon your Sony dealer regarding this product. Model No. 3-866-600-11(1) Personal MiniDisc System Operating Instructions Owner's Record The model number and the serial number are located on the right side.
Primary User Manual
Page 2
... to charge the built-in this equipment does cause harmful interference to turn off first. If this manual could void your nearest Sony service station immediately. • The speakers, super woofer, and player are designed to the presence of uninsulated "dangerous voltage" ... this player for a Class B digital device, pursuant to Part 15 of important operating and maintenance (servicing) instructions in the duct of optical instruments with the instructions, may cause the connected equipment to persons. When you use this product will not occur in a residential installation...
... to charge the built-in this equipment does cause harmful interference to turn off first. If this manual could void your nearest Sony service station immediately. • The speakers, super woofer, and player are designed to the presence of uninsulated "dangerous voltage" ... this player for a Class B digital device, pursuant to Part 15 of important operating and maintenance (servicing) instructions in the duct of optical instruments with the instructions, may cause the connected equipment to persons. When you use this product will not occur in a residential installation...

Primary User Manual
Page 4
Position Track Playing pointer number time 4 Basic Operations Basic Operations Playing a CD 21 For hookup instructions, see pages 53 - 58. 1 Press 6 CD OPEN/CLOSE (direct power-on) and place the CD on the Display remote). With the label side up 2 Press CD ^ (CD ( on the CD compartment. The lid of the CD compartment closes and the player plays all the tracks once.
Position Track Playing pointer number time 4 Basic Operations Basic Operations Playing a CD 21 For hookup instructions, see pages 53 - 58. 1 Press 6 CD OPEN/CLOSE (direct power-on) and place the CD on the Display remote). With the label side up 2 Press CD ^ (CD ( on the CD compartment. The lid of the CD compartment closes and the player plays all the tracks once.

Primary User Manual
Page 6
Recording a whole CD (Synchronized recording) 45 321 For hookup instructions, see pages 53 - 58. 1 Insert a recordable MD (direct Display power-on the CD compartment. With the label side up 3 Press CD p. 6 Basic Operations Press 6 CD OPEN/CLOSE again to close the CD compartment. With the label side up Insert in the direction of the arrow After "TOC Reading" is displayed, the disc name will be displayed if it is labeled. 2 Press 6 CD OPEN/CLOSE and place the CD on ).
Recording a whole CD (Synchronized recording) 45 321 For hookup instructions, see pages 53 - 58. 1 Insert a recordable MD (direct Display power-on the CD compartment. With the label side up 3 Press CD p. 6 Basic Operations Press 6 CD OPEN/CLOSE again to close the CD compartment. With the label side up Insert in the direction of the arrow After "TOC Reading" is displayed, the disc name will be displayed if it is labeled. 2 Press 6 CD OPEN/CLOSE and place the CD on ).

Primary User Manual
Page 8
Playing an MD 21 For hookup instructions, see pages 53 - 58. 1 InserttheMD(directpower-on the remote). Track name is displayed if it is labeled. After "TOC Reading" is displayed, the disc name will be displayed if it is labeled. Display With the label side up Insert in the direction of the arrow 2 Press MD ^ (MD ( on ). Track number Playing time 8 Basic Operations The player plays all the tracks once.
Playing an MD 21 For hookup instructions, see pages 53 - 58. 1 InserttheMD(directpower-on the remote). Track name is displayed if it is labeled. After "TOC Reading" is displayed, the disc name will be displayed if it is labeled. Display With the label side up Insert in the direction of the arrow 2 Press MD ^ (MD ( on ). Track number Playing time 8 Basic Operations The player plays all the tracks once.

Primary User Manual
Page 10
If you want appears in the display (direct power-on). "FM" or "AM" appears 2 Hold down TUNE + or TUNE - repeatedly to change in the display. Indicates an FM stereo broadcast 10 Basic Operations until the Display band you can't tune in a station, press TUNE + or TUNE - The player automatically scans the radio frequencies and stops when it finds a clear station. Listening to the radio 12 For hookup instructions, see pages 53 - 58. 1 Press RADIO BAND until the frequency digits begin to change the frequency step by step.
If you want appears in the display (direct power-on). "FM" or "AM" appears 2 Hold down TUNE + or TUNE - repeatedly to change in the display. Indicates an FM stereo broadcast 10 Basic Operations until the Display band you can't tune in a station, press TUNE + or TUNE - The player automatically scans the radio frequencies and stops when it finds a clear station. Listening to the radio 12 For hookup instructions, see pages 53 - 58. 1 Press RADIO BAND until the frequency digits begin to change the frequency step by step.
Primary User Manual
Page 48
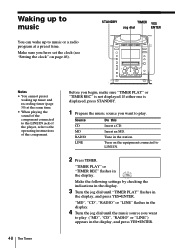
... at the same time. • When playing the sound of the component connected to the LINE IN jack of the player, refer to the operating instructions of the component. 48 The Timer Before you begin, make sure "TIMER PLAY" or "TIMER REC" is displayed, press STANDBY. 1 Prepare the music ...source you want to play . Source CD MD RADIO LINE Do this Insert a CD. Insert an MD. Turn on page 46). Tune in the display. Make the following settings by checking the indications in the display. 3 Turn the...
... at the same time. • When playing the sound of the component connected to the LINE IN jack of the player, refer to the operating instructions of the component. 48 The Timer Before you begin, make sure "TIMER PLAY" or "TIMER REC" is displayed, press STANDBY. 1 Prepare the music ...source you want to play . Source CD MD RADIO LINE Do this Insert a CD. Insert an MD. Turn on page 46). Tune in the display. Make the following settings by checking the indications in the display. 3 Turn the...

Primary User Manual
Page 50
... time. • When recording from the component connected to the LINE IN jack of the player. When recording from the component connected to the operating instructions of the player, turn the jog dial until "RADIO" flashes in the display. You can set the minutes, and press YES•ENTER. STANDBY TIMER... "TIMER REC" flashes in the display, and press YES•ENTER. 4 Turn the jog dial until "LINE" flashes in the radio station and insert an MD. 2 Press TIMER.
... time. • When recording from the component connected to the LINE IN jack of the player. When recording from the component connected to the operating instructions of the player, turn the jog dial until "RADIO" flashes in the display. You can set the minutes, and press YES•ENTER. STANDBY TIMER... "TIMER REC" flashes in the display, and press YES•ENTER. 4 Turn the jog dial until "LINE" flashes in the radio station and insert an MD. 2 Press TIMER.

Primary User Manual
Page 59
For details, refer to the instructions of each component before making connections. continued Setting Up 59 LINE/LINE LEVEL LINE IN Note Connect the cords firmly to display "LINE". to be ...
For details, refer to the instructions of each component before making connections. continued Setting Up 59 LINE/LINE LEVEL LINE IN Note Connect the cords firmly to display "LINE". to be ...

