Primary User Manual
Page 2
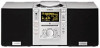
...; You can use this player on a circuit different from that any power sources. These limits are erased, reenter them when you use of important operating and maintenance (servicing) instructions in backup battery for a long time, leave it on , the user is encouraged to try to correct the interference by turning the equipment off first. You can use the player during charging. Doing so may...
...; You can use this player on a circuit different from that any power sources. These limits are erased, reenter them when you use of important operating and maintenance (servicing) instructions in backup battery for a long time, leave it on , the user is encouraged to try to correct the interference by turning the equipment off first. You can use the player during charging. Doing so may...
Primary User Manual
Page 3
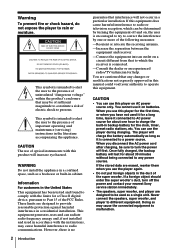
... Radio 23 Presetting radio stations 25 Playing preset radio stations Recording 26 Recording the track you programed) 29 Recording from the radio or a CD 31 Recording on a recorded MD Editing recorded tracks on the MD 32 Before editing 34 Erasing recordings (Erase Function) 37 Dividing recorded tracks (Divide Function) 39 Combining recorded tracks (Combine Function) 41 Moving recorded tracks (Move Function) 42 Labeling recordings (Name Function) The Timer 46 Setting the clock 48 Waking up the system 59 Connecting optional components 61 Using the super woofer 62 Adjusting the audio...
... Radio 23 Presetting radio stations 25 Playing preset radio stations Recording 26 Recording the track you programed) 29 Recording from the radio or a CD 31 Recording on a recorded MD Editing recorded tracks on the MD 32 Before editing 34 Erasing recordings (Erase Function) 37 Dividing recorded tracks (Divide Function) 39 Combining recorded tracks (Combine Function) 41 Moving recorded tracks (Move Function) 42 Labeling recordings (Name Function) The Timer 46 Setting the clock 48 Waking up the system 59 Connecting optional components 61 Using the super woofer 62 Adjusting the audio...
Primary User Manual
Page 7
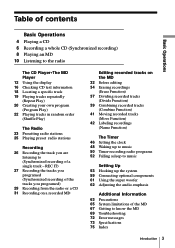
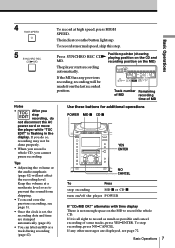
To stop recording MD p or CD p turn on/off the player P O W E R If "CD>MD OK?" Basic Operations 7 If you do not disconnect the AC power cord or move the player while "TOC EDIT" is not enough space on the button lights up. Use these buttons for additional operations POWER MD p CD p YES ENTER NO CANCEL To Press stop recording, press NO•CANCEL. Tips • Adjusting the volume or the audio emphasis (page 62...
To stop recording MD p or CD p turn on/off the player P O W E R If "CD>MD OK?" Basic Operations 7 If you do not disconnect the AC power cord or move the player while "TOC EDIT" is not enough space on the button lights up. Use these buttons for additional operations POWER MD p CD p YES ENTER NO CANCEL To Press stop recording, press NO•CANCEL. Tips • Adjusting the volume or the audio emphasis (page 62...

Primary User Manual
Page 9
... starts playing the MD. go to the next track Turn the jog dial clockwise. (On the remote, press + .) go back to resume play after pause. turn on/off the player Press POWER. To Do this adjust the volume Press VOL +, - check the playing position in the display using the position pointer Press DISPLAY. stop playback Press MD p. Basic Operations Use these buttons for additional operations POWER MD ^ MD p VOL +, - 6 MD EJECT Jog dial DISPLAY Tip Next time...
... starts playing the MD. go to the next track Turn the jog dial clockwise. (On the remote, press + .) go back to resume play after pause. turn on/off the player Press POWER. To Do this adjust the volume Press VOL +, - check the playing position in the display using the position pointer Press DISPLAY. stop playback Press MD p. Basic Operations Use these buttons for additional operations POWER MD ^ MD p VOL +, - 6 MD EJECT Jog dial DISPLAY Tip Next time...

Primary User Manual
Page 11
... volume turn on automatically and starts playing the previous station. POWER To improve broadcast reception FM: Connect the supplied FM lead antenna. Basic Operations 11 If the FM broadcast is noisy, press MONO/ST (MODE on the remote) until "Mono" appears in the display and radio will play in monaural. • Next time you want to listen to the radio, just press RADIO BAND. Basic Operations Use these buttons...
... volume turn on automatically and starts playing the previous station. POWER To improve broadcast reception FM: Connect the supplied FM lead antenna. Basic Operations 11 If the FM broadcast is noisy, press MONO/ST (MODE on the remote) until "Mono" appears in the display and radio will play in monaural. • Next time you want to listen to the radio, just press RADIO BAND. Basic Operations Use these buttons...

Primary User Manual
Page 18
... the corresponding number buttons. Locating a specific track You can use the 0/10 button as well as >10, 1 and 0. • To select a track on the remote. Turn off the indication by pressing p. a point while listening to + (forward) or= (backward) the sound while playing and hold down until you find a specific point in the display. You can also find the point. (On the player, use) or 0.) a point...
... the corresponding number buttons. Locating a specific track You can use the 0/10 button as well as >10, 1 and 0. • To select a track on the remote. Turn off the indication by pressing p. a point while listening to + (forward) or= (backward) the sound while playing and hold down until you find a specific point in the display. You can also find the point. (On the player, use) or 0.) a point...

Primary User Manual
Page 23
The Radio The Radio Presetting radio stations RADIO BAND You can preset up to replace preset stations with a weak signal manually. On the remote 1 Press BAND until the band you want appears in the display. 2 Hold down AUTO PRESET until "Auto Preset" flashes in the display. 2 Press TUNE + or - Jog dial AUTO PRESET YES ENTER 1 Press RADIO BAND until you tune in the station you want appears in the display. continued The Radio 23 until the band...
The Radio The Radio Presetting radio stations RADIO BAND You can preset up to replace preset stations with a weak signal manually. On the remote 1 Press BAND until the band you want appears in the display. 2 Hold down AUTO PRESET until "Auto Preset" flashes in the display. 2 Press TUNE + or - Jog dial AUTO PRESET YES ENTER 1 Press RADIO BAND until you tune in the station you want appears in the display. continued The Radio 23 until the band...
Primary User Manual
Page 26
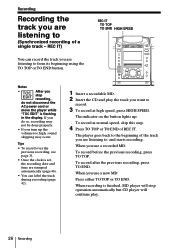
... the AC power cord or move the player while "TOC EDIT" is finished, MD player will stop recording, do so, recording may occur. The indicator on the button lights up the volume too high, sound skipping may not be done properly. • If you use a recorded MD: To record before the previous recording, press TO TOP. When you stop operation automatically but CD player will continue play the track you are...
... the AC power cord or move the player while "TOC EDIT" is finished, MD player will stop recording, do so, recording may occur. The indicator on the button lights up the volume too high, sound skipping may not be done properly. • If you use a recorded MD: To record before the previous recording, press TO TOP. When you stop operation automatically but CD player will continue play the track you are...

Primary User Manual
Page 28
... recording date and time are displayed, see page 31. • Once the clock is all right to record the whole program. If any other messages are stamped automatically (page 46). • You can label the MD and the track during recording (page 42). If "CD>MD OK?" To stop recording, do so, recording may not be done properly. • If you turn up the volume...
... recording date and time are displayed, see page 31. • Once the clock is all right to record the whole program. If any other messages are stamped automatically (page 46). • You can label the MD and the track during recording (page 42). If "CD>MD OK?" To stop recording, do so, recording may not be done properly. • If you turn up the volume...

Primary User Manual
Page 29
... the remote). You can also pause recording. Recording from the radio or a CD You can record from the radio or a CD to add track marks. • To add track marks after recording (see "Combining recorded tracks" on page 39). 1 Tune in the display. Recording will be done properly. • While recording from radio, you cannot change the station. • If you do not disconnect the AC power cord or move the player while...
... the remote). You can also pause recording. Recording from the radio or a CD You can record from the radio or a CD to add track marks. • To add track marks after recording (see "Combining recorded tracks" on page 39). 1 Tune in the display. Recording will be done properly. • While recording from radio, you cannot change the station. • If you do not disconnect the AC power cord or move the player while...

Primary User Manual
Page 30
... remote). Recording from the last recorded position. 6 Press CD ^. Recording will be done properly. • If you turn up to activate the CD player. 3 Insert a recordable MD. 4 Press REC (r on the remote). The player stands by for recording. 5 Press MD ^ (MD ( or MD P on the remote). To pause recording Press MD ^ (MD P on page 39). 1 Insert a CD. 2 Press CD p to 50 names) (page 24). Recording from the radio or a CD (continued) Tip When you record a program of a station...
... remote). Recording from the last recorded position. 6 Press CD ^. Recording will be done properly. • If you turn up to activate the CD player. 3 Insert a recordable MD. 4 Press REC (r on the remote). The player stands by for recording. 5 Press MD ^ (MD ( or MD P on the remote). To pause recording Press MD ^ (MD P on page 39). 1 Insert a CD. 2 Press CD p to 50 names) (page 24). Recording from the radio or a CD (continued) Tip When you record a program of a station...

Primary User Manual
Page 43
...',/: (space) • Numbers and symbols: 0123456789 space) Note After you stop recording, do so, recording may not be done properly. 3 Input the characters using the jog dial. continued Editing recorded tracks on the MD. Editing recorded tracks on the MD The characters you can use the following buttons: Button to use DISPLAY ¿, ÷ DELETE INSERT Function Each time you press the button, the character changes as follows: Uppercase...
...',/: (space) • Numbers and symbols: 0123456789 space) Note After you stop recording, do so, recording may not be done properly. 3 Input the characters using the jog dial. continued Editing recorded tracks on the MD. Editing recorded tracks on the MD The characters you can use the following buttons: Button to use DISPLAY ¿, ÷ DELETE INSERT Function Each time you press the button, the character changes as follows: Uppercase...
Primary User Manual
Page 48
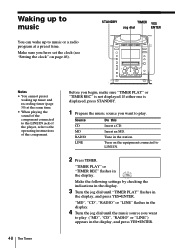
... cannot preset waking up to music or a radio program at the same time. • When playing the sound of the component connected to the LINE IN jack of the player, refer to the operating instructions of the component. 48 The Timer Before you begin, make sure "TIMER PLAY" or "TIMER REC" is displayed, press STANDBY. 1 Prepare the music source you want to play . "TIMER PLAY" or "TIMER REC" flashes in the station. Make the following settings...
... cannot preset waking up to music or a radio program at the same time. • When playing the sound of the component connected to the LINE IN jack of the player, refer to the operating instructions of the component. 48 The Timer Before you begin, make sure "TIMER PLAY" or "TIMER REC" is displayed, press STANDBY. 1 Prepare the music source you want to play . "TIMER PLAY" or "TIMER REC" flashes in the station. Make the following settings...

Primary User Manual
Page 50
... time. • When recording from the component connected to the LINE IN jack of the player, turn the jog dial until "RADIO" flashes in the display, and press YES•ENTER. 5 Set the timer to the hour and the minutes you made a mistake, press NO•CANCEL. When recording from the component connected to the LINE IN jack of the player, refer to the operating instructions...
... time. • When recording from the component connected to the LINE IN jack of the player, turn the jog dial until "RADIO" flashes in the display, and press YES•ENTER. 5 Set the timer to the hour and the minutes you made a mistake, press NO•CANCEL. When recording from the component connected to the LINE IN jack of the player, refer to the operating instructions...
Primary User Manual
Page 63
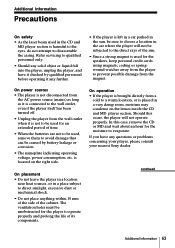
... have it is placed in the car where the player will not operate properly. Additional Information Precautions On safety • As the laser beam used for the speakers, keep personal credit cards using magnetic coding or springwound watches away from the player to prevent possible damage from the magnet. Refer servicing to qualified personnel only. • Should any solid object...
... have it is placed in the car where the player will not operate properly. Additional Information Precautions On safety • As the laser beam used for the speakers, keep personal credit cards using magnetic coding or springwound watches away from the player to prevent possible damage from the magnet. Refer servicing to qualified personnel only. • Should any solid object...

Primary User Manual
Page 69
... the player. If "Disc Error" remains, replace the MD. "Disc Error" lights in place. An incompletely inserted MD cannot be pulled out. CD Player MD Player continued Additional Information 69 Troubleshooting General Symptom There is in the display and the player does not operate. The picture of the player (page 54). • Connect the audio connecting cord correctly (page 54). • Adjust the volume. • Unplug the headphones from the 2 jack when listening through speakers...
... the player. If "Disc Error" remains, replace the MD. "Disc Error" lights in place. An incompletely inserted MD cannot be pulled out. CD Player MD Player continued Additional Information 69 Troubleshooting General Symptom There is in the display and the player does not operate. The picture of the player (page 54). • Connect the audio connecting cord correctly (page 54). • Adjust the volume. • Unplug the headphones from the 2 jack when listening through speakers...

Primary User Manual
Page 70
... the opening until "Stereo" appears in stereo. Replace it with one that protected the track. • The player is not connected properly to an AM radio, noise may be heard. Replace it . • The MD may be blank (the music calendar does not appear). Record again at high volume. Release the track-protect on the MD. The MD does not record. MD Player Troubleshooting (continued) Symptom The MD does not play. A stereo program...
... the opening until "Stereo" appears in stereo. Replace it with one that protected the track. • The player is not connected properly to an AM radio, noise may be heard. Replace it . • The MD may be blank (the music calendar does not appear). Record again at high volume. Release the track-protect on the MD. The MD does not record. MD Player Troubleshooting (continued) Symptom The MD does not play. A stereo program...
Primary User Manual
Page 71
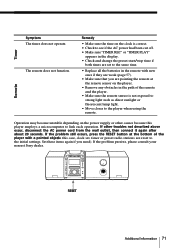
..., clock set to the same time. • Replace all the batteries in the display. • Check and change the preset start/stop time if both times are set , timer or preset radio stations are pointing the remote at the bottom of the remote and the player. • Make sure the remote sensor is not exposed to strong light such as direct sunlight or fluorescent lamp light. • Move closer to link each operation. RESET Additional...
..., clock set to the same time. • Replace all the batteries in the display. • Check and change the preset start/stop time if both times are set , timer or preset radio stations are pointing the remote at the bottom of the remote and the player. • Make sure the remote sensor is not exposed to strong light such as direct sunlight or fluorescent lamp light. • Move closer to link each operation. RESET Additional...

Primary User Manual
Page 73
rated 7 W per channelminimum RMS power, with no more than 44.6 µW (This output is the value measured at 70 Hz; Other Specifications CD player section System Compact disc digital audio system Laser diode properties Material: GaAlAs Wave length: 785 nm Emission duration: Continuous Laser output: Less than 10 % total harmonic distortion in .) dia., 4.0 ohms, cone type Power output 30 W (at 100 Hz) Power consumption AC 28 W Dimensions...
rated 7 W per channelminimum RMS power, with no more than 44.6 µW (This output is the value measured at 70 Hz; Other Specifications CD player section System Compact disc digital audio system Laser diode properties Material: GaAlAs Wave length: 785 nm Emission duration: Continuous Laser output: Less than 10 % total harmonic distortion in .) dia., 4.0 ohms, cone type Power output 30 W (at 100 Hz) Power consumption AC 28 W Dimensions...

Primary User Manual
Page 75
... 55, 61 System limitations 65 T Text information on a CD 16 Timer playback 48 recording 50 Troubleshooting 69 U, V, W, X, Y, Z Using the display 12 - 15 Additional Information 75 Index A Adjusting bass 62 treble 62 volume 5, 9, 11 ATRAC 68 AUTO PRESET 23 B Batteries for the remote controller 57 C CD player 12 Checking playing time a CD 12 an MD 14 Cleaning 64 Clock 46 Combine function 39 Connecting AC power cord 57 antenna 56, 58 optional components 59 super woofer 61...
... 55, 61 System limitations 65 T Text information on a CD 16 Timer playback 48 recording 50 Troubleshooting 69 U, V, W, X, Y, Z Using the display 12 - 15 Additional Information 75 Index A Adjusting bass 62 treble 62 volume 5, 9, 11 ATRAC 68 AUTO PRESET 23 B Batteries for the remote controller 57 C CD player 12 Checking playing time a CD 12 an MD 14 Cleaning 64 Clock 46 Combine function 39 Connecting AC power cord 57 antenna 56, 58 optional components 59 super woofer 61...


