Primary User Manual
Page 2
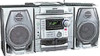
... connected to wide slot, fully insert. Model No. Warning Do not install the appliance in backup battery for about one or more of plug to a power source. This symbol is no 2 Introduction guarantee that to which can radiate radio frequency energy and, if not installed and used it for a Class B digital device, pursuant to Part 15 of electric shock to provide reasonable protection...
... connected to wide slot, fully insert. Model No. Warning Do not install the appliance in backup battery for about one or more of plug to a power source. This symbol is no 2 Introduction guarantee that to which can radiate radio frequency energy and, if not installed and used it for a Class B digital device, pursuant to Part 15 of electric shock to provide reasonable protection...
Primary User Manual
Page 3
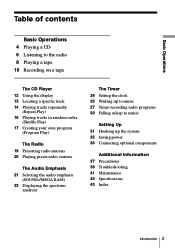
... Basic Operations 4 Playing a CD 6 Listening to the radio 8 Playing a tape 10 Recording on a tape The CD Player 12 Using the display 13 Locating a specific track 14 Playing tracks repeatedly (Repeat Play) 16 Playing tracks in random order (Shuffle Play) 17 Creating your own program (Program Play) The Radio 19 Presetting radio stations 20 Playing preset radio stations The Audio Emphasis 21 Selecting the audio emphasis (SOUND/MEGA BASS) 23 Displaying the spectrum analyzer The Timer 24 Setting the clock 25 Waking up to music 27...
... Basic Operations 4 Playing a CD 6 Listening to the radio 8 Playing a tape 10 Recording on a tape The CD Player 12 Using the display 13 Locating a specific track 14 Playing tracks repeatedly (Repeat Play) 16 Playing tracks in random order (Shuffle Play) 17 Creating your own program (Program Play) The Radio 19 Presetting radio stations 20 Playing preset radio stations The Audio Emphasis 21 Selecting the audio emphasis (SOUND/MEGA BASS) 23 Displaying the spectrum analyzer The Timer 24 Setting the clock 25 Waking up to music 27...

Primary User Manual
Page 5
... DISC CHANGE, press Z CD OPEN/CLOSE to select the desired CD and then press CD u (DISC 1, DISC 2 or DISC 3 on automatically and starts playing the CD. The player plays all the tracks of all the CDs in the CD tray once. Display CD number Track Playing number time Tips • You can change the CD. go back to pull out the CD tray and change a CD while playing another. on the remote). The player turns on the remote). Basic Operations 5 Basic Operations 4 CD Press CD u . play...
... DISC CHANGE, press Z CD OPEN/CLOSE to select the desired CD and then press CD u (DISC 1, DISC 2 or DISC 3 on automatically and starts playing the CD. The player plays all the tracks of all the CDs in the CD tray once. Display CD number Track Playing number time Tips • You can change the CD. go back to pull out the CD tray and change a CD while playing another. on the remote). The player turns on the remote). Basic Operations 5 Basic Operations 4 CD Press CD u . play...

Primary User Manual
Page 7
... possible from the player and reorient it . To adjust the volume turn on automatically and starts playing the previous station. If the FM broadcast is noisy, press MODE until "MONO" appears in the display and the radio will play in monaural. • Next time you want to listen to the radio, just press RADIO BAND• AUTO PRESET. Basic Operations 7 Basic Operations Use these buttons for additional operations POWER VOLUME MODE Tips •...
... possible from the player and reorient it . To adjust the volume turn on automatically and starts playing the previous station. If the FM broadcast is noisy, press MODE until "MONO" appears in the display and the radio will play in monaural. • Next time you want to listen to the radio, just press RADIO BAND• AUTO PRESET. Basic Operations 7 Basic Operations Use these buttons for additional operations POWER VOLUME MODE Tips •...
Primary User Manual
Page 10
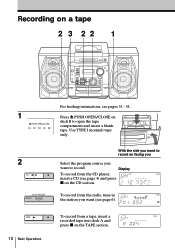
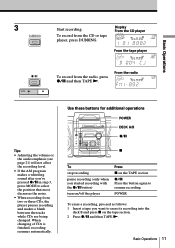
... 4) and press x on the TAPE section. Display To record from a tape, insert a recorded tape into deck A and press x on the CD section. Recording on a tape 2 3 22 1 For hookup instructions, see pages 31 - 34. 1 Press Z PUSH OPEN/CLOSE on facing you Select the program source you want to open the tape compartment and insert a blank tape. TAPE 10 Basic Operations To record from the CD player, insert a CD (see page 6).
... 4) and press x on the TAPE section. Display To record from a tape, insert a recorded tape into deck A and press x on the CD section. Recording on a tape 2 3 22 1 For hookup instructions, see pages 31 - 34. 1 Press Z PUSH OPEN/CLOSE on facing you Select the program source you want to open the tape compartment and insert a blank tape. TAPE 10 Basic Operations To record from the CD player, insert a CD (see page 6).
Primary User Manual
Page 11
... changing of CDs is finished, recording resumes automatically. Basic Operations 11 From the radio Tips • Adjusting the volume or the audio emphasis (see page 21) will not affect the recording level. • If the AM program makes a whistling sound after you've pressed z/X in step 3, press MODE to resume recording. Display From the CD player From the tape player Basic Operations z/X TAPE To record from the CD or tape player...
... changing of CDs is finished, recording resumes automatically. Basic Operations 11 From the radio Tips • Adjusting the volume or the audio emphasis (see page 21) will not affect the recording level. • If the AM program makes a whistling sound after you've pressed z/X in step 3, press MODE to resume recording. Display From the CD player From the tape player Basic Operations z/X TAPE To record from the CD or tape player...
Primary User Manual
Page 13
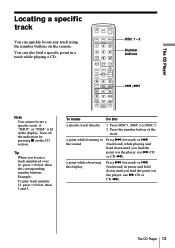
... the player, use M CD or CD m). Example: To play track number 23, press >10 first, then 2 and 3. The CD Player 13 Turn off the indication by pressing x on the remote. You can quickly locate any track using the number buttons on the CD section. To locate Do this a specific track directly 1 Press DISC 1, DISC 2 or DISC 3. 2 Press the number button of the track. The CD Player Locating a specific track You can also find a specific point...
... the player, use M CD or CD m). Example: To play track number 23, press >10 first, then 2 and 3. The CD Player 13 Turn off the indication by pressing x on the remote. You can quickly locate any track using the number buttons on the CD section. To locate Do this a specific track directly 1 Press DISC 1, DISC 2 or DISC 3. 2 Press the number button of the track. The CD Player Locating a specific track You can also find a specific point...
Primary User Manual
Page 19
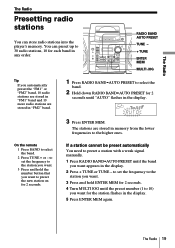
... RADIO BAND•AUTO PRESET to preset the new station on for the station flashes in any order. to set the frequency to the station you want. 3 Press and hold ENTER MEM for 2 seconds. 4 Turn MULTI JOG until the preset number (1 to 10) you want to select the band. 2 Hold down RADIO BAND•AUTO PRESET for each band in the display. 5 Press ENTER MEM again. RADIO BAND AUTO PRESET TUNE - + TUNE ENTER MEM MULTI...
... RADIO BAND•AUTO PRESET to preset the new station on for the station flashes in any order. to set the frequency to the station you want. 3 Press and hold ENTER MEM for 2 seconds. 4 Turn MULTI JOG until the preset number (1 to 10) you want to select the band. 2 Hold down RADIO BAND•AUTO PRESET for each band in the display. 5 Press ENTER MEM again. RADIO BAND AUTO PRESET TUNE - + TUNE ENTER MEM MULTI...

Primary User Manual
Page 23
CD OPEN/ POWER CLOSE SLEEP DISC 1 DISC 2 DISC 3 CD/RADIO VOL DISPLAY SURROUND SOUND CD REPEAT RADIO BAND TAPE TUNE DECK A/B LINE COUNTER SPCANL RESET SPCANL Displaying the audio signal pattern Press SPCANL to display the audio signal pattern you are listening to by using the remote. The Audio Emphasis Displaying the spectrum analyzer You can display 3 different patterns of each band Peak the highest level of the audio signal you are listening to . Each time the button is pressed, the display changes. Choose Peak...
CD OPEN/ POWER CLOSE SLEEP DISC 1 DISC 2 DISC 3 CD/RADIO VOL DISPLAY SURROUND SOUND CD REPEAT RADIO BAND TAPE TUNE DECK A/B LINE COUNTER SPCANL RESET SPCANL Displaying the audio signal pattern Press SPCANL to display the audio signal pattern you are listening to by using the remote. The Audio Emphasis Displaying the spectrum analyzer You can display 3 different patterns of each band Peak the highest level of the audio signal you are listening to . Each time the button is pressed, the display changes. Choose Peak...
Primary User Manual
Page 25
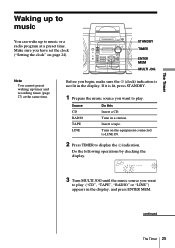
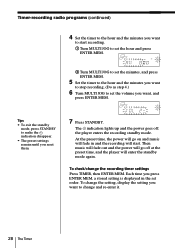
... Timer 25 STANDBY TIMER ENTER MEM MULTI JOG Note You cannot preset waking up to music or a radio program at the same time. Insert a tape. Turn on page 24). If it is not lit in the display. Source CD RADIO TAPE LINE Do this Insert a CD. Tune in the display, and press ENTER MEM. Do the following operations by checking the display. 3 Turn MULTI JOG until the music source you want to play ("CD", "TAPE", "RADIO" or...
... Timer 25 STANDBY TIMER ENTER MEM MULTI JOG Note You cannot preset waking up to music or a radio program at the same time. Insert a tape. Turn on page 24). If it is not lit in the display. Source CD RADIO TAPE LINE Do this Insert a CD. Tune in the display, and press ENTER MEM. Do the following operations by checking the display. 3 Turn MULTI JOG until the music source you want to play ("CD", "TAPE", "RADIO" or...

Primary User Manual
Page 26
... the preset time.) Turn off the player before a timer playback starts If you turn on page 25, you reset them. 26 The Timer 7 Press STANDBY. Then music will fade out and the power will enter the standby mode again. the player enters the standby mode. To change the setting, display the setting you can use it . Each time you press ENTER MEM, a stored setting is different from the one you tuned in...
... the preset time.) Turn off the player before a timer playback starts If you turn on page 25, you reset them. 26 The Timer 7 Press STANDBY. Then music will fade out and the power will enter the standby mode again. the player enters the standby mode. To change the setting, display the setting you can use it . Each time you press ENTER MEM, a stored setting is different from the one you tuned in...

Primary User Manual
Page 27
... component connected to the LINE IN jacks of the player, turn MULTI JOG to the LINE IN jacks of the player, refer to display the indication. When recording from the component connected to the LINE IN jacks of the player. You can set the clock (see "Setting the clock" on facing you receive the AM program in the display. Tip When you . 2 Press TIMER to the operating instructions of the component connected...
... component connected to the LINE IN jacks of the player, turn MULTI JOG to the LINE IN jacks of the player, refer to display the indication. When recording from the component connected to the LINE IN jacks of the player. You can set the clock (see "Setting the clock" on facing you receive the AM program in the display. Tip When you . 2 Press TIMER to the operating instructions of the component connected...
Primary User Manual
Page 28
... set the volume you want , and press ENTER MEM. Tips • To exit the standby mode, press STANDBY to make the indication disappear. • The preset settings remain until you press ENTER MEM, a stored setting is displayed in and the recording will enter the standby mode again. The indication lights up and the power goes off at the preset time, and the player will start recording. 1 Turn MULTI...
... set the volume you want , and press ENTER MEM. Tips • To exit the standby mode, press STANDBY to make the indication disappear. • The preset settings remain until you press ENTER MEM, a stored setting is displayed in and the recording will enter the standby mode again. The indication lights up and the power goes off at the preset time, and the player will start recording. 1 Turn MULTI...

Primary User Manual
Page 31
..., connect the cords firmly. SPEAKERR IMP.6Ω L R L continued Setting Up 31 Setting Up Setting Up Hooking up the speakers Connect the red wire to the (+) plus terminal, and the black wire to the (-) minus terminal. Wrong connections cause mal- functions. Connect the AC power cord last. 2 AM loop antenna 2 FM lead antenna Right speaker Left speaker Notes • Be sure to turn off the power of the player before connecting/ disconnecting the AC power cord. • Connect...
..., connect the cords firmly. SPEAKERR IMP.6Ω L R L continued Setting Up 31 Setting Up Setting Up Hooking up the speakers Connect the red wire to the (+) plus terminal, and the black wire to the (-) minus terminal. Wrong connections cause mal- functions. Connect the AC power cord last. 2 AM loop antenna 2 FM lead antenna Right speaker Left speaker Notes • Be sure to turn off the power of the player before connecting/ disconnecting the AC power cord. • Connect...

Primary User Manual
Page 35
The player enters the lower power consumption standby mode. If you use the saving power function, you can reduce power consumption to less than 1 W. Saving power Even when power is off , this player consumes about 7.5 W for time indication, timer operation, remote control reception. To cancel the saving power To make the time indication appear, press and hold DISPLAY for about 2 seconds. Setting Up Setting Up 35 DISPLAY When the power is off, press and hold DISPLAY for about 2 seconds when the power is turned off .
The player enters the lower power consumption standby mode. If you use the saving power function, you can reduce power consumption to less than 1 W. Saving power Even when power is off , this player consumes about 7.5 W for time indication, timer operation, remote control reception. To cancel the saving power To make the time indication appear, press and hold DISPLAY for about 2 seconds. Setting Up Setting Up 35 DISPLAY When the power is off, press and hold DISPLAY for about 2 seconds when the power is turned off .
Primary User Manual
Page 38
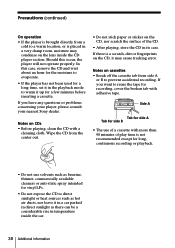
... or problems concerning your player, please consult your nearest Sony dealer. Notes on the lens inside the car. 38 Additional Information Should this case, remove the CD and wait about an hour for the moisture to evaporate. • If the player has not been used for a long time, set it in a very damp room, moisture may cause tracking error.
... or problems concerning your player, please consult your nearest Sony dealer. Notes on the lens inside the car. 38 Additional Information Should this case, remove the CD and wait about an hour for the moisture to evaporate. • If the player has not been used for a long time, set it in a very damp room, moisture may cause tracking error.
Primary User Manual
Page 39
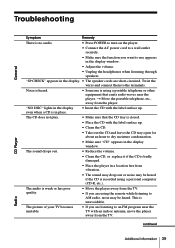
Troubleshooting General CD Player Symptom Remedy There is no audio. • Press POWER to turn on the player. • Connect the AC power cord to a wall outlet securely. • Make sure the function you want to dry moisture condensation. • Make sure "CD" appears in the display window. The CD does not play. • Make sure that emits radio waves near the TV with an indoor antenna, move...
Troubleshooting General CD Player Symptom Remedy There is no audio. • Press POWER to turn on the player. • Connect the AC power cord to a wall outlet securely. • Make sure the function you want to dry moisture condensation. • Make sure "CD" appears in the display window. The CD does not play. • Make sure that emits radio waves near the TV with an indoor antenna, move...
Primary User Manual
Page 40
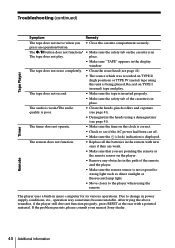
...; Demagnetize the heads using this unit is in the display window. Timer Remote The player uses a built-in power supply conditions, etc., operation way sometimes become unstable. If the problem persists, please consult your nearest Sony dealer. 40 Additional Information press an operation button. Troubleshooting (continued) Tape Player Symptom Remedy The tape does not move when you are pointing the remote at the rear with new ones...
...; Demagnetize the heads using this unit is in the display window. Timer Remote The player uses a built-in power supply conditions, etc., operation way sometimes become unstable. If the problem persists, please consult your nearest Sony dealer. 40 Additional Information press an operation button. Troubleshooting (continued) Tape Player Symptom Remedy The tape does not move when you are pointing the remote at the rear with new ones...
Primary User Manual
Page 42
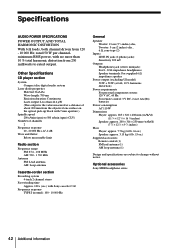
... and specifications are subject to rated output. rated 50 W per channelminimum RMS power, with Sony cassette C-60 Frequency response TYPE I (normal): 100 - 10 000 Hz General Speaker Woofer: 13 cm (5 1⁄8 inches) dia., Tweeter: 5 cm (2 inches) dia., 6 Ω, cone type (2) Inputs LINE IN jacks (2 phono jacks): Sensitivity 220 mV Outputs Headphones jack (stereo minijack): For 8 - 32 Ω impedance headphones Speaker terminals: For supplied 6 Ω impedance speaker Power output (excluding US model...
... and specifications are subject to rated output. rated 50 W per channelminimum RMS power, with Sony cassette C-60 Frequency response TYPE I (normal): 100 - 10 000 Hz General Speaker Woofer: 13 cm (5 1⁄8 inches) dia., Tweeter: 5 cm (2 inches) dia., 6 Ω, cone type (2) Inputs LINE IN jacks (2 phono jacks): Sensitivity 220 mV Outputs Headphones jack (stereo minijack): For 8 - 32 Ω impedance headphones Speaker terminals: For supplied 6 Ω impedance speaker Power output (excluding US model...

Primary User Manual
Page 43
Index A Audio emphasis 21 B Batteries for remote 34 C CD player 12 Cleaning cabinet 41 tape heads and tape path 41 Connecting AC power cord 34 antennas 32 optional components 36 speakers 31 Creating your own program 17 D, E, F, G, H Demagnetizing the tape heads 41 Demonstration mode 34 Display 12 I, J, K Improving broadcast reception 7 L Listening to the radio 6 Locating a specific track 13 M, N, O MEGA BASS 22 P, Q Playing a CD 4 a tape 8 preset radio stations 20 tracks repeatedly 14 Presetting radio stations 19 Program Play 17 R Radio stations playing 20 presetting 19 Recording...
Index A Audio emphasis 21 B Batteries for remote 34 C CD player 12 Cleaning cabinet 41 tape heads and tape path 41 Connecting AC power cord 34 antennas 32 optional components 36 speakers 31 Creating your own program 17 D, E, F, G, H Demagnetizing the tape heads 41 Demonstration mode 34 Display 12 I, J, K Improving broadcast reception 7 L Listening to the radio 6 Locating a specific track 13 M, N, O MEGA BASS 22 P, Q Playing a CD 4 a tape 8 preset radio stations 20 tracks repeatedly 14 Presetting radio stations 19 Program Play 17 R Radio stations playing 20 presetting 19 Recording...


