
Online Help Center
Page 1
Your new computer is designed to help you for your computer. View the VAIO® Computer Specifications, which describes your Sony VAIO® computer! Page 1 The information provided here is a superb blend of high technology and easy-to-use functionality. Welcome Thank you to become familiar with the hardware and software applications included with your system. View the Latest Updates for purchasing your computer's hardware configuration and preinstalled software information.
Your new computer is designed to help you for your computer. View the VAIO® Computer Specifications, which describes your Sony VAIO® computer! Page 1 The information provided here is a superb blend of high technology and easy-to-use functionality. Welcome Thank you to become familiar with the hardware and software applications included with your system. View the Latest Updates for purchasing your computer's hardware configuration and preinstalled software information.
Online Help Center
Page 3
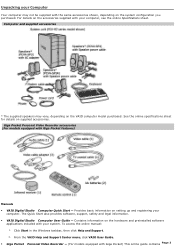
..., depending on supplied accessories. To access the online manual: 1. Provides basic information on the VAIO computer model purchased. Contains information on the accessories supplied with your computer, see the online Specifications sheet. From the VAIO Help and Support Center menu, click VAIO User Guide. Giga Pocket Personal Video Recorder - (For models equipped with Giga Pocket...
..., depending on supplied accessories. To access the online manual: 1. Provides basic information on the VAIO computer model purchased. Contains information on the accessories supplied with your computer, see the online Specifications sheet. From the VAIO Help and Support Center menu, click VAIO User Guide. Giga Pocket Personal Video Recorder - (For models equipped with Giga Pocket...
Online Help Center
Page 4
... software license agreement and Sony end-user license agreement. From the VAIO Help and Support Center menu, click VAIO Multimedia. 3. Click Creating DVDs. Specifications - From the VAIO Help and Support Center menu, click VAIO User Guide. 3. To access this online information: 1. Click the link in the text, "View the VAIO Computer Specifications, which lists your computer if they become...
... software license agreement and Sony end-user license agreement. From the VAIO Help and Support Center menu, click VAIO Multimedia. 3. Click Creating DVDs. Specifications - From the VAIO Help and Support Center menu, click VAIO User Guide. 3. To access this online information: 1. Click the link in the text, "View the VAIO Computer Specifications, which lists your computer if they become...

Online Help Center
Page 6
... and required operating conditions. The i.LINK connection may vary, depending on your computer.Your computer may vary from the illustrations shown in this section. To view the specific connection capabilities for information on operating conditions and proper connection. All products with ...an i.LINK connection may be equipped with all of these hardware features and the location of Sony...
... and required operating conditions. The i.LINK connection may vary, depending on your computer.Your computer may vary from the illustrations shown in this section. To view the specific connection capabilities for information on operating conditions and proper connection. All products with ...an i.LINK connection may be equipped with all of these hardware features and the location of Sony...
Online Help Center
Page 7
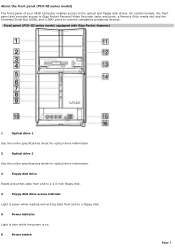
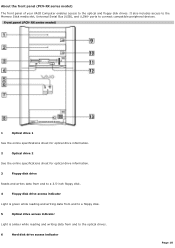
...; ports to the optical and floppy disk drives. About the front panel (PCV-RZ series model) The front panel of your VAIO Computer enables access to connect compatible peripheral devices. RZ series m odel, equipped with Giga Pocket features) 1 Optical drive 1 See the online specifications sheet for optical drive information. 2 Optical drive 2 See the online...
...; ports to the optical and floppy disk drives. About the front panel (PCV-RZ series model) The front panel of your VAIO Computer enables access to connect compatible peripheral devices. RZ series m odel, equipped with Giga Pocket features) 1 Optical drive 1 See the online specifications sheet for optical drive information. 2 Optical drive 2 See the online...
Online Help Center
Page 10
... optical and floppy disk drives. About the front panel (PCV-RX series model) The front panel of your VAIO Computer enables access to connect compatible peripheral devices. RX series m odel) 1 Optical drive 1 See the online specifications sheet for optical drive information. 2 Optical drive 2 See the online specifications sheet for optical drive information. 3 Floppy disk drive... access indicator Light is amber while reading and writing data from and to the optical drives. 6 Hard disk drive access indicator Page 10 Front panel (PCV-
... optical and floppy disk drives. About the front panel (PCV-RX series model) The front panel of your VAIO Computer enables access to connect compatible peripheral devices. RX series m odel) 1 Optical drive 1 See the online specifications sheet for optical drive information. 2 Optical drive 2 See the online specifications sheet for optical drive information. 3 Floppy disk drive... access indicator Light is amber while reading and writing data from and to the optical drives. 6 Hard disk drive access indicator Page 10 Front panel (PCV-

Online Help Center
Page 18
Press again to restore the sound. 2 Channel number buttons Press to select specific channels. (Press the ENT button to activate channel selection.) JUMP button Press to return to activate channel selection. ENT button Press to the previous channel. ...
Press again to restore the sound. 2 Channel number buttons Press to select specific channels. (Press the ENT button to activate channel selection.) JUMP button Press to return to activate channel selection. ENT button Press to the previous channel. ...

Online Help Center
Page 21
See the online specifications sheet for your specific computer. Page 21 The location of these hardware features, therefore some instructions may vary from the illustrations shown in this section. Setting Up Your Computer Your computer may not be equipped with all of the controls, ports, and jacks may not apply to your system's configuration.
See the online specifications sheet for your specific computer. Page 21 The location of these hardware features, therefore some instructions may vary from the illustrations shown in this section. Setting Up Your Computer Your computer may not be equipped with all of the controls, ports, and jacks may not apply to your system's configuration.

Online Help Center
Page 34
... in this section, depending on the system configuration purchased. Configuring Your VAIO Computer This section provides basic information about managing your computer, see the online specifications sheet. About Your Hard Disk Drive Partition i.LINK Compatibility VAIO Action Setup Changing The Sony Software Window Design Using The Memory Stick Media Slot ...
... in this section, depending on the system configuration purchased. Configuring Your VAIO Computer This section provides basic information about managing your computer, see the online specifications sheet. About Your Hard Disk Drive Partition i.LINK Compatibility VAIO Action Setup Changing The Sony Software Window Design Using The Memory Stick Media Slot ...
Online Help Center
Page 37
... system configuration purchased. A 6-pin i.LINK port can be equipped with your computer see the online specifications sheet. To view the specific hardware configuration for your compatible i.LINK device for use with your system, such... as an optical or hard disk drive, confirm their operating system compatibility and required operating conditions. i.LINK Compatibility Your VAIO® computer may be purchased from your local retailer, from the Sony VAIO...
... system configuration purchased. A 6-pin i.LINK port can be equipped with your computer see the online specifications sheet. To view the specific hardware configuration for your compatible i.LINK device for use with your system, such... as an optical or hard disk drive, confirm their operating system compatibility and required operating conditions. i.LINK Compatibility Your VAIO® computer may be purchased from your local retailer, from the Sony VAIO...

Online Help Center
Page 43
... configuration for exchanging and sharing digital data with a Memory Stick® media slot as shown. Use your computer see the online specifications sheet. Inserting the Mem ory Stick Media (PCV- Insert the Memory Stick® media into the slot. Carefully reinsert the Memory Stick media, but do not force it is a compact, ...series m odel shown) 3. A Memory Stick media is not upside-down or backwards. RZ series m odel shown) 2. Page 43 Using The Memory Stick Media Slot Your computer may not be equipped with similarly equipped products. Opening the front panel...
... configuration for exchanging and sharing digital data with a Memory Stick® media slot as shown. Use your computer see the online specifications sheet. Inserting the Mem ory Stick Media (PCV- Insert the Memory Stick® media into the slot. Carefully reinsert the Memory Stick media, but do not force it is a compact, ...series m odel shown) 3. A Memory Stick media is not upside-down or backwards. RZ series m odel shown) 2. Page 43 Using The Memory Stick Media Slot Your computer may not be equipped with similarly equipped products. Opening the front panel...
Online Help Center
Page 45
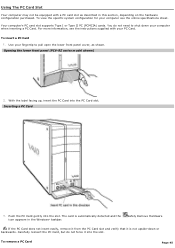
...icon appears in this section, depending on the hardware configuration purchased. The card is not upside-down your computer when inserting a PC Card. Inserting a PC Card 3. To view the specific system configuration for your PC Card. Safely Remove Hardware If the PC Card does not insert easily, ...remove it from the PC Card slot and verify that it into the slot. Opening the lower front panel (PCV- Push the PC Card gently into the PC Card slot. Your computer...
...icon appears in this section, depending on the hardware configuration purchased. The card is not upside-down your computer when inserting a PC Card. Inserting a PC Card 3. To view the specific system configuration for your PC Card. Safely Remove Hardware If the PC Card does not insert easily, ...remove it from the PC Card slot and verify that it into the slot. Opening the lower front panel (PCV- Push the PC Card gently into the PC Card slot. Your computer...

Online Help Center
Page 47
...remote control, depending on the hardware configuration purchased. Setting up to avoid possible damage from battery leakage. Page 47 If your computer, see the online specifications sheet. Insert two AA batteries (supplied) into the rem ote control Under normal use, the AA batteries may last up the... remote control Your computer may need to be supplied with Giga Pocket hardware features. To view the specific system configuration for extended periods of time, remove the batteries to six months. A remote control is...
...remote control, depending on the hardware configuration purchased. Setting up to avoid possible damage from battery leakage. Page 47 If your computer, see the online specifications sheet. Insert two AA batteries (supplied) into the rem ote control Under normal use, the AA batteries may last up the... remote control Your computer may need to be supplied with Giga Pocket hardware features. To view the specific system configuration for extended periods of time, remove the batteries to six months. A remote control is...

Online Help Center
Page 49
... before you are near the slot cover you open the system or connect your computer, see the online specifications sheet. Otherwise, damage may result in personal injury or equipment damage. To view the specific hardware configuration for example, cellophane wrappers). Electrostatic discharge (ESD) can damage disk ... in a carpeted area and do so may occur to peripheral equipment. Always turn the power off before you plan to your specific computer. Page 49 Overview The procedures in this section assume that you open the unit or follow any of the procedures described in ...
... before you are near the slot cover you open the system or connect your computer, see the online specifications sheet. Otherwise, damage may result in personal injury or equipment damage. To view the specific hardware configuration for example, cellophane wrappers). Electrostatic discharge (ESD) can damage disk ... in a carpeted area and do so may occur to peripheral equipment. Always turn the power off before you plan to your specific computer. Page 49 Overview The procedures in this section assume that you open the unit or follow any of the procedures described in ...
Online Help Center
Page 54
... Inline Memory Modules (DIMM). Push down your computer and turn off all peripheral devices, such as your computer. See the online specifications sheet for details about the amount of memory installed in your computer and all peripheral devices. 3. Unplug your computer. See Removing the Side Panel. 4. Gently ...remove the memory in a static-free bag. Grasp one edge of the module and lift it from your computer. Rem ov ing/Installing m em ory (PCV- Installing Memory The amount of preinstalled memory may ship with all available memory slots filled. To remove memory 1....
... Inline Memory Modules (DIMM). Push down your computer and turn off all peripheral devices, such as your computer. See the online specifications sheet for details about the amount of memory installed in your computer and all peripheral devices. 3. Unplug your computer. See Removing the Side Panel. 4. Gently ...remove the memory in a static-free bag. Grasp one edge of the module and lift it from your computer. Rem ov ing/Installing m em ory (PCV- Installing Memory The amount of preinstalled memory may ship with all available memory slots filled. To remove memory 1....
Online Help Center
Page 58
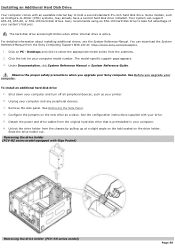
...your drive. 5. You can support ATA-33, ATA-66, or ATA-100 hard disk drives. Unplug your computer model number. Rem ov ing the driv e holder (PCV- The model-specific support page appears. 3. To install an additional hard disk drive 1. Configure the jumpers on PC - Some ... a slave. Desktops and click to -Order (CTO) systems, may already have a second hard disk drive installed. See Before you upgrade your Sony computer. See the configuration instructions supplied with Giga Pocket) Rem ov ing the driv e holder (PCV- Unlock the drive holder from the Sony Computing Support Web site...
...your drive. 5. You can support ATA-33, ATA-66, or ATA-100 hard disk drives. Unplug your computer model number. Rem ov ing the driv e holder (PCV- The model-specific support page appears. 3. To install an additional hard disk drive 1. Configure the jumpers on PC - Some ... a slave. Desktops and click to -Order (CTO) systems, may already have a second hard disk drive installed. See Before you upgrade your Sony computer. See the configuration instructions supplied with Giga Pocket) Rem ov ing the driv e holder (PCV- Unlock the drive holder from the Sony Computing Support Web site...

Online Help Center
Page 66
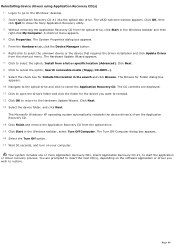
... to run the Application Recovery CD utility. Page 66 You can reinstall a software application or driver to correct a problem that shipped with your computer, peripheral hardware, or specific software. You may not need to reinstall the entire contents of the software that you to reinstall individual software, individual drivers, and to repair...
... to run the Application Recovery CD utility. Page 66 You can reinstall a software application or driver to correct a problem that shipped with your computer, peripheral hardware, or specific software. You may not need to reinstall the entire contents of the software that you to reinstall individual software, individual drivers, and to repair...
Online Help Center
Page 69
...close the Sony Application Recovery utility. 3. The Microsoft® Windows® XP operating system automatically reinstalls the device driver(s) from a list or specific location ... CD. Insert Application Recovery CD #1, to the Windows® desktop. 2. You are displayed. 11. Without removing the Application Recovery...to go to start the application or driver recovery process. The VAIO welcome window appears. The System Properties dialog box appears. 5....location in the Windows taskbar and then right-click My Computer. Navigate to the optical drive and click to reinstall. ...
...close the Sony Application Recovery utility. 3. The Microsoft® Windows® XP operating system automatically reinstalls the device driver(s) from a list or specific location ... CD. Insert Application Recovery CD #1, to the Windows® desktop. 2. You are displayed. 11. Without removing the Application Recovery...to go to start the application or driver recovery process. The VAIO welcome window appears. The System Properties dialog box appears. 5....location in the Windows taskbar and then right-click My Computer. Navigate to the optical drive and click to reinstall. ...

Online Help Center
Page 74
... and select Help and Support. Select Startup and Shutdown Troubleshooter. Follow the on the right side of specific problem topics appears on -screen instructions according to your specific situation. Select Fixing a Problem and then select Startup and Shut Down problems. A list of the ...dialog box. 3. Page 74 For troubleshooting information, you can search Windows Help. 1. The VAIO Help and Support Center menu appears. 2....
... and select Help and Support. Select Startup and Shutdown Troubleshooter. Follow the on the right side of specific problem topics appears on -screen instructions according to your specific situation. Select Fixing a Problem and then select Startup and Shut Down problems. A list of the ...dialog box. 3. Page 74 For troubleshooting information, you can search Windows Help. 1. The VAIO Help and Support Center menu appears. 2....

Online Help Center
Page 78
... the text, "View the VAIO® Computer Specifications," which describes your computer's hardware configuration and preinstalled software information. Click the Welcome link. To access the online specifications sheet: 1. The Welcome page displays on your VAIO computer. Page 78 Locate the link in the Windows® taskbar and click Help and Support. 2. From the VAIO Help and Support Center...
... the text, "View the VAIO® Computer Specifications," which describes your computer's hardware configuration and preinstalled software information. Click the Welcome link. To access the online specifications sheet: 1. The Welcome page displays on your VAIO computer. Page 78 Locate the link in the Windows® taskbar and click Help and Support. 2. From the VAIO Help and Support Center...