Operating Instructions
Page 2
...for help. For questions regarding this product. Address: 16450 W. PCGA-UVC11A Serial No For customers in a particular installation. This equipment has been tested and found to subpart B of... de l'humidité. Model No. These limits are designed to radio communications. Declaration of the camera. Owner's Record The model number and the serial number are cautioned that... the equipment into an outlet on the bottom of Conformity Trade Name: SONY Model No.: PCGA-UVC11A Responsible Party: Sony Electronics Inc. The number below . Bernardo Dr, San Diego, CA 92127...
...for help. For questions regarding this product. Address: 16450 W. PCGA-UVC11A Serial No For customers in a particular installation. This equipment has been tested and found to subpart B of... de l'humidité. Model No. These limits are designed to radio communications. Declaration of the camera. Owner's Record The model number and the serial number are cautioned that... the equipment into an outlet on the bottom of Conformity Trade Name: SONY Model No.: PCGA-UVC11A Responsible Party: Sony Electronics Inc. The number below . Bernardo Dr, San Diego, CA 92127...
Operating Instructions
Page 3
... of Parts 6 Setting Up the Camera 7 Installing the driver and the software 7 Installing the Wireless LAN driver 12 Connecting the Camera 14 When mounting directly 14 When you cannot record with the camera microphone 24 Precautions 26 Maintenance 27 Getting Help 28 Specifications 29 Troubleshooting 30 3 GB and Canada. • Sony, VAIO, , and the Eco Info logo...
... of Parts 6 Setting Up the Camera 7 Installing the driver and the software 7 Installing the Wireless LAN driver 12 Connecting the Camera 14 When mounting directly 14 When you cannot record with the camera microphone 24 Precautions 26 Maintenance 27 Getting Help 28 Specifications 29 Troubleshooting 30 3 GB and Canada. • Sony, VAIO, , and the Eco Info logo...
Operating Instructions
Page 5
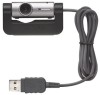
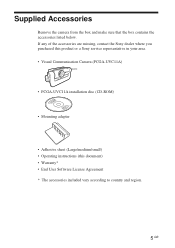
If any of the accessories are missing, contact the Sony dealer where you purchased this product or a Sony service representative in your area. • Visual Communication Camera (PCGA-UVC11A) • PCGA-UVC11A installation disc (CD-ROM) • Mounting adapter • Adhesive sheet (Large/medium/small) • Operating instructions (this document) • Warranty* • End User Software License Agreement * ...
If any of the accessories are missing, contact the Sony dealer where you purchased this product or a Sony service representative in your area. • Visual Communication Camera (PCGA-UVC11A) • PCGA-UVC11A installation disc (CD-ROM) • Mounting adapter • Adhesive sheet (Large/medium/small) • Operating instructions (this document) • Warranty* • End User Software License Agreement * ...
Operating Instructions
Page 7
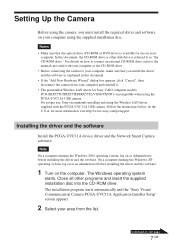
... running the Windows 2000 operating system, log on next page 7 GB The installation program starts automatically and the "Sony Visual Communication Camera PCGA-UVC11A Application Installer Setup" screen appears. 2 Select your area from your computer and reinstall it. • The preinstalled Wireless LAN driver for Sony VAIO computer models PCG-SRX55TC/SRX55TH/SRX55TL/VX89/VX89P is available for more information...
... running the Windows 2000 operating system, log on next page 7 GB The installation program starts automatically and the "Sony Visual Communication Camera PCGA-UVC11A Application Installer Setup" screen appears. 2 Select your area from your computer and reinstall it. • The preinstalled Wireless LAN driver for Sony VAIO computer models PCG-SRX55TC/SRX55TH/SRX55TL/VX89/VX89P is available for more information...

Operating Instructions
Page 8
...then click "Properties". The necessary driver and software are automatically installed. For operating systems other than the Windows XP operating system, click "Start", point to Step 4. If it does, click "Yes". 5 Connect the camera to your Windows operating system restarts, you can begin using...does not appear. 4 Follow the on-screen instructions. "Control Panel" appears. 3 Double-click "System". z Hint When the installation is installed 1 Connect the camera to your computer may require you to restart your computer appears, click "Yes". The "System Properties" dialog box appears. 4...
...then click "Properties". The necessary driver and software are automatically installed. For operating systems other than the Windows XP operating system, click "Start", point to Step 4. If it does, click "Yes". 5 Connect the camera to your Windows operating system restarts, you can begin using...does not appear. 4 Follow the on-screen instructions. "Control Panel" appears. 3 Double-click "System". z Hint When the installation is installed 1 Connect the camera to your computer may require you to restart your computer appears, click "Yes". The "System Properties" dialog box appears. 4...
Operating Instructions
Page 9
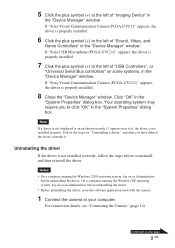
... software application used with the camera. 1 Connect the camera to the left of "USB Controllers", or "Universal Serial Bus controllers" on some systems, in the "Device Manager" window. On a computer running the Windows 2000 operating system, log on next page 9 GB If "Sony Visual Communication Camera PCGA-UVC11" appears, the driver is properly installed. 6 Click the plus symbol (+) to...
... software application used with the camera. 1 Connect the camera to the left of "USB Controllers", or "Universal Serial Bus controllers" on some systems, in the "Device Manager" window. On a computer running the Windows 2000 operating system, log on next page 9 GB If "Sony Visual Communication Camera PCGA-UVC11" appears, the driver is properly installed. 6 Click the plus symbol (+) to...
Operating Instructions
Page 11
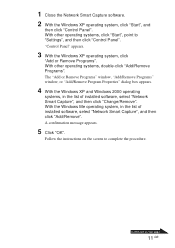
...window, or "Add/Remove Program Properties" dialog box appears. 4 With the Windows XP and Windows 2000 operating systems, in the list of installed software, select "Network Smart Capture", and then click "Change/Remove". Follow the instructions on next page 11 GB With the Windows Me ...operating system, in the list of installed software, select "Network Smart Capture", and then click "Add/Remove". Continued on the screen to "Settings", and then click "Control Panel". ...
...window, or "Add/Remove Program Properties" dialog box appears. 4 With the Windows XP and Windows 2000 operating systems, in the list of installed software, select "Network Smart Capture", and then click "Change/Remove". Follow the instructions on next page 11 GB With the Windows Me ...operating system, in the list of installed software, select "Network Smart Capture", and then click "Add/Remove". Continued on the screen to "Settings", and then click "Control Panel". ...

Operating Instructions
Page 12
... Mini PCI Card", and then click "Update Driver" on the CD-ROM, and then click "OK". 8 Click "Next". 9 Click "Finish". 12 GB Installing the Wireless LAN driver Only necessary for the PCG-SRX55TC/SRX55TH/SRX55TL/VX89/ VX89P. The "System Properties" dialog box appears. 2 Click the "Hardware" tab,... and then click the "Device Manager" button. The "Device Manager" window appears. 3 Click the plus symbol (+) to install", and then click "Next". 6 In "Network adapters", click "Have Disk". 7 Click "Browse", select the UPDATE\WirelessLAN folder on the shortcut menu.
... Mini PCI Card", and then click "Update Driver" on the CD-ROM, and then click "OK". 8 Click "Next". 9 Click "Finish". 12 GB Installing the Wireless LAN driver Only necessary for the PCG-SRX55TC/SRX55TH/SRX55TL/VX89/ VX89P. The "System Properties" dialog box appears. 2 Click the "Hardware" tab,... and then click the "Device Manager" button. The "Device Manager" window appears. 3 Click the plus symbol (+) to install", and then click "Next". 6 In "Network adapters", click "Have Disk". 7 Click "Browse", select the UPDATE\WirelessLAN folder on the shortcut menu.

Operating Instructions
Page 13
Confirming the installation of "Network adapters", right-click "ORiNOCO Mini PCI Card", and then click "Update Driver" on the shortcut menu. 4 Click the "Driver" tab. The "System Properties" dialog box appears. 2 Click the "Hardware" tab, and then click the "Device Manager" button. The "Device Manager" window appears. 3 Click the plus symbol (+) to the left of the Wireless LAN driver 1 Click "Start", right-click "My Computer", and then click "Properties". If the version of the driver is "7.16.0.189", then it was installed properly. 13 GB
Confirming the installation of "Network adapters", right-click "ORiNOCO Mini PCI Card", and then click "Update Driver" on the shortcut menu. 4 Click the "Driver" tab. The "System Properties" dialog box appears. 2 Click the "Hardware" tab, and then click the "Device Manager" button. The "Device Manager" window appears. 3 Click the plus symbol (+) to the left of the Wireless LAN driver 1 Click "Start", right-click "My Computer", and then click "Properties". If the version of the driver is "7.16.0.189", then it was installed properly. 13 GB
Operating Instructions
Page 14
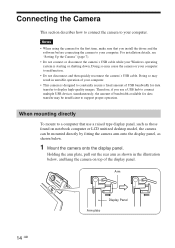
... system is designed to constantly secure a fixed amount of USB bandwidth for data transfer may cause the camera or your computer. • This camera is starting or shutting down. For installation details, see "Setting Up the Camera" (page 7). • Do not connect or disconnect the camera's USB cable while your computer. When mounting directly To mount to...
... system is designed to constantly secure a fixed amount of USB bandwidth for data transfer may cause the camera or your computer. • This camera is starting or shutting down. For installation details, see "Setting Up the Camera" (page 7). • Do not connect or disconnect the camera's USB cable while your computer. When mounting directly To mount to...
Operating Instructions
Page 21
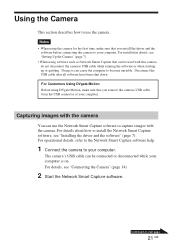
..." (page 7). For Customers Using DVgate Motion Before using the camera for the first time, make sure that you remove the cameras USB cable from the USB connector of your computer. The camera's USB cable can cause the computer to install the Network Smart Capture software, see "Connecting the Camera" (page 14). 2 Start the Network Smart Capture software. Using...
..." (page 7). For Customers Using DVgate Motion Before using the camera for the first time, make sure that you remove the cameras USB cable from the USB connector of your computer. The camera's USB cable can cause the computer to install the Network Smart Capture software, see "Connecting the Camera" (page 14). 2 Start the Network Smart Capture software. Using...
Operating Instructions
Page 24
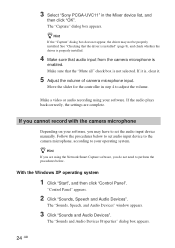
... dialog box appears. z Hint If the "Capture" dialog box does not appear, the driver may have to set audio input device to the camera microphone, according to your operating system. If it is not selected. Move the slider for the controller in the Mixer device list, and then ..." window appears. 3 Click "Sounds and Audio Devices". 3 Select "Sony PCGA-UVC11" in step 4 to adjust the volume. z Hint If you do not need to perform the procedures below to set the audio input device manually. See "Checking that the driver is installed" (page 8), and check whether the driver is properly...
... dialog box appears. z Hint If the "Capture" dialog box does not appear, the driver may have to set audio input device to the camera microphone, according to your operating system. If it is not selected. Move the slider for the controller in the Mixer device list, and then ..." window appears. 3 Click "Sounds and Audio Devices". 3 Select "Sony PCGA-UVC11" in step 4 to adjust the volume. z Hint If you do not need to perform the procedures below to set the audio input device manually. See "Checking that the driver is installed" (page 8), and check whether the driver is properly...

Operating Instructions
Page 29
...Visual Communication Camera Image pickup 1/5.5" 370,000-pixel (310,000 effective pixels) color CMOS progressive scanning image sensor. Lens 2 groups of 2 lenses, F3.4 Focal length f=2.8 mm (0.1 inch) (equivalent to a 35 mm (1.4 inch) camera at 140°F (60°C) (hygrometer reading of your computer and the application you are subject to country and region. Camera... rotational range Approx. 220° Power consumption Approx. 0.5 W Interface USB (powered directly from the VAIO computer) Connector USB...°C)) Supplied accessories • PCGA-UVC11A installation disc (CD-ROM × ...
...Visual Communication Camera Image pickup 1/5.5" 370,000-pixel (310,000 effective pixels) color CMOS progressive scanning image sensor. Lens 2 groups of 2 lenses, F3.4 Focal length f=2.8 mm (0.1 inch) (equivalent to a 35 mm (1.4 inch) camera at 140°F (60°C) (hygrometer reading of your computer and the application you are subject to country and region. Camera... rotational range Approx. 220° Power consumption Approx. 0.5 W Interface USB (powered directly from the VAIO computer) Connector USB...°C)) Supplied accessories • PCGA-UVC11A installation disc (CD-ROM × ...
Operating Instructions
Page 30
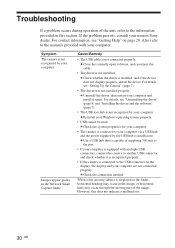
... Cause/Remedy • The USB cable is not installed. c Use a USB hub that is capable of supplying 500 mA to your computer via a USB hub, and the power supplied by your computer. • The camera is insufficient. c Uninstall the... driver, then restart your Windows operating system properly. • USB cannot be used. c Check the system properties for your computer. For contact information, see "Getting Help" on the display, the display and your nearest Sony dealer. For details, see "Uninstalling the driver" (page 9) and "Installing...
... Cause/Remedy • The USB cable is not installed. c Use a USB hub that is capable of supplying 500 mA to your computer via a USB hub, and the power supplied by your computer. • The camera is insufficient. c Uninstall the... driver, then restart your Windows operating system properly. • USB cannot be used. c Check the system properties for your computer. For contact information, see "Getting Help" on the display, the display and your nearest Sony dealer. For details, see "Uninstalling the driver" (page 9) and "Installing...
Operating Instructions
Page 31
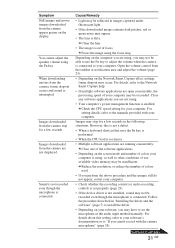
... you are not displayed. Follow the procedure described in "Installing the driver and the software" (page 7) to install the driver. • Depending on the screen mode and number of use the Fn key to adjust the volume when the camera is connected to set properly (page 23). • ...If the device driver is not installed, sound may not be able to "If you cannot record with the camera microphone" (page 24). When downloading movies from the camera, frame dropout occurs and sound is connected. Sound is not recorded even though ...
... you are not displayed. Follow the procedure described in "Installing the driver and the software" (page 7) to install the driver. • Depending on the screen mode and number of use the Fn key to adjust the volume when the camera is connected to set properly (page 23). • ...If the device driver is not installed, sound may not be able to "If you cannot record with the camera microphone" (page 24). When downloading movies from the camera, frame dropout occurs and sound is connected. Sound is not recorded even though ...
Operating Instructions
Page 32
...the video standby mode. If "Hold" is also possible to the manuals provided with your computer screen. Operation does not shift to install the driver. When downloading still images, the image does not download immediately after you press the CAPTURE button. (An image occurring after ...disconnecting the USB cable from the camera appear white. If you cannot restart your computer, refer to modify power options with your computer does not go on standby. ...
...the video standby mode. If "Hold" is also possible to the manuals provided with your computer screen. Operation does not shift to install the driver. When downloading still images, the image does not download immediately after you press the CAPTURE button. (An image occurring after ...disconnecting the USB cable from the camera appear white. If you cannot restart your computer, refer to modify power options with your computer does not go on standby. ...

