Operating Instructions
Page 2
.... - Connect the equipment into an outlet on , the user is subject to radio communications. Pour les utilisateurs au Canada AVERTISSEMENT Pour prévenir tout risque d'incendie ou d'é... technician for the Sony Service Center nearest you call 1-888-476-6972 in the United States or 1-800-961-7669 in Canada. Declaration of the camera. Telephone No.: ...Conformity Trade Name: SONY Model No.: PCGA-UVC11A Responsible Party: Sony Electronics Inc. For questions regarding your authority to which can radiate radio frequency energy and, if not installed and used with...
.... - Connect the equipment into an outlet on , the user is subject to radio communications. Pour les utilisateurs au Canada AVERTISSEMENT Pour prévenir tout risque d'incendie ou d'é... technician for the Sony Service Center nearest you call 1-888-476-6972 in the United States or 1-800-961-7669 in Canada. Declaration of the camera. Telephone No.: ...Conformity Trade Name: SONY Model No.: PCGA-UVC11A Responsible Party: Sony Electronics Inc. For questions regarding your authority to which can radiate radio frequency energy and, if not installed and used with...
Operating Instructions
Page 3
• Sony, VAIO, , and the Eco Info logo are trademarks of Sony Corporation. • Microsoft and Windows are registered trademarks of Microsoft Corporation in the United States and/ or other countries. • All other names of ...; XP Professional and Microsoft® Windows® XP Media Center Edition* are trademarks of Parts 6 Setting Up the Camera 7 Installing the driver and the software 7 Installing the Wireless LAN driver 12 Connecting the Camera 14 When mounting directly 14 When you cannot mount directly 15 GB Using the mounting adapter ..... 15 Fastening using...
• Sony, VAIO, , and the Eco Info logo are trademarks of Sony Corporation. • Microsoft and Windows are registered trademarks of Microsoft Corporation in the United States and/ or other countries. • All other names of ...; XP Professional and Microsoft® Windows® XP Media Center Edition* are trademarks of Parts 6 Setting Up the Camera 7 Installing the driver and the software 7 Installing the Wireless LAN driver 12 Connecting the Camera 14 When mounting directly 14 When you cannot mount directly 15 GB Using the mounting adapter ..... 15 Fastening using...
Operating Instructions
Page 5
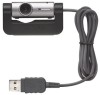
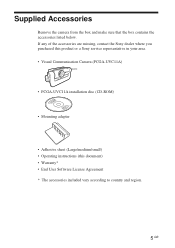
If any of the accessories are missing, contact the Sony dealer where you purchased this product or a Sony service representative in your area. • Visual Communication Camera (PCGA-UVC11A) • PCGA-UVC11A installation disc (CD-ROM) • Mounting adapter • Adhesive sheet (Large/medium/small) • Operating instructions (this document) • Warranty* • End User Software License Agreement * ...
If any of the accessories are missing, contact the Sony dealer where you purchased this product or a Sony service representative in your area. • Visual Communication Camera (PCGA-UVC11A) • PCGA-UVC11A installation disc (CD-ROM) • Mounting adapter • Adhesive sheet (Large/medium/small) • Operating instructions (this document) • Warranty* • End User Software License Agreement * ...
Operating Instructions
Page 7
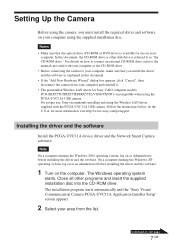
... the PCGA-UVC11A USB camera. On a computer running the Windows 2000 operating system, log on as Administrator before installing the driver and the software. 1 Turn on your area from your computer and reinstall it. • The preinstalled Wireless LAN driver for more information visit http://www.sony.com/pcsupport. The installation program starts automatically and the "Sony Visual Communication Camera PCGA-UVC11A Application Installer...
... the PCGA-UVC11A USB camera. On a computer running the Windows 2000 operating system, log on as Administrator before installing the driver and the software. 1 Turn on your area from your computer and reinstall it. • The preinstalled Wireless LAN driver for more information visit http://www.sony.com/pcsupport. The installation program starts automatically and the "Sony Visual Communication Camera PCGA-UVC11A Application Installer...

Operating Instructions
Page 8
... "Properties". "Control Panel" appears. 3 Double-click "System". Go to "Settings", and then click "Control Panel". 3 Make sure that the software that the driver is installed 1 Connect the camera to your computer. Checking that you to click the "Device Manager" tab. For operating systems other than the Windows XP operating system, click "Start...
... "Properties". "Control Panel" appears. 3 Double-click "System". Go to "Settings", and then click "Control Panel". 3 Make sure that the software that the driver is installed 1 Connect the camera to your computer. Checking that you to click the "Device Manager" tab. For operating systems other than the Windows XP operating system, click "Start...
Operating Instructions
Page 9
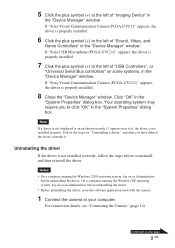
..."Sony USB Microphone (PCGA-UVC11)" appears, the driver is not installed correctly, follow the steps below to it . On a computer running the Windows 2000 operating system, log on next page 9 GB Continued on as an administrator before uninstalling the driver. If "Sony Visual Communication Camera (PCGA-UVC11...)" appears, the driver is not installed properly. Follow the steps for "Uninstalling a driver," and after you to click "OK" in the...
..."Sony USB Microphone (PCGA-UVC11)" appears, the driver is not installed correctly, follow the steps below to it . On a computer running the Windows 2000 operating system, log on next page 9 GB Continued on as an administrator before uninstalling the driver. If "Sony Visual Communication Camera (PCGA-UVC11...)" appears, the driver is not installed properly. Follow the steps for "Uninstalling a driver," and after you to click "OK" in the...
Operating Instructions
Page 11
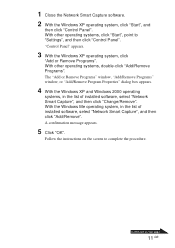
...complete the procedure. With other operating systems, double-click "Add/Remove Programs". With the Windows Me operating system, in the list of installed software, select "Network Smart Capture", and then click "Add/Remove". The "Add or Remove Programs" window, "Add/Remove Programs" ...window, or "Add/Remove Program Properties" dialog box appears. 4 With the Windows XP and Windows 2000 operating systems, in the list of installed software, select "Network Smart Capture", and then click "Change/Remove". Follow the instructions on next page 11 GB A confirmation message appears....
...complete the procedure. With other operating systems, double-click "Add/Remove Programs". With the Windows Me operating system, in the list of installed software, select "Network Smart Capture", and then click "Add/Remove". The "Add or Remove Programs" window, "Add/Remove Programs" ...window, or "Add/Remove Program Properties" dialog box appears. 4 With the Windows XP and Windows 2000 operating systems, in the list of installed software, select "Network Smart Capture", and then click "Change/Remove". Follow the instructions on next page 11 GB A confirmation message appears....

Operating Instructions
Page 12
... mentioned above. 1 Click "Start", right-click "My Computer", and then click "Properties". The hardware update wizard starts. 4 In the dialog box, select "Install from a list or specific location (Advanced)", and then click "Next". 5 Select "Don't search. I will choose the driver to the left of "Network ... PCI Card", and then click "Update Driver" on the CD-ROM, and then click "OK". 8 Click "Next". 9 Click "Finish". 12 GB Installing the Wireless LAN driver Only necessary for the PCG-SRX55TC/SRX55TH/SRX55TL/VX89/ VX89P. The "System Properties" dialog box appears. 2 Click the "Hardware" tab...
... mentioned above. 1 Click "Start", right-click "My Computer", and then click "Properties". The hardware update wizard starts. 4 In the dialog box, select "Install from a list or specific location (Advanced)", and then click "Next". 5 Select "Don't search. I will choose the driver to the left of "Network ... PCI Card", and then click "Update Driver" on the CD-ROM, and then click "OK". 8 Click "Next". 9 Click "Finish". 12 GB Installing the Wireless LAN driver Only necessary for the PCG-SRX55TC/SRX55TH/SRX55TL/VX89/ VX89P. The "System Properties" dialog box appears. 2 Click the "Hardware" tab...

Operating Instructions
Page 13
If the version of "Network adapters", right-click "ORiNOCO Mini PCI Card", and then click "Update Driver" on the shortcut menu. 4 Click the "Driver" tab. The "Device Manager" window appears. 3 Click the plus symbol (+) to the left of the driver is "7.16.0.189", then it was installed properly. 13 GB Confirming the installation of the Wireless LAN driver 1 Click "Start", right-click "My Computer", and then click "Properties". The "System Properties" dialog box appears. 2 Click the "Hardware" tab, and then click the "Device Manager" button.
If the version of "Network adapters", right-click "ORiNOCO Mini PCI Card", and then click "Update Driver" on the shortcut menu. 4 Click the "Driver" tab. The "Device Manager" window appears. 3 Click the plus symbol (+) to the left of the driver is "7.16.0.189", then it was installed properly. 13 GB Confirming the installation of the Wireless LAN driver 1 Click "Start", right-click "My Computer", and then click "Properties". The "System Properties" dialog box appears. 2 Click the "Hardware" tab, and then click the "Device Manager" button.
Operating Instructions
Page 14
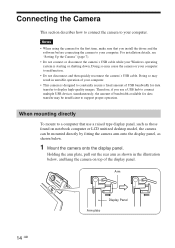
... the illustration below . 1 Mount the camera onto the display panel. Therefore, if you install the driver and the software before connecting the camera to display high-quality images. Connecting the Camera This section describes how to connect the camera to malfunction. • Do not disconnect and then quickly reconnect the camera's USB cable. When mounting directly To...
... the illustration below . 1 Mount the camera onto the display panel. Therefore, if you install the driver and the software before connecting the camera to display high-quality images. Connecting the Camera This section describes how to connect the camera to malfunction. • Do not disconnect and then quickly reconnect the camera's USB cable. When mounting directly To...
Operating Instructions
Page 21
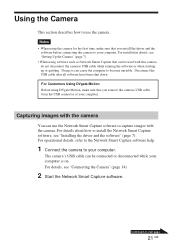
...describes how to use the Network Smart Capture software to capture images with this camera, do not disconnect the cameras USB cable while running the software or when starting up or quitting. For details, see "Installing the driver and the software" (page 7). For Customers Using DVgate Motion Before... using software such as Network Smart Capture that you remove the cameras USB cable from the USB connector of your computer is on next page 21 GB For installation details, see "Setting Up the Camera" (page 7). • When using DVgate Motion, make sure that can cause...
...describes how to use the Network Smart Capture software to capture images with this camera, do not disconnect the cameras USB cable while running the software or when starting up or quitting. For details, see "Installing the driver and the software" (page 7). For Customers Using DVgate Motion Before... using software such as Network Smart Capture that you remove the cameras USB cable from the USB connector of your computer is on next page 21 GB For installation details, see "Setting Up the Camera" (page 7). • When using DVgate Motion, make sure that can cause...
Operating Instructions
Page 24
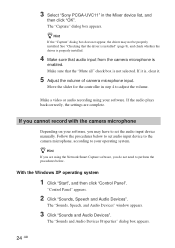
...you cannot record with the camera microphone Depending on your software, you may not be properly installed. The "Sounds and Audio Devices Properties" dialog box appears. 24 GB See "Checking that the driver is installed" (page 8), and check whether the driver is properly installed. 4 Make sure that the...box does not appear, the driver may have to set audio input device to the camera microphone, according to your software. "Control Panel" appears. 2 Click "Sounds, Speech and Audio Devices". 3 Select "Sony PCGA-UVC11" in step 4 to adjust the volume. Move the slider for the controller in...
...you cannot record with the camera microphone Depending on your software, you may not be properly installed. The "Sounds and Audio Devices Properties" dialog box appears. 24 GB See "Checking that the driver is installed" (page 8), and check whether the driver is properly installed. 4 Make sure that the...box does not appear, the driver may have to set audio input device to the camera microphone, according to your software. "Control Panel" appears. 2 Click "Sounds, Speech and Audio Devices". 3 Select "Sony PCGA-UVC11" in step 4 to adjust the volume. Move the slider for the controller in...

Operating Instructions
Page 29
Camera rotational range Approx. 220° Power consumption Approx. 0.5 W Interface USB (powered directly from the VAIO computer) Connector USB type A Dimensions Approx...specifications of less than 95°F (35°C)) Supplied accessories • PCGA-UVC11A installation disc (CD-ROM × 1) • Mounting adapter (1) •...camera at 140°F (60°C) (hygrometer reading of your computer and the application you are using. Lens 2 groups of 2 lenses, F3.4 Focal length f=2.8 mm (0.1 inch) (equivalent to change without notice. 29 GB Specifications Visual Communication Camera...
Camera rotational range Approx. 220° Power consumption Approx. 0.5 W Interface USB (powered directly from the VAIO computer) Connector USB type A Dimensions Approx...specifications of less than 95°F (35°C)) Supplied accessories • PCGA-UVC11A installation disc (CD-ROM × 1) • Mounting adapter (1) •...camera at 140°F (60°C) (hygrometer reading of your computer and the application you are using. Lens 2 groups of 2 lenses, F3.4 Focal length f=2.8 mm (0.1 inch) (equivalent to change without notice. 29 GB Specifications Visual Communication Camera...
Operating Instructions
Page 30
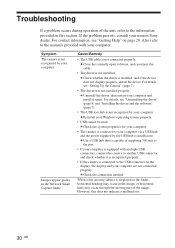
... properly. • If the camera is connected to your computer are not connected properly. c Reinstall your nearest Sony dealer. Images appear grainy in the Network Smart Capture finder Cause/Remedy • The USB cable is not installed. When a fast-moving subject is installed, and if the device does not display properly, install the driver. c Check whether...
... properly. • If the camera is connected to your computer are not connected properly. c Reinstall your nearest Sony dealer. Images appear grainy in the Network Smart Capture finder Cause/Remedy • The USB cable is not installed. When a fast-moving subject is installed, and if the device does not display properly, install the driver. c Check whether...
Operating Instructions
Page 31
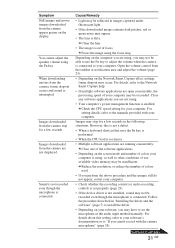
... Check whether the recording control (or audio recording control) is dirty. Continued on the computer you cannot record with your computer. Images downloaded from the camera, frame dropout occurs and sound is interrupted. Depending on next page 31 GB c Close one of your software, you perform the above procedure and the.... c Clean the lens. • The image is connected. c Reduce the resolution, or reduce the number of colors used. • If you may have to install the driver. • Depending on the screen mode and number of use the Fn key to adjust the volume when the...
... Check whether the recording control (or audio recording control) is dirty. Continued on the computer you cannot record with your computer. Images downloaded from the camera, frame dropout occurs and sound is interrupted. Depending on next page 31 GB c Close one of your software, you perform the above procedure and the.... c Clean the lens. • The image is connected. c Reduce the resolution, or reduce the number of colors used. • If you may have to install the driver. • Depending on the screen mode and number of use the Fn key to adjust the volume when the...
Operating Instructions
Page 32
..." dialog box and, after the point when you pressed the CAPTURE button is downloaded.) Images downloaded from the USB connector, follow the procedure described in "Installing the driver and the software" (page 7) to the manuals provided with your computer. Close all software applications ... on your computer screen. The white balance is not installed. When downloading still images, the image does not download immediately after you press the CAPTURE button. (An image occurring after disconnecting the USB cable from the camera appear white. It is actually downloaded . For details,...
..." dialog box and, after the point when you pressed the CAPTURE button is downloaded.) Images downloaded from the USB connector, follow the procedure described in "Installing the driver and the software" (page 7) to the manuals provided with your computer. Close all software applications ... on your computer screen. The white balance is not installed. When downloading still images, the image does not download immediately after you press the CAPTURE button. (An image occurring after disconnecting the USB cable from the camera appear white. It is actually downloaded . For details,...

