Operating Instructions
Page 2
... energy and, if not installed and used with the instructions, may cause undesired operation. Connect the equipment into an outlet on the bottom of the FCC Rules. For questions regarding this manual could void your product or for a digital device pursuant to radio communications. The number below . Declaration of the FCC Rules. Record the serial number in the space provided...
... energy and, if not installed and used with the instructions, may cause undesired operation. Connect the equipment into an outlet on the bottom of the FCC Rules. For questions regarding this manual could void your product or for a digital device pursuant to radio communications. The number below . Declaration of the FCC Rules. Record the serial number in the space provided...
Operating Instructions
Page 3
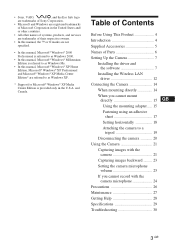
... of Parts 6 Setting Up the Camera 7 Installing the driver and the software 7 Installing the Wireless LAN driver 12 Connecting the Camera 14 When mounting directly 14 When you cannot mount directly 15 GB Using the mounting adapter ..... 15 Fastening using an adhesive sheet 17 Setting horizontally 18 Attaching the camera to a tripod 19 Disconnecting the camera 20 Using the Camera 21 Capturing images with the camera 21 Capturing images backward ......... 23 Setting the camera microphone...
... of Parts 6 Setting Up the Camera 7 Installing the driver and the software 7 Installing the Wireless LAN driver 12 Connecting the Camera 14 When mounting directly 14 When you cannot mount directly 15 GB Using the mounting adapter ..... 15 Fastening using an adhesive sheet 17 Setting horizontally 18 Attaching the camera to a tripod 19 Disconnecting the camera 20 Using the Camera 21 Capturing images with the camera 21 Capturing images backward ......... 23 Setting the camera microphone...
Operating Instructions
Page 4
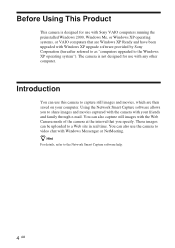
... use this camera to a Web site in real time. You can be uploaded to capture still images and movies, which are Windows XP Ready and have been upgraded with Windows XP upgrade software provided by Sony Corporation (hereafter referred to as "computers upgraded to video chat with any other computer. z Hint For details, refer to share images and movies captured with the camera with the Web Camera mode of the camera...
... use this camera to a Web site in real time. You can be uploaded to capture still images and movies, which are Windows XP Ready and have been upgraded with Windows XP upgrade software provided by Sony Corporation (hereafter referred to as "computers upgraded to video chat with any other computer. z Hint For details, refer to share images and movies captured with the camera with the Web Camera mode of the camera...
Operating Instructions
Page 5
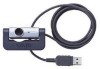
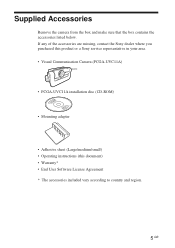
.... If any of the accessories are missing, contact the Sony dealer where you purchased this product or a Sony service representative in your area. • Visual Communication Camera (PCGA-UVC11A) • PCGA-UVC11A installation disc (CD-ROM) • Mounting adapter • Adhesive sheet (Large/medium/small) • Operating instructions (this document) • Warranty* • End User Software License Agreement * The accessories included vary according to country...
.... If any of the accessories are missing, contact the Sony dealer where you purchased this product or a Sony service representative in your area. • Visual Communication Camera (PCGA-UVC11A) • PCGA-UVC11A installation disc (CD-ROM) • Mounting adapter • Adhesive sheet (Large/medium/small) • Operating instructions (this document) • Warranty* • End User Software License Agreement * The accessories included vary according to country...
Operating Instructions
Page 7
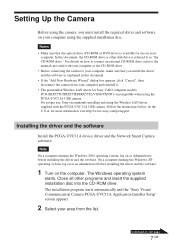
... http://www.sony.com/pcsupport. The installation program starts automatically and the "Sony Visual Communication Camera PCGA-UVC11A Application Installer Setup" screen appears. 2 Select your computer using the supplied installation disc. In this document. • If the "Add New Hardware Wizard" dialog box appears, click "Cancel", then disconnect the camera from the list. In the U.S.A, for use , Sony recommends installing and using the Wireless LAN driver supplied with your computer or the CD-ROM drive. • Before connecting the camera...
... http://www.sony.com/pcsupport. The installation program starts automatically and the "Sony Visual Communication Camera PCGA-UVC11A Application Installer Setup" screen appears. 2 Select your computer using the supplied installation disc. In this document. • If the "Add New Hardware Wizard" dialog box appears, click "Cancel", then disconnect the camera from the list. In the U.S.A, for use , Sony recommends installing and using the Wireless LAN driver supplied with your computer or the CD-ROM drive. • Before connecting the camera...

Operating Instructions
Page 8
... to restart your computer. For connection details, see "Connecting the Camera" (page 14). 2 With the Windows XP operating system, click "Start", right-click "My Computer", and then click "Properties". The "System Properties" dialog box appears. z Hint If the software is already installed, the check box does not appear. 4 Follow the on-screen instructions. Your operating system may appear. If the message...
... to restart your computer. For connection details, see "Connecting the Camera" (page 14). 2 With the Windows XP operating system, click "Start", right-click "My Computer", and then click "Properties". The "System Properties" dialog box appears. z Hint If the software is already installed, the check box does not appear. 4 Follow the on-screen instructions. Your operating system may appear. If the message...
Operating Instructions
Page 9
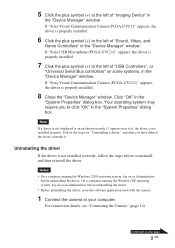
... the driver, close the software application used with the camera. 1 Connect the camera to it . Notes • On a computer running the Windows XP operating system, log on some systems, in the "System Properties" dialog box. For connection details, see "Connecting the Camera" (page 14). If "Sony Visual Communication Camera (PCGA-UVC11)" appears, the driver is properly installed. 7 Click the plus symbol (+) to the left of "Sound, Video, and Game Controllers...
... the driver, close the software application used with the camera. 1 Connect the camera to it . Notes • On a computer running the Windows XP operating system, log on some systems, in the "System Properties" dialog box. For connection details, see "Connecting the Camera" (page 14). If "Sony Visual Communication Camera (PCGA-UVC11)" appears, the driver is properly installed. 7 Click the plus symbol (+) to the left of "Sound, Video, and Game Controllers...
Operating Instructions
Page 10
Go to "Settings", and then click "Control Panel". Your operating system may require you to click "OK" in the "System Properties" dialog box. Uninstalling the software If you can remove the software by performing the following procedure. The "System Properties" dialog box appears. Click "OK" in the "Device Manager" window. 6 Click "Sony Visual Communication Camera (PCGA-UVC11)" or "USB Composite Device", and then...
Go to "Settings", and then click "Control Panel". Your operating system may require you to click "OK" in the "System Properties" dialog box. Uninstalling the software If you can remove the software by performing the following procedure. The "System Properties" dialog box appears. Click "OK" in the "Device Manager" window. 6 Click "Sony Visual Communication Camera (PCGA-UVC11)" or "USB Composite Device", and then...
Operating Instructions
Page 11
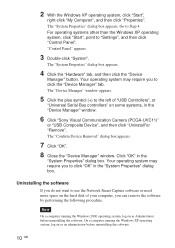
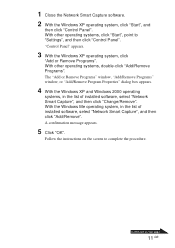
... Network Smart Capture software. 2 With the Windows XP operating system, click "Start", and then click "Control Panel". Follow the instructions on next page 11 GB The "Add or Remove Programs" window, "Add/Remove Programs" window, or "Add/Remove Program Properties" dialog box appears. 4 With the Windows XP and Windows 2000 operating systems, in the list of installed software, select "Network Smart Capture", and then click "Change/Remove". "Control Panel" appears. 3 With the Windows XP operating...
... Network Smart Capture software. 2 With the Windows XP operating system, click "Start", and then click "Control Panel". Follow the instructions on next page 11 GB The "Add or Remove Programs" window, "Add/Remove Programs" window, or "Add/Remove Program Properties" dialog box appears. 4 With the Windows XP and Windows 2000 operating systems, in the list of installed software, select "Network Smart Capture", and then click "Change/Remove". "Control Panel" appears. 3 With the Windows XP operating...

Operating Instructions
Page 12
... "Device Manager" button. The "Device Manager" window appears. 3 Click the plus symbol (+) to install", and then click "Next". 6 In "Network adapters", click "Have Disk". 7 Click "Browse", select the UPDATE\WirelessLAN folder on the shortcut menu. I will choose the driver to the left of "Network adapters", right-click "ORiNOCO Mini PCI Card", and then click "Update Driver" on the CD-ROM, and then click...
... "Device Manager" button. The "Device Manager" window appears. 3 Click the plus symbol (+) to install", and then click "Next". 6 In "Network adapters", click "Have Disk". 7 Click "Browse", select the UPDATE\WirelessLAN folder on the shortcut menu. I will choose the driver to the left of "Network adapters", right-click "ORiNOCO Mini PCI Card", and then click "Update Driver" on the CD-ROM, and then click...
Operating Instructions
Page 14
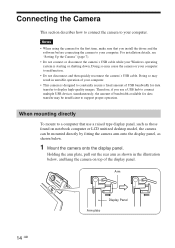
... connect multiple USB devices simultaneously, the amount of USB bandwidth for the first time, make sure that you use a raised type display panel, such as shown below. 1 Mount the camera onto the display panel. Notes • When using the camera for data transfer to your computer. • This camera is starting or shutting down. Therefore, if you install the driver and the software before connecting the camera...
... connect multiple USB devices simultaneously, the amount of USB bandwidth for the first time, make sure that you use a raised type display panel, such as shown below. 1 Mount the camera onto the display panel. Notes • When using the camera for data transfer to your computer. • This camera is starting or shutting down. Therefore, if you install the driver and the software before connecting the camera...
Operating Instructions
Page 15
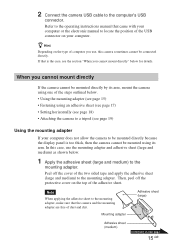
...then the camera cannot be connected directly. Refer to the operating instructions manual that the camera and the mounting adapter are free of the USB connector on the type of the steps outlined below. • Using the mounting adapter (see the section "When you use, this case, use the mounting adapter and ...the camera to the mounting adapter. 2 Connect the camera USB cable to locate the position of dust and dirt. Note When applying the adhesive sheet to the mounting adapter, make sure that came with your computer or the electronic manual to the computer's USB connector. ...
...then the camera cannot be connected directly. Refer to the operating instructions manual that the camera and the mounting adapter are free of the USB connector on the type of the steps outlined below. • Using the mounting adapter (see the section "When you use, this case, use the mounting adapter and ...the camera to the mounting adapter. 2 Connect the camera USB cable to locate the position of dust and dirt. Note When applying the adhesive sheet to the mounting adapter, make sure that came with your computer or the electronic manual to the computer's USB connector. ...
Operating Instructions
Page 21
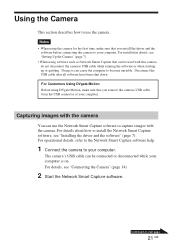
...; When using the camera for the first time, make sure that you install the driver and the software before connecting the camera to your computer. For details, see "Installing the driver and the software" (page 7). Notes • When using software such as Network Smart Capture that you remove the cameras USB cable from the USB connector of your computer. For operational details, refer to the Network Smart Capture software help. 1 Connect the camera to...
...; When using the camera for the first time, make sure that you install the driver and the software before connecting the camera to your computer. For details, see "Installing the driver and the software" (page 7). Notes • When using software such as Network Smart Capture that you remove the cameras USB cable from the USB connector of your computer. For operational details, refer to the Network Smart Capture software help. 1 Connect the camera to...
Operating Instructions
Page 24
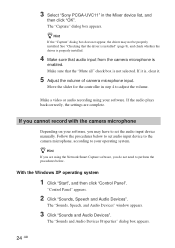
... below to set the audio input device manually. If it . 5 Adjust the volume of camera microphone input. Make a video or audio recording using the Network Smart Capture software, you cannot record with the camera microphone Depending on your software. Follow the procedures below . Make sure that audio input from the camera microphone is , clear it is enabled. z Hint If you may not be properly installed. The "Sounds and Audio Devices Properties...
... below to set the audio input device manually. If it . 5 Adjust the volume of camera microphone input. Make a video or audio recording using the Network Smart Capture software, you cannot record with the camera microphone Depending on your software. Follow the procedures below . Make sure that audio input from the camera microphone is , clear it is enabled. z Hint If you may not be properly installed. The "Sounds and Audio Devices Properties...
Operating Instructions
Page 25
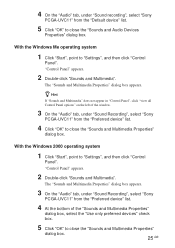
... Recording", select "Sony PCGA-UVC11" from the "Preferred device" list. 4 At the bottom of the window. 3 On the "Audio" tab, under "Sound recording", select "Sony PCGA-UVC11" from the "Preferred device" list. 4 Click "OK" to close the "Sounds and Audio Devices Properties" dialog box. "Control Panel" appears. 2 Double-click "Sounds and Multimedia". "Control Panel" appears. 2 Double-click "Sounds and Multimedia". With the Windows 2000 operating...
... Recording", select "Sony PCGA-UVC11" from the "Preferred device" list. 4 At the bottom of the window. 3 On the "Audio" tab, under "Sound recording", select "Sony PCGA-UVC11" from the "Preferred device" list. 4 Click "OK" to close the "Sounds and Audio Devices Properties" dialog box. "Control Panel" appears. 2 Double-click "Sounds and Multimedia". "Control Panel" appears. 2 Double-click "Sounds and Multimedia". With the Windows 2000 operating...
Operating Instructions
Page 28
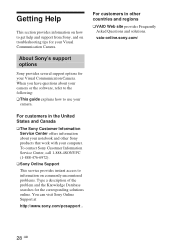
... Visual Communication Camera. For customers in the United States and Canada ❑ The Sony Customer Information Service Center offers information about your camera or the software, refer to the following: ❑ This guide explains how to use your computer. Getting Help This section provides information on how to get help and support from Sony, and on commonly encountered problems. Type a description of the problem and...
... Visual Communication Camera. For customers in the United States and Canada ❑ The Sony Customer Information Service Center offers information about your camera or the software, refer to the following: ❑ This guide explains how to use your computer. Getting Help This section provides information on how to get help and support from Sony, and on commonly encountered problems. Type a description of the problem and...

Operating Instructions
Page 29
... than 95°F (35°C)) Supplied accessories • PCGA-UVC11A installation disc (CD-ROM × 1) • Mounting adapter (1) • Adhesive sheet (3) • Operating instructions (1) • Warranty (1)* • End User Software License Agreement (1) * The accessories included vary according to change without notice. 29 GB Camera rotational range Approx. 220° Power consumption Approx. 0.5 W Interface USB (powered directly from the VAIO computer) Connector USB type A Dimensions Approx. 2.4 × 1.4 ×...
... than 95°F (35°C)) Supplied accessories • PCGA-UVC11A installation disc (CD-ROM × 1) • Mounting adapter (1) • Adhesive sheet (3) • Operating instructions (1) • Warranty (1)* • End User Software License Agreement (1) * The accessories included vary according to change without notice. 29 GB Camera rotational range Approx. 220° Power consumption Approx. 0.5 W Interface USB (powered directly from the VAIO computer) Connector USB type A Dimensions Approx. 2.4 × 1.4 ×...
Operating Instructions
Page 30
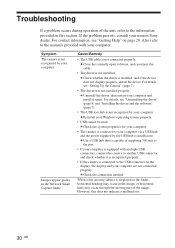
... "Setting Up the Camera" (page 7). • The driver was not installed properly. For details, see "Uninstalling the driver" (page 9) and "Installing the driver and the software" (page 7). • The USB root hub is not recognized by the USB hub is connected to the information provided in this does not indicate a malfunction. 30 GB When a fast-moving part of the image. Troubleshooting If a problem occurs during operation...
... "Setting Up the Camera" (page 7). • The driver was not installed properly. For details, see "Uninstalling the driver" (page 9) and "Installing the driver and the software" (page 7). • The USB root hub is not recognized by the USB hub is connected to the information provided in this does not indicate a malfunction. 30 GB When a fast-moving part of the image. Troubleshooting If a problem occurs during operation...
Operating Instructions
Page 31
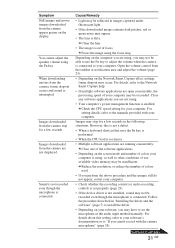
... whether the recording control (or audio recording control) is set the microphone as other conditions of focus. Images may stop for a few seconds in images captured under fluorescent light. • If the downloaded image contains dark patches, red or green noise may have to your computer is using, as well as the audio input method manually. c Close one of the software applications. • Depending on the screen mode and number of...
... whether the recording control (or audio recording control) is set the microphone as other conditions of focus. Images may stop for a few seconds in images captured under fluorescent light. • If the downloaded image contains dark patches, red or green noise may have to your computer is using, as well as the audio input method manually. c Close one of the software applications. • Depending on the screen mode and number of...
Operating Instructions
Page 32
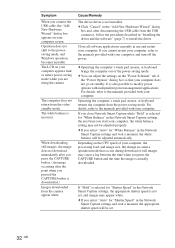
... return from the power-saving mode. For details, refer to install the driver. If "Hold" is selected for "White Balance" in use and restart your computer, and turn off the power. When downloading still images, the image does not download immediately after you press the CAPTURE button. (An image occurring after disconnecting the USB cable from the camera appear white. c If you start your computer screen. c You can...
... return from the power-saving mode. For details, refer to install the driver. If "Hold" is selected for "White Balance" in use and restart your computer, and turn off the power. When downloading still images, the image does not download immediately after you press the CAPTURE button. (An image occurring after disconnecting the USB cable from the camera appear white. c If you start your computer screen. c You can...


