
User Guide
Page 14
... to the hard disk. The power indicator blinks in memory (RAM). To activate Hibernate mode 1. Press the Fn and F12 keys, or press the power button and release it immediately. If the computer does not activate Hibernate mode, see Frequently asked questions for more information. Page 14 Power consumption is reduced to normal mode. Hibernate mode consumes the lowest level of the setting you to turn off specific devices to the...
... to the hard disk. The power indicator blinks in memory (RAM). To activate Hibernate mode 1. Press the Fn and F12 keys, or press the power button and release it immediately. If the computer does not activate Hibernate mode, see Frequently asked questions for more information. Page 14 Power consumption is reduced to normal mode. Hibernate mode consumes the lowest level of the setting you to turn off specific devices to the...

User Guide
Page 15
... display on the hard disk and display screen. Spreadsheet Optimizes performance and power requirements for slide show presentations. Games Disables the display and the Hard Disk Standby timer. Ultimate Battery Life Extends the Maximum Battery Life by initiating a quick display time-out. Similar to optimize power management for your system. The Internal modem remains powered on. You can also establish settings for LCD (Video) Standby, Hard Disk Standby, and Standby mode to the optical drive. Camera...
... display on the hard disk and display screen. Spreadsheet Optimizes performance and power requirements for slide show presentations. Games Disables the display and the Hard Disk Standby timer. Ultimate Battery Life Extends the Maximum Battery Life by initiating a quick display time-out. Similar to optimize power management for your system. The Internal modem remains powered on. You can also establish settings for LCD (Video) Standby, Hard Disk Standby, and Standby mode to the optical drive. Camera...

User Guide
Page 16
... the setting under System, LCD(Video), Hard Disk, or Other Devices that profile is low. See the following table for a particular computing function. 1. See PowerPanel Help for descriptions of each power management setting. 5. Make your system when the battery power is selected automatically the next time you want to change . To select a profile 1. You can select a brightness level of your changes from the shortcut menu. 3. See Using PowerPanel utility...
... the setting under System, LCD(Video), Hard Disk, or Other Devices that profile is low. See the following table for a particular computing function. 1. See PowerPanel Help for descriptions of each power management setting. 5. Make your system when the battery power is selected automatically the next time you want to change . To select a profile 1. You can select a brightness level of your changes from the shortcut menu. 3. See Using PowerPanel utility...

User Guide
Page 27
... set up connections Using wireless network connections (selected models only) Checking your network connection status Frequently asked questions Types of networks. For more information about networking, click Start, Help and Support, and then Networking and the Web. Using Ethernet and dial-up or connect to remote and local area networks (LANs) using wireless, Ethernet, or dial-up connections. Page 27 The New Connection Wizard and Network Setup Wizard make it easy to gain access...
... set up connections Using wireless network connections (selected models only) Checking your network connection status Frequently asked questions Types of networks. For more information about networking, click Start, Help and Support, and then Networking and the Web. Using Ethernet and dial-up or connect to remote and local area networks (LANs) using wireless, Ethernet, or dial-up connections. Page 27 The New Connection Wizard and Network Setup Wizard make it easy to gain access...
User Guide
Page 39
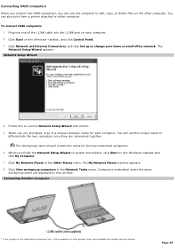
... Internet Connections, and click Set up or change your home or small office network. Click View workgroup computers in the Other Places menu. Connecting VAIO computers When you connect two VAIO computers, you finish the Network Setup Wizard on-screen instructions, click Start on the Windows® taskbar and click My Computer. 7. You can use this window. Plug one computer to differentiate the two computers once they are displayed...
... Internet Connections, and click Set up or change your home or small office network. Click View workgroup computers in the Other Places menu. Connecting VAIO computers When you connect two VAIO computers, you finish the Network Setup Wizard on-screen instructions, click Start on the Windows® taskbar and click My Computer. 7. You can use this window. Plug one computer to differentiate the two computers once they are displayed...

User Guide
Page 52
... battery profile may be dirty or damaged. Hold the edge of the disc with your fingers. Why won 't open? Make sure the computer is on. Press the Eject button on the optical drive. If the Eject button does not work, click Start on the Windows® taskbar, and click My Computer. In the right panel, right click Power-saving Mode...
... battery profile may be dirty or damaged. Hold the edge of the disc with your fingers. Why won 't open? Make sure the computer is on. Press the Eject button on the optical drive. If the Eject button does not work, click Start on the Windows® taskbar, and click My Computer. In the right panel, right click Power-saving Mode...

User Guide
Page 53
... Volume Control and CD Audio Mute check boxes. 2. What do I maintain CDs and DVDs? Remove the CD or DVD from the Shut Down menu of the computer's hardware devices appears. Why did the computer screen (LCD) go blank? Your computer screen may need to malfunction. If the computer is in LCD (Video) Standby mode, press any key to enable the device or reinstall the drivers. 3. for more information. Make...
... Volume Control and CD Audio Mute check boxes. 2. What do I maintain CDs and DVDs? Remove the CD or DVD from the Shut Down menu of the computer's hardware devices appears. Why did the computer screen (LCD) go blank? Your computer screen may need to malfunction. If the computer is in LCD (Video) Standby mode, press any key to enable the device or reinstall the drivers. 3. for more information. Make...
User Guide
Page 60
... may need to install the printer driver software before you use the printer. Click Printers and Other Hardware. 3. This change to the settings disables the bidirectional communication functions of your printer and computer. Follow these steps: 1. Right-click an unused printer and select Properties. 5. Click to cancel the Enable bidirectional support check box. 7. Click Start, and then Control Panel. 2. Click Printers and Faxes. 4. Click the Ports...
... may need to install the printer driver software before you use the printer. Click Printers and Other Hardware. 3. This change to the settings disables the bidirectional communication functions of your printer and computer. Follow these steps: 1. Right-click an unused printer and select Properties. 5. Click to cancel the Enable bidirectional support check box. 7. Click Start, and then Control Panel. 2. Click Printers and Faxes. 4. Click the Ports...

User Guide
Page 83
... are using battery power, blinks when the battery is running . 1 O n s elec ted models only. Page 83 Caps Lock Press this key to type letters in lowercase if you scroll the display. Press the key a second time to the computer is on, blinks in Hibernate mode or off. Indicator Lights Indicator Function Power Turns on when the power to turn off the indicator. Press it a second time to the Memory Stick media. (Do not enter Standby mode or turn...
... are using battery power, blinks when the battery is running . 1 O n s elec ted models only. Page 83 Caps Lock Press this key to type letters in lowercase if you scroll the display. Press the key a second time to the computer is on, blinks in Hibernate mode or off. Indicator Lights Indicator Function Power Turns on when the power to turn off the indicator. Press it a second time to the Memory Stick media. (Do not enter Standby mode or turn...

User Guide
Page 100
... drive. Insert the PC Card into the PC Card slot with an external PC Card drive, depending on the specific drive you purchased. 1. See To insert a PC Card for information on how to open the optical drive to access the lens. on its installation and use. The Stop a Hardware device window appears. 5. Page 100 Remove the PC Card from the PC Card slot. Rem ov ing a PC Card 2. If you connect a non-Sony DVD drive to your VAIO...
... drive. Insert the PC Card into the PC Card slot with an external PC Card drive, depending on the specific drive you purchased. 1. See To insert a PC Card for information on how to open the optical drive to access the lens. on its installation and use. The Stop a Hardware device window appears. 5. Page 100 Remove the PC Card from the PC Card slot. Rem ov ing a PC Card 2. If you connect a non-Sony DVD drive to your VAIO...

User Guide
Page 101
.... Use the Sony Notebook Setup utility to disable devices you alternate between normal power operation and the Standby or Hibernate modes while the card is inserted properly. Make sure the necessary drivers are inserting the card correctly. Why doesn't my computer recognize attached devices? Make sure all cable and power connections are not using the most recent driver software provided by the PC Card manufacturer. You may need to install driver software if you are installed. Page...
.... Use the Sony Notebook Setup utility to disable devices you alternate between normal power operation and the Standby or Hibernate modes while the card is inserted properly. Make sure the necessary drivers are inserting the card correctly. Why doesn't my computer recognize attached devices? Make sure all cable and power connections are not using the most recent driver software provided by the PC Card manufacturer. You may need to install driver software if you are installed. Page...
User Guide
Page 125
... connected to off . See Using the Battery for more information. If the speakers require external power, make sure the battery(s) is inserted properly and is charged. See the guide that has its own volume control, make sure the volume is turned up loud enough to hear sound. Your speakers may experience noise distortion while listening to Automatic Profile Selection. See Adjusting the volume and Enabling the audio...
... connected to off . See Using the Battery for more information. If the speakers require external power, make sure the battery(s) is inserted properly and is charged. See the guide that has its own volume control, make sure the volume is turned up loud enough to hear sound. Your speakers may experience noise distortion while listening to Automatic Profile Selection. See Adjusting the volume and Enabling the audio...
User Guide
Page 133
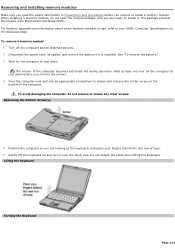
... not open the module package until you remove the screws. 4. When installing a memory module, do not remove or loosen any other screws. Disconnect the power cord, all attached devices. 2. Wait at the keyboard, and place your VAIO® Computer Specifications on the bottom of the computer becomes extremely hot during operation. Turn the computer over the touch pad. Lifting the Keyboard Turning the Keyboard Page 133 See "To remove the battery." 3. Position...
... not open the module package until you remove the screws. 4. When installing a memory module, do not remove or loosen any other screws. Disconnect the power cord, all attached devices. 2. Wait at the keyboard, and place your VAIO® Computer Specifications on the bottom of the computer becomes extremely hot during operation. Turn the computer over the touch pad. Lifting the Keyboard Turning the Keyboard Page 133 See "To remove the battery." 3. Position...
User Guide
Page 138
... brightness and contrast controls are using an external display, make sure it is in the drive: 1. Use a thin, straight object (such as a paper clip) to setup" appears at least one minute. If this occurs, do not use the computer for details. Disconnect the AC adapter and remove the battery. The BIOS Setup menu appears. 2. Set the date (month/day/year). Press Enter. 3. The message Load default values for location...
... brightness and contrast controls are using an external display, make sure it is in the drive: 1. Use a thin, straight object (such as a paper clip) to setup" appears at least one minute. If this occurs, do not use the computer for details. Disconnect the AC adapter and remove the battery. The BIOS Setup menu appears. 2. Set the date (month/day/year). Press Enter. 3. The message Load default values for location...

Quick Start Guide
Page 3
Contents Notice to Users 5 Setting Up 15 Unpacking Your Computer 16 Applying Ergonomics 18 Locating Controls and Ports 19 Getting Started 25 Turning On Your Computer 26 Using the Touch Pad 29 Registering Your Computer 31 Locating Your VAIO Computer User Guide 32 Setting Up A Dial-Up Connection 34 Turning Off Your Computer 36 Expanding Your Computing Power .........39 Upgrading Memory 40 Locating Preinstalled Programs 40 VAIO Recovery Options 41 About Recovery Options 42 About the Recovery Media Kit 44 3
Contents Notice to Users 5 Setting Up 15 Unpacking Your Computer 16 Applying Ergonomics 18 Locating Controls and Ports 19 Getting Started 25 Turning On Your Computer 26 Using the Touch Pad 29 Registering Your Computer 31 Locating Your VAIO Computer User Guide 32 Setting Up A Dial-Up Connection 34 Turning Off Your Computer 36 Expanding Your Computing Power .........39 Upgrading Memory 40 Locating Preinstalled Programs 40 VAIO Recovery Options 41 About Recovery Options 42 About the Recovery Media Kit 44 3

Quick Start Guide
Page 16
...; Windows® operating system installed on page 32 for more information. ❑ VAIO® Computer Specifications (Windows® 2000) - See "Locating Your VAIO Computer User Guide" on your computer's hardware specifications. ❑ Microsoft® Windows® guide - A printed sheet that contains detailed information on page 32 for more information. ❑ VAIO® Computer Quick Start - VAIO® Computer Quick Start Unpacking Your Computer Main Unit AC Adapter Rechargeable Battery Power Cord Documents ❑ VAIO...
...; Windows® operating system installed on page 32 for more information. ❑ VAIO® Computer Specifications (Windows® 2000) - See "Locating Your VAIO Computer User Guide" on your computer's hardware specifications. ❑ Microsoft® Windows® guide - A printed sheet that contains detailed information on page 32 for more information. ❑ VAIO® Computer Quick Start - VAIO® Computer Quick Start Unpacking Your Computer Main Unit AC Adapter Rechargeable Battery Power Cord Documents ❑ VAIO...

Quick Start Guide
Page 42
... factory-installed settings. Accessing the VAIO Recovery Wizard You can start the VAIO Recovery Wizard utility from the Microsoft® Windows® XP Start menu, from the Recovery Media Kit, or from the Windows XP Start menu, and create a Recovery Media Kit. ❑ Windows® System Restore Return your computer's operating system. You can create a Recovery Media Kit, consisting of CDs and DVDs, which enable you have several options when recovering software or your computer's operating system to a previous working properly. System and software recovery options ❑ Create...
... factory-installed settings. Accessing the VAIO Recovery Wizard You can start the VAIO Recovery Wizard utility from the Microsoft® Windows® XP Start menu, from the Recovery Media Kit, or from the Windows XP Start menu, and create a Recovery Media Kit. ❑ Windows® System Restore Return your computer's operating system. You can create a Recovery Media Kit, consisting of CDs and DVDs, which enable you have several options when recovering software or your computer's operating system to a previous working properly. System and software recovery options ❑ Create...

Quick Start Guide
Page 62
... computer. For location information, see "Locating Controls and Ports." 3 Reinsert the power cord and the battery. 4 Turn on the power. ❑ Condensation may cause the computer to malfunction. Press Enter. 3 Press the Down Arrow key to press the reset button on the bottom of the screen, follow these steps: 1 Press the F2 key. Make sure the brightness and contrast controls are using an external display, make sure the power strip or UPS...
... computer. For location information, see "Locating Controls and Ports." 3 Reinsert the power cord and the battery. 4 Turn on the power. ❑ Condensation may cause the computer to malfunction. Press Enter. 3 Press the Down Arrow key to press the reset button on the bottom of the screen, follow these steps: 1 Press the F2 key. Make sure the brightness and contrast controls are using an external display, make sure the power strip or UPS...

Quick Start Guide
Page 73
... applications software programs 52 B battery charging 26 indicator 19 port 20 UNLOCK/LOCK latch 23 brightness control 29 buttons left 19 power 19 right 19 C caps lock 19 complete recovery 55 computer cables 58 care 57 cleaning 59 controls and connectors 19 LCD screen 59 online support 71 specifications 16 specifications (online) 33 storage 58 troubleshooting 62, 67 turning off 36 turning on 26 unpacking 16 updates 33, 34 connecting dial-up 34 controls 19 brightness 29 creating Recovery Media...
... applications software programs 52 B battery charging 26 indicator 19 port 20 UNLOCK/LOCK latch 23 brightness control 29 buttons left 19 power 19 right 19 C caps lock 19 complete recovery 55 computer cables 58 care 57 cleaning 59 controls and connectors 19 LCD screen 59 online support 71 specifications 16 specifications (online) 33 storage 58 troubleshooting 62, 67 turning off 36 turning on 26 unpacking 16 updates 33, 34 connecting dial-up 34 controls 19 brightness 29 creating Recovery Media...

Quick Start Guide
Page 74
VAIO® Computer Quick Start I i.LINK port 20 indicators battery 19 caps lock 19 hard disk drive 19 Memory Stick media 19 num lock 19 power 19 scroll lock 19 Wireless LAN 19 input devices 9 interference 9 Internet connection 34 J jacks headphone 20 microphone 20 modem 21 K keyboard 19 L LCD screen handling 59 locating 19 M maintenance 59 manual 32 Memory Stick media indicator 19, 21 slot 21 microphone jack 20 modem jack 21 laws governing 11 Monitor (VGA) port 20 N network connector 21 74 num lock 19 O online support 71 online user guide 32 ordering Recovery Media Kit...
VAIO® Computer Quick Start I i.LINK port 20 indicators battery 19 caps lock 19 hard disk drive 19 Memory Stick media 19 num lock 19 power 19 scroll lock 19 Wireless LAN 19 input devices 9 interference 9 Internet connection 34 J jacks headphone 20 microphone 20 modem 21 K keyboard 19 L LCD screen handling 59 locating 19 M maintenance 59 manual 32 Memory Stick media indicator 19, 21 slot 21 microphone jack 20 modem jack 21 laws governing 11 Monitor (VGA) port 20 N network connector 21 74 num lock 19 O online support 71 online user guide 32 ordering Recovery Media Kit...


