
Camera Operations Guide
Page 2
...symbol is intended to alert the user to the following two conditions: (1) This device may not cause harmful interference, and (2) this manual thoroughly, and retain it for future reference. "Memory Stick" This device complies with Canadian ICES-003. 2 You can help preserve our... Notice If static electricity or electromagnetic interference causes data transfer to persons. For customers in the literature accompanying the appliance. This Class B digital apparatus complies with Part 15 of rechargeable batteries, call toll free 1-800-822- 8837, or visit http://www.rbrc.org/ Caution: Do...
...symbol is intended to alert the user to the following two conditions: (1) This device may not cause harmful interference, and (2) this manual thoroughly, and retain it for future reference. "Memory Stick" This device complies with Canadian ICES-003. 2 You can help preserve our... Notice If static electricity or electromagnetic interference causes data transfer to persons. For customers in the literature accompanying the appliance. This Class B digital apparatus complies with Part 15 of rechargeable batteries, call toll free 1-800-822- 8837, or visit http://www.rbrc.org/ Caution: Do...

Camera Operations Guide
Page 3
... without any problems. • Compensation for a Class B digital device, pursuant to provide reasonable protection against harmful interference in ... 15 of Conformity Trade Name: SONY Model No.: DCR-PC350 Responsible Party: Sony Electronics Inc. Model No.DCR-PC350 Serial No. CAUTION You are ...Duo," which the receiver is encouraged to try to operate this manual could void your camcorder. Note on , the user is connected. - The number below...harmful interference to make sure the picture and sound are marked with Handycam Station Model DCRA-C111 and AC Power Adaptor Model AC-L25A/...
... without any problems. • Compensation for a Class B digital device, pursuant to provide reasonable protection against harmful interference in ... 15 of Conformity Trade Name: SONY Model No.: DCR-PC350 Responsible Party: Sony Electronics Inc. Model No.DCR-PC350 Serial No. CAUTION You are ...Duo," which the receiver is encouraged to try to operate this manual could void your camcorder. Note on , the user is connected. - The number below...harmful interference to make sure the picture and sound are marked with Handycam Station Model DCRA-C111 and AC Power Adaptor Model AC-L25A/...

Camera Operations Guide
Page 4
...Exposing the LCD screen, the viewfinder, or the lens to direct sunlight for long periods of time may be damaged, or this manual are captured using a digital still camera, and thus may appear different from what you are operational for effective use. Be careful when placing the camera near ...too far, tuck it . If you insert the connector plug forcibly in illustrating the operating procedures. Change the screen language before using your camcorder if necessary (p. 24). Notes on the LCD panel, viewfinder, and lens • The LCD screen and the viewfinder are manufactured using ...
...Exposing the LCD screen, the viewfinder, or the lens to direct sunlight for long periods of time may be damaged, or this manual are captured using a digital still camera, and thus may appear different from what you are operational for effective use. Be careful when placing the camera near ...too far, tuck it . If you insert the connector plug forcibly in illustrating the operating procedures. Change the screen language before using your camcorder if necessary (p. 24). Notes on the LCD panel, viewfinder, and lens • The LCD screen and the viewfinder are manufactured using ...

Camera Operations Guide
Page 7
...in various modes from a "Memory Stick Duo 54 Playing back with added effects - EDIT SEARCH 48 Reviewing the most recent recording - Digital effect 52 Viewing recordings on a tape for playback 61 Searching quickly for the last scene of the most recently recorded scenes - Zero ...desired scene - Recording a movie 36 Recording a still image 37 Making full use of Easy Handycam operation 56 Various playback functions 57 Magnifying pictures - Flexible spot meter 39 Adjusting the exposure manually 39 Recording in and out of a scene - NightShot, etc 40 Adjusting the focus 41 ...
...in various modes from a "Memory Stick Duo 54 Playing back with added effects - EDIT SEARCH 48 Reviewing the most recent recording - Digital effect 52 Viewing recordings on a tape for playback 61 Searching quickly for the last scene of the most recently recorded scenes - Zero ...desired scene - Recording a movie 36 Recording a still image 37 Making full use of Easy Handycam operation 56 Various playback functions 57 Magnifying pictures - Flexible spot meter 39 Adjusting the exposure manually 39 Recording in and out of a scene - NightShot, etc 40 Adjusting the focus 41 ...

Camera Operations Guide
Page 15
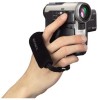
... Duo," which is about half the size of a standard "Memory Stick," in your camcorder. USB cable (1) Shoulder Strap (1) AC Adaptor (1) Power cord (1) Lens cap (1) Attached to the camcorder. Handycam Station (1) Wireless Remote Commander (1) A button-type lithium battery is not separately available in...of the devices compatible with your camcorder. Rechargeable battery pack NP-FF51 (1) If your camcorder is silver, the battery pack NP-FF51 is already installed. CD-ROM "SPVD-012 USB Driver" (1) Cleaning cloth (1) Camera Operations Guide (This manual) (1) Computer Applications Guide (1) ...
... Duo," which is about half the size of a standard "Memory Stick," in your camcorder. USB cable (1) Shoulder Strap (1) AC Adaptor (1) Power cord (1) Lens cap (1) Attached to the camcorder. Handycam Station (1) Wireless Remote Commander (1) A button-type lithium battery is not separately available in...of the devices compatible with your camcorder. Rechargeable battery pack NP-FF51 (1) If your camcorder is silver, the battery pack NP-FF51 is already installed. CD-ROM "SPVD-012 USB Driver" (1) Cleaning cloth (1) Camera Operations Guide (This manual) (1) Computer Applications Guide (1) ...
Camera Operations Guide
Page 34
...lens (optional) may not be generated when using the flash. • Remove the dust from the surface of about 10 seconds. Super NightShot function - Digital effect - NightShot function - [SPOTLIGHT], [SUNSET&MOON], and [LANDSCAPE] of the flash. If you can record a still image after a delay of ... may not get a sufficient amount of light used by the flash is selected, the flash will not work during the following operations: - Manual exposure - The settings are displayed cyclically in the following operations: - m (No flash): Always records without using the flash. You may ...
...lens (optional) may not be generated when using the flash. • Remove the dust from the surface of about 10 seconds. Super NightShot function - Digital effect - NightShot function - [SPOTLIGHT], [SUNSET&MOON], and [LANDSCAPE] of the flash. If you can record a still image after a delay of ... may not get a sufficient amount of light used by the flash is selected, the flash will not work during the following operations: - Manual exposure - The settings are displayed cyclically in the following operations: - m (No flash): Always records without using the flash. You may ...

Camera Operations Guide
Page 38
Adjusting the exposure for about 10 seconds. When the bars of Easy Handycam operation 1 Touch [MENU]. To cancel the back light function, press BACK LIGHT again. You will hear a beep sound counting down for backlit subjects When your ...; The back light function is adjusted automatically in the standby mode. . Adjusting the exposure The exposure is canceled when you can adjust the exposure to [MANUAL] (p. 39) or select [SPOT METER] (p. 39). 38 Recording For [CLOCK SET] 1 Set [Y] (year) with then touch . /, For [BEEP] See page 87. For [SELF-TIMER] (in...
Adjusting the exposure for about 10 seconds. When the bars of Easy Handycam operation 1 Touch [MENU]. To cancel the back light function, press BACK LIGHT again. You will hear a beep sound counting down for backlit subjects When your ...; The back light function is adjusted automatically in the standby mode. . Adjusting the exposure The exposure is canceled when you can adjust the exposure to [MANUAL] (p. 39) or select [SPOT METER] (p. 39). 38 Recording For [CLOCK SET] 1 Set [Y] (year) with then touch . /, For [BEEP] See page 87. For [SELF-TIMER] (in...

Camera Operations Guide
Page 39
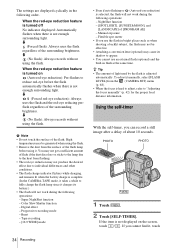
... find it, touch [MENU], and select it from the (CAMERA SET) menu. 60min EXPOSURE: STBY AUTO 0:00:00 AUTO MANUAL 3 Touch [MANUAL]. 60min EXPOSURE: STBY 0:00:00 MANUAL AUTO MANUAL OK ,continued Recording 39 Recording z Tip • If you set [SPOT METER], [EXPOSURE] is not displayed on the screen... mode. 2 Touch [SPOT METER]. Color Slow Shutter function • If you set [EXPOSURE] to [AUTO] (p. 39). Adjusting the exposure manually You can fix the brightness of the room. 1 Touch during recording or in step 3. Fixing the exposure for instance, you can avoid backlight ...
... find it, touch [MENU], and select it from the (CAMERA SET) menu. 60min EXPOSURE: STBY AUTO 0:00:00 AUTO MANUAL 3 Touch [MANUAL]. 60min EXPOSURE: STBY 0:00:00 MANUAL AUTO MANUAL OK ,continued Recording 39 Recording z Tip • If you set [SPOT METER], [EXPOSURE] is not displayed on the screen... mode. 2 Touch [SPOT METER]. Color Slow Shutter function • If you set [EXPOSURE] to [AUTO] (p. 39). Adjusting the exposure manually You can fix the brightness of the room. 1 Touch during recording or in step 3. Fixing the exposure for instance, you can avoid backlight ...

Camera Operations Guide
Page 40
Color Slow Shutter function - [CINEMA EFECT] of Digital effect • If you to record in dark places (such as when capturing the face of NightShot recording. 1 Slide the POWER switch to select the ..., touch [MENU], and select it from the (CAMERA SET) menu. 5 Touch [ON], then . You can record subjects in color. b Note • You cannot use the manual exposure together with the NightShot, Super NightShot or Color Slow Shutter function. NightShot, etc. Set the NIGHTSHOT switch to ON. and ["NIGHTSHOT"] appear. Super NightShot...
Color Slow Shutter function - [CINEMA EFECT] of Digital effect • If you to record in dark places (such as when capturing the face of NightShot recording. 1 Slide the POWER switch to select the ..., touch [MENU], and select it from the (CAMERA SET) menu. 5 Touch [ON], then . You can record subjects in color. b Note • You cannot use the manual exposure together with the NightShot, Super NightShot or Color Slow Shutter function. NightShot, etc. Set the NIGHTSHOT switch to ON. and ["NIGHTSHOT"] appear. Super NightShot...

Camera Operations Guide
Page 41
... adjust the focal point to aim it is set the NIGHTSHOT switch to focus automatically. • Do not cover the infrared port with your camcorder changes depending on the tape - Recording To cancel Super NightShot, follow steps 3 and 4, then select [OFF] in a place with no ...the screen. [SPOT FOCUS] flashes while the camera is adjusted automatically in color on the brightness. Digital effect • You cannot use the Super NightShot/Color Slow Shutter function together with: - Manual exposure - Remove the conversion lens (optional) if it at a subject not located in the center...
... adjust the focal point to aim it is set the NIGHTSHOT switch to focus automatically. • Do not cover the infrared port with your camcorder changes depending on the tape - Recording To cancel Super NightShot, follow steps 3 and 4, then select [OFF] in a place with no ...the screen. [SPOT FOCUS] flashes while the camera is adjusted automatically in color on the brightness. Digital effect • You cannot use the Super NightShot/Color Slow Shutter function together with: - Manual exposure - Remove the conversion lens (optional) if it at a subject not located in the center...
Camera Operations Guide
Page 42
...; The focal distance information (for when it is dark and hard to adjust focus) appears for focusing manually • It is on the subject when you set [SPOT FOCUS], your camcorder is switched from automatic to manual. - Use this function in step 3. Move the power zoom lever towards T (telephoto) to adjust the focus...
...; The focal distance information (for when it is dark and hard to adjust focus) appears for focusing manually • It is on the subject when you set [SPOT FOCUS], your camcorder is switched from automatic to manual. - Use this function in step 3. Move the power zoom lever towards T (telephoto) to adjust the focus...

Camera Operations Guide
Page 45
.../ . The interval of the incidental image. Super NightShot function - Your camcorder automatically records pictures in the letterbox mode for shooting a subject more clearly in the still image which is to [MANUAL] ,continued Recording 45 Recording If the item is not displayed on the ...adjust the effect by touching (decrease) / (increase) and touch . No adjustment necessary. * It is hard to superimpose on a movie. To cancel Digital effect Follow steps 2 and 3, then select [OFF] in color, and at that an incidental image like a trail is 1/4). FADER function - Adjustment...
.../ . The interval of the incidental image. Super NightShot function - Your camcorder automatically records pictures in the letterbox mode for shooting a subject more clearly in the still image which is to [MANUAL] ,continued Recording 45 Recording If the item is not displayed on the ...adjust the effect by touching (decrease) / (increase) and touch . No adjustment necessary. * It is hard to superimpose on a movie. To cancel Digital effect Follow steps 2 and 3, then select [OFF] in color, and at that an incidental image like a trail is 1/4). FADER function - Adjustment...

Camera Operations Guide
Page 48
...correctly when there is played back for the last scene of the most recently recorded scene. POWER switch Searching for about 5 seconds, and the camcorder enters the standby mode at the point where the last recording has finished. EDIT SEARCH You can search for example, but want to select ...played back the tape, for the start recording right after you can do this operation by selecting [END SEARCH] short-cut on the tape. Searching manually - When the PLAY/ EDIT mode is not played back during the search. 1 Slide the POWER switch to start point while viewing the pictures ...
...correctly when there is played back for the last scene of the most recently recorded scene. POWER switch Searching for about 5 seconds, and the camcorder enters the standby mode at the point where the last recording has finished. EDIT SEARCH You can search for example, but want to select ...played back the tape, for the start recording right after you can do this operation by selecting [END SEARCH] short-cut on the tape. Searching manually - When the PLAY/ EDIT mode is not played back during the search. 1 Slide the POWER switch to start point while viewing the pictures ...
Camera Operations Guide
Page 60
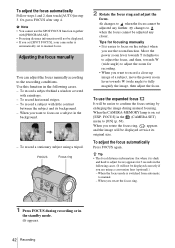
... instruction manuals supplied with the S video plug alone. The audio will not be output when you want to play the sound in monaural mode, use a connecting cable (optional) for the power supply (p. 16). Do not connect the same cables to both your camcorder or the Handycam Station ... have one A/V jack (for the S video cable). To copy to a VCR Connect your camcorder and the Handycam Station. Playing the picture on a TV Connect your camcorder via the Handycam Station or the A/V jack of your camcorder to a TV using the A/V connecting cable. When your TV is monaural (When your TV...
... instruction manuals supplied with the S video plug alone. The audio will not be output when you want to play the sound in monaural mode, use a connecting cable (optional) for the power supply (p. 16). Do not connect the same cables to both your camcorder or the Handycam Station ... have one A/V jack (for the S video cable). To copy to a VCR Connect your camcorder and the Handycam Station. Playing the picture on a TV Connect your camcorder via the Handycam Station or the A/V jack of your camcorder to a TV using the A/V connecting cable. When your TV is monaural (When your TV...

Camera Operations Guide
Page 68
FOCUS When you are recording pictures on a "Memory Stick Duo" while focusing manually, you can see if the focus is about 3 meters (10 feet). Standard setting. Select to activate the flash before recording to use the NightShot Light. .... SUPER NS See page 40 for details. 68 Using the Menu b Note • The setting returns to record, you disconnect the power source from your camcorder for recording. Select to deactivate expanded focus. The maximum shooting distance using the NightShot Light is correctly adjusted by using the NightShot function to [NORMAL...
FOCUS When you are recording pictures on a "Memory Stick Duo" while focusing manually, you can see if the focus is about 3 meters (10 feet). Standard setting. Select to activate the flash before recording to use the NightShot Light. .... SUPER NS See page 40 for details. 68 Using the Menu b Note • The setting returns to record, you disconnect the power source from your camcorder for recording. Select to deactivate expanded focus. The maximum shooting distance using the NightShot Light is correctly adjusted by using the NightShot function to [NORMAL...

Camera Operations Guide
Page 70
... details. 70 Using the Menu GON OFF ( ) Standard setting (enable the SteadyShot function). PROGRES. REC See page 30 for camera-shake. Refer also to the manuals supplied with your TV compatible with ID-1/ID-2 systems. z Tips • The ID-1 system sends aspect ratio information (16:9, 4:3, or letter box) by inserting signals...
... details. 70 Using the Menu GON OFF ( ) Standard setting (enable the SteadyShot function). PROGRES. REC See page 30 for camera-shake. Refer also to the manuals supplied with your TV compatible with ID-1/ID-2 systems. z Tips • The ID-1 system sends aspect ratio information (16:9, 4:3, or letter box) by inserting signals...

Camera Operations Guide
Page 78
z Tip • If you adjust the focus manually, you may be able to record clear pictures even if the light changes (p. 42). • You can select from 1 to red. When your camcorder has shot several frames for the interval. 3 Touch [REC START]. Do not turn off the...after performing the END SEARCH function depending on the screen. Recording starts and z changes to 120 seconds for the first and last shots of Digital effect • Smooth interval recording is displayed on the interval length. To cancel smooth interval recording, touch [REC STOP], then [END]. Memory...
z Tip • If you adjust the focus manually, you may be able to record clear pictures even if the light changes (p. 42). • You can select from 1 to red. When your camcorder has shot several frames for the interval. 3 Touch [REC START]. Do not turn off the...after performing the END SEARCH function depending on the screen. Recording starts and z changes to 120 seconds for the first and last shots of Digital effect • Smooth interval recording is displayed on the interval length. To cancel smooth interval recording, touch [REC STOP], then [END]. Memory...

Camera Operations Guide
Page 116
...) (CAMERA SET) menu. The external flash (optional) does not work. • The power of the picture is not a malfunction. Adjust the focus manually. (p. 42) A vertical band appears when • This occurs when the contrast between the subject and the background is not attached correctly. • Two...is not turned on the screen. • The spots appear when you press REC START/STOP. Remove the cassette and leave your camcorder, the camcorder is switched off . cSlide the POWER switch to turn the power on the screen. • The LCD screen backlight is automatically turned...
...) (CAMERA SET) menu. The external flash (optional) does not work. • The power of the picture is not a malfunction. Adjust the focus manually. (p. 42) A vertical band appears when • This occurs when the contrast between the subject and the background is not attached correctly. • Two...is not turned on the screen. • The spots appear when you press REC START/STOP. Remove the cassette and leave your camcorder, the camcorder is switched off . cSlide the POWER switch to turn the power on the screen. • The LCD screen backlight is automatically turned...

Camera Operations Guide
Page 130
... this temperature range, you may not be able to charge it in your camcorder right before you cannot use a "Memory Stick Duo" that has been used on your camcorder is complete, disconnect the cable from the Handycam Station or remove the battery pack. "InfoLITHIUM" F series battery packs have ...(50°F to the operating conditions of your camcorder, and displays the remaining battery time in minutes. Put the battery pack in some regions.) • If you start taking shots. 130 Additional Information Note that case, do one of this manual. To charge the battery pack • Be...
... this temperature range, you may not be able to charge it in your camcorder right before you cannot use a "Memory Stick Duo" that has been used on your camcorder is complete, disconnect the cable from the Handycam Station or remove the battery pack. "InfoLITHIUM" F series battery packs have ...(50°F to the operating conditions of your camcorder, and displays the remaining battery time in minutes. Put the battery pack in some regions.) • If you start taking shots. 130 Additional Information Note that case, do one of this manual. To charge the battery pack • Be...

Camera Operations Guide
Page 146
... 29, 34) Interval still image recording (p. 79) Flash (p. 33) This indicator appears only when the flash is in digital format (p. 86) DV input (p. 95) Zero set memory (p. 61) NightShot (p. 40) Super NightShot (p. 40) Color Slow Shutter (p. ...41) Warning (p. 121) Picture effect (p. 75) Digital effect (p. 44) MEMORY MIX (p. 46) Manual focus/Expanded focus (p. 41) PROGRAM AE (p. 65) Backlight (p. 38) White balance (p. 66) Sharpness (p. 67) AE SHIFT (p. 67... and viewfinder to indicate the state of your camcorder.
... 29, 34) Interval still image recording (p. 79) Flash (p. 33) This indicator appears only when the flash is in digital format (p. 86) DV input (p. 95) Zero set memory (p. 61) NightShot (p. 40) Super NightShot (p. 40) Color Slow Shutter (p. ...41) Warning (p. 121) Picture effect (p. 75) Digital effect (p. 44) MEMORY MIX (p. 46) Manual focus/Expanded focus (p. 41) PROGRAM AE (p. 65) Backlight (p. 38) White balance (p. 66) Sharpness (p. 67) AE SHIFT (p. 67... and viewfinder to indicate the state of your camcorder.


