"Handycam" Handbook
Page 12
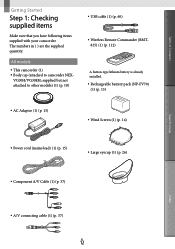
The numbers in ( ) are the supplied quantity. VG30H/VG30EH; All models This camcorder (1) Body cap (attached to other models) (1) (p. 18) USB cable (1) (p. 60) Wireless Remote Commander (RMT835) (1) (p. 112) A button-type lithium battery is already installed. Rechargeable ... of Contents Getting Started Step 1: Checking supplied items Make sure that you have following items supplied with your camcorder. supplied but not attached to camcorder NEX-
The numbers in ( ) are the supplied quantity. VG30H/VG30EH; All models This camcorder (1) Body cap (attached to other models) (1) (p. 18) USB cable (1) (p. 60) Wireless Remote Commander (RMT835) (1) (p. 112) A button-type lithium battery is already installed. Rechargeable ... of Contents Getting Started Step 1: Checking supplied items Make sure that you have following items supplied with your camcorder. supplied but not attached to camcorder NEX-

"Handycam" Handbook
Page 18
If you use another lens, refer to the instruction manual supplied with NEX-VG30H/VG30EH (the lens is attached to attach a lens using the E PZ 18-200mm F3.5-6.3 OSS lens that comes with that lens. Front lens cap ... speed switch Zoom lever Zoom switch Focus ring Mounting index Lens contacts* * Do not touch or dirty the lens contacts. Remove the body cap from the camcorder body and the packaging lid from the rear of the lens. Search image Index US 18 Table of Contents Step 4: Attaching the lens This...
If you use another lens, refer to the instruction manual supplied with NEX-VG30H/VG30EH (the lens is attached to attach a lens using the E PZ 18-200mm F3.5-6.3 OSS lens that comes with that lens. Front lens cap ... speed switch Zoom lever Zoom switch Focus ring Mounting index Lens contacts* * Do not touch or dirty the lens contacts. Remove the body cap from the camcorder body and the packaging lid from the rear of the lens. Search image Index US 18 Table of Contents Step 4: Attaching the lens This...

"Handycam" Handbook
Page 19
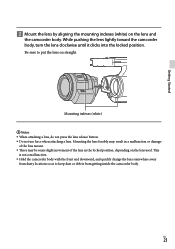
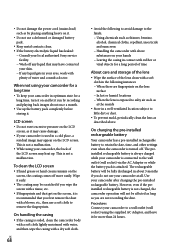
This is not a malfunction. Hold the camcorder body with the front end downward, and quickly change the lens somewhere away from dusty locations so as to put the lens on straight. Mounting the ... Table of the lens in the locked position, depending on the lens and the camcorder body. Be sure to keep dust or debris from getting inside the camcorder body. While pushing the lens lightly toward the camcorder body, turn the lens clockwise until it clicks into the locked position. Mounting indexes (white) ...
This is not a malfunction. Hold the camcorder body with the front end downward, and quickly change the lens somewhere away from dusty locations so as to put the lens on straight. Mounting the ... Table of the lens in the locked position, depending on the lens and the camcorder body. Be sure to keep dust or debris from getting inside the camcorder body. While pushing the lens lightly toward the camcorder body, turn the lens clockwise until it clicks into the locked position. Mounting indexes (white) ...

"Handycam" Handbook
Page 20
Align the marks. Notes When changing the lens, if dust or debris gets inside the camcorder body and adheres to the surface of the lens and the camcorder body. The image sensor is applied with the anti-dust coating, to prevent dust from dusty locations. Do not leave the camcorder... until it stops. When you remove the lens, make sure that acts as the film), it may appear on the image, depending on the body cap to the mounting indexes, and turn the cap clockwise. Before you hold both of the image sensor (the part that you attach caps...
Align the marks. Notes When changing the lens, if dust or debris gets inside the camcorder body and adheres to the surface of the lens and the camcorder body. The image sensor is applied with the anti-dust coating, to prevent dust from dusty locations. Do not leave the camcorder... until it stops. When you remove the lens, make sure that acts as the film), it may appear on the image, depending on the body cap to the mounting indexes, and turn the cap clockwise. Before you hold both of the image sensor (the part that you attach caps...

"Handycam" Handbook
Page 21
...your camera. Functions Autofocus AF system AF/MF Select LA-EA1 Available with the Mount Adaptor. For details, refer to your Sony dealer or local authorized Sony service facility. If dust or debris adheres on the FOCUS button Single/Continuous US 21 Index Table of Contents Search image &#...57768; Notes Do not use a spray blower because it may scatter water droplets inside the camcorder body. Do not put the...
...your camera. Functions Autofocus AF system AF/MF Select LA-EA1 Available with the Mount Adaptor. For details, refer to your Sony dealer or local authorized Sony service facility. If dust or debris adheres on the FOCUS button Single/Continuous US 21 Index Table of Contents Search image &#...57768; Notes Do not use a spray blower because it may scatter water droplets inside the camcorder body. Do not put the...

"Handycam" Handbook
Page 103
... screen with a blower, etc., then use a soft cloth to remove the fingerprints. On handling the casing If the casing is soiled, clean the camcorder body with a soft cloth lightly moistened with water, and then wipe the casing with a dry soft cloth. Avoid the following instances: When there are...
... screen with a blower, etc., then use a soft cloth to remove the fingerprints. On handling the casing If the casing is soiled, clean the camcorder body with a soft cloth lightly moistened with water, and then wipe the casing with a dry soft cloth. Avoid the following instances: When there are...

"Handycam" Handbook
Page 104
... to somebody, it is recommended that you delete data completely using the supplied AC Adaptor, and leave it is recommended that you destroy the actual body of the memory card.
... to somebody, it is recommended that you delete data completely using the supplied AC Adaptor, and leave it is recommended that you destroy the actual body of the memory card.

Operating Guide
Page 14
All models This camcorder (1) Body cap (attached to other models) (1) (p. 20) AC Adaptor (1) (p. 17) USB cable (1) (p. 53) Wireless Remote Commander (RMT835) (1) A button-type lithium battery is already ...) Large eyecup (1) (p. 30) A/V connecting cable (1) (p. 42) US 14 The numbers in ( ) are the supplied quantity. VG30H/VG30EH; supplied but not attached to camcorder NEX- Getting Started Step 1: Checking supplied items Make sure that you have following items supplied with your camcorder.
All models This camcorder (1) Body cap (attached to other models) (1) (p. 20) AC Adaptor (1) (p. 17) USB cable (1) (p. 53) Wireless Remote Commander (RMT835) (1) A button-type lithium battery is already ...) Large eyecup (1) (p. 30) A/V connecting cable (1) (p. 42) US 14 The numbers in ( ) are the supplied quantity. VG30H/VG30EH; supplied but not attached to camcorder NEX- Getting Started Step 1: Checking supplied items Make sure that you have following items supplied with your camcorder.

Operating Guide
Page 20
US 20 Step 4: Attaching the lens This manual explains how to the camcorder at the time of the lens. Front lens cap Zoom ring Hood index Rear lens cap Zoom speed switch Zoom lever Zoom switch Focus ring Mounting index Lens contacts* * Do not touch or dirty the lens contacts. Remove the body cap from the camcorder body and the packaging lid from the rear of purchase). If you use another lens, refer to the instruction manual supplied with NEX-VG30H/VG30EH (the lens is attached to attach a lens using the E PZ 18-200mm F3.5-6.3 OSS lens that comes with that lens.
US 20 Step 4: Attaching the lens This manual explains how to the camcorder at the time of the lens. Front lens cap Zoom ring Hood index Rear lens cap Zoom speed switch Zoom lever Zoom switch Focus ring Mounting index Lens contacts* * Do not touch or dirty the lens contacts. Remove the body cap from the camcorder body and the packaging lid from the rear of purchase). If you use another lens, refer to the instruction manual supplied with NEX-VG30H/VG30EH (the lens is attached to attach a lens using the E PZ 18-200mm F3.5-6.3 OSS lens that comes with that lens.
Operating Guide
Page 21
... somewhere away from dusty locations so as to put the lens on straight. Be sure to keep dust or debris from getting inside the camcorder body. Getting Started Mount the lens by aligning the mounting indexes (white) on the lens used. Mounting the lens forcibly may result in a ... of the lens mount. There may be some slight movement of the lens in the locked position, depending on the lens and the camcorder body. Mounting indexes (white) Notes When attaching a lens, do not press the lens release button. Do not use force when attaching a lens....
... somewhere away from dusty locations so as to put the lens on straight. Be sure to keep dust or debris from getting inside the camcorder body. Getting Started Mount the lens by aligning the mounting indexes (white) on the lens used. Mounting the lens forcibly may result in a ... of the lens mount. There may be some slight movement of the lens in the locked position, depending on the lens and the camcorder body. Mounting indexes (white) Notes When attaching a lens, do not press the lens release button. Do not use force when attaching a lens....

Operating Guide
Page 22
... removed. US 22 Lens release button Replace the packaging lid on the lens and attach the body cap to the camcorder body. Align the mark on the body cap to the mounting indexes, and turn the lens counterclockwise until it stops. When you remove the lens, make ...image, depending on the shooting conditions. However, attach or remove the lens quickly somewhere away from dusty locations. Do not leave the camcorder body with the anti-dust coating, to prevent dust from them. Removing the lens While pressing the lens release button all the way in, ...
... removed. US 22 Lens release button Replace the packaging lid on the lens and attach the body cap to the camcorder body. Align the mark on the body cap to the mounting indexes, and turn the lens counterclockwise until it stops. When you remove the lens, make ...image, depending on the shooting conditions. However, attach or remove the lens quickly somewhere away from dusty locations. Do not leave the camcorder body with the anti-dust coating, to prevent dust from them. Removing the lens While pressing the lens release button all the way in, ...

Operating Guide
Page 23
... lens (sold separately), and then reattach the lens. Notes Do not use a spray blower because it may scatter water droplets inside the camcorder body. Do not put the tip of a blower into the cavity beyond the mount, so that the tip of the blower does not touch the... image sensor. Hold the camcorder's face downward to prevent the dust from resettling in the camcorder. Do not apply a mechanical shock to your Sony dealer or local authorized Sony service facility. For details, refer to the operating instructions supplied with the Mount Adaptor.
... lens (sold separately), and then reattach the lens. Notes Do not use a spray blower because it may scatter water droplets inside the camcorder body. Do not put the tip of a blower into the cavity beyond the mount, so that the tip of the blower does not touch the... image sensor. Hold the camcorder's face downward to prevent the dust from resettling in the camcorder. Do not apply a mechanical shock to your Sony dealer or local authorized Sony service facility. For details, refer to the operating instructions supplied with the Mount Adaptor.
Operating Guide
Page 68
...on your hands Leaving the casing in contact with rubber or vinyl objects for more easily. This is soiled, clean the camcorder body with a soft cloth lightly moistened with water, and then wipe the casing with above . The rechargeable battery will not be fully discharged in...a deformed or damaged battery pack. Keep metal contacts clean. If the battery electrolytic liquid has leaked: Consult your local authorized Sony service facility. Wash off any liquid gets in your eyes, wash with a blower, etc., then use a soft cloth to retain the date, ...
...on your hands Leaving the casing in contact with rubber or vinyl objects for more easily. This is soiled, clean the camcorder body with a soft cloth lightly moistened with water, and then wipe the casing with above . The rechargeable battery will not be fully discharged in...a deformed or damaged battery pack. Keep metal contacts clean. If the battery electrolytic liquid has leaked: Consult your local authorized Sony service facility. Wash off any liquid gets in your eyes, wash with a blower, etc., then use a soft cloth to retain the date, ...
Operating Guide
Page 69
...Indoor] (3 200 K), [Outdoor] (5 600 K), manual (2 500 K - 9 900 K) Minimum illumination 9 lx (lux) (in default setting, shutter speed 1/60 second (NEX-VG30/VG30H) / 1/50 second (NEX-VG30E/VG30EH), gain: 30 dB, aperture F3.5) Additional information US 69 To change the battery of the memory card. Use of another battery may...to pull out the battery case. Place a new battery with a Sony CR2025 lithium battery. Also, when you dispose of the memory card, it is recommended that you destroy the actual body of the Wireless Remote Commander While pressing on the tab, inset ...
...Indoor] (3 200 K), [Outdoor] (5 600 K), manual (2 500 K - 9 900 K) Minimum illumination 9 lx (lux) (in default setting, shutter speed 1/60 second (NEX-VG30/VG30H) / 1/50 second (NEX-VG30E/VG30EH), gain: 30 dB, aperture F3.5) Additional information US 69 To change the battery of the memory card. Use of another battery may...to pull out the battery case. Place a new battery with a Sony CR2025 lithium battery. Also, when you dispose of the memory card, it is recommended that you destroy the actual body of the Wireless Remote Commander While pressing on the tab, inset ...

Operating Guide
Page 70
...5/8 in.) (w/h/d) including the projecting parts, E PZ 18-200mm F3.5-6.3 OSS lens*, lens hood* and supplied battery pack (NP-FV70) * Supplied with NEX-VG30H/VG30EH Mass (approx.) Camcorder body only: Approx. 650 g (1 lb 6 oz) When recording: Approx. 1 420 g (3 lb 2 oz) (With the accessories lens* and supplied ...battery pack (NP-FV70)) * Supplied with NEX-VG30H/VG30EH US 70 AC Adaptor AC-L200D Power requirements: AC 100 V - 240 V, 50 Hz/60 Hz...
...5/8 in.) (w/h/d) including the projecting parts, E PZ 18-200mm F3.5-6.3 OSS lens*, lens hood* and supplied battery pack (NP-FV70) * Supplied with NEX-VG30H/VG30EH Mass (approx.) Camcorder body only: Approx. 650 g (1 lb 6 oz) When recording: Approx. 1 420 g (3 lb 2 oz) (With the accessories lens* and supplied ...battery pack (NP-FV70)) * Supplied with NEX-VG30H/VG30EH US 70 AC Adaptor AC-L200D Power requirements: AC 100 V - 240 V, 50 Hz/60 Hz...

Marketing Specifications
Page 4
...-UAM1 cable, AC power for camcorder, and FAT-32 hard drive less than 2TB (Terabytes) sold separately © 2012 Sony Electronics Inc. Mac OS® not supported. 5. Sony, Handycam, Optical SteadyShot, Exmor, Tru-Finder, Xtra Fine LCD, Memory Stick PRO Duo, Memory Stick PRO-HG Duo and... is prohibited. Accessories Supplied Accessories Rechargeable Battery Pack(NP-FV70) (1) AC Adaptor (1) Power Cord (1) Component A/V Cable (1) A/V Connecting Cable (1) USB Cable (1) Body cap (1) Wind screen (1) Large eye cup (1) CD-ROM("Handycam" Application Software) (1) Remote Commander(RMT-835 with...
...-UAM1 cable, AC power for camcorder, and FAT-32 hard drive less than 2TB (Terabytes) sold separately © 2012 Sony Electronics Inc. Mac OS® not supported. 5. Sony, Handycam, Optical SteadyShot, Exmor, Tru-Finder, Xtra Fine LCD, Memory Stick PRO Duo, Memory Stick PRO-HG Duo and... is prohibited. Accessories Supplied Accessories Rechargeable Battery Pack(NP-FV70) (1) AC Adaptor (1) Power Cord (1) Component A/V Cable (1) A/V Connecting Cable (1) USB Cable (1) Body cap (1) Wind screen (1) Large eye cup (1) CD-ROM("Handycam" Application Software) (1) Remote Commander(RMT-835 with...