
2011 α Lens and Lens Accessory Brochure and Specifications
Page 4
... with a pinhole camera. In all shooting distances. A simple pinhole of appropriate size is a measure of the speed of multiple elements allows lens designers to effectively reduce optical aberrations so you get nice sharp, clean images. In principle, lenses work similarly to the pinhole, but dim image Figure 2. Zoom lenses require a larger number of projecting a sharp but they capture and control light The linguistic roots...
... with a pinhole camera. In all shooting distances. A simple pinhole of appropriate size is a measure of the speed of multiple elements allows lens designers to effectively reduce optical aberrations so you get nice sharp, clean images. In principle, lenses work similarly to the pinhole, but dim image Figure 2. Zoom lenses require a larger number of projecting a sharp but they capture and control light The linguistic roots...

2011 α Lens and Lens Accessory Brochure and Specifications
Page 7
... lens hoods work Extraneous light Enlarged view No ghosts Light needed for image formation Lens hood Use your lens has a built-in extending hood, it should be extended when you're shooting. Without circular PL filter (reduced contrast) Without ND filter 12 Petal hood Round hood With circular PL filter (increased contrast and deep saturation) Circular polarizing filters for improved contrast and color...
... lens hoods work Extraneous light Enlarged view No ghosts Light needed for image formation Lens hood Use your lens has a built-in extending hood, it should be extended when you're shooting. Without circular PL filter (reduced contrast) Without ND filter 12 Petal hood Round hood With circular PL filter (increased contrast and deep saturation) Circular polarizing filters for improved contrast and color...

2011 α Lens and Lens Accessory Brochure and Specifications
Page 8
...get closer together they start to resolve finely spaced black and white lines printed on an APS-C format body. The red line is over a range of aperture settings.The smaller the gap between a lens's resolution and contrast in relation to the lens: "R" (radial = lines parallel to the radius...-range zoom like the 28-75mm F2.8 SAM (SAL2875) for shooting wildlife. If you 'll want the framing versatility of tones in sharp focus. Wildlife Since you won't need to know to capture the moment, and that stopping down to any lens that arises spontaneously.You're shooting snapshots ...
...get closer together they start to resolve finely spaced black and white lines printed on an APS-C format body. The red line is over a range of aperture settings.The smaller the gap between a lens's resolution and contrast in relation to the lens: "R" (radial = lines parallel to the radius...-range zoom like the 28-75mm F2.8 SAM (SAL2875) for shooting wildlife. If you 'll want the framing versatility of tones in sharp focus. Wildlife Since you won't need to know to capture the moment, and that stopping down to any lens that arises spontaneously.You're shooting snapshots ...
2011 α Lens and Lens Accessory Brochure and Specifications
Page 16
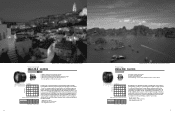
... lens is a must-have! For photo enthusiasts who use either or both full frame and APS-C format cameras. magnification ratio: 0.13x 31 Contrast (%) Contrast (%) Ultra wide angle 20mm F2.8 SAL20F28 M mode, 1/125 sec., F11, ISO 200, Landscape Creative Style; Close objects will loom large, while distant objects appear to allow comfortable shooting indoors or on full-frame cameras...
... lens is a must-have! For photo enthusiasts who use either or both full frame and APS-C format cameras. magnification ratio: 0.13x 31 Contrast (%) Contrast (%) Ultra wide angle 20mm F2.8 SAL20F28 M mode, 1/125 sec., F11, ISO 200, Landscape Creative Style; Close objects will loom large, while distant objects appear to allow comfortable shooting indoors or on full-frame cameras...
Handycam® Handbook
Page 6
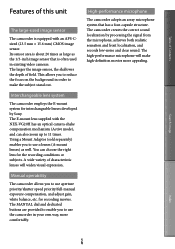
... to use aperture priority/shutter speed priority/full-manual exposure compensation, and adjust gain, white balance, etc. You can also zoom up to use α lenses (A-mount lenses) as the 1/3-inch image sensor that has a four-capsule structure. Manual operability The camcorder allows you to reduce the focus on the background in order to use the camcorder in existing video cameras. The camcorder creates the correct sound localization by Sony. Index...
... to use aperture priority/shutter speed priority/full-manual exposure compensation, and adjust gain, white balance, etc. You can also zoom up to use α lenses (A-mount lenses) as the 1/3-inch image sensor that has a four-capsule structure. Manual operability The camcorder allows you to reduce the focus on the background in order to use the camcorder in existing video cameras. The camcorder creates the correct sound localization by Sony. Index...
Handycam® Handbook
Page 9
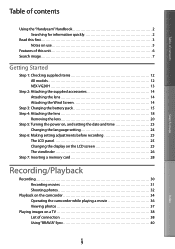
... battery pack 15 Step 4: Attaching the lens 18 Removing the lens 20 Step 5: Turning the power on, and setting the date and time 23 Changing the language setting 24 Step 6: Making setting adjustments before recording 25 The LCD panel 25 Changing the display on the LCD screen 25 The viewfinder 26 Step 7: Inserting a memory card 28 Recording/Playback Recording 30 Recording movies 31 Shooting photos 32 Playback on the camcorder 34 Operating the camcorder while playing a movie 36 Viewing photos 37 Playing images on a TV 38 List of connection 38 Using...
... battery pack 15 Step 4: Attaching the lens 18 Removing the lens 20 Step 5: Turning the power on, and setting the date and time 23 Changing the language setting 24 Step 6: Making setting adjustments before recording 25 The LCD panel 25 Changing the display on the LCD screen 25 The viewfinder 26 Step 7: Inserting a memory card 28 Recording/Playback Recording 30 Recording movies 31 Shooting photos 32 Playback on the camcorder 34 Operating the camcorder while playing a movie 36 Viewing photos 37 Playing images on a TV 38 List of connection 38 Using...
Handycam® Handbook
Page 22
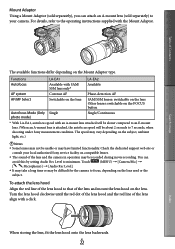
... setting Audio Rec Level to minimum. When storing the lens, fit the lens hood onto the lens backwards. Check the dedicated support web site or consult your camera. Turn the lens hood clockwise until the red dot of the lens hood and the red line of the lens and mount the lens hood on the lens. Mount Adaptor Using a Mount Adaptor (sold separately) to your local authorized Sony service facility on compatible...
... setting Audio Rec Level to minimum. When storing the lens, fit the lens hood onto the lens backwards. Check the dedicated support web site or consult your camera. Turn the lens hood clockwise until the red dot of the lens hood and the red line of the lens and mount the lens hood on the lens. Mount Adaptor Using a Mount Adaptor (sold separately) to your local authorized Sony service facility on compatible...

Handycam® Handbook
Page 31
... start recording. You cannot operate your camcorder during this time, do not use a tripod). Note that your left hand to support the camera during recording (p. 112). Recording movies (Movie): When recording a movie (Photo): When recording a photo START/STOP button [STBY] [REC] Table of Contents Search image MODE button Press MODE to turn on the (Movie) lamp. Press START/STOP to start recording after recording has finished. Make sure that if the attached lens does not have a power zoom function...
... start recording. You cannot operate your camcorder during this time, do not use a tripod). Note that your left hand to support the camera during recording (p. 112). Recording movies (Movie): When recording a movie (Photo): When recording a photo START/STOP button [STBY] [REC] Table of Contents Search image MODE button Press MODE to turn on the (Movie) lamp. Press START/STOP to start recording after recording has finished. Make sure that if the attached lens does not have a power zoom function...
Handycam® Handbook
Page 46
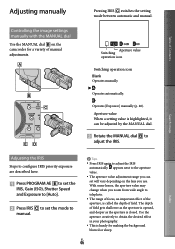
... a setting value is handy for a variety of manual adjustments. Pressing IRIS switches the setting mode between automatic and manual. appears next to the aperture value. The aperture value adjustment range you can be adjusted by the MANUAL dial. Rotate the MANUAL dial to adjust the IRIS automatically. Table of Contents Adjusting manually Controlling the image settings manually with the MANUAL dial Use the MANUAL dial on the lens...
... a setting value is handy for a variety of manual adjustments. Pressing IRIS switches the setting mode between automatic and manual. appears next to the aperture value. The aperture value adjustment range you can be adjusted by the MANUAL dial. Rotate the MANUAL dial to adjust the IRIS automatically. Table of Contents Adjusting manually Controlling the image settings manually with the MANUAL dial Use the MANUAL dial on the lens...

Handycam® Handbook
Page 61
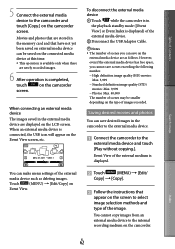
... USB cable while [Preparing image database file. The format screen appears when an external media device is displayed on the LCD screen. DB F.] is displayed on the external media device before use. You can also play back images on the camcorder or another playback device. Notes For this operation, you format it to the wall outlet (wall socket). Tips You can import images saved on the external media device to your computer by using the supplied software "PMB." 3 Connect...
... USB cable while [Preparing image database file. The format screen appears when an external media device is displayed on the LCD screen. DB F.] is displayed on the external media device before use. You can also play back images on the camcorder or another playback device. Notes For this operation, you format it to the wall outlet (wall socket). Tips You can import images saved on the external media device to your computer by using the supplied software "PMB." 3 Connect...
Handycam® Handbook
Page 62
.../ Copy] [Copy]. Follow the instructions that have not yet been saved on external media device can make menu settings of the image. You can be smaller depending on the camcorder screen. Saving desired movies and photos You can save desired images in the memory card and that appear on the Event View screen, etc. However, even if the external media device has free space, you can save on the external media device are newly recorded images. 6 After operation is connected, the USB...
.../ Copy] [Copy]. Follow the instructions that have not yet been saved on external media device can make menu settings of the image. You can be smaller depending on the camcorder screen. Saving desired movies and photos You can save desired images in the memory card and that appear on the Event View screen, etc. However, even if the external media device has free space, you can save on the external media device are newly recorded images. 6 After operation is connected, the USB...
Handycam® Handbook
Page 66
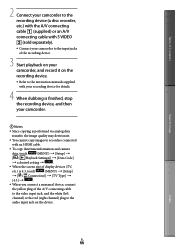
...recorders connected with an HDMI cable. To copy date/time information and camera data, touch (MENU) [Setup] [ ( Playback Settings)] [Data Code] a desired setting . When the screen size of display devices (TV, etc.) is 4:3, touch (MENU) [Setup] [ ( Connection)] [TV Type] [4:3] . When you connect a monaural device, connect the yellow plug of the A/V connecting cable to the video input jack, and the white (left channel) or the red (right channel) plug to the audio...
...recorders connected with an HDMI cable. To copy date/time information and camera data, touch (MENU) [Setup] [ ( Playback Settings)] [Data Code] a desired setting . When the screen size of display devices (TV, etc.) is 4:3, touch (MENU) [Setup] [ ( Connection)] [TV Type] [4:3] . When you connect a monaural device, connect the yellow plug of the A/V connecting cable to the video input jack, and the white (left channel) or the red (right channel) plug to the audio...
Handycam® Handbook
Page 88
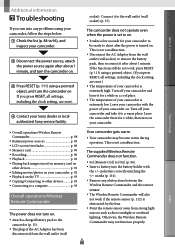
... operations/Wireless Remote Commander p. 88 Batteries/power sources p. 89 LCD screen/viewfinder p. 89 Memory card p. 90 Recording p. 90 Playback p. 92 Playing back images stored on memory card on other devices.......... polarities correctly matching the +/- Turn off your camcorder and take it to the camcorder (p. 15). The plug of the AC Adaptor has been disconnected from the wall outlet (wall socket) or remove the battery...
... operations/Wireless Remote Commander p. 88 Batteries/power sources p. 89 LCD screen/viewfinder p. 89 Memory card p. 90 Recording p. 90 Playback p. 92 Playing back images stored on memory card on other devices.......... polarities correctly matching the +/- Turn off your camcorder and take it to the camcorder (p. 15). The plug of the AC Adaptor has been disconnected from the wall outlet (wall socket) or remove the battery...
Handycam® Handbook
Page 101
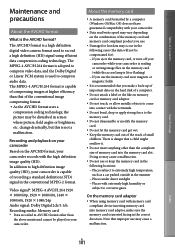
... video data, and the Dolby Digital or Linear PCM system is a high definition digital video camera format used to corrosive gases On the memory card adaptor When using efficient data compression coding technology. Recording and playback on your camcorder Based on the AVCHD format, your camcorder is reading or writing image files on the memory card (while the access lamp is lit or flashing) If you make a back-up of important data on the hard disk...
... video data, and the Dolby Digital or Linear PCM system is a high definition digital video camera format used to corrosive gases On the memory card adaptor When using efficient data compression coding technology. Recording and playback on your camcorder Based on the AVCHD format, your camcorder is reading or writing image files on the memory card (while the access lamp is lit or flashing) If you make a back-up of important data on the hard disk...
Operating Guide
Page 33
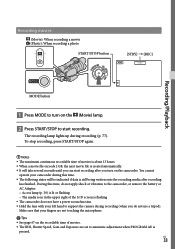
Recording movies (Movie): When recording a movie (Photo): When recording a photo START/STOP button [STBY] [REC] Recording/Playback MODE button Press MODE to turn on the camcorder. US 33 You cannot operate your camcorder during this time, do not use a tripod). Make sure that your left hand to support the camera during recording (p. 77). To stop recording, press START/STOP again. Notes The maximum continuous recordable time of movies. The IRIS, Shutter Speed, Gain and Exposure are not touching the...
Recording movies (Movie): When recording a movie (Photo): When recording a photo START/STOP button [STBY] [REC] Recording/Playback MODE button Press MODE to turn on the camcorder. US 33 You cannot operate your camcorder during this time, do not use a tripod). Make sure that your left hand to support the camera during recording (p. 77). To stop recording, press START/STOP again. Notes The maximum continuous recordable time of movies. The IRIS, Shutter Speed, Gain and Exposure are not touching the...

Operating Guide
Page 53
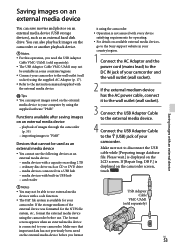
... power cable, connect it using the camcorder. Operation is available for the NTFS file system, etc., format the external media device using the supplied software "PMB." If [Repair Img. DB F.] is displayed on the LCD screen. Functions available after saving images on an external media device playback of images through the camcorder (p. 55) importing images to "PMB" Devices that important data has not previously been saved on the external media device before use. Make sure that cannot be used as an external media device You cannot use...
... power cable, connect it using the camcorder. Operation is available for the NTFS file system, etc., format the external media device using the supplied software "PMB." If [Repair Img. DB F.] is displayed on the LCD screen. Functions available after saving images on an external media device playback of images through the camcorder (p. 55) importing images to "PMB" Devices that important data has not previously been saved on the external media device before use. Make sure that cannot be used as an external media device You cannot use...
Operating Guide
Page 58
... cable. To copy date/time information and camera data, touch (MENU) [Setup] [ ( Playback Settings)] [Data Code] a desired setting . When the screen size of the A/V connecting cable to the video input jack, and the white (left channel) or the red (right channel) plug to the audio input jack on the device. Notes Since copying is performed via analog data transfer, the image quality may deteriorate. You cannot copy images to recorders connected with your recording device...
... cable. To copy date/time information and camera data, touch (MENU) [Setup] [ ( Playback Settings)] [Data Code] a desired setting . When the screen size of the A/V connecting cable to the video input jack, and the white (left channel) or the red (right channel) plug to the audio input jack on the device. Notes Since copying is performed via analog data transfer, the image quality may deteriorate. You cannot copy images to recorders connected with your recording device...

Operating Guide
Page 78
... Connection 41 D Data Code 25 Date/Time 25 Delete 44 Disc recorder 57 DVD writer 56 E Event Index 37 External media 53 F Fully charged 16 H "Handycam" Handbook 63 I Image Data Converter 50 Install 47 L Language Setting 26 Lens 19 M Macintosh 46 Maintenance 68 MANUAL dial 36 Media Settings 30 "Memory Stick" media 31 US 78 "Memory Stick PRO-HG Duo" media 31 "Memory Stick PRO Duo" media 31 Menus 60 Movies 33, 39 P Photos 34, 40 Playing 37 PMB (Picture Motion Browser 49 Power on 24 Precautions 68 R Recording 32 Recording and playback time...
... Connection 41 D Data Code 25 Date/Time 25 Delete 44 Disc recorder 57 DVD writer 56 E Event Index 37 External media 53 F Fully charged 16 H "Handycam" Handbook 63 I Image Data Converter 50 Install 47 L Language Setting 26 Lens 19 M Macintosh 46 Maintenance 68 MANUAL dial 36 Media Settings 30 "Memory Stick" media 31 US 78 "Memory Stick PRO-HG Duo" media 31 "Memory Stick PRO Duo" media 31 Menus 60 Movies 33, 39 P Photos 34, 40 Playing 37 PMB (Picture Motion Browser 49 Power on 24 Precautions 68 R Recording 32 Recording and playback time...
Operating Guide
Page 53
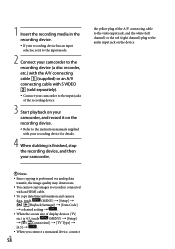
... an external media device. media devices with a capacity exceeding 2 TB ordinary disc drive such as an external hard disk drive. Please wait.] is displayed on the camcorder screen, touch . If [Repair Img. If the storage medium of the external device was formatted for your camcorder. Make sure not to your computer by using the supplied software "PMB." Functions available after saving images on an external media device playback of your camcorder. DB F.] is displayed on the LCD screen. USB Adaptor Cable...
... an external media device. media devices with a capacity exceeding 2 TB ordinary disc drive such as an external hard disk drive. Please wait.] is displayed on the camcorder screen, touch . If [Repair Img. If the storage medium of the external device was formatted for your camcorder. Make sure not to your computer by using the supplied software "PMB." Functions available after saving images on an external media device playback of your camcorder. DB F.] is displayed on the LCD screen. USB Adaptor Cable...
Operating Guide
Page 78
... Connection 41 D Data Code 25 Date/Time 25 Delete 44 Disc recorder 57 DVD writer 56 E Event Index 37 External media 53 F Fully charged 16 H "Handycam" Handbook 63 I Image Data Converter 50 Install 47 L Language Setting 26 Lens 19 M Macintosh 46 Maintenance 68 MANUAL dial 36 Media Settings 30 "Memory Stick" media 31 US 78 "Memory Stick PRO-HG Duo" media 31 "Memory Stick PRO Duo" media 31 Menus 60 Movies 33, 39 P Photos 34, 40 Playing 37 PMB (Picture Motion Browser 49 Power on 24 Precautions 68 R Recording 32 Recording and playback time...
... Connection 41 D Data Code 25 Date/Time 25 Delete 44 Disc recorder 57 DVD writer 56 E Event Index 37 External media 53 F Fully charged 16 H "Handycam" Handbook 63 I Image Data Converter 50 Install 47 L Language Setting 26 Lens 19 M Macintosh 46 Maintenance 68 MANUAL dial 36 Media Settings 30 "Memory Stick" media 31 US 78 "Memory Stick PRO-HG Duo" media 31 "Memory Stick PRO Duo" media 31 Menus 60 Movies 33, 39 P Photos 34, 40 Playing 37 PMB (Picture Motion Browser 49 Power on 24 Precautions 68 R Recording 32 Recording and playback time...


