
Handycam® Handbook
Page 1
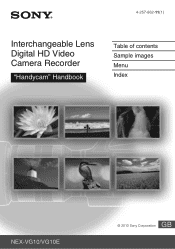
4-257-862-11(1) Interchangeable Lens Digital HD Video Camera Recorder "Handycam" Handbook Table of contents Sample images Menu Index NEX-VG10/VG10E GB © 2010 Sony Corporation
4-257-862-11(1) Interchangeable Lens Digital HD Video Camera Recorder "Handycam" Handbook Table of contents Sample images Menu Index NEX-VG10/VG10E GB © 2010 Sony Corporation
Handycam® Handbook
Page 2
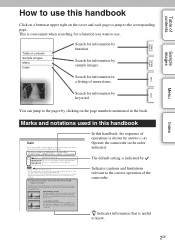
You can jump to know. 2GB Search for information by function. Marks and notations used in the book. z Indicates information that is convenient when searching for a function you want to the corresponding page. This is useful to the pages by clicking on the cover and each page to jump to use this handbook Click on a button at upper right on the page numbers mentioned in this handbook In this handbook, the sequence of the camcorder. Indicates cautions and limitations relevant to the correct operation of operations is indicated by . Search for information in the order ...
You can jump to know. 2GB Search for information by function. Marks and notations used in the book. z Indicates information that is convenient when searching for a function you want to the corresponding page. This is useful to the pages by clicking on the cover and each page to jump to use this handbook Click on a button at upper right on the page numbers mentioned in this handbook In this handbook, the sequence of the camcorder. Indicates cautions and limitations relevant to the correct operation of operations is indicated by . Search for information in the order ...

Handycam® Handbook
Page 3
Table of contents Sample images Menu Index Table of contents Notes on using the camcorder How to use this handbook 2 Sample images 5 Basic operations Using the operating buttons 8 Menu 10 Using functions with the buttons on the control panel DISP (Display Contents 14 FOCUS (AF/MF Select 16 GAIN (Gain 18 ISO 19 (Exposure Comp 20 WB (White Balance 21 (Image Index 23 Using functions in the menu Shoot Mode 10 Camera 11 Rec Mode/Image Size 11 Brightness/Color 11 Playback 12 Setup 12 3GB Continued r
Table of contents Sample images Menu Index Table of contents Notes on using the camcorder How to use this handbook 2 Sample images 5 Basic operations Using the operating buttons 8 Menu 10 Using functions with the buttons on the control panel DISP (Display Contents 14 FOCUS (AF/MF Select 16 GAIN (Gain 18 ISO 19 (Exposure Comp 20 WB (White Balance 21 (Image Index 23 Using functions in the menu Shoot Mode 10 Camera 11 Rec Mode/Image Size 11 Brightness/Color 11 Playback 12 Setup 12 3GB Continued r
Handycam® Handbook
Page 4
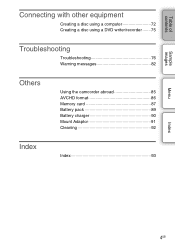
Table of contents Sample images Connecting with other equipment Creating a disc using a computer 72 Creating a disc using a DVD writer/recorder 75 Troubleshooting Troubleshooting 76 Warning messages 82 Others Using the camcorder abroad 85 AVCHD format 86 Memory card 87 Battery pack 89 Battery charger 90 Mount Adaptor 91 Cleaning 92 Index Index 93 Menu Index 4GB
Table of contents Sample images Connecting with other equipment Creating a disc using a computer 72 Creating a disc using a DVD writer/recorder 75 Troubleshooting Troubleshooting 76 Warning messages 82 Others Using the camcorder abroad 85 AVCHD format 86 Memory card 87 Battery pack 89 Battery charger 90 Mount Adaptor 91 Cleaning 92 Index Index 93 Menu Index 4GB

Handycam® Handbook
Page 5
Click the desired sample image. You may find the answer by hand (page 6) Shooting landscapes (page 6) Shooting clear still images (page 7) If you click on an image, the screen will jump to the page describing the function recommended for shooting that kind of contents Sample images Menu Index Sample images "This is the scene I want to capture in an image, but how can I do?" Table of image. Click! 5GB Continued r Shooting movies as clear as still images (page 6) Shooting when holding the camcorder by going through the sample images listed here.
Click the desired sample image. You may find the answer by hand (page 6) Shooting landscapes (page 6) Shooting clear still images (page 7) If you click on an image, the screen will jump to the page describing the function recommended for shooting that kind of contents Sample images Menu Index Sample images "This is the scene I want to capture in an image, but how can I do?" Table of image. Click! 5GB Continued r Shooting movies as clear as still images (page 6) Shooting when holding the camcorder by going through the sample images listed here.
Handycam® Handbook
Page 6
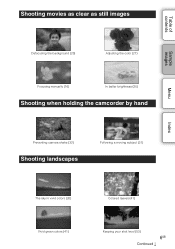
Shooting movies as clear as still images Table of contents Sample images 25 Defocusing the background (25) 16 Focusing manually (16) 21 Adjusting the color (21) 20 In better brightness (20) Shooting when holding the camcorder by hand Menu Index 32 Preventing camera shake (32) Shooting landscapes 31 Following a moving subject (31) 20 The sky in vivid colors (20) 41 Vivid green colors (41) 41 Colored leaves (41) 53 Keeping your shot level (53) 6GB Continued r
Shooting movies as clear as still images Table of contents Sample images 25 Defocusing the background (25) 16 Focusing manually (16) 21 Adjusting the color (21) 20 In better brightness (20) Shooting when holding the camcorder by hand Menu Index 32 Preventing camera shake (32) Shooting landscapes 31 Following a moving subject (31) 20 The sky in vivid colors (20) 41 Vivid green colors (41) 41 Colored leaves (41) 53 Keeping your shot level (53) 6GB Continued r

Handycam® Handbook
Page 7
Table of contents Sample images Shooting clear still images 29 In candle light (29) 36 The same scene with different brightness (36) 44 Light outdoors shot from a dark interior (44) 28 Holding the camera by hand (28) 44 Scenery with a wide range of brightness (44) 34 Capturing the best moment (34) Menu Index 7GB
Table of contents Sample images Shooting clear still images 29 In candle light (29) 36 The same scene with different brightness (36) 44 Light outdoors shot from a dark interior (44) 28 Holding the camera by hand (28) 44 Scenery with a wide range of brightness (44) 34 Capturing the best moment (34) Menu Index 7GB
Handycam® Handbook
Page 8
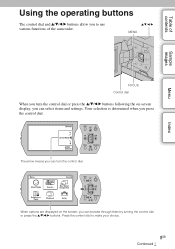
When options are displayed on -screen display, you can select items and settings. Press the control dial to use various functions of contents Basic operations Using the operating buttons The control dial and v/V/b/B buttons allow you to make your choice. 8GB Continued r Your selection is determined when you can turn the control dial. The arrow means you can browse through them by turning the control dial or press the v/V/b/B buttons. Table of the camcorder. v/V/b/B MENU Sample images Menu Index FOCUS Control dial When you turn the control dial or press the v/V/b/B ...
When options are displayed on -screen display, you can select items and settings. Press the control dial to use various functions of contents Basic operations Using the operating buttons The control dial and v/V/b/B buttons allow you to make your choice. 8GB Continued r Your selection is determined when you can turn the control dial. The arrow means you can browse through them by turning the control dial or press the v/V/b/B buttons. Table of the camcorder. v/V/b/B MENU Sample images Menu Index FOCUS Control dial When you turn the control dial or press the v/V/b/B ...

Handycam® Handbook
Page 9
v: DISP (Display Contents) (page 14) V: (Exposure Comp.) during recording (page 20)/ (Image Index) during playback (page 48) b: WB (White Balance) (page 21) B: GAIN (Gain) (page 18) 9GB Table of the screen, press the FOCUS ...
v: DISP (Display Contents) (page 14) V: (Exposure Comp.) during recording (page 20)/ (Image Index) during playback (page 48) b: WB (White Balance) (page 21) B: GAIN (Gain) (page 18) 9GB Table of the screen, press the FOCUS ...
Handycam® Handbook
Page 10
... blur without using a tripod. Adjusts the shutter speed to customize settings, except for the camcorder as a whole, or execute functions such as recording, playback, or other operations. Reduces the camera shake when shooting a slightly dark indoor scene or a telephoto. Program Auto Hand-held Twilight* Anti Motion Blur* Manual Exposure Shutter Priority Aperture...
... blur without using a tripod. Adjusts the shutter speed to customize settings, except for the camcorder as a whole, or execute functions such as recording, playback, or other operations. Reduces the camera shake when shooting a slightly dark indoor scene or a telephoto. Program Auto Hand-held Twilight* Anti Motion Blur* Manual Exposure Shutter Priority Aperture...
Handycam® Handbook
Page 11
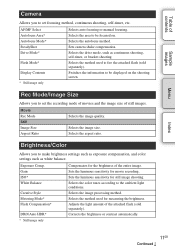
... of the attached flash (sold separately). Index 11GB Continued r Sets camera shake compensation. Gain ISO* White Balance Creative Style Metering Mode* Flash Compensation* DRO/Auto HDR* * Still image only Compensates for movie recording. AF/MF Select Autofocus Area* Autofocus Mode* SteadyShot Drive Mode* ...image. Selects the method used to fire the attached flash (sold separately). Table of contents Sample images Menu Camera Allows you to set the recording mode of movies and the image size of still images. Selects the aspect ratio. Sets the luminous sensitivity ...
... of the attached flash (sold separately). Index 11GB Continued r Sets camera shake compensation. Gain ISO* White Balance Creative Style Metering Mode* Flash Compensation* DRO/Auto HDR* * Still image only Compensates for movie recording. AF/MF Select Autofocus Area* Autofocus Mode* SteadyShot Drive Mode* ...image. Selects the method used to fire the attached flash (sold separately). Table of contents Sample images Menu Camera Allows you to set the recording mode of movies and the image size of still images. Selects the aspect ratio. Sets the luminous sensitivity ...
Handycam® Handbook
Page 12
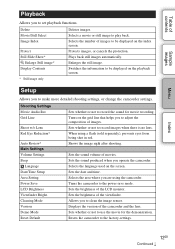
...be displayed on the index screen. Switches the information to be displayed on the playback screen. * Still image only Setup Allows you to record the sound for the demonstration. Shooting Settings Movie Audio Rec Grid Line Shoot w/o Lens Red Eye Reduction* Auto Review* Main Settings Volume .../Time Setup Area Setting Power Save LCD Brightness Viewfinder Bright. Sets the sound produced when you to play back. Turns the camcorder to record images when there is no lens. Sets whether or not to make more detailed shooting settings, or change the camcorder settings. Index 12GB...
...be displayed on the index screen. Switches the information to be displayed on the playback screen. * Still image only Setup Allows you to record the sound for the demonstration. Shooting Settings Movie Audio Rec Grid Line Shoot w/o Lens Red Eye Reduction* Auto Review* Main Settings Volume .../Time Setup Area Setting Power Save LCD Brightness Viewfinder Bright. Sets the sound produced when you to play back. Turns the camcorder to record images when there is no lens. Sets whether or not to make more detailed shooting settings, or change the camcorder settings. Index 12GB...

Handycam® Handbook
Page 13
Selects the method used for assigning file numbers to images. Table of movies when inconsistencies are found. Sample images Menu Index 13GB Repairs the image database file of contents Memory Card Tool Format Recover Image DB File Number* * Still image only Formats the memory card.
Selects the method used for assigning file numbers to images. Table of movies when inconsistencies are found. Sample images Menu Index 13GB Repairs the image database file of contents Memory Card Tool Format Recover Image DB File Number* * Still image only Formats the memory card.

Handycam® Handbook
Page 14
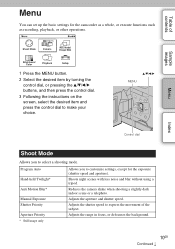
... of contents Sample images Using functions with the buttons on the control panel DISP (Display Contents) Using the button: 1 Press the DISP button repeatedly to recording condition. No Disp. During shooting Display Info. Does not show recording information. Menu Index 14GB Continued r Using the menu: 1 During shooting, MENU button...
... of contents Sample images Using functions with the buttons on the control panel DISP (Display Contents) Using the button: 1 Press the DISP button repeatedly to recording condition. No Disp. During shooting Display Info. Does not show recording information. Menu Index 14GB Continued r Using the menu: 1 During shooting, MENU button...

Handycam® Handbook
Page 15
... image will make the entire histogram shift to the right side, and darker image to the camcorder using an HDMI cable (sold separately) will show recording information. Basic Info Shows recording information. Detail Info Shows detailed...
... image will make the entire histogram shift to the right side, and darker image to the camcorder using an HDMI cable (sold separately) will show recording information. Basic Info Shows recording information. Detail Info Shows detailed...
Handycam® Handbook
Page 16
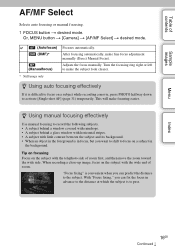
...in focus, but you want to shift to the subject. With "Focus fixing," you can fix the focus in the background. Or, MENU button t [Camera] t [AF/MF Select] t desired mode. (Autofocus) (DMF)* (Manualfocus) * Still image only Focuses automatically. Adjusts the focus manually. This will... make fine focus adjustment manually (Direct Manual Focus). Tip on focusing Focus on a subject while recording a movie, press PHOTO halfway down to pass. "Focus fixing" is difficult to make the subject look clearer. z Using auto focusing ...
...in focus, but you want to shift to the subject. With "Focus fixing," you can fix the focus in the background. Or, MENU button t [Camera] t [AF/MF Select] t desired mode. (Autofocus) (DMF)* (Manualfocus) * Still image only Focuses automatically. Adjusts the focus manually. This will... make fine focus adjustment manually (Direct Manual Focus). Tip on focusing Focus on a subject while recording a movie, press PHOTO halfway down to pass. "Focus fixing" is difficult to make the subject look clearer. z Using auto focusing ...
Handycam® Handbook
Page 17
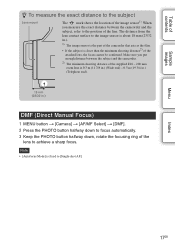
... E18 - 200 mm zoom lens is 0.3 m (11 7/8 in.) (Wide end) - 0.5 m (19 3/4 in.) (Telephoto end). 18 mm (23/32 in.) DMF (Direct Manual Focus) 1 MENU button t [Camera] t [AF/MF Select] t [DMF]. 2 Press the PHOTO button halfway down to focus automatically. 3 Keep the PHOTO button halfway down, rotate the focusing ring of the...
... E18 - 200 mm zoom lens is 0.3 m (11 7/8 in.) (Wide end) - 0.5 m (19 3/4 in.) (Telephoto end). 18 mm (23/32 in.) DMF (Direct Manual Focus) 1 MENU button t [Camera] t [AF/MF Select] t [DMF]. 2 Press the PHOTO button halfway down to focus automatically. 3 Keep the PHOTO button halfway down, rotate the focusing ring of the...

Handycam® Handbook
Page 18
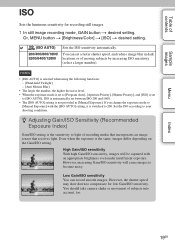
... that incorporates an image sensor that receives light. However, the shutter speed may slow down to be captured with the [Auto] setting. 1 In movie recording mode, GAIN button t desired setting. Or, MENU button t [Brightness/Color] t [Gain] t desired setting. High Gain/ISO sensitivity With high Gain/ISO ...sensitivity, images will cause images to become noisy. Even when the exposure is not provided in dim places. You should take camera shake or movement of subjects into account, too. Select the desired gain value when you change the exposure mode to [Manual Exposure] with...
... that incorporates an image sensor that receives light. However, the shutter speed may slow down to be captured with the [Auto] setting. 1 In movie recording mode, GAIN button t desired setting. Or, MENU button t [Brightness/Color] t [Gain] t desired setting. High Gain/ISO sensitivity With high Gain/ISO ...sensitivity, images will cause images to become noisy. Even when the exposure is not provided in dim places. You should take camera shake or movement of subjects into account, too. Select the desired gain value when you change the exposure mode to [Manual Exposure] with...
Handycam® Handbook
Page 19
... that incorporates an image sensor that receives light. Set the ISO according to compensate for recording still images. 1 In still image recording mode, GAIN button t desired setting. You should take camera shake or movement of moving subjects by increasing ISO sensitivity (select a larger number). Table of contents Sample images Menu ISO Sets the... can set between ISO 200 and 1600. • The [ISO AUTO] setting is the same, images differ depending on the Gain/ISO setting. You can record smooth images.
... that incorporates an image sensor that receives light. Set the ISO according to compensate for recording still images. 1 In still image recording mode, GAIN button t desired setting. You should take camera shake or movement of moving subjects by increasing ISO sensitivity (select a larger number). Table of contents Sample images Menu ISO Sets the... can set between ISO 200 and 1600. • The [ISO AUTO] setting is the same, images differ depending on the Gain/ISO setting. You can record smooth images.

Handycam® Handbook
Page 20
z Adjusting the exposure for better looking images Overexposure = too much light Whitish image m Set [Exposure Comp.] toward +. Index 20GB Correct exposure M Set [Exposure Comp.] toward -. Or, MENU button t [Brightness/Color] t [Exposure Comp.] t desired value. To make photos of food look more appealing, shoot the food a little brighter than usual and try to use a flash (sold separately), you to capture the sky in brighter tones, set a +-side exposure compensation. Table of -2.0 EV to +2.0 EV. 1 (Exposure Comp.) button t desired value. You can adjust the exposure in 1/3...
z Adjusting the exposure for better looking images Overexposure = too much light Whitish image m Set [Exposure Comp.] toward +. Index 20GB Correct exposure M Set [Exposure Comp.] toward -. Or, MENU button t [Brightness/Color] t [Exposure Comp.] t desired value. To make photos of food look more appealing, shoot the food a little brighter than usual and try to use a flash (sold separately), you to capture the sky in brighter tones, set a +-side exposure compensation. Table of -2.0 EV to +2.0 EV. 1 (Exposure Comp.) button t desired value. You can adjust the exposure in 1/3...
