α Handbook
Page 2
...indicates information that is convenient when searching for information by function. Operate the camera in this manual are reproduced images, and are not actual images shot using the camera How to use . Search for information in this handbook In this handbook Click on... a button at upper right on using this camera. Marks and notations used as examples of pictures in the order indicated. Search for information by arrows (t). The default setting is shown by sample...
...indicates information that is convenient when searching for information by function. Operate the camera in this manual are reproduced images, and are not actual images shot using the camera How to use . Search for information in this handbook In this handbook Click on... a button at upper right on using this camera. Marks and notations used as examples of pictures in the order indicated. Search for information by arrows (t). The default setting is shown by sample...
α Handbook
Page 3
Table of contents Sample photo Menu Index Table of contents Notes on using the camera How to use this handbook 2 Sample photo 6 Identifying parts 12 List of icons on the screen 17 Basic operations Operating the camera 20 Menu 22 Shooting images 27 Playing back images 29 Deleting images 31 Using the Photo Creativity function Photo Creativity 32 Bkground Defocus 33 Brightness 34 Color 35 Vividness 36 Picture Effect 37 Using functions with the control wheel DISP (Display Contents 39 (Exposure Comp 41 (Drive Mode 42 ISO (ISO 48 3GB Continued r
Table of contents Sample photo Menu Index Table of contents Notes on using the camera How to use this handbook 2 Sample photo 6 Identifying parts 12 List of icons on the screen 17 Basic operations Operating the camera 20 Menu 22 Shooting images 27 Playing back images 29 Deleting images 31 Using the Photo Creativity function Photo Creativity 32 Bkground Defocus 33 Brightness 34 Color 35 Vividness 36 Picture Effect 37 Using functions with the control wheel DISP (Display Contents 39 (Exposure Comp 41 (Drive Mode 42 ISO (ISO 48 3GB Continued r
α Handbook
Page 4
Table of contents Sample photo Menu Index Using functions with the W/T (zoom) lever Zoom 49 (Image Index 51 Using functions in the menu Shoot Mode 22 Camera 23 Image Size 23 Brightness/Color 24 Playback 24 Setup 24 Connecting with other equipment Viewing images on a TV 162 Using with your computer 164 Installing the software 166 Connecting the camera to the computer 168 Creating a movie disc 170 Printing still images 174 Troubleshooting Troubleshooting 175 Warning messages 182 4GB Continued r
Table of contents Sample photo Menu Index Using functions with the W/T (zoom) lever Zoom 49 (Image Index 51 Using functions in the menu Shoot Mode 22 Camera 23 Image Size 23 Brightness/Color 24 Playback 24 Setup 24 Connecting with other equipment Viewing images on a TV 162 Using with your computer 164 Installing the software 166 Connecting the camera to the computer 168 Creating a movie disc 170 Printing still images 174 Troubleshooting Troubleshooting 175 Warning messages 182 4GB Continued r
α Handbook
Page 12
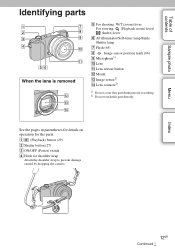
...parentheses for details on operation for shoulder strap Attach the shoulder strap to prevent damage caused by dropping the camera. Table of contents Sample photo Identifying parts When the lens is removed E For shooting: W/T (zoom) lever For viewing: (Playback zoom) lever/ ...(Index) lever F AF illuminator/Self-timer lamp/Smile Shutter lamp G Flash (65) H Image sensor position mark (66) I Microphone1) J Lens K Lens release button L Mount M Image sensor2) N Lens contacts2) 1) Do not cover this part during movie recording. 2) Do not touch this part directly. ...
...parentheses for details on operation for shoulder strap Attach the shoulder strap to prevent damage caused by dropping the camera. Table of contents Sample photo Identifying parts When the lens is removed E For shooting: W/T (zoom) lever For viewing: (Playback zoom) lever/ ...(Index) lever F AF illuminator/Self-timer lamp/Smile Shutter lamp G Flash (65) H Image sensor position mark (66) I Microphone1) J Lens K Lens release button L Mount M Image sensor2) N Lens contacts2) 1) Do not cover this part during movie recording. 2) Do not touch this part directly. ...
α Handbook
Page 17
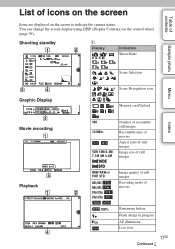
...using DISP (Display Contents) on the screen to indicate the camera status. Shooting standby A Display P A S M Indication Shoot Mode Scene Selection Sample photo Menu Graphic Display Scene Recognition icon Memory card/Upload Index Movie recording 100 123Min 16M 14M 8.4M 7.1M 4M 3.4M Number of recordable ...still images Recordable time of movies Aspect ratio of still images Image size of still images Playback RAW RAW+J FINE STD 60i/50i 60i/50i 24p/25p 24p/25p 100% Image quality of still images Recording mode of icons on the screen Icons are...
...using DISP (Display Contents) on the screen to indicate the camera status. Shooting standby A Display P A S M Indication Shoot Mode Scene Selection Sample photo Menu Graphic Display Scene Recognition icon Memory card/Upload Index Movie recording 100 123Min 16M 14M 8.4M 7.1M 4M 3.4M Number of recordable ...still images Recordable time of movies Aspect ratio of still images Image size of still images Playback RAW RAW+J FINE STD 60i/50i 60i/50i 24p/25p 24p/25p 100% Image quality of still images Recording mode of icons on the screen Icons are...
α Handbook
Page 18
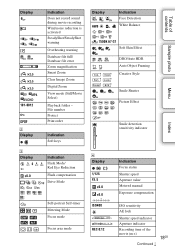
... speed Aperture value Metered manual Exposure compensation ISO sensitivity AE lock Shutter speed indicator Aperture indicator Recording time of the movie (m:s) Continued r 18GB Index Menu Sample photo Table of contents Display 101-0012 B Display C Display ±0.0 Indication Does not record sound during movie recording Wind noise reduction is activated SteadyShot/SteadyShot...
... speed Aperture value Metered manual Exposure compensation ISO sensitivity AE lock Shutter speed indicator Aperture indicator Recording time of the movie (m:s) Continued r 18GB Index Menu Sample photo Table of contents Display 101-0012 B Display C Display ±0.0 Indication Does not record sound during movie recording Wind noise reduction is activated SteadyShot/SteadyShot...
α Handbook
Page 19
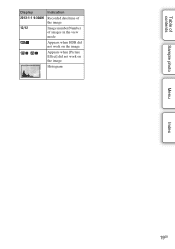
Appears when [Picture Effect] did not work on the image. Table of contents Display Indication 2013-1-1 9:30AM Recorded date/time of the image 12/12 Image number/Number of images in the view mode Appears when HDR did not work on the image. Histogram Sample photo Menu Index 19GB
Appears when [Picture Effect] did not work on the image. Table of contents Display Indication 2013-1-1 9:30AM Recorded date/time of the image 12/12 Image number/Number of images in the view mode Appears when HDR did not work on the image. Histogram Sample photo Menu Index 19GB
α Handbook
Page 22
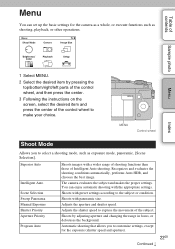
... Superior Auto Intelligent Auto Scene Selection Sweep Panorama Manual Exposure Shutter Priority Aperture Priority Program Auto Shoots images with preset settings according to make your choice. Recognizes and evaluates the shooting conditions automatically, performs Auto HDR, and chooses... the best image. Adjusts the shutter speed to select a shooting mode, such as shooting, playback, or other operations. Adjusts the aperture and shutter speed. Sample photo Menu Index 1 Select MENU. 2 Select the desired item...
... Superior Auto Intelligent Auto Scene Selection Sweep Panorama Manual Exposure Shutter Priority Aperture Priority Program Auto Shoots images with preset settings according to make your choice. Recognizes and evaluates the shooting conditions automatically, performs Auto HDR, and chooses... the best image. Adjusts the shutter speed to select a shooting mode, such as shooting, playback, or other operations. Adjusts the aperture and shutter speed. Sample photo Menu Index 1 Select MENU. 2 Select the desired item...

α Handbook
Page 23
... access all shooting tips. Selects AVCHD or MP4. Index 23GB Continued r Selects the image size, frame rate, and image quality of panoramic images. Each time the camera detects a smile, the camera releases the shutter automatically. Detects... people's faces automatically, and adjusts focus and exposure to fire the flash. Selects the area to be displayed on a subject while tracking it. Allows you to select the kind of contents Sample...
... access all shooting tips. Selects AVCHD or MP4. Index 23GB Continued r Selects the image size, frame rate, and image quality of panoramic images. Each time the camera detects a smile, the camera releases the shutter automatically. Detects... people's faces automatically, and adjusts focus and exposure to fire the flash. Selects the area to be displayed on a subject while tracking it. Allows you to select the kind of contents Sample...

α Handbook
Page 24
...amount of movies. Delete Still/Movie Select Slide Show Specify Printing Image Index Enlarge Image Rotate Protect Volume Settings DiusrpinlagypClaoynbteacnkts Deletes images. Selects the images to the ambient light conditions. Protects images, or cancels the protection. Sets the sound volume of flash light... express a unique atmosphere. Table of contents Sample photo Brightness/Color Allows you to make more detailed shooting settings, or change the camera settings. Sets the ISO sensitivity. Plays back images automatically. Rotates images. Menu Index Setup Allows you press the...
...amount of movies. Delete Still/Movie Select Slide Show Specify Printing Image Index Enlarge Image Rotate Protect Volume Settings DiusrpinlagypClaoynbteacnkts Deletes images. Selects the images to the ambient light conditions. Protects images, or cancels the protection. Sets the sound volume of flash light... express a unique atmosphere. Table of contents Sample photo Brightness/Color Allows you to make more detailed shooting settings, or change the camera settings. Sets the ISO sensitivity. Plays back images automatically. Rotates images. Menu Index Setup Allows you press the...

α Handbook
Page 25
...the soft key or the right side of the screen. Reduces the color deviation at the corners of images. Selects a first-displayed menu from the top menu or the last menu screen. Assigns functions to... Lens Comp.: Chro. This feature can reduce the camera-shake when shooting self-portrait. Displays an enlarged image when focusing manually. Sets camera-shake compensation. Sets whether or not to record sound when recording a movie.... Sets the date and time. Continued r 25GB Index Menu Sample photo Table of time the image will be also available in [Superior Auto] mode.
...the soft key or the right side of the screen. Reduces the color deviation at the corners of images. Selects a first-displayed menu from the top menu or the last menu screen. Assigns functions to... Lens Comp.: Chro. This feature can reduce the camera-shake when shooting self-portrait. Displays an enlarged image when focusing manually. Sets camera-shake compensation. Sets whether or not to record sound when recording a movie.... Sets the date and time. Continued r 25GB Index Menu Sample photo Table of time the image will be also available in [Superior Auto] mode.

α Handbook
Page 26
...Table of the LCD screen. HDMI Resolution Sets the resolution when connected to display wide images. File Number Selects the method to the power save mode. Display Color Selects the color of contents Sample photo Menu Power Saving Start Time Sets the time to turn the camera to use... [Multi]. Version Displays the versions of still images on the memory card. Display Card Space Displays the remaining recording ...
...Table of the LCD screen. HDMI Resolution Sets the resolution when connected to display wide images. File Number Selects the method to the power save mode. Display Color Selects the color of contents Sample photo Menu Power Saving Start Time Sets the time to turn the camera to use... [Multi]. Version Displays the versions of still images on the memory card. Display Card Space Displays the remaining recording ...

α Handbook
Page 27
...for a movie is approximately 29 minutes (limited by product specifications). • The continuous recording time of contents Sample photo Menu Index Shooting images Shooting images with appropriate settings. z On Scene Recognition The Scene Recognition function lets the camera automatically recognize the shooting conditions and... the LCD screen when the scene is recognized. 27GB Continued r To record movies, press the MOVIE button to shoot the image with the settings in effect when you to start recording. The camera makes decisions appropriate to the situation, and adjusts the ...
...for a movie is approximately 29 minutes (limited by product specifications). • The continuous recording time of contents Sample photo Menu Index Shooting images Shooting images with appropriate settings. z On Scene Recognition The Scene Recognition function lets the camera automatically recognize the shooting conditions and... the LCD screen when the scene is recognized. 27GB Continued r To record movies, press the MOVIE button to shoot the image with the settings in effect when you to start recording. The camera makes decisions appropriate to the situation, and adjusts the ...

α Handbook
Page 28
... on the subject automatically, the focus indicator blinks. Focusing in the following a moving quickly. - Focal point moves following situations: - Table of contents Sample photo z Tips for shooting a still image of a subject that is backlit. Cannot focus. • Focusing may be difficult in progress. The subject is locked. Focus indicator Focus indicator z lit...
... on the subject automatically, the focus indicator blinks. Focusing in the following a moving quickly. - Focal point moves following situations: - Table of contents Sample photo z Tips for shooting a still image of a subject that is backlit. Cannot focus. • Focusing may be difficult in progress. The subject is locked. Focus indicator Focus indicator z lit...

α Handbook
Page 29
... on the left , or turn the control wheel clockwise. Table of contents Sample photo Playing back images Plays back the recorded images. 1 Press the (Playback) button. 2 Select the image with the control wheel. 3 To play back panoramic images or movies, press the center of the control wheel. Turn clockwise during pause. You can switch between...
... on the left , or turn the control wheel clockwise. Table of contents Sample photo Playing back images Plays back the recorded images. 1 Press the (Playback) button. 2 Select the image with the control wheel. 3 To play back panoramic images or movies, press the center of the control wheel. Turn clockwise during pause. You can switch between...

α Handbook
Page 30
... range L Approx. ×1.0 - ×13.6 M Approx. ×1.0 - ×9.9 S Approx. ×1.0 - ×6.8 Menu Index 30GB Table of contents Sample photo Enlarged playback A portion of a still image can enlarge playback images from the menu (page 101). 1 Display the image you want to enlarge and then slide the W/T (zoom) lever to the T ( ) side. 2 Adjust the scaling by.... 4 To cancel the enlarged playback, select . z Scaling range The scaling range is convenient to enlarge by pressing the top/bottom/right/left of a recorded still image. This is as follows.
... range L Approx. ×1.0 - ×13.6 M Approx. ×1.0 - ×9.9 S Approx. ×1.0 - ×6.8 Menu Index 30GB Table of contents Sample photo Enlarged playback A portion of a still image can enlarge playback images from the menu (page 101). 1 Display the image you want to enlarge and then slide the W/T (zoom) lever to the T ( ) side. 2 Adjust the scaling by.... 4 To cancel the enlarged playback, select . z Scaling range The scaling range is convenient to enlarge by pressing the top/bottom/right/left of a recorded still image. This is as follows.

α Handbook
Page 31
z Deleting several images at the same time. 31GB Table of contents Sample photo Menu Index Deleting images You can delete the image displayed. 1 While displaying the image you want to delete the image before proceeding. Be sure that you want to delete, select (Delete). 2 Select OK. Select to select and delete several images Select MENU t [Playback] t [Delete] to quit the operation. (Delete) OK Notes • You cannot delete protected images. • Once you have deleted an image, you cannot restore it.
z Deleting several images at the same time. 31GB Table of contents Sample photo Menu Index Deleting images You can delete the image displayed. 1 While displaying the image you want to delete the image before proceeding. Be sure that you want to delete, select (Delete). 2 Select OK. Select to select and delete several images Select MENU t [Playback] t [Delete] to quit the operation. (Delete) OK Notes • You cannot delete protected images. • Once you have deleted an image, you cannot restore it.
α Handbook
Page 32
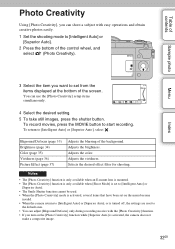
.... • If you turn on the [Photo Creativity] function while [Superior Auto] is activated, the camera does not make a composite image. 32GB To record movies, press the MOVIE button to [Intelligent Auto] or [Superior Auto], select . Table of contents Using the Photo ... (Photo Creativity). To return to start recording. Adjusts the color. Sample photo Menu Index 3 Select the item you can use the [Photo Creativity] setup items simultaneously. 4 Select the desired setting. 5 To take still images, press the shutter button. Adjusts the brightness. Notes • The...
.... • If you turn on the [Photo Creativity] function while [Superior Auto] is activated, the camera does not make a composite image. 32GB To record movies, press the MOVIE button to [Intelligent Auto] or [Superior Auto], select . Table of contents Using the Photo ... (Photo Creativity). To return to start recording. Adjusts the color. Sample photo Menu Index 3 Select the item you can use the [Photo Creativity] setup items simultaneously. 4 Select the desired setting. 5 To take still images, press the shutter button. Adjusts the brightness. Notes • The...

α Handbook
Page 34
Select [AUTO] to restore to the original status. 34GB Table of contents Sample photo Menu Index Brightness You can adjust the brightness easily in [Photo Creativity]. 1 MENU t [Shoot Mode] t [Intelligent Auto] or [Superior Auto]. 2 Select (Photo Creativity). 3 Select [Brightness]. 4 Select the desired brightness. : You can make images brighter. : You can make images darker.
Select [AUTO] to restore to the original status. 34GB Table of contents Sample photo Menu Index Brightness You can adjust the brightness easily in [Photo Creativity]. 1 MENU t [Shoot Mode] t [Intelligent Auto] or [Superior Auto]. 2 Select (Photo Creativity). 3 Select [Brightness]. 4 Select the desired brightness. : You can make images brighter. : You can make images darker.

α Handbook
Page 36
Table of contents Sample photo Menu Index Vividness You can adjust the vividness easily in [Photo Creativity]. 1 MENU t [Shoot Mode] t [Intelligent Auto] or [Superior Auto]. 2 Select (Photo Creativity). 3 Select [Vividness]. 4 Select the desired vividness. : You can make images vivid. : You can make images faint. Select [AUTO] to restore to the original status. 36GB
Table of contents Sample photo Menu Index Vividness You can adjust the vividness easily in [Photo Creativity]. 1 MENU t [Shoot Mode] t [Intelligent Auto] or [Superior Auto]. 2 Select (Photo Creativity). 3 Select [Vividness]. 4 Select the desired vividness. : You can make images vivid. : You can make images faint. Select [AUTO] to restore to the original status. 36GB


