α Handbook
Page 2
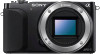
The default setting is convenient when searching for a function you want to use this handbook Click on a button at upper right on using this camera. Indicates cautions and limitations relevant to the correct operation of the camera. This is indicated by . The zmark ...
The default setting is convenient when searching for a function you want to use this handbook Click on a button at upper right on using this camera. Indicates cautions and limitations relevant to the correct operation of the camera. This is indicated by . The zmark ...
α Handbook
Page 12
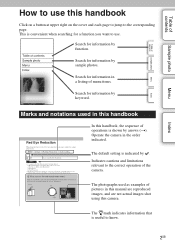
...: (Playback zoom) lever/ (Index) lever F AF illuminator/Self-timer lamp/Smile Shutter lamp G Flash (65) H Image sensor position mark (66) I Microphone1) J Lens K Lens release button L Mount M Image sensor2) N Lens contacts2) 1) Do not cover this part during movie recording. 2) Do not touch this part directly. See the pages in parentheses for... details on operation for shoulder strap Attach the shoulder strap to prevent damage caused by dropping the camera. Menu Index 12GB Continued r A (Playback) button (29) B Shutter button (27) C ON/OFF (Power) switch D Hook for the parts.
...: (Playback zoom) lever/ (Index) lever F AF illuminator/Self-timer lamp/Smile Shutter lamp G Flash (65) H Image sensor position mark (66) I Microphone1) J Lens K Lens release button L Mount M Image sensor2) N Lens contacts2) 1) Do not cover this part during movie recording. 2) Do not touch this part directly. See the pages in parentheses for... details on operation for shoulder strap Attach the shoulder strap to prevent damage caused by dropping the camera. Menu Index 12GB Continued r A (Playback) button (29) B Shutter button (27) C ON/OFF (Power) switch D Hook for the parts.

α Handbook
Page 13
... the screw of the tripod once and adjust the angle of the LCD screen. F Charge lamp G Memory card insertion slot H HDMI micro jack (162) I MOVIE button (27) J Soft key A (21) K Control wheel (20) L Soft key C (21) M Soft key B (21) z LCD screen • You can adjust the LCD screen to an easily..., you may not be able to adjust the angle of the LCD screen. 13GB Continued r Table of contents Sample photo Menu Index A (Flash pop-up) button (65) B LCD screen C Access lamp D Memory card/terminal cover E Multi/Micro USB Terminal (168) Supports Micro USB compatible device.
... the screw of the tripod once and adjust the angle of the LCD screen. F Charge lamp G Memory card insertion slot H HDMI micro jack (162) I MOVIE button (27) J Soft key A (21) K Control wheel (20) L Soft key C (21) M Soft key B (21) z LCD screen • You can adjust the LCD screen to an easily..., you may not be able to adjust the angle of the LCD screen. 13GB Continued r Table of contents Sample photo Menu Index A (Flash pop-up) button (65) B LCD screen C Access lamp D Memory card/terminal cover E Multi/Micro USB Terminal (168) Supports Micro USB compatible device.

α Handbook
Page 15
...Focusing ring change according to the Zooming/Focusing ring (Autofocus) Zoom (DMF (Direct manual focus)) Before pressing the shutter button halfway down: Zoom While pressing the shutter button halfway down: Focus (Manual Focus) Focus Menu Index 15GB Continued r AF/MF Select Function assigned to the [AF.../MF Select] settings (page 66). Table of contents Sample photo Lens E PZ 16-50 mm F3.5-5.6 OSS (supplied with NEX-3NL/3NY) A Zooming...
...Focusing ring change according to the Zooming/Focusing ring (Autofocus) Zoom (DMF (Direct manual focus)) Before pressing the shutter button halfway down: Zoom While pressing the shutter button halfway down: Focus (Manual Focus) Focus Menu Index 15GB Continued r AF/MF Select Function assigned to the [AF.../MF Select] settings (page 66). Table of contents Sample photo Lens E PZ 16-50 mm F3.5-5.6 OSS (supplied with NEX-3NL/3NY) A Zooming...

α Handbook
Page 21
... different roles, depending on the screen. To use the function shown at the center, press the center of the control wheel (soft key C). Tips) button. Sample photo Menu Index When options are indicated by turning or pressing the top/bottom/ right/left parts of the screen, press soft key A. Press... the center to the soft key B (page 133). In this case, soft key A works as the MENU (Menu) button, and soft C key B as (Shoot. Table of contents When you turn or press the top/bottom/right/left parts of the control wheel. The assigned...
... different roles, depending on the screen. To use the function shown at the center, press the center of the control wheel (soft key C). Tips) button. Sample photo Menu Index When options are indicated by turning or pressing the top/bottom/ right/left parts of the screen, press soft key A. Press... the center to the soft key B (page 133). In this case, soft key A works as the MENU (Menu) button, and soft C key B as (Shoot. Table of contents When you turn or press the top/bottom/right/left parts of the control wheel. The assigned...

α Handbook
Page 23
...rate, and image quality of panoramic images. Selects the autofocus method. Keeps the focus on the LCD screen when you press the DISP button. Selects the aspect ratio. Allows you to set shooting functions, such as continuous shooting, self-timer, or bracket shooting. Selects AVCHD ...Autofocus Mode Tracking Focus Face Detection Face Registration Smile Shutter Auto Object Framing Soft Skin Effect Shooting Tip List LCD Display (DISP) DISP Button(Monitor) Selects the drive mode, such as continuous shooting, self-timer, and flash. Detects people's faces automatically, and adjusts focus ...
...rate, and image quality of panoramic images. Selects the autofocus method. Keeps the focus on the LCD screen when you press the DISP button. Selects the aspect ratio. Allows you to set shooting functions, such as continuous shooting, self-timer, or bracket shooting. Selects AVCHD ...Autofocus Mode Tracking Focus Face Detection Face Registration Smile Shutter Auto Object Framing Soft Skin Effect Shooting Tip List LCD Display (DISP) DISP Button(Monitor) Selects the drive mode, such as continuous shooting, self-timer, and flash. Detects people's faces automatically, and adjusts focus ...

α Handbook
Page 24
... the index screen. Enlarges the image. Sets the ISO sensitivity. Selects the method used for the brightness of flash light. Allows you press the shutter button halfway down. Switches the information to prevent eyes from being shot in dim places. Shooting Settings AEL w/ shutter AF Illuminator Red Eye Reduction Live View...
... the index screen. Enlarges the image. Sets the ISO sensitivity. Selects the method used for the brightness of flash light. Allows you press the shutter button halfway down. Switches the information to prevent eyes from being shot in dim places. Shooting Settings AEL w/ shutter AF Illuminator Red Eye Reduction Live View...

α Handbook
Page 25
... Clear Image Zoom Digital Zoom Self-portrait Self-timer S. Auto Image Extract. Aber. AF Micro Adj. Main Settings Menu start MOVIE Button Custom Key Settings Beep Language Date/Time Setup Area Setting Help Guide Display Power Save Turns on or off. Enhances the outline of... the screen. When you operate the camera. Changes the range of the power saving feature. Sets whether or not to activate the MOVIE button. Sets the noise reduction processing for distortion of in [Superior Auto] mode. Compensates for long exposure shootings. Reduces wind noise during tracking ...
... Clear Image Zoom Digital Zoom Self-portrait Self-timer S. Auto Image Extract. Aber. AF Micro Adj. Main Settings Menu start MOVIE Button Custom Key Settings Beep Language Date/Time Setup Area Setting Help Guide Display Power Save Turns on or off. Enhances the outline of... the screen. When you operate the camera. Changes the range of the power saving feature. Sets whether or not to activate the MOVIE button. Sets the noise reduction processing for distortion of in [Superior Auto] mode. Compensates for long exposure shootings. Reduces wind noise during tracking ...

α Handbook
Page 27
... conditions. The camera makes decisions appropriate to start recording. Table of MP4 12M is explained here. To record movies, press the MOVIE button to the situation, and adjusts the settings. 1 Adjust the LCD screen angle, and hold the camera. The Scene Recognition function begins to... work. 2 To take still images, press the shutter button halfway down to shoot. Icon for a movie is approximately 29 minutes (limited by product specifications). • The continuous recording time of contents...
... conditions. The camera makes decisions appropriate to start recording. Table of MP4 12M is explained here. To record movies, press the MOVIE button to the situation, and adjusts the settings. 1 Adjust the LCD screen angle, and hold the camera. The Scene Recognition function begins to... work. 2 To take still images, press the shutter button halfway down to shoot. Icon for a movie is approximately 29 minutes (limited by product specifications). • The continuous recording time of contents...

α Handbook
Page 29
... wheel. Menu Index 29GB Continued r Turn counterclockwise during pause. Table of contents Sample photo Playing back images Plays back the recorded images. 1 Press the (Playback) button. 2 Select the image with the control wheel. 3 To play back panoramic images or movies, press the center of the control wheel. z Displaying a desired folder To...
... wheel. Menu Index 29GB Continued r Turn counterclockwise during pause. Table of contents Sample photo Playing back images Plays back the recorded images. 1 Press the (Playback) button. 2 Select the image with the control wheel. 3 To play back panoramic images or movies, press the center of the control wheel. z Displaying a desired folder To...
α Handbook
Page 32
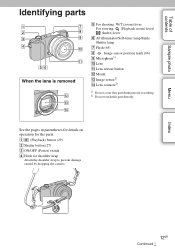
... ones. • You can use the [Photo Creativity] setup items simultaneously. 4 Select the desired setting. 5 To take still images, press the shutter button. To record movies, press the MOVIE button to [Intelligent Auto] or [Superior Auto], select . Adjusts the brightness. Selects the desired effect filter for shooting. Notes • The [Photo Creativity...
... ones. • You can use the [Photo Creativity] setup items simultaneously. 4 Select the desired setting. 5 To take still images, press the shutter button. To record movies, press the MOVIE button to [Intelligent Auto] or [Superior Auto], select . Adjusts the brightness. Selects the desired effect filter for shooting. Notes • The [Photo Creativity...

α Handbook
Page 40
... in addition to recording information. During playback Display Info. Flashing R (red) Luminance • If the image has a loss of details in shooting mode with [DISP Button(Monitor)] (page 78). Table of contents Sample photo Menu z Setting the screen display modes to be available You can select which LCD screen display modes...
... in addition to recording information. During playback Display Info. Flashing R (red) Luminance • If the image has a loss of details in shooting mode with [DISP Button(Monitor)] (page 78). Table of contents Sample photo Menu z Setting the screen display modes to be available You can select which LCD screen display modes...
α Handbook
Page 42
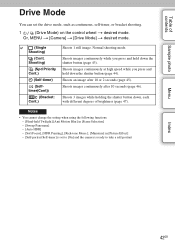
... Mode You can set to [On] and the camera is ready to take a self-portrait Menu Index 42GB Shoots 3 images while holding the shutter button down the shutter button (page 44). Or, MENU t [Camera] t [Drive Mode] t desired mode. (Single Shooting) (Cont. Shoots images continuously while you press and hold down the shutter...
... Mode You can set to [On] and the camera is ready to take a self-portrait Menu Index 42GB Shoots 3 images while holding the shutter button down the shutter button (page 44). Or, MENU t [Camera] t [Drive Mode] t desired mode. (Single Shooting) (Cont. Shoots images continuously while you press and hold down the shutter...
α Handbook
Page 43
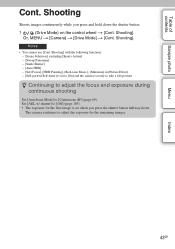
Set [AEL w/ shutter] to [Off] (page 105). • The exposure for the remaining images. Shooting Shoots images continuously while you press the shutter button halfway down the shutter button. 1 (Drive Mode) on the control wheel t [Cont. Shooting]. Menu Index 43GB Shooting] with the following functions: - [Scene Selection], excluding [Sports Action] - [Sweep Panorama] - [Smile...
Set [AEL w/ shutter] to [Off] (page 105). • The exposure for the remaining images. Shooting Shoots images continuously while you press the shutter button halfway down the shutter button. 1 (Drive Mode) on the control wheel t [Cont. Shooting]. Menu Index 43GB Shooting] with the following functions: - [Scene Selection], excluding [Sports Action] - [Sweep Panorama] - [Smile...
α Handbook
Page 44
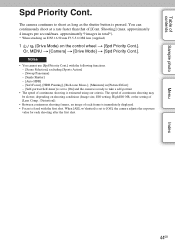
... on the control wheel t [Spd Priority Cont.]. approximately 9 images in [Picture Effect] - [Self-portrait Self-timer] is set to shoot as long as the shutter button is pressed. You can continuously shoot at a rate faster than that of contents Sample photo Spd Priority Cont. Or, MENU t [Camera] t [Drive Mode] t [Spd Priority...
... on the control wheel t [Spd Priority Cont.]. approximately 9 images in [Picture Effect] - [Self-portrait Self-timer] is set to shoot as long as the shutter button is pressed. You can continuously shoot at a rate faster than that of contents Sample photo Spd Priority Cont. Or, MENU t [Camera] t [Drive Mode] t [Spd Priority...
α Handbook
Page 45
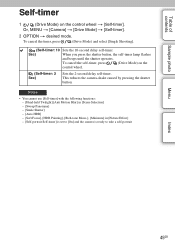
... [Single Shooting]. (Self-timer: 10 Sets the 10-second delay self-timer. This reduces the camera-shake caused by pressing the shutter button. Sec) When you press the shutter button, the self-timer lamp flashes and beeps until the shutter operates. Notes • You cannot use [Self-timer] with the following functions...
... [Single Shooting]. (Self-timer: 10 Sets the 10-second delay self-timer. This reduces the camera-shake caused by pressing the shutter button. Sec) When you press the shutter button, the self-timer lamp flashes and beeps until the shutter operates. Notes • You cannot use [Self-timer] with the following functions...
α Handbook
Page 46
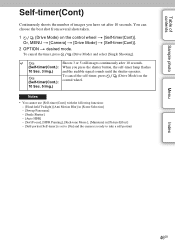
... to take a self-portrait Menu Index 46GB Table of contents Sample photo Self-timer(Cont) Continuously shoots the number of images you press the shutter button, the self-timer lamp flashes and the audible signal sounds until the shutter operates. You can choose the best shot from several shots taken. 1 (Drive...
... to take a self-portrait Menu Index 46GB Table of contents Sample photo Self-timer(Cont) Continuously shoots the number of images you press the shutter button, the self-timer lamp flashes and the audible signal sounds until the shutter operates. You can choose the best shot from several shots taken. 1 (Drive...
α Handbook
Page 47
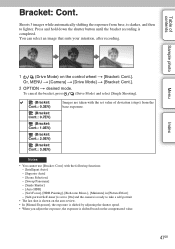
... automatically shifting the exposure from the base exposure. You can select an image that suits your intention, after recording. Press and hold down the shutter button until the bracket recording is completed. To cancel the bracket, press (Drive Mode) and select [Single Shooting]. (Bracket: Cont.: 0.3EV) (Bracket: Cont.: 0.7EV) (Bracket: Cont...
... automatically shifting the exposure from the base exposure. You can select an image that suits your intention, after recording. Press and hold down the shutter button until the bracket recording is completed. To cancel the bracket, press (Drive Mode) and select [Single Shooting]. (Bracket: Cont.: 0.3EV) (Bracket: Cont.: 0.7EV) (Bracket: Cont...
α Handbook
Page 50
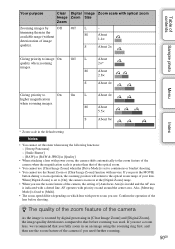
... camera shifts automatically to the zoom feature of the camera when the magnification scale is greater than that before shooting. If you press the MOVIE button during a zoom operation, the zooming position will return to the optical zoom range of image quality). Also, [Metering Mode] is set to [On], the camera...
... camera shifts automatically to the zoom feature of the camera when the magnification scale is greater than that before shooting. If you press the MOVIE button during a zoom operation, the zooming position will return to the optical zoom range of image quality). Also, [Metering Mode] is set to [On], the camera...

α Handbook
Page 51
..., and then press the top/bottom parts of contents Sample photo Menu Index Image Index Displays multiple images at the same time. 1 Press the (Playback) button to switch to the playback mode. 2 Slide the W/T (zoom) lever to a 12-image index by pressing the center of the control wheel.
..., and then press the top/bottom parts of contents Sample photo Menu Index Image Index Displays multiple images at the same time. 1 Press the (Playback) button to switch to the playback mode. 2 Slide the W/T (zoom) lever to a 12-image index by pressing the center of the control wheel.

