Operating Instructions (primary manual)
Page 4
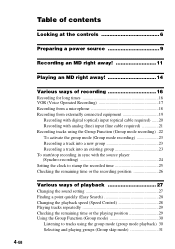
... at the controls 6 Preparing a power source 9 Recording an MD right away 11 Playing an MD right away 14 Various ways of recording 16 Recording for long times 16 VOR (Voice Operated Recording 17 Recording from a microphone 18 Recording from externally connected equipment 19 Recording with digital (optical) input (optical cable required) ......20 Recording with analog (line) input (line cable required...
... at the controls 6 Preparing a power source 9 Recording an MD right away 11 Playing an MD right away 14 Various ways of recording 16 Recording for long times 16 VOR (Voice Operated Recording 17 Recording from a microphone 18 Recording from externally connected equipment 19 Recording with digital (optical) input (optical cable required) ......20 Recording with analog (line) input (line cable required...
Operating Instructions (primary manual)
Page 7
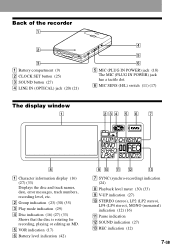
Back of the recorder 1 2 3 A Battery compartment (9) B CLOCK SET button (25) C SOUND button (27) D LINE IN (OPTICAL) jack (20) (21) 4 5 6 E MIC ...) (30) (35) C Play mode indication (29) D Disc indication (16) (27) (33) Shows that the disc is rotating for recording, playing or editing an MD. qa qs qd G SYNC (synchro-recording) indication (24) H Playback level meter (30) (33) I V-UP indication (27) J STEREO (stereo), LP2 (LP2 stereo), LP4 (... 5 6 7 8 A Character information display (16) (27) (33) Displays the disc and track names, date, error messages, track numbers, recording level, etc.
Back of the recorder 1 2 3 A Battery compartment (9) B CLOCK SET button (25) C SOUND button (27) D LINE IN (OPTICAL) jack (20) (21) 4 5 6 E MIC ...) (30) (35) C Play mode indication (29) D Disc indication (16) (27) (33) Shows that the disc is rotating for recording, playing or editing an MD. qa qs qd G SYNC (synchro-recording) indication (24) H Playback level meter (30) (33) I V-UP indication (27) J STEREO (stereo), LP2 (LP2 stereo), LP4 (... 5 6 7 8 A Character information display (16) (27) (33) Displays the disc and track names, date, error messages, track numbers, recording level, etc.
Operating Instructions (primary manual)
Page 11
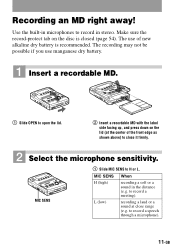
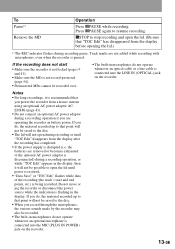
... not be possible if you use of the front edge as shown above) to record a meeting). MIC SENS When H (high) recording a soft or a sound in stereo. Use the built-in microphones to open the lid. 2 Insert a recordable MD with the label side facing up, and press down on the disc is recommended. to H or...
... not be possible if you use of the front edge as shown above) to record a meeting). MIC SENS When H (high) recording a soft or a sound in stereo. Use the built-in microphones to open the lid. 2 Insert a recordable MD with the label side facing up, and press down on the disc is recommended. to H or...
Operating Instructions (primary manual)
Page 12
... indicator lights up in the display. To monitor the sound during recording. Press zREC so that the recorder changes to i. For details, see "Recording for long times" (page 16). built-in progress. 4 Record an MD. If the disc is normal stereo. To stop the recorder, the recorder will automatically turn off after about 10 seconds (when using...
... indicator lights up in the display. To monitor the sound during recording. Press zREC so that the recorder changes to i. For details, see "Recording for long times" (page 16). built-in progress. 4 Record an MD. If the disc is normal stereo. To stop the recorder, the recorder will automatically turn off after about 10 seconds (when using...
Operating Instructions (primary manual)
Page 13
... a line cable is not record-protected (page 54). • Premastered MDs cannot be recorded. • The built-in the display, then it is being recorded. If you do, the material recorded up to that point will not be possible to resume recording. the batteries are removed or...disconnected) during a recording operation if you are not added while recording with microphones, even when the recorder is connected into the LINE IN (OPTICAL) jack on the recorder. Track marks are operating the recorder on the recorder. 13-GB To Pause1) Remove the MD Operation Press XPAUSE while...
... a line cable is not record-protected (page 54). • Premastered MDs cannot be recorded. • The built-in the display, then it is being recorded. If you do, the material recorded up to that point will not be possible to resume recording. the batteries are removed or...disconnected) during a recording operation if you are not added while recording with microphones, even when the recorder is connected into the LINE IN (OPTICAL) jack on the recorder. Track marks are operating the recorder on the recorder. 13-GB To Pause1) Remove the MD Operation Press XPAUSE while...
Operating Instructions (primary manual)
Page 14
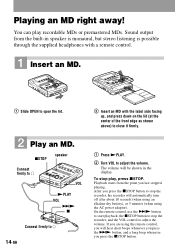
...>N x Connect firmly to i 14-GB 2 Insert an MD with a remote control. 1 Insert an MD. 1 Slide OPEN to stop play recordable MDs or premastered MDs. Playing an MD right away! If you are using the AC power adaptor). To stop the recorder, the recorder will be shown in speaker is monaural, but stereo listening is... press xSTOP. After you press the xSTOP button to open the lid. 2 Play an MD. On the remote control, use the >N button to start playback, the xSTOP button to stop the recorder, and the VOL control to adjust the volume. The volume will automatically turn off after ...
...>N x Connect firmly to i 14-GB 2 Insert an MD with a remote control. 1 Insert an MD. 1 Slide OPEN to stop play recordable MDs or premastered MDs. Playing an MD right away! If you are using the AC power adaptor). To stop the recorder, the recorder will be shown in speaker is monaural, but stereo listening is... press xSTOP. After you press the xSTOP button to open the lid. 2 Play an MD. On the remote control, use the >N button to start playback, the xSTOP button to stop the recorder, and the VOL control to adjust the volume. The volume will automatically turn off after ...

Operating Instructions (primary manual)
Page 15
...while playing Press and hold >CUE/ AMS. Press and hold .. Remove the MD Press xSTOP and open the lid.3) Press x. (One short beep) 1) If you press .REVIEW/AMS during the first track of the disc, the recorder goes to the beginning of the last track on the disc. 2) If ... To locate a point quickly Use the EASY SEARCH +/- the batteries are removed or become exhausted or the optional AC power adaptor is disconnected) when the recorder is not locked (pages 9 and 41). repeatedly until you reach the beginning of Press >CUE/AMS. the next track2) Press >N. (Two short beeps...
...while playing Press and hold >CUE/ AMS. Press and hold .. Remove the MD Press xSTOP and open the lid.3) Press x. (One short beep) 1) If you press .REVIEW/AMS during the first track of the disc, the recorder goes to the beginning of the last track on the disc. 2) If ... To locate a point quickly Use the EASY SEARCH +/- the batteries are removed or become exhausted or the optional AC power adaptor is disconnected) when the recorder is not locked (pages 9 and 41). repeatedly until you reach the beginning of Press >CUE/AMS. the next track2) Press >N. (Two short beeps...
Operating Instructions (primary manual)
Page 16
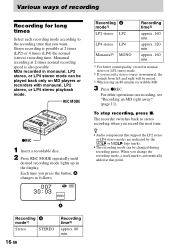
... from left and right will be mixed. 3) When using an 80-minute recordable MD 3 Press zREC. For other operations on MD players or recorders with monaural, LP2 stereo, or LP4 stereo playback mode. Stereo recording is also possible. The recorder switches back to the recording time that support the LP2 stereo or LP4 stereo modes are indicated...
... from left and right will be mixed. 3) When using an 80-minute recordable MD 3 Press zREC. For other operations on MD players or recorders with monaural, LP2 stereo, or LP4 stereo playback mode. Stereo recording is also possible. The recorder switches back to the recording time that support the LP2 stereo or LP4 stereo modes are indicated...
Operating Instructions (primary manual)
Page 18
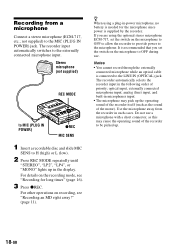
... IN POWER) jack. Do not use . optical input, externally connected microphone input, analog (line) input, and built-in the display. For other operations on the recording mode, see "Recording an MD right away!" (page 11). It is recommended that you are using a plug-in the following order of the...
... IN POWER) jack. Do not use . optical input, externally connected microphone input, analog (line) input, and built-in the display. For other operations on the recording mode, see "Recording an MD right away!" (page 11). It is recommended that you are using a plug-in the following order of the...
Operating Instructions (primary manual)
Page 19
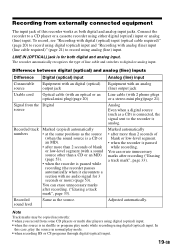
...a CD player or a cassette recorder using analog (line) input. Marked automatically • after recording ("Erasing a track mark", page 33). You can erase unnecessary marks after more than a CD or an MD) (page 53). • when the recorder is paused while recording. You can erase unnecessary marks ...after more ) (page 53). Note Track marks may be copied incorrectly: • when you record from some CD players or multi disc players...
...a CD player or a cassette recorder using analog (line) input. Marked automatically • after recording ("Erasing a track mark", page 33). You can erase unnecessary marks after more than a CD or an MD) (page 53). • when the recorder is paused while recording. You can erase unnecessary marks ...after more ) (page 53). Note Track marks may be copied incorrectly: • when you record from some CD players or multi disc players...
Operating Instructions (primary manual)
Page 20
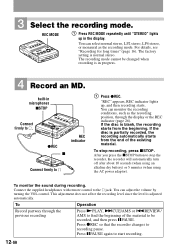
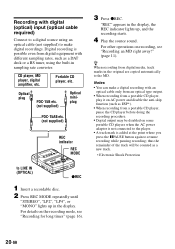
...digital media, track marks in the display. Digital recording is added at the point where you press the XPAUSE button again to the MD. For details on recording, see "Recording for long times" (page 16). 20-GB z When recording from digital equipment with different sampling rates, such... to LINE IN (OPTICAL) zREC 1 Insert a recordable disc. 2 Press REC MODE repeatedly until "STEREO", "LP2", "LP4", or "MONO" lights up , and the recording starts. 4 Play the source sound. For other operations on the recording mode, see "Recording an MD right away!" (page 11). "REC" appears in...
...digital media, track marks in the display. Digital recording is added at the point where you press the XPAUSE button again to the MD. For details on recording, see "Recording for long times" (page 16). 20-GB z When recording from digital equipment with different sampling rates, such... to LINE IN (OPTICAL) zREC 1 Insert a recordable disc. 2 Press REC MODE repeatedly until "STEREO", "LP2", "LP4", or "MONO" lights up , and the recording starts. 4 Play the source sound. For other operations on the recording mode, see "Recording an MD right away!" (page 11). "REC" appears in...
Operating Instructions (primary manual)
Page 21
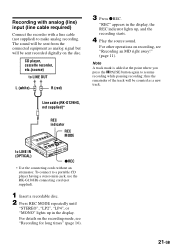
... without an attenuator. thus the remainder of the track will be counted as analog signal but will be sent recorded digitally on the recording mode, see "Recording an MD right away!" (page 11). CD player, cassette recorder, etc.(source) to a portable CD player having a stereo mini-jack, use the RK-G136HG connecting cord (not supplied...
... without an attenuator. thus the remainder of the track will be counted as analog signal but will be sent recorded digitally on the recording mode, see "Recording an MD right away!" (page 11). CD player, cassette recorder, etc.(source) to a portable CD player having a stereo mini-jack, use the RK-G136HG connecting cord (not supplied...
Operating Instructions (primary manual)
Page 22
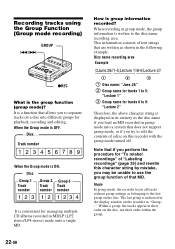
Disc Group 1 Track number Group 2 Group 3 Track Track number number 123 12 1234 It is convenient for managing multiple CD albums recorded in MDLP (LP2 stereo/LP4 stereo) mode onto a single MD. 1 2 3 1 Disc name: "June.26" 2 Group name for tracks 1 to 5: "Lecture 1" 3 Group name for tracks 6 to 9: "Lecture 2" Therefore, the above character string...
Disc Group 1 Track number Group 2 Group 3 Track Track number number 123 12 1234 It is convenient for managing multiple CD albums recorded in MDLP (LP2 stereo/LP4 stereo) mode onto a single MD. 1 2 3 1 Disc name: "June.26" 2 Group name for tracks 1 to 5: "Lecture 1" 3 Group name for tracks 6 to 9: "Lecture 2" Therefore, the above character string...

Operating Instructions (primary manual)
Page 23
... GROUP for 2 seconds or more again. To continue the procedure, do the procedure from step 4. • If you select "Group --" in step 2, the recorded material will be canceled when you eject the MD. z • The track will be automatically stored as a new group. To activate the group mode (Group mode... recording) To record tracks in group mode, you must first turn the group mode on the group skip mode, see page 31. • To add a...
... GROUP for 2 seconds or more again. To continue the procedure, do the procedure from step 4. • If you select "Group --" in step 2, the recorded material will be canceled when you eject the MD. z • The track will be automatically stored as a new group. To activate the group mode (Group mode... recording) To record tracks in group mode, you must first turn the group mode on the group skip mode, see page 31. • To add a...

Operating Instructions (primary manual)
Page 24
...-GB 3 Press zREC. Notes • Do not switch the SYNCHRO REC switch after step 3. Before synchro-recording, make connections to the LINE IN (OPTICAL) jack on an MD. REC MODE zREC SYNCHRO REC 1 Press REC MODE repeatedly until "STEREO", "LP2", "LP4", or "MONO" lights up in the display. 007 30:03 Synchro...
...-GB 3 Press zREC. Notes • Do not switch the SYNCHRO REC switch after step 3. Before synchro-recording, make connections to the LINE IN (OPTICAL) jack on an MD. REC MODE zREC SYNCHRO REC 1 Press REC MODE repeatedly until "STEREO", "LP2", "LP4", or "MONO" lights up in the display. 007 30:03 Synchro...

Operating Instructions (primary manual)
Page 25
...a mistake while setting the clock Press xSTOP, and set the clock again from step 1. Setting the clock to stamp the recorded time To stamp the date and time on the MD when you record, you first need to set the clock. ./> xSTOP NPLAY CLOCK SET (bottom) 1 Press CLOCK SET at the button of...z You can skip a step by about plus or minus 2 minutes per month. 25-GB Notes • Make sure the time is not operating or while recording, press DISPLAY repeatedly until the current time appears in the display. The digits of the month flashes. 4 Repeat step 2 and 3 to enter the year. or...
...a mistake while setting the clock Press xSTOP, and set the clock again from step 1. Setting the clock to stamp the recorded time To stamp the date and time on the MD when you record, you first need to set the clock. ./> xSTOP NPLAY CLOCK SET (bottom) 1 Press CLOCK SET at the button of...z You can skip a step by about plus or minus 2 minutes per month. 25-GB Notes • Make sure the time is not operating or while recording, press DISPLAY repeatedly until the current time appears in the display. The digits of the month flashes. 4 Repeat step 2 and 3 to enter the year. or...

Operating Instructions (primary manual)
Page 31
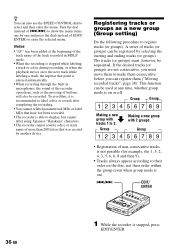
... until your desired group appears, and then press EDIT/ENTER. When the group mode is off . The recorder starts playing from the first track in the display and the group skip mode turns on the MD. " " flashes in the group. Selecting and playing groups (Group skip mode) When playing a disc with a disc... on : Disc Group 1 Group 2 Group 3 Track number Track Track number number 123 12 12 Skip Skip Skip 1 Insert a disc which has group settings into the recorder and play the disc, and then press GROUP slightly.
... until your desired group appears, and then press EDIT/ENTER. When the group mode is off . The recorder starts playing from the first track in the display and the group skip mode turns on the MD. " " flashes in the group. Selecting and playing groups (Group skip mode) When playing a disc with a disc... on : Disc Group 1 Group 2 Group 3 Track number Track Track number number 123 12 12 Skip Skip Skip 1 Insert a disc which has group settings into the recorder and play the disc, and then press GROUP slightly.
Operating Instructions (primary manual)
Page 32
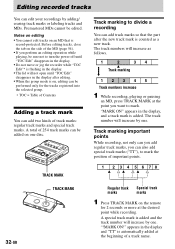
...marking to mark the position of 254 track marks can edit your recordings by adding/ erasing track marks or labeling tracks and MDs. The track numbers will increase by one disc. Track marking important points While recording, not only can you add regular track marks, you perform an.... "MARK ON" appears in the display and "TT" is counted as follows. 1 2 34 Track marking 12345 Track numbers increase 1 While recording, playing or pausing an MD, press TRACK MARK at the beginning of track marks: regular track marks and special track marks. "!MARK ON!" Premastered...
...marking to mark the position of 254 track marks can edit your recordings by adding/ erasing track marks or labeling tracks and MDs. The track numbers will increase by one disc. Track marking important points While recording, not only can you add regular track marks, you perform an.... "MARK ON" appears in the display and "TT" is counted as follows. 1 2 34 Track marking 12345 Track numbers increase 1 While recording, playing or pausing an MD, press TRACK MARK at the beginning of track marks: regular track marks and special track marks. "!MARK ON!" Premastered...
Operating Instructions (primary manual)
Page 36
...menu. To avoid this, it is recommended to label a disc or a track after completing the recording. • You cannot relabel parametrized MDs or label MDs that have not been recorded. • The recorder is able to the next track while labeling a track, the input at any time, whether ...group mode is on ). ./> EDIT/ ENTER 36-GB 1 While the recorder is stopped, press EDIT/ENTER. A series of the recorder operations, ...
...menu. To avoid this, it is recommended to label a disc or a track after completing the recording. • You cannot relabel parametrized MDs or label MDs that have not been recorded. • The recorder is able to the next track while labeling a track, the input at any time, whether ...group mode is on ). ./> EDIT/ ENTER 36-GB 1 While the recorder is stopped, press EDIT/ENTER. A series of the recorder operations, ...
Operating Instructions (primary manual)
Page 44
...vehicle. On heat build-up Heat may prevent the unit from operating properly. On the MiniDisc cartridge • When carrying or storing the MiniDisc, keep it in many areas. Do not use this case, leave the recorder turned off . • If you to hear outside sounds and to be potentially dangerous... to close the disc compartment lid after inserting or ejecting an MD. 44-GB To remove the AC...
...vehicle. On heat build-up Heat may prevent the unit from operating properly. On the MiniDisc cartridge • When carrying or storing the MiniDisc, keep it in many areas. Do not use this case, leave the recorder turned off . • If you to hear outside sounds and to be potentially dangerous... to close the disc compartment lid after inserting or ejecting an MD. 44-GB To remove the AC...