
Operating Instructions
Page 3
... technician for a Class B digital device, pursuant to provide reasonable protection against harmful interference in a particular installation. You are designed to Part 15 of the following measures: - For the Sony Service Center nearest you call 1-800-222-SONY (United States only) For the Factory Service Center nearest you unwanted lithium ion batteries to your authority...
... technician for a Class B digital device, pursuant to provide reasonable protection against harmful interference in a particular installation. You are designed to Part 15 of the following measures: - For the Sony Service Center nearest you call 1-800-222-SONY (United States only) For the Factory Service Center nearest you unwanted lithium ion batteries to your authority...

Operating Instructions
Page 5
...various functions for recording 31 Enjoying Picture Effect 31 Using the PROGRAM AE function 32 Additional information Changing the lithium battery in the camera 33 Precautions 34 Troubleshooting 36 Self-diagnosis display 38 Specifications 39 Warning messages 40 Index 41 5-GB Table of ...images that can be recorded/ played back 20 Viewing images using your camera 7 Parts identification 8 Basic operations Preparation 11 1: Charging the battery pack 11 2: Installing the battery pack 12 3: Setting the date and time 13 Recording and playing back images 16 1: ...
...various functions for recording 31 Enjoying Picture Effect 31 Using the PROGRAM AE function 32 Additional information Changing the lithium battery in the camera 33 Precautions 34 Troubleshooting 36 Self-diagnosis display 38 Specifications 39 Warning messages 40 Index 41 5-GB Table of ...images that can be recorded/ played back 20 Viewing images using your camera 7 Parts identification 8 Basic operations Preparation 11 1: Charging the battery pack 11 2: Installing the battery pack 12 3: Setting the date and time 13 Recording and playing back images 16 1: ...
Operating Instructions
Page 7
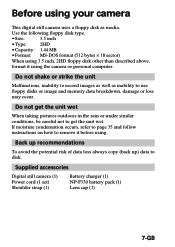
... loss always copy (back up) data to remove it using the camera or personal computer. Do not get the unit wet. Supplied accessories Digital still camera (1) Power cord (1 set) Shoulder strap (1) Battery charger (1) NP-F330 battery pack (1) Lens cap (1) 7-GB Before using your camera This digital still camera uses a floppy disk as inability to get the unit wet...
... loss always copy (back up) data to remove it using the camera or personal computer. Do not get the unit wet. Supplied accessories Digital still camera (1) Power cord (1 set) Shoulder strap (1) Battery charger (1) NP-F330 battery pack (1) Lens cap (1) 7-GB Before using your camera This digital still camera uses a floppy disk as inability to get the unit wet...
Operating Instructions
Page 9
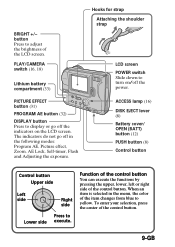
...Press to Lower side execute. Hooks for strap Attaching the shoulder strap LCD screen POWER switch Slide down to yellow. BRIGHT +/- PLAY/CAMERA switch (16, 18) Lithium battery compartment (33) PICTURE EFFECT button (31) PROGRAM AE button (32) DISPLAY button Press to display or go off the power.... modes: Program AE, Picture effect, Zoom, AE Lock, Self-timer, Flash and Adjusting the exposure. ACCESS lamp (16) DISK EJECT lever (8) Battery cover/ OPEN (BATT) button (12) PUSH button (8) Control button Control button Upper side Left side Right side Press to adjust the brightness of ...
...Press to Lower side execute. Hooks for strap Attaching the shoulder strap LCD screen POWER switch Slide down to yellow. BRIGHT +/- PLAY/CAMERA switch (16, 18) Lithium battery compartment (33) PICTURE EFFECT button (31) PROGRAM AE button (32) DISPLAY button Press to display or go off the power.... modes: Program AE, Picture effect, Zoom, AE Lock, Self-timer, Flash and Adjusting the exposure. ACCESS lamp (16) DISK EJECT lever (8) Battery cover/ OPEN (BATT) button (12) PUSH button (8) Control button Control button Upper side Left side Right side Press to adjust the brightness of ...
Operating Instructions
Page 11
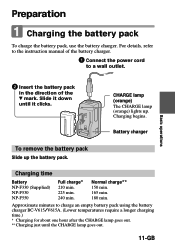
...150 min. 165 min. 180 min. Battery charger To remove the battery pack Slide up . Preparation Charging the battery pack To charge the battery pack, use the battery charger. CHARGE lamp (orange) The CHARGE lamp (orange) lights up the battery pack. Charging time Battery NP-F330 (Supplied) NP-F530 NP-F550... Full charge* 210 min. 225 min. 240 min. For details, refer to a wall outlet. Basic operations 2 Insert the battery pack in the direction of the battery charger. 1 Connect the power...
...150 min. 165 min. 180 min. Battery charger To remove the battery pack Slide up . Preparation Charging the battery pack To charge the battery pack, use the battery charger. CHARGE lamp (orange) The CHARGE lamp (orange) lights up the battery pack. Charging time Battery NP-F330 (Supplied) NP-F530 NP-F550... Full charge* 210 min. 225 min. 240 min. For details, refer to a wall outlet. Basic operations 2 Insert the battery pack in the direction of the battery charger. 1 Connect the power...
Operating Instructions
Page 12
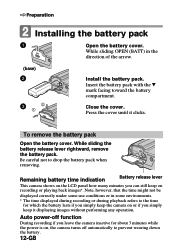
... Auto power-off function During recording if you leave the camera inactive for about 3 minutes while the power is on, the camera turns off automatically to the time for which the battery lasts if you simply keep the camera on recording or playing back images*. Note, however, that...GB Press the cover until it displaying images without performing any operation. Be careful not to drop the battery pack when removing. Remaining battery time indication Battery release lever This camera shows on the LCD panel how many minutes you can still keep on or if you simply keep...
... Auto power-off function During recording if you leave the camera inactive for about 3 minutes while the power is on, the camera turns off automatically to the time for which the battery lasts if you simply keep the camera on recording or playing back images*. Note, however, that...GB Press the cover until it displaying images without performing any operation. Be careful not to drop the battery pack when removing. Remaining battery time indication Battery release lever This camera shows on the LCD panel how many minutes you can still keep on or if you simply keep...

Operating Instructions
Page 13
..., and CLOCK SET screen in step 3 appears whenever you to turn on the power. 2 Select "CLOCK SET" in CAMERA mode. 1 Slide POWER down to power the camera from the following two power sources: •Sony InfoLithium battery* (L series), NP-F330 (supplied)/F530 (not supplied)/F550 (not supplied) •AC power adopter AC-VQ800 (not...
..., and CLOCK SET screen in step 3 appears whenever you to turn on the power. 2 Select "CLOCK SET" in CAMERA mode. 1 Slide POWER down to power the camera from the following two power sources: •Sony InfoLithium battery* (L series), NP-F330 (supplied)/F530 (not supplied)/F550 (not supplied) •AC power adopter AC-VQ800 (not...
Operating Instructions
Page 15
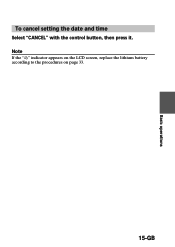
Note If the "W" indicator appears on the LCD screen, replace the lithium battery according to the procedures on page 33. 15-GB Basic operations To cancel setting the date and time Select "CANCEL" with the control button, then press it.
Note If the "W" indicator appears on the LCD screen, replace the lithium battery according to the procedures on page 33. 15-GB Basic operations To cancel setting the date and time Select "CANCEL" with the control button, then press it.

Operating Instructions
Page 16
... not turn on the power and insert the floppy disk until it clicks. The AE lock indicator z (green) appears. ACCESS lamp 1 Set PLAY/CAMERA to turn the power off or remove the battery pack or floppy disk. Recording and playing back images Recording images To record the images, slide POWER down to...
... not turn on the power and insert the floppy disk until it clicks. The AE lock indicator z (green) appears. ACCESS lamp 1 Set PLAY/CAMERA to turn the power off or remove the battery pack or floppy disk. Recording and playing back images Recording images To record the images, slide POWER down to...
Operating Instructions
Page 17
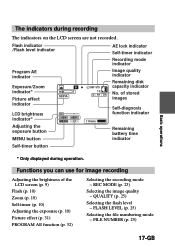
... (p. 25) Selecting the file numbering mode - Functions you can use for image recording Adjusting the brightness of stored images 110min Self-diagnosis function indicator Remaining battery time indicator Self-timer button Basic operations * Only displayed during recording The indicators on the LCD screen are not recorded. QUALITY (p. 25) Selecting the flash...
... (p. 25) Selecting the file numbering mode - Functions you can use for image recording Adjusting the brightness of stored images 110min Self-diagnosis function indicator Remaining battery time indicator Self-timer button Basic operations * Only displayed during recording The indicators on the LCD screen are not recorded. QUALITY (p. 25) Selecting the flash...
Operating Instructions
Page 19
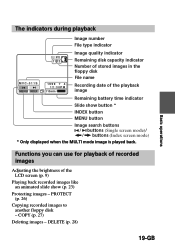
COPY (p. 27) Deleting images - DELETE (p. 28) 19-GB Basic operations The indicators during playback Image number File type indicator STD 11/12 MVC-011S MENU INDEX 1999 7 4 12:30PM 110min Image quality indicator Remaining disk capacity indicator Number of stored images in the floppy disk File name ... the MULTI mode image is played back. Functions you can use for playback of recorded images Adjusting the brightness of the playback image Remaining battery time indicator Slide show (p. 23) Protecting images - PROTECT (p. 26) Copying recorded images to another floppy disk -
COPY (p. 27) Deleting images - DELETE (p. 28) 19-GB Basic operations The indicators during playback Image number File type indicator STD 11/12 MVC-011S MENU INDEX 1999 7 4 12:30PM 110min Image quality indicator Remaining disk capacity indicator Number of stored images in the floppy disk File name ... the MULTI mode image is played back. Functions you can use for playback of recorded images Adjusting the brightness of the playback image Remaining battery time indicator Slide show (p. 23) Protecting images - PROTECT (p. 26) Copying recorded images to another floppy disk -
Operating Instructions
Page 20
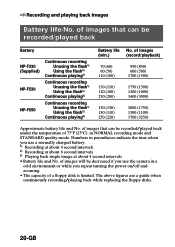
...6 second intervals 3) Playing back single image at about 4 second intervals • Battery life and No. kRecording and playing back images Battery life/No. Numbers in a cold environment or while you use the camera in parentheses indicate the time when you repeat turning the power on/off and zooming... and STANDARD quality mode. of images that can be recorded/played back under the temperature of images will be recorded/played back Battery NP-F330 (Supplied) NP-F530 NP-F550 Continuous recording Unusing the flash1) Using the flash2) Continuous playing3) Continuous recording Unusing ...
...6 second intervals 3) Playing back single image at about 4 second intervals • Battery life and No. kRecording and playing back images Battery life/No. Numbers in a cold environment or while you use the camera in parentheses indicate the time when you repeat turning the power on/off and zooming... and STANDARD quality mode. of images that can be recorded/played back under the temperature of images will be recorded/played back Battery NP-F330 (Supplied) NP-F530 NP-F550 Continuous recording Unusing the flash1) Using the flash2) Continuous playing3) Continuous recording Unusing ...

Operating Instructions
Page 29
... floppy disk. Notes • In the middle of the disk before formatting and copying disk. • Be sure that the battery is displayed, insert another 1 Select "DISK COPY", then "OK". Items for both CAMERA and PLAY modes DISK TOOL •Select FORMAT to format the floppy disk loaded in the... be replaced by newly written data including the protected image data. Check the contents of the above steps from 1 through 4, turn off the camera. • Formatting erases all information on the floppy disk, and with copying disk, all information saved on the recipient floppy disk are erased to...
... floppy disk. Notes • In the middle of the disk before formatting and copying disk. • Be sure that the battery is displayed, insert another 1 Select "DISK COPY", then "OK". Items for both CAMERA and PLAY modes DISK TOOL •Select FORMAT to format the floppy disk loaded in the... be replaced by newly written data including the protected image data. Check the contents of the above steps from 1 through 4, turn off the camera. • Formatting erases all information on the floppy disk, and with copying disk, all information saved on the recipient floppy disk are erased to...

Operating Instructions
Page 33
...battery, keep the battery pack attached. CAUTION Danger of in the camera When the lithium battery becomes weak or dead, the "W" indicator flashes on the LCD screen. Discard used batteries according to reset the date and time retained by the manufacturer. Replace only with the same type recommended by the lithium battery.... 1 Slide the lid of the lithium battery compartment and open it. 2 Push the lithium battery once and push it out from the holder. 3 Install the lithium battery with a Sony CR2025 or Duracell DL-2025 lithium battery. Changing the lithium battery ...
...battery, keep the battery pack attached. CAUTION Danger of in the camera When the lithium battery becomes weak or dead, the "W" indicator flashes on the LCD screen. Discard used batteries according to reset the date and time retained by the manufacturer. Replace only with the same type recommended by the lithium battery.... 1 Slide the lid of the lithium battery compartment and open it. 2 Push the lithium battery once and push it out from the holder. 3 Install the lithium battery with a Sony CR2025 or Duracell DL-2025 lithium battery. Changing the lithium battery ...

Operating Instructions
Page 35
...room, moisture may occur. •Note that terminals on the battery match the terminals on lithium battery •Keep the lithium battery out of the reach of time. 1 Be sure to tightly seal the plastic bag containing the camera. 2 Remove the bag when the air temperature inside or ... to +40 °C). Be sure to install the lithium battery so that the lithium battery has a positive (+) and a negative (-) terminals. circuit may condense inside it has reached the temperature surrounding it to adapt to evaporate. Should this camera in a plastic bag and allow it (about an hour...
...room, moisture may occur. •Note that terminals on the battery match the terminals on lithium battery •Keep the lithium battery out of the reach of time. 1 Be sure to tightly seal the plastic bag containing the camera. 2 Remove the bag when the air temperature inside or ... to +40 °C). Be sure to install the lithium battery so that the lithium battery has a positive (+) and a negative (-) terminals. circuit may condense inside it has reached the temperature surrounding it to adapt to evaporate. Should this camera in a plastic bag and allow it (about an hour...

Operating Instructions
Page 36
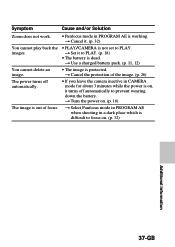
... have made those checks, consult your nearest Sony dealer. Cause and/or Solution • The camera does not operate when using a battery pack that uses strong magnets. t Use an "InfoLITHIUM" battery pack. (p. 13) • The floppy disk is noisy. The battery life deteriorates too fast. • The smear... placed near a TV or other equipment that is set . If "C: ss: ss" appears on the disk is not an "InfoLITHIUM" battery pack. t The camera is not malfunctioning. • The ambient temperature is too low. • Charging of the image. (p. 9) • The LCD screen is too dark. ...
... have made those checks, consult your nearest Sony dealer. Cause and/or Solution • The camera does not operate when using a battery pack that uses strong magnets. t Use an "InfoLITHIUM" battery pack. (p. 13) • The floppy disk is noisy. The battery life deteriorates too fast. • The smear... placed near a TV or other equipment that is set . If "C: ss: ss" appears on the disk is not an "InfoLITHIUM" battery pack. t The camera is not malfunctioning. • The ambient temperature is too low. • Charging of the image. (p. 9) • The LCD screen is too dark. ...
Operating Instructions
Page 37
...image. The power turns off automatically to prevent wearing down the battery. Symptom Cause and/or Solution Zoom does not work. • Panfocus mode in PROGRAM AE is protected. t Set it . (p. 32) You cannot play back the images. • PLAY/CAMERA is not set to focus on . (p. 16) The ...image is dead. t Turn the power on . (p. 32) Additional information 37-GB t Cancel it to PLAY. (p. 18) • The battery is out of the image. (p. 26) • If you leave the camera inactive in CAMERA mode for about 3 minutes while the power is difficult to PLAY.
...image. The power turns off automatically to prevent wearing down the battery. Symptom Cause and/or Solution Zoom does not work. • Panfocus mode in PROGRAM AE is protected. t Set it . (p. 32) You cannot play back the images. • PLAY/CAMERA is not set to focus on . (p. 16) The ...image is dead. t Turn the power on . (p. 32) Additional information 37-GB t Cancel it to PLAY. (p. 18) • The battery is out of the image. (p. 26) • If you leave the camera inactive in CAMERA mode for about 3 minutes while the power is difficult to PLAY.
Operating Instructions
Page 39
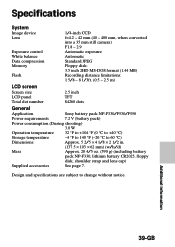
...camera) F1.8 - 2.9 Automatic exposure Automatic Standard JPEG Floppy disk: 3.5 inch 2HD MS-DOS format (1.44 MB) Recording distance limitations: 1 5/8 - 8 1/3ft. (0.5 - 2.5 m) LCD screen Screen size LCD panel Total dot number 2.5 inch TFT 84260 dots General Application Sony battery... pack NP-F330/F530/F550 Power requirements 7.2 V (battery pack) Power consumption (During shooting) 3.0 W Operation temperature 32 °F to +104 °F (0 °C to +40...
...camera) F1.8 - 2.9 Automatic exposure Automatic Standard JPEG Floppy disk: 3.5 inch 2HD MS-DOS format (1.44 MB) Recording distance limitations: 1 5/8 - 8 1/3ft. (0.5 - 2.5 m) LCD screen Screen size LCD panel Total dot number 2.5 inch TFT 84260 dots General Application Sony battery... pack NP-F330/F530/F550 Power requirements 7.2 V (battery pack) Power consumption (During shooting) 3.0 W Operation temperature 32 °F to +104 °F (0 °C to +40...

Operating Instructions
Page 40
... during playback. Trouble is full. The disk is with the disk. No image has been recorded on the LCD screen. The battery is protected. The image is weak. The lithium battery is weak or is set to the writing impossible position. The tab on the disk is not installed. 40-GB k Specifications...
... during playback. Trouble is full. The disk is with the disk. No image has been recorded on the LCD screen. The battery is protected. The image is weak. The lithium battery is weak or is set to the writing impossible position. The tab on the disk is not installed. 40-GB k Specifications...
Operating Instructions
Page 41
...13 Adjusting brightness LCD screen 9 Image 10 Adjusting the exposure .......... 10 AE (auto exposure 16 Auto power-off function ........ 12 B, C Battery pack 11, 12 Battery charger 11 BEEP 30 BITMAP 23 Charging 11 Cleaning 34 CLOCK SET 30 Control button 9 COPY 27 D, E DELETE 28 DEMO MODE 25 ... 35 MULTI 23 N, P Normal charge 11 PICTURE EFFECT 31 Playing back 18 PROGRAM AE 32 PROTECT 26 R REC MODE 23 Recording 16 Remaining battery indicator 17, 19 S, T Self-diagnosis display 38 Self timer 10 Setting the date and time ....... 13 Solar window 10 Troubleshooting 36 U, V ...
...13 Adjusting brightness LCD screen 9 Image 10 Adjusting the exposure .......... 10 AE (auto exposure 16 Auto power-off function ........ 12 B, C Battery pack 11, 12 Battery charger 11 BEEP 30 BITMAP 23 Charging 11 Cleaning 34 CLOCK SET 30 Control button 9 COPY 27 D, E DELETE 28 DEMO MODE 25 ... 35 MULTI 23 N, P Normal charge 11 PICTURE EFFECT 31 Playing back 18 PROGRAM AE 32 PROTECT 26 R REC MODE 23 Recording 16 Remaining battery indicator 17, 19 S, T Self-diagnosis display 38 Self timer 10 Setting the date and time ....... 13 Solar window 10 Troubleshooting 36 U, V ...


