Operating Instructions
Page 4
... periods Note that constantly appear on the camera are for the two models: MVC-CD200, MVC-CD300. Do not get the camera wet. Back up recommendation To avoid the potential risk of your camera Operating instructions Before operating the unit, please...digital still camera uses 8 cm CD-Rs/ CD-RWs as "disc" in the manufacturing process and do not shake or strike the camera. ∗ The Mavica disc is an 8 cm CD-R/CD-RW with Mavica discs*. • While the image is working correctly. When a distinction between CD-Rs and CD-RWs is necessary, "disc" is indicated as "CD-R" or "CD-RW...
... periods Note that constantly appear on the camera are for the two models: MVC-CD200, MVC-CD300. Do not get the camera wet. Back up recommendation To avoid the potential risk of your camera Operating instructions Before operating the unit, please...digital still camera uses 8 cm CD-Rs/ CD-RWs as "disc" in the manufacturing process and do not shake or strike the camera. ∗ The Mavica disc is an 8 cm CD-R/CD-RW with Mavica discs*. • While the image is working correctly. When a distinction between CD-Rs and CD-RWs is necessary, "disc" is indicated as "CD-R" or "CD-RW...
Operating Instructions
Page 5
... with the manual adjustments 56 Recording images according to shooting conditions (SCENE SELECTION 58 Recording three images continuously (BURST) (only for MVC-CD300 59 Recording still images for e-mail (E-MAIL 59 Adding audio files to still images (VOICE 60 Recording text documents (TEXT)...Creating Clip Motion Files 64 Setting the distance to print (PRINT 81 Formatting a CD-RW 82 Changing the setup settings (SET UP 84 Additional information Precautions 87 On discs 89 Using your camera abroad 90 About "InfoLITHIUM" battery pack 91 Troubleshooting 93 Warning and notice messages ...
... with the manual adjustments 56 Recording images according to shooting conditions (SCENE SELECTION 58 Recording three images continuously (BURST) (only for MVC-CD300 59 Recording still images for e-mail (E-MAIL 59 Adding audio files to still images (VOICE 60 Recording text documents (TEXT)...Creating Clip Motion Files 64 Setting the distance to print (PRINT 81 Formatting a CD-RW 82 Changing the setup settings (SET UP 84 Additional information Precautions 87 On discs 89 Using your camera abroad 90 About "InfoLITHIUM" battery pack 91 Troubleshooting 93 Warning and notice messages ...

Operating Instructions
Page 6
...the camera (page 28) View on your computer, the finalization is before Unfinalize finalization [About 1 min] (page 34) About 13 MB disc space restores. Blank disc Format [About 7 min] (page 82) The disc space is fully available. 6 View through a CD-R/CD-RW drive (page 41) View through a CD-ROM... for recording is complete. Flow chart for disc operations Start : CD-R : CD-RW • A new disc • The disc finalized with your computer You can easily copy images onto your computer through a CD-ROM drive, CD-R drive, CD-RW drive, or the USB cable and view and modify images on ...
...the camera (page 28) View on your computer, the finalization is before Unfinalize finalization [About 1 min] (page 34) About 13 MB disc space restores. Blank disc Format [About 7 min] (page 82) The disc space is fully available. 6 View through a CD-R/CD-RW drive (page 41) View through a CD-ROM... for recording is complete. Flow chart for disc operations Start : CD-R : CD-RW • A new disc • The disc finalized with your computer You can easily copy images onto your computer through a CD-ROM drive, CD-R drive, CD-RW drive, or the USB cable and view and modify images on ...
Operating Instructions
Page 16
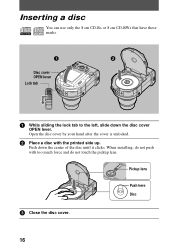
Inserting a disc You can use only the 8 cm CD-Rs or 8 cm CD-RWs that have these marks. 1 2 Disc cover OPEN lever Lock tab 1 While sliding the lock tab to the left, slide down the center of the disc until it clicks. When installing, do not touch the pickup lens. Pickup lens Push here Disc 3 Close the disc cover. 16 Push down the disc cover OPEN lever. Open the disc cover by your hand after the cover is unlocked. 2 Place a disc with too much force and do not push with the printed side up.
Inserting a disc You can use only the 8 cm CD-Rs or 8 cm CD-RWs that have these marks. 1 2 Disc cover OPEN lever Lock tab 1 While sliding the lock tab to the left, slide down the center of the disc until it clicks. When installing, do not touch the pickup lens. Pickup lens Push here Disc 3 Close the disc cover. 16 Push down the disc cover OPEN lever. Open the disc cover by your hand after the cover is unlocked. 2 Place a disc with too much force and do not push with the printed side up.
Operating Instructions
Page 21
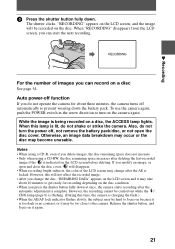
... (page 8) is being recorded on the LCD screen before deleting. Notes • When using a CD-R, even if you delete images, the disc remaining space does not increase. • Only when using a CD-RW, the disc remaining space increases after deleting the last-recorded image if the is indicated on a disc...image is flashing. (During this will not affect the recorded image. • After you can start the next recording. However, this time, the camera is charging the flash.) • When the AE/AF lock indicator flashes slowly, the subject may be hard to prevent wearing down . The ...
... (page 8) is being recorded on the LCD screen before deleting. Notes • When using a CD-R, even if you delete images, the disc remaining space does not increase. • Only when using a CD-RW, the disc remaining space increases after deleting the last-recorded image if the is indicated on a disc...image is flashing. (During this will not affect the recorded image. • After you can start the next recording. However, this time, the camera is charging the flash.) • When the AE/AF lock indicator flashes slowly, the subject may be hard to prevent wearing down . The ...
Operating Instructions
Page 32
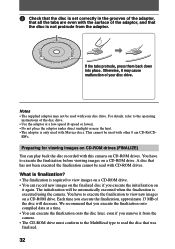
... record new images on CD-ROM drives. The initialization will decrease. RWs. What is finalization? • The finalization is required to the operating instructions of the disc drive. • Use the adaptor at a time. • You can play back the disc recorded with this camera on the finalized disc if... you execute the finalization onto compiled data at a low-speed (8-speed or lower). • Do not place the adaptor under direct sunlight or near the heat. • The adaptor is only used with Mavica discs. This cannot be...
... record new images on CD-ROM drives. The initialization will decrease. RWs. What is finalization? • The finalization is required to the operating instructions of the disc drive. • Use the adaptor at a time. • You can play back the disc recorded with this camera on the finalized disc if... you execute the finalization onto compiled data at a low-speed (8-speed or lower). • Do not place the adaptor under direct sunlight or near the heat. • The adaptor is only used with Mavica discs. This cannot be...
Operating Instructions
Page 34
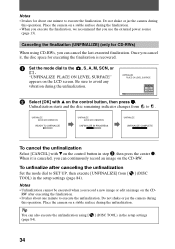
...also execute the unfinalization using CD-RWs, you record a new image or edit an image on the CD-RW. To unfinalize after executing the finalization. • It takes about one minute to execute the unfinalization. UNFINALIZE PLACE ON LEVEL SURFACE READY? Place the camera on the LCD screen.... Do not shake or jar the camera during the unfinalization. When it , the disc space for CD-RWs) When using [ (page 84). ] (DISC TOOL) in the setup settings (page ...
...also execute the unfinalization using CD-RWs, you record a new image or edit an image on the CD-RW. To unfinalize after executing the finalization. • It takes about one minute to execute the unfinalization. UNFINALIZE PLACE ON LEVEL SURFACE READY? Place the camera on the LCD screen.... Do not shake or jar the camera during the unfinalization. When it , the disc space for CD-RWs) When using [ (page 84). ] (DISC TOOL) in the setup settings (page ...
Operating Instructions
Page 35
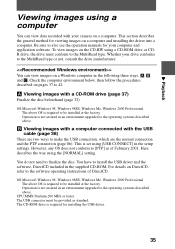
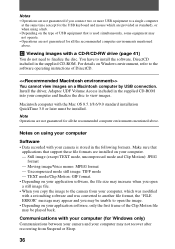
... Operation is required to the operating systems described above. B Viewing images with a computer connected with a CD-ROM drive (page 37) Finalize the disc beforehand (page 32). OS:Microsoft Windows 98, Windows 98SE,...standard. Here describes the way using [USB CONNECT] in the supplied CD-ROM. The CD-ROM drive is set using the [NORMAL] setting. Whether your camera on a computer and installing the driver into a computer. For details... using a computer You can view images on the CD-RW using a CD-ROM drive or CDR drive, the drive must be installed at the factory.
... Operation is required to the operating systems described above. B Viewing images with a computer connected with a CD-ROM drive (page 37) Finalize the disc beforehand (page 32). OS:Microsoft Windows 98, Windows 98SE,...standard. Here describes the way using [USB CONNECT] in the supplied CD-ROM. The CD-ROM drive is set using the [NORMAL] setting. Whether your camera on a computer and installing the driver into a computer. For details... using a computer You can view images on the CD-RW using a CD-ROM drive or CDR drive, the drive must be installed at the factory.
Operating Instructions
Page 36
...Voice memo: MPEG format - Uncompressed mode still image: TIFF mode - Macintosh computer with your computer (for Windows only) Communications between your camera and your computer may not recover after recovering from your computer, which was modified with a retouching software and was converted to another file ...(except for the USB keyboard and mouse which are provided as standard), or when using your computer Software • Data recorded with a CD-R/CD-RW drive (page 41) You do not need to finalize the disc. TEXT mode/Clip Motion: GIF format. • Depending on your application...
...Voice memo: MPEG format - Uncompressed mode still image: TIFF mode - Macintosh computer with your computer (for Windows only) Communications between your camera and your computer may not recover after recovering from your computer, which was modified with a retouching software and was converted to another file ...(except for the USB keyboard and mouse which are provided as standard), or when using your computer Software • Data recorded with a CD-R/CD-RW drive (page 41) You do not need to finalize the disc. TEXT mode/Clip Motion: GIF format. • Depending on your application...
Operating Instructions
Page 41
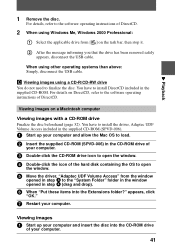
... Select the applicable drive from the window opened in step 4 (drag and drop). 6 When "Put these items into the CD-ROM drive of your computer. 41 When using a CD-R/CD-RW drive You do not need to the "System Folder" folder in the window opened in step 3 to finalize the disc. Viewing... images on a Macintosh computer Viewing images with a CD-ROM drive Finalize the disc beforehand (page 32). C Viewing images using...
... Select the applicable drive from the window opened in step 4 (drag and drop). 6 When "Put these items into the CD-ROM drive of your computer. 41 When using a CD-R/CD-RW drive You do not need to the "System Folder" folder in the window opened in step 3 to finalize the disc. Viewing... images on a Macintosh computer Viewing images with a CD-ROM drive Finalize the disc beforehand (page 32). C Viewing images using...
Operating Instructions
Page 78
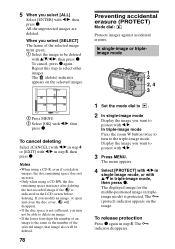
... Set the mode dial to . 2 In single-image mode Display the image you want to delete an image. • If the lower four-digit file number of an image is indicated on the LCD screen before deleting. To release protection Press z again in tripleimage mode) is protected. 5 ...2, 4 3 SET MENU TO NEXT 2 Press MENU. 3 Select [OK] with b/B, then press z. Notes • When using a CD-R, even if you delete images, the disc remaining space does not increase. • Only when using a CD-RW, the disc remaining space increases after deleting the last-recorded image if the is the same as...
... Set the mode dial to . 2 In single-image mode Display the image you want to delete an image. • If the lower four-digit file number of an image is indicated on the LCD screen before deleting. To release protection Press z again in tripleimage mode) is protected. 5 ...2, 4 3 SET MENU TO NEXT 2 Press MENU. 3 Select [OK] with b/B, then press z. Notes • When using a CD-R, even if you delete images, the disc remaining space does not increase. • Only when using a CD-RW, the disc remaining space increases after deleting the last-recorded image if the is the same as...
Operating Instructions
Page 82
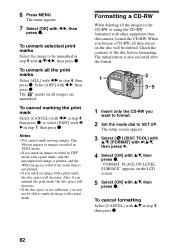
..., the disc space will decrease. • If the disc space is also executed after the format. 1 2 3-5 1 Insert only the CD-RW you format a CD-RW, all the images in TIFF mode with a print mark, only the uncompressed image is printed, and the JPEG image recorded at the same ... with b/B, then press z. 6 Press MENU. When you want to format. 2 Set the mode dial to mark an image with other equipment than this camera, format the CD-RW. To cancel formatting Select [CANCEL] with v/V, then press z. Check the contents of the disc before formatting. The setup screen appears. 3 Select [ ]...
..., the disc space will decrease. • If the disc space is also executed after the format. 1 2 3-5 1 Insert only the CD-RW you format a CD-RW, all the images in TIFF mode with a print mark, only the uncompressed image is printed, and the JPEG image recorded at the same ... with b/B, then press z. 6 Press MENU. When you want to format. 2 Set the mode dial to mark an image with other equipment than this camera, format the CD-RW. To cancel formatting Select [CANCEL] with v/V, then press z. Check the contents of the disc before formatting. The setup screen appears. 3 Select [ ]...
Operating Instructions
Page 83
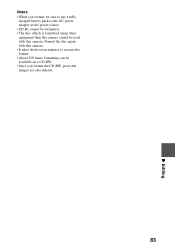
Notes • When you format, be sure to execute the format. • About 300 times formatting can be used with this camera cannot be available on a CD-RW. • Once you format the CD-RW, protected images are also deleted. 83 B Editing Format the disc again with this camera. • It takes about seven minutes to use a fully charged battery pack or the AC power adaptor as the power source. • CD-Rs cannot be formatted. • The disc which is formatted using other equipment than this camera.
Notes • When you format, be sure to execute the format. • About 300 times formatting can be used with this camera cannot be available on a CD-RW. • Once you format the CD-RW, protected images are also deleted. 83 B Editing Format the disc again with this camera. • It takes about seven minutes to use a fully charged battery pack or the AC power adaptor as the power source. • CD-Rs cannot be formatted. • The disc which is formatted using other equipment than this camera.
Operating Instructions
Page 84
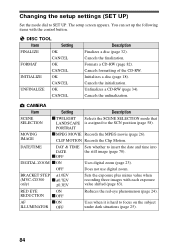
...CD-RW (page 82). BRACKET STEP ±1.0EV (MVC-CD300 x±0.7EV only) ±0.3EV Sets the exposure plus minus value when recording three images with the control button. Unfinalizes a CD-RW (page 34). You can set up the following items with each exposure value shifted (page 63). Cancels the unfinalization. OFF Does not use digital... zoom. AF xON ILLUMINATOR OFF Uses when it is assigned to focus on the subject under dark situations (page 25). 84 Initializes a disc (page 18). CLIP MOTION Records the Clip Motion. CAMERA Item Setting ...
...CD-RW (page 82). BRACKET STEP ±1.0EV (MVC-CD300 x±0.7EV only) ±0.3EV Sets the exposure plus minus value when recording three images with the control button. Unfinalizes a CD-RW (page 34). You can set up the following items with each exposure value shifted (page 63). Cancels the unfinalization. OFF Does not use digital... zoom. AF xON ILLUMINATOR OFF Uses when it is assigned to focus on the subject under dark situations (page 25). 84 Initializes a disc (page 18). CLIP MOTION Records the Clip Motion. CAMERA Item Setting ...
Operating Instructions
Page 103
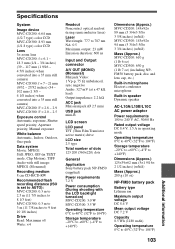
...camera) MVC-CD200: F = 2.8 - 2.9 MVC-CD300: F = 2.0 - 2.5 Exposure control Automatic exposure, Shutter speed priority, Aperture priority, Manual exposure White balance Automatic, Indoor, Outdoor, One-push Data system Movie: MPEG1 Still: JPEG, GIF (in TEXT mode, Clip Motion), TIFF Audio with still image: MPEG1 (Monaural) Recording medium 8 cm CD-R/CD-RW Recommended flash recording distance (ISO is set to AUTO): MVC-CD200... Application Sony battery pack NP-FM50 (supplied) Power requirements 7.2 V Power consumption (During shooting with the LCD backlight turned on) MVC-CD200: 3.0 W MVC-CD300:...
...camera) MVC-CD200: F = 2.8 - 2.9 MVC-CD300: F = 2.0 - 2.5 Exposure control Automatic exposure, Shutter speed priority, Aperture priority, Manual exposure White balance Automatic, Indoor, Outdoor, One-push Data system Movie: MPEG1 Still: JPEG, GIF (in TEXT mode, Clip Motion), TIFF Audio with still image: MPEG1 (Monaural) Recording medium 8 cm CD-R/CD-RW Recommended flash recording distance (ISO is set to AUTO): MVC-CD200... Application Sony battery pack NP-FM50 (supplied) Power requirements 7.2 V Power consumption (During shooting with the LCD backlight turned on) MVC-CD200: 3.0 W MVC-CD300:...
Operating Instructions
Page 104
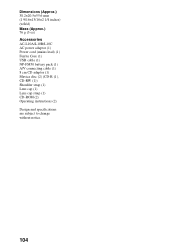
Dimensions (Approx.) 38.2×20.5×55.6 mm (1 9/16×13/16×2 1/4 inches) (w/h/d) Mass (Approx.) 76 g (3 oz) Accessories AC-L10A/L10B/L10C AC power adaptor (1) Power cord (mains lead) (1) Ferrite Core (1) USB cable (1) NP-FM50 battery pack (1) A/V connecting cable (1) 8 cm CD adaptor (1) Mavica disc (2) (CD-R (1), CD-RW (1)) Shoulder strap (1) Lens cap (1) Lens cap strap (1) CD-ROM (2) Operating instructions (2) Design and specifications are subject to change without notice. 104
Dimensions (Approx.) 38.2×20.5×55.6 mm (1 9/16×13/16×2 1/4 inches) (w/h/d) Mass (Approx.) 76 g (3 oz) Accessories AC-L10A/L10B/L10C AC power adaptor (1) Power cord (mains lead) (1) Ferrite Core (1) USB cable (1) NP-FM50 battery pack (1) A/V connecting cable (1) 8 cm CD adaptor (1) Mavica disc (2) (CD-R (1), CD-RW (1)) Shoulder strap (1) Lens cap (1) Lens cap strap (1) CD-ROM (2) Operating instructions (2) Design and specifications are subject to change without notice. 104


