
Limited Warranty (U.S. Only)
Page 1
... option, (i) repair the product using new or refurbished parts or (ii) replace the product with a new or refurbished product. it does not cover product issues caused by defects in exchange for parts determined to its option, repair or replace with the Product for the time periods and as fuses or batteries). Instructions: To obtain warranty service, you . Only) Sony Electronics Inc. ("Sony") warrants this...
... option, (i) repair the product using new or refurbished parts or (ii) replace the product with a new or refurbished product. it does not cover product issues caused by defects in exchange for parts determined to its option, repair or replace with the Product for the time periods and as fuses or batteries). Instructions: To obtain warranty service, you . Only) Sony Electronics Inc. ("Sony") warrants this...
Operating Instructions
Page 1
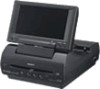
MV-65ST © 2004 Sony Corporation 2-021-315-13 (2) Portable DVD Player Operating Instructions US Mode d'emploi FR Manual de instrucciones ES Owner's Record The model and serial numbers are located on page 8. Si desea obtener información sobre la instalación y las conexiones, consulte el apartado "Conexiones" de la página 8. Model No. Refer to "Connection" on the bottom of the unit. En ce qui concerne...
MV-65ST © 2004 Sony Corporation 2-021-315-13 (2) Portable DVD Player Operating Instructions US Mode d'emploi FR Manual de instrucciones ES Owner's Record The model and serial numbers are located on page 8. Si desea obtener información sobre la instalación y las conexiones, consulte el apartado "Conexiones" de la página 8. Model No. Refer to "Connection" on the bottom of the unit. En ce qui concerne...
Operating Instructions
Page 2
... device. This is intended to alert the user to provide reasonable protection against harmful interference in the literature accompanying the appliance. AVOID DIRECT EXPOSURE TO BEAM. You are designed to the presence of important operating and maintenance (servicing) instructions in a residential installation. CAUTION Use of controls or adjustments or performance of procedures other than those specified herein may be determined by turning...
... device. This is intended to alert the user to provide reasonable protection against harmful interference in the literature accompanying the appliance. AVOID DIRECT EXPOSURE TO BEAM. You are designed to the presence of important operating and maintenance (servicing) instructions in a residential installation. CAUTION Use of controls or adjustments or performance of procedures other than those specified herein may be determined by turning...
Operating Instructions
Page 3
... Displaying the multi-angle notice - SPEAKER menu 25 Selecting the downmix mode - ANGLE MARK 23 Preparing for the input video signal 27 Settings by using the MENU button on the monitor 27 Adjusting the contrast 27 Adjusting the brightness 28 Adjusting the color 28 Adjusting the hue (NTSC only 28 Adjusting the dimmer 28 Resetting the adjustments 28 Setting the screen mode 28 Setting the FM transmitter 29 Setting the blue background screen 29 Exiting the menu operation 29 Turning...
... Displaying the multi-angle notice - SPEAKER menu 25 Selecting the downmix mode - ANGLE MARK 23 Preparing for the input video signal 27 Settings by using the MENU button on the monitor 27 Adjusting the contrast 27 Adjusting the brightness 28 Adjusting the color 28 Adjusting the hue (NTSC only 28 Adjusting the dimmer 28 Resetting the adjustments 28 Setting the screen mode 28 Setting the FM transmitter 29 Setting the blue background screen 29 Exiting the menu operation 29 Turning...
Operating Instructions
Page 4
... protection technology must not use the player for a long time, be authorized by Macrovision Corporation. never pull the cord. The driver must not watch and operate the player or use any foreign objects in the player if it may lead to disconnect the power supply (AC power adapter or car battery cord). ROMs/CD-Rs/CD-RWs). •Supplied controller accessory Card remote commander RM-X137 Before operating the player...
... protection technology must not use the player for a long time, be authorized by Macrovision Corporation. never pull the cord. The driver must not watch and operate the player or use any foreign objects in the player if it may lead to disconnect the power supply (AC power adapter or car battery cord). ROMs/CD-Rs/CD-RWs). •Supplied controller accessory Card remote commander RM-X137 Before operating the player...
Operating Instructions
Page 5
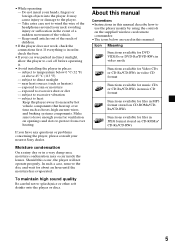
... temperature below are used in this manual: Icon Meaning Functions available for DVD VIDEOs or DVD-Rs/DVD-RWs in video mode Functions available for Video CDs or CD-Rs/CD-RWs in video CD format Functions available for music CDs or CD-Rs/CD-RWs in music CD format Functions available for files in this occur, the player will not operate properly. subject to protect from nearby hot...
... temperature below are used in this manual: Icon Meaning Functions available for DVD VIDEOs or DVD-Rs/DVD-RWs in video mode Functions available for Video CDs or CD-Rs/CD-RWs in video CD format Functions available for music CDs or CD-Rs/CD-RWs in music CD format Functions available for files in this occur, the player will not operate properly. subject to protect from nearby hot...
Operating Instructions
Page 6
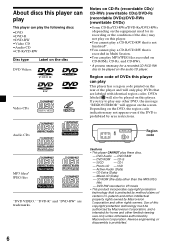
... Corporation and other limited viewing uses only unless otherwise authorized by Macrovision Corporation. DVD-Audio - CD-G - CD-Extra (Data) - Use of this copyright protection technology must be authorized by Macrovision Corporation, and is intended for home and other rights owners. About discs this player can play This player can play the following discs: • DVD • DVD-R • DVD-RW •Video CD •Audio CD • CD...
... Corporation and other limited viewing uses only unless otherwise authorized by Macrovision Corporation. DVD-Audio - CD-G - CD-Extra (Data) - Use of this copyright protection technology must be authorized by Macrovision Corporation, and is intended for home and other rights owners. About discs this player can play This player can play the following discs: • DVD • DVD-R • DVD-RW •Video CD •Audio CD • CD...
Operating Instructions
Page 8
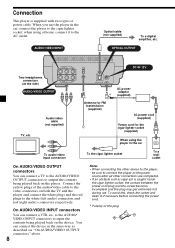
... using the player in the same way as described on the player. On AUDIO/VIDEO INPUT connectors You can connect a TV to the AUDIO/VIDEO OUTPUT connectors to input the contents being played back on "On AUDIO/VIDEO OUTPUT connectors" above. 8 Notes • When connecting the other device to the player, be sure to connect the player to the cigar lighter socket; AUDIO/VIDEO INPUT Optical cable (not supplied) To a digital amplifier, etc. You can connect the device in the car...
... using the player in the same way as described on the player. On AUDIO/VIDEO INPUT connectors You can connect a TV to the AUDIO/VIDEO OUTPUT connectors to input the contents being played back on "On AUDIO/VIDEO OUTPUT connectors" above. 8 Notes • When connecting the other device to the player, be sure to connect the player to the cigar lighter socket; AUDIO/VIDEO INPUT Optical cable (not supplied) To a digital amplifier, etc. You can connect the device in the car...
Operating Instructions
Page 10
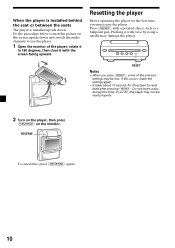
... it with the screen facing upward. If you do, the player may be reset properly. 2 Turn on the player, then press (REVERSE) on the screen upside down . RESET Notes • When you must reset the player. Press (RESET) with force by using a needle may damage the player. Do not insert a disc during this , press (REVERSE) again. 10 If this occurs, make the settings again. • It...
... it with the screen facing upward. If you do, the player may be reset properly. 2 Turn on the player, then press (REVERSE) on the screen upside down . RESET Notes • When you must reset the player. Press (RESET) with force by using a needle may damage the player. Do not insert a disc during this , press (REVERSE) again. 10 If this occurs, make the settings again. • It...
Operating Instructions
Page 11
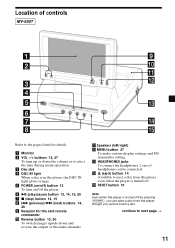
... jacks To connect the headphones. 2 sets of the audio channels. Reverse button 10, 30 To switch images upside down the volume or to select the item during menu operation. 3 Disc slot 4 DISC IN light When a disc is turned off by pressing (POWER), you cannot insert a disc. continue to next page t 11 qf Z (eject) button 14 Available to eject a disc from the player, though you can be connected. Location of controls MV-65ST 9 0 qa qs 6 7 8 DISC IN RESET qd qf...
... jacks To connect the headphones. 2 sets of the audio channels. Reverse button 10, 30 To switch images upside down the volume or to select the item during menu operation. 3 Disc slot 4 DISC IN light When a disc is turned off by pressing (POWER), you cannot insert a disc. continue to next page t 11 qf Z (eject) button 14 Available to eject a disc from the player, though you can be connected. Location of controls MV-65ST 9 0 qa qs 6 7 8 DISC IN RESET qd qf...
Operating Instructions
Page 12
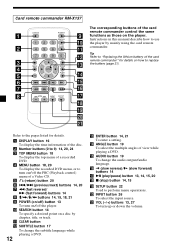
... To select the multiple angles of view while playing a DVD. wa VOL (-/+) buttons 13, 27 To turn on how to the pages listed for details on /off ) button 13 To turn up or down the volume. VOL INPUT SETUP Refer to replace the battery (page 31). Tip Refer to "Replacing the lithium battery of the card remote commander" for details. 1 DISPLAY button 16 To display the time information of the disc. 2 Number buttons...
... To select the multiple angles of view while playing a DVD. wa VOL (-/+) buttons 13, 27 To turn on how to the pages listed for details on /off ) button 13 To turn up or down the volume. VOL INPUT SETUP Refer to replace the battery (page 31). Tip Refer to "Replacing the lithium battery of the card remote commander" for details. 1 DISPLAY button 16 To display the time information of the disc. 2 Number buttons...
Operating Instructions
Page 13
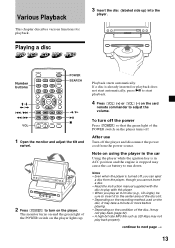
... instruction manual supplied with the disc to play an 8-cm disc (e.g., CD-single), be sure to insert it to next page t 13 Various Playback This chapter describes various functions for playback. Number buttons M/m m/M VOL DISPLAY POWER 12 45 78 TOP MENU SEARCH 3 CLEAR 6 90 SUBTITLE MENU ENTER ANGLE AUDIO VOL INPUT SETUP POWER SEARCH /y u x 1 Open the monitor and adjust the tilt and swivel. 2 Press (POWER) to turn off the power...
... instruction manual supplied with the disc to play an 8-cm disc (e.g., CD-single), be sure to insert it to next page t 13 Various Playback This chapter describes various functions for playback. Number buttons M/m m/M VOL DISPLAY POWER 12 45 78 TOP MENU SEARCH 3 CLEAR 6 90 SUBTITLE MENU ENTER ANGLE AUDIO VOL INPUT SETUP POWER SEARCH /y u x 1 Open the monitor and adjust the tilt and swivel. 2 Press (POWER) to turn off the power...

Operating Instructions
Page 21
...: •SYSTEM menu (system settings) •DVD SETUP menu (settings for DVD playback) •SPEAKER menu (setting for downmix mode) •AUDIO menu (settings for digital audio output) •VIDEO menu (settings for the menus from the English and Japanese. 1 Press (SETUP). OSD LANGUAGE You can set when you first use this player using the on the menus - SYSTEM menu You can select the language used for video output) Selecting the language on -screen setup menus. M/m Most settings need to be set up and adjust this player.
...: •SYSTEM menu (system settings) •DVD SETUP menu (settings for DVD playback) •SPEAKER menu (setting for downmix mode) •AUDIO menu (settings for digital audio output) •VIDEO menu (settings for the menus from the English and Japanese. 1 Press (SETUP). OSD LANGUAGE You can set when you first use this player using the on the menus - SYSTEM menu You can select the language used for video output) Selecting the language on -screen setup menus. M/m Most settings need to be set up and adjust this player.
Operating Instructions
Page 22
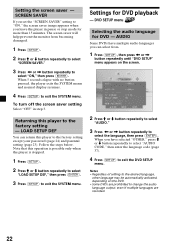
... no button pressed, the player exits the SYSTEM menu and normal display resumes. 4 Press (SETUP) to change the audio language output, even if multiple languages are prohibited to exit the SYSTEM menu. Follow the steps below. Settings for DVD - DVD SETUP menu Selecting the audio language for DVD playback - To turn off the screen saver setting Select "OFF" in pause or stop mode for more than 15 minutes. The screen saver will help prevent...
... no button pressed, the player exits the SYSTEM menu and normal display resumes. 4 Press (SETUP) to change the audio language output, even if multiple languages are prohibited to exit the SYSTEM menu. Follow the steps below. Settings for DVD - DVD SETUP menu Selecting the audio language for DVD playback - To turn off the screen saver setting Select "OFF" in pause or stop mode for more than 15 minutes. The screen saver will help prevent...
Operating Instructions
Page 23
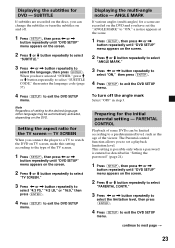
... < or , button repeatedly to select "ON," then press (ENTER). 4 Press (SETUP) to a predetermined level, such as described in step 3. TV SCREEN When you can be automatically activated, depending on the DVD. Preparing for the TV screen - Displaying the subtitles for a scene are recorded on the discs, you connect the player to a TV to watch the DVD on TV screen, make this setting according to select the language...
... < or , button repeatedly to select "ON," then press (ENTER). 4 Press (SETUP) to a predetermined level, such as described in step 3. TV SCREEN When you can be automatically activated, depending on the DVD. Preparing for the TV screen - Displaying the subtitles for a scene are recorded on the discs, you connect the player to a TV to watch the DVD on TV screen, make this setting according to select the language...

Operating Instructions
Page 25
... "STEREO" or "LT/RT." STEREO: Select this when the connected audio equipment supports Dolby Surround (Pro Logic). 1 Press (SETUP), then press < or , button repeatedly until "AUDIO" menu appears on the screen. LT/RT: Select this when the connected audio equipment does not support Dolby Surround (Pro Logic). SPEAKER menu Selecting the downmix mode - Notes • When "OFF" is selected, no signal is used to exit the AUDIO menu. DOWNMIX You can set the mode of a source. AUDIO menu...
... "STEREO" or "LT/RT." STEREO: Select this when the connected audio equipment supports Dolby Surround (Pro Logic). 1 Press (SETUP), then press < or , button repeatedly until "AUDIO" menu appears on the screen. LT/RT: Select this when the connected audio equipment does not support Dolby Surround (Pro Logic). SPEAKER menu Selecting the downmix mode - Notes • When "OFF" is selected, no signal is used to exit the AUDIO menu. DOWNMIX You can set the mode of a source. AUDIO menu...
Operating Instructions
Page 26
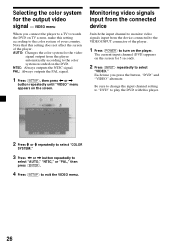
... the player. Selecting the color system for the video signal output from the device connected to the VIDEO INPUT connector of the player. 1 Press (POWER) to play the DVD with this setting does not affect the screen of your country. Be sure to change the input channel setting to "DVD" to turn on the DVD. AUTO: Changes the color system for the output video signal - Note that this player. 2 Press M or m repeatedly to select "COLOR SYSTEM." 3 Press < or , button repeatedly to select "AUTO," "NTSC...
... the player. Selecting the color system for the video signal output from the device connected to the VIDEO INPUT connector of the player. 1 Press (POWER) to play the DVD with this setting does not affect the screen of your country. Be sure to change the input channel setting to "DVD" to turn on the DVD. AUTO: Changes the color system for the output video signal - Note that this player. 2 Press M or m repeatedly to select "COLOR SYSTEM." 3 Press < or , button repeatedly to select "AUTO," "NTSC...
Operating Instructions
Page 27
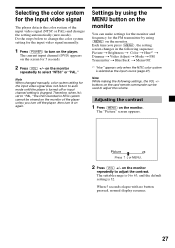
... auto mode until the player is turned off the player, then turn it is set to select "NTSC" or "PAL." Note When changed . buttons on the card remote commander can make settings for the monitor and frequency for the input video signal manually. 1 Press (POWER) to turn off or input channel setting is changed manually, color system setting for the input video signal The player detects the color system of the player unless you press (MENU), the setting screen changes in NTSC system cannot be used...
... auto mode until the player is turned off the player, then turn it is set to select "NTSC" or "PAL." Note When changed . buttons on the card remote commander can make settings for the monitor and frequency for the input video signal manually. 1 Press (POWER) to turn off or input channel setting is changed manually, color system setting for the input video signal The player detects the color system of the player unless you press (MENU), the setting screen changes in NTSC system cannot be used...
Operating Instructions
Page 29
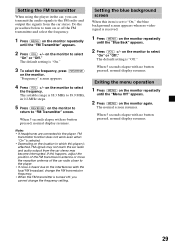
... blue background screen appears when no button pressed, normal display resumes. Exiting the menu operation 1 Press (MENU) on the monitor repeatedly until the "FM Transmitter" appears. 2 Press (VOL) +/- on the monitor to select "On" or "Off." on the monitor to select the frequency. When 5 seconds elapse with no video signal is "Off." The normal screen resumes. Setting the FM transmitter When using the player in...
... blue background screen appears when no button pressed, normal display resumes. Exiting the menu operation 1 Press (MENU) on the monitor repeatedly until the "FM Transmitter" appears. 2 Press (VOL) +/- on the monitor to select "On" or "Off." on the monitor to select the frequency. When 5 seconds elapse with no video signal is "Off." The normal screen resumes. Setting the FM transmitter When using the player in...
Operating Instructions
Page 35
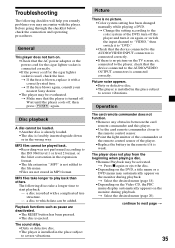
...;Replace the battery in the remote if it to "DVD." •Check that the device connected to the AUDIO/VIDEO OUTPUT connectors is not added to next page t 35 t Press x again or eject the disc. •Depending on the DVD, a title menu or a DVD menu may automatically appear on the TV screen, etc. t Select the desired menu (page 20). Wait until the player cools off the player and turn off , then press (POWER...
...;Replace the battery in the remote if it to "DVD." •Check that the device connected to the AUDIO/VIDEO OUTPUT connectors is not added to next page t 35 t Press x again or eject the disc. •Depending on the DVD, a title menu or a DVD menu may automatically appear on the TV screen, etc. t Select the desired menu (page 20). Wait until the player cools off the player and turn off , then press (POWER...


