Operating Instructions
Page 1
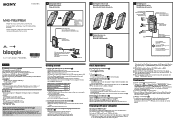
...MHS‑PM5K)(1) Wrist strap (1) CD-ROM (1) "PMB" (software, including "PMB Help") bloggie Handbook (PDF) Instruction Manual Important Notice * When measuring media capacity, 1 GB equals 1 billion bytes, a portion of the camera on, then connect the camera..."bloggie" is a trademark of Sony ...MP4) compliant Power Rechargeable Battery Pack NP-BK1, 3.6V Power Consumption 1.9 W [1280 × 720 30P] Operating Temperature 0°C - 40°C (32°F - 104°F) Getting further detailed information from the "bloggie...
...MHS‑PM5K)(1) Wrist strap (1) CD-ROM (1) "PMB" (software, including "PMB Help") bloggie Handbook (PDF) Instruction Manual Important Notice * When measuring media capacity, 1 GB equals 1 billion bytes, a portion of the camera on, then connect the camera..."bloggie" is a trademark of Sony ...MP4) compliant Power Rechargeable Battery Pack NP-BK1, 3.6V Power Consumption 1.9 W [1280 × 720 30P] Operating Temperature 0°C - 40°C (32°F - 104°F) Getting further detailed information from the "bloggie...
bloggie™ Handbook
Page 1
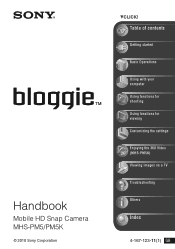
Table of contents Getting started Basic Operations Using with your computer Using functions for shooting Using functions for viewing Customizing the settings Enjoying the 360 Video (MHS-PM5K) Viewing images on a TV Troubleshooting Others Index 4-167-123-11(1) GB Handbook Mobile HD Snap Camera MHS-PM5/PM5K © 2010 Sony Corporation VCLICK!
Table of contents Getting started Basic Operations Using with your computer Using functions for shooting Using functions for viewing Customizing the settings Enjoying the 360 Video (MHS-PM5K) Viewing images on a TV Troubleshooting Others Index 4-167-123-11(1) GB Handbook Mobile HD Snap Camera MHS-PM5/PM5K © 2010 Sony Corporation VCLICK!
bloggie™ Handbook
Page 2
... you format the memory card, all the data on -screen displays in each local language are collectively called "Memory Stick PRO Duo" media in this camera are "Memory Stick PRO Duo" media, "Memory Stick PRO-HG Duo" media, SD memory cards and SDHC memory cards. "Memory Stick PRO Duo"/"Memory Stick... Duo" media When using "Memory Stick PRO Duo" media with the standard size "Memory Stick" media compatible slot Be sure to operate correctly with this camera. • "Memory Stick PRO Duo" media and "Memory Stick PRO-HG Duo" are used . • See page 41 for a long time, use it with ...
... you format the memory card, all the data on -screen displays in each local language are collectively called "Memory Stick PRO Duo" media in this camera are "Memory Stick PRO Duo" media, "Memory Stick PRO-HG Duo" media, SD memory cards and SDHC memory cards. "Memory Stick PRO Duo"/"Memory Stick... Duo" media When using "Memory Stick PRO Duo" media with the standard size "Memory Stick" media compatible slot Be sure to operate correctly with this camera. • "Memory Stick PRO Duo" media and "Memory Stick PRO-HG Duo" are used . • See page 41 for a long time, use it with ...
bloggie™ Handbook
Page 3
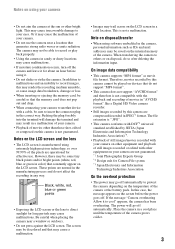
...not compatible with a cable, be saved on disposal/transfer • When using extremely high-precision technology, so over 99.99% of movies in JPEG*1 format. Notes on using your camera • Do not aim the camera at the sun or other than those shot, edited or composed on this case, ...or cause image data breakdown, damage or loss. • When inserting or ejecting the memory card, be careful so that do not support "MP4 format". • This camera does not support "AVCHD format" and therefore is not guaranteed. Black, white, red, blue or green points • Exposing the LCD screen ...
...not compatible with a cable, be saved on disposal/transfer • When using extremely high-precision technology, so over 99.99% of movies in JPEG*1 format. Notes on using your camera • Do not aim the camera at the sun or other than those shot, edited or composed on this case, ...or cause image data breakdown, damage or loss. • When inserting or ejecting the memory card, be careful so that do not support "MP4 format". • This camera does not support "AVCHD format" and therefore is not guaranteed. Black, white, red, blue or green points • Exposing the LCD screen ...

bloggie™ Handbook
Page 4
Notes on using your camera Warning on copyright • Television programs, films, videotapes, and other accessories are not actual images shot using this Handbook are reproduced images, and are subject to change without notice. 4 About this Handbook • The photographs used as examples of pictures in this camera. • Design and specifications of the copyright laws. Unauthorized recording of such materials may be contrary to the provisions of recording media and other materials may be copyrighted.
Notes on using your camera Warning on copyright • Television programs, films, videotapes, and other accessories are not actual images shot using this Handbook are reproduced images, and are subject to change without notice. 4 About this Handbook • The photographs used as examples of pictures in this camera. • Design and specifications of the copyright laws. Unauthorized recording of such materials may be contrary to the provisions of recording media and other materials may be copyrighted.
bloggie™ Handbook
Page 5
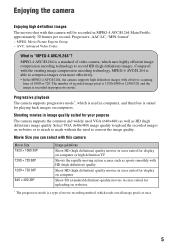
..., AAC LC, "MP4 format". - Progressive playback The camera supports progressive mode*, which reads out all image pixels at once. 5 Shooting movies in image quality suited for your purpose The camera supports the common and widely used VGA (640×480) as well as sports smoothly with HD (high definition) quality Shoot HD (high definition) quality movies in...
..., AAC LC, "MP4 format". - Progressive playback The camera supports progressive mode*, which reads out all image pixels at once. 5 Shooting movies in image quality suited for your purpose The camera supports the common and widely used VGA (640×480) as well as sports smoothly with HD (high definition) quality Shoot HD (high definition) quality movies in...

bloggie™ Handbook
Page 6
How to handle the camera • When carrying the camera, rotate the lens portion back as illustrated. • Be careful not to block the lens with your finger when shooting. • Do not hold the camera by only holding the battery/memory card cover, jack cover, the USB jack or the lens portion. • See page 15 for how to attach the wrist strap. 6
How to handle the camera • When carrying the camera, rotate the lens portion back as illustrated. • Be careful not to block the lens with your finger when shooting. • Do not hold the camera by only holding the battery/memory card cover, jack cover, the USB jack or the lens portion. • See page 15 for how to attach the wrist strap. 6
bloggie™ Handbook
Page 7
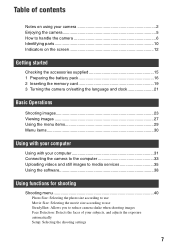
... on the screen 12 Getting started Checking the accessories supplied 15 1 Preparing the battery pack 16 2 Inserting the memory card 19 3 Turning the camera on/setting the language and clock 21 Basic Operations Shooting images 23 Viewing images 27 Using the menu items 29 Menu items 30 Using with... your computer Using with your computer 31 Connecting the camera to the computer 33 Uploading videos and still images to media services 35 Using the software 38 Using functions for shooting Shooting menu 40...
... on the screen 12 Getting started Checking the accessories supplied 15 1 Preparing the battery pack 16 2 Inserting the memory card 19 3 Turning the camera on/setting the language and clock 21 Basic Operations Shooting images 23 Viewing images 27 Using the menu items 29 Menu items 30 Using with... your computer Using with your computer 31 Connecting the camera to the computer 33 Uploading videos and still images to media services 35 Using the software 38 Using functions for shooting Shooting menu 40...
bloggie™ Handbook
Page 11
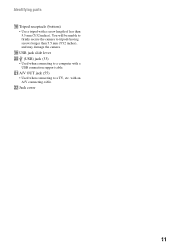
You will be unable to firmly secure the camera to a TV, etc. U A/V OUT jack (55) • Used when connecting to tripods having screws longer than 5.5 mm (7/32 inches). with a USB connection support cable. S USB jack slide lever T (USB) jack (33) • Used when connecting to a computer with an A/V connecting cable. V Jack cover 11 Identifying parts R Tripod receptacle (bottom) • Use a tripod with a screw length of less than 5.5 mm (7/32 inches), and may damage the camera.
You will be unable to firmly secure the camera to a TV, etc. U A/V OUT jack (55) • Used when connecting to tripods having screws longer than 5.5 mm (7/32 inches). with a USB connection support cable. S USB jack slide lever T (USB) jack (33) • Used when connecting to a computer with an A/V connecting cable. V Jack cover 11 Identifying parts R Tripod receptacle (bottom) • Use a tripod with a screw length of less than 5.5 mm (7/32 inches), and may damage the camera.

bloggie™ Handbook
Page 12
... changes (page 25). Indicators on the screen disappear after about 5 seconds with the default settings in parentheses for only 5 seconds, however. If you purchased this camera. When shooting still images A Display / B Display Indication Battery remaining (18) Low battery warning (64) SteadyShot (42) Recording folder • This does not appear when using...
... changes (page 25). Indicators on the screen disappear after about 5 seconds with the default settings in parentheses for only 5 seconds, however. If you purchased this camera. When shooting still images A Display / B Display Indication Battery remaining (18) Low battery warning (64) SteadyShot (42) Recording folder • This does not appear when using...

bloggie™ Handbook
Page 15
...") - bloggie Handbook (PDF) • Instruction Manual • Important Notice Hook 15 Getting started Getting started Checking the accessories supplied • Rechargeable battery pack NP-BK1 (1) • 360 Video Lens VCL-BPP1 (1) (MHS-PM5K only) • Memory card ("Memory Stick PRO Duo" 4GB) (1) (MHS-PM5K only)... • A/V connecting cable (1) • USB connection support cable (1) Attach the strap and place your hand through the loop to prevent the camera from damage by being...
...") - bloggie Handbook (PDF) • Instruction Manual • Important Notice Hook 15 Getting started Getting started Checking the accessories supplied • Rechargeable battery pack NP-BK1 (1) • 360 Video Lens VCL-BPP1 (1) (MHS-PM5K only) • Memory card ("Memory Stick PRO Duo" 4GB) (1) (MHS-PM5K only)... • A/V connecting cable (1) • USB connection support cable (1) Attach the strap and place your hand through the loop to prevent the camera from damage by being...
bloggie™ Handbook
Page 16
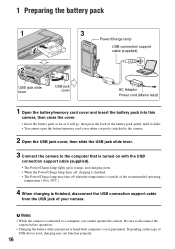
...jack slide lever USB jack cover AC Adaptor Power cord (Mains lead) 1 Open the battery/memory card cover and insert the battery pack into this camera, then close the cover. • Insert the battery pack as far as it will go, then press the back of the battery pack gently ... the USB jack cover, then slide the USB jack slide lever. 3 Connect the camera to the computer that is turned on the type of your camera. b Notes • While the camera is connected to disconnect the camera before operation. • Charging the battery with the USB connection support cable (supplied). • The ...
...jack slide lever USB jack cover AC Adaptor Power cord (Mains lead) 1 Open the battery/memory card cover and insert the battery pack into this camera, then close the cover. • Insert the battery pack as far as it will go, then press the back of the battery pack gently ... the USB jack cover, then slide the USB jack slide lever. 3 Connect the camera to the computer that is turned on the type of your camera. b Notes • While the camera is connected to disconnect the camera before operation. • Charging the battery with the USB connection support cable (supplied). • The ...
bloggie™ Handbook
Page 17
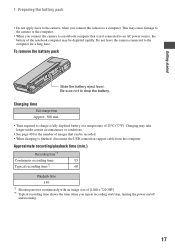
...charge a fully depleted battery at a temperature of [1280 × 720 30P] *2 Typical recording time shows the time when you connect the camera to the camera or the computer. • When you repeat recording start/stop, turning the power on/off and zooming. 17 Charging may take longer under... certain circumstances or conditions. • See page 40 for a long time. Do not leave the camera connected to the computer for the number of the notebook computer may cause damage to a notebook computer that can be depleted rapidly. Approximate ...
...charge a fully depleted battery at a temperature of [1280 × 720 30P] *2 Typical recording time shows the time when you connect the camera to the camera or the computer. • When you repeat recording start/stop, turning the power on/off and zooming. 17 Charging may take longer under... certain circumstances or conditions. • See page 40 for a long time. Do not leave the camera connected to the computer for the number of the notebook computer may cause damage to a notebook computer that can be depleted rapidly. Approximate ...
bloggie™ Handbook
Page 18
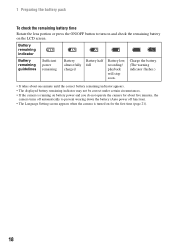
...The warning indicator flashes.) • It takes about five minutes, the camera turns off function). • The Language Setting screen appears when the camera is running on battery power and you do not operate the camera for about one minute until the correct battery remaining indicator appears. •...; The displayed battery remaining indicator may not be correct under certain circumstances. • If the camera is turned on the LCD screen. 1 Preparing the battery pack To check the remaining battery time Rotate the lens portion or press...
...The warning indicator flashes.) • It takes about five minutes, the camera turns off function). • The Language Setting screen appears when the camera is running on battery power and you do not operate the camera for about one minute until the correct battery remaining indicator appears. •...; The displayed battery remaining indicator may not be correct under certain circumstances. • If the camera is turned on the LCD screen. 1 Preparing the battery pack To check the remaining battery time Rotate the lens portion or press...
bloggie™ Handbook
Page 19
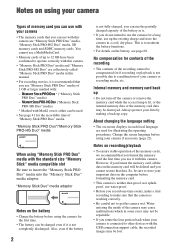
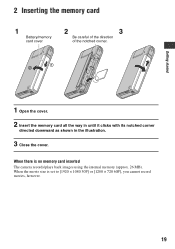
When the movie size is no memory card inserted The camera records/plays back images using the internal memory (approx. 26 MB). When there is set to [1920 × 1080 30P] or [1280 × 720 60P], you cannot record movies, however. 19 Getting started 2 Inserting the memory card 1 Battery/memory card cover 2 3 Be careful of the direction of the notched corner. 1 2 1 Open the cover. 2 Insert the memory card all the way in until it clicks with its notched corner directed downward as shown in the illustration. 3 Close the cover.
When the movie size is no memory card inserted The camera records/plays back images using the internal memory (approx. 26 MB). When there is set to [1920 × 1080 30P] or [1280 × 720 60P], you cannot record movies, however. 19 Getting started 2 Inserting the memory card 1 Battery/memory card cover 2 3 Be careful of the direction of the notched corner. 1 2 1 Open the cover. 2 Insert the memory card all the way in until it clicks with its notched corner directed downward as shown in the illustration. 3 Close the cover.

bloggie™ Handbook
Page 21
Getting started 3 Turning the camera on/setting the language and clock ON/OFF button Power/Charge lamp MENU button Multi-selector 1 Rotate the lens portion to turn the power on. • The Power/Charge lamp lights up in green. • Rotating the lens portion in the arrow direction turns on the camera. • You can also turn the power on by pressing the ON/OFF button. • The lens rotates within the range of 0 to 270 degrees. 2 Select the desired language with the multi-selector tilt to v/V, then press the multi-selector. 21
Getting started 3 Turning the camera on/setting the language and clock ON/OFF button Power/Charge lamp MENU button Multi-selector 1 Rotate the lens portion to turn the power on. • The Power/Charge lamp lights up in green. • Rotating the lens portion in the arrow direction turns on the camera. • You can also turn the power on by pressing the ON/OFF button. • The lens rotates within the range of 0 to 270 degrees. 2 Select the desired language with the multi-selector tilt to v/V, then press the multi-selector. 21

bloggie™ Handbook
Page 22
3 Turning the camera on/setting the language and clock 3 Set the clock with the multi-selector. 1 Select the date display format with v/V, then press the multi-selector. 2 Select ... turn the power off Press the ON/OFF button. • You can also turn the power off by rotating the lens portion back while the camera is in the recording mode. • You cannot turn the power off, even if you rotate the lens portion back while the...
3 Turning the camera on/setting the language and clock 3 Set the clock with the multi-selector. 1 Select the date display format with v/V, then press the multi-selector. 2 Select ... turn the power off Press the ON/OFF button. • You can also turn the power off by rotating the lens portion back while the camera is in the recording mode. • You cannot turn the power off, even if you rotate the lens portion back while the...

bloggie™ Handbook
Page 25
...those using the zoom lever. However, the battery power may decrease faster under such condition. • The LCD screen will not display while the camera is set to AUTO. Tilt the multi-selector to v (Screen display) repeatedly, the display changes as follows. Tilt to v (Screen display)... seconds, however. • By tilting to normal. • If you can increase the brightness of the LCD backlight. If you purchased the camera. AUTO ON OFF • Indicators on the screen disappear after about 5 seconds with the default settings in bright outside light, adjust the brightness ...
...those using the zoom lever. However, the battery power may decrease faster under such condition. • The LCD screen will not display while the camera is set to AUTO. Tilt the multi-selector to v (Screen display) repeatedly, the display changes as follows. Tilt to v (Screen display)... seconds, however. • By tilting to normal. • If you can increase the brightness of the LCD backlight. If you purchased the camera. AUTO ON OFF • Indicators on the screen disappear after about 5 seconds with the default settings in bright outside light, adjust the brightness ...

bloggie™ Handbook
Page 26
...; The image may become distorted when you press (Photo) button and (Movie) button, countdown timer is displayed, and after rapid beep sounds are heard, the camera will be normal when recorded. • The same image as those recorded appears on the LCD screen, but the image will shoot. Shooting images Useful...
...; The image may become distorted when you press (Photo) button and (Movie) button, countdown timer is displayed, and after rapid beep sounds are heard, the camera will be normal when recorded. • The same image as those recorded appears on the LCD screen, but the image will shoot. Shooting images Useful...

bloggie™ Handbook
Page 30
Menu for shooting (page 40) Photo Size SteadyShot Setup Movie Size Face Detection Menu for viewing (page 43) (Delete) (Protect) (Setup) (Slideshow) (Rotate) 30 The shooting menu is available only in the shooting mode, and the viewing menu is available only in the playback mode. Only the available items are displayed on the camera mode. Menu items The available menu items vary depending on the screen.
Menu for shooting (page 40) Photo Size SteadyShot Setup Movie Size Face Detection Menu for viewing (page 43) (Delete) (Protect) (Setup) (Slideshow) (Rotate) 30 The shooting menu is available only in the shooting mode, and the viewing menu is available only in the playback mode. Only the available items are displayed on the camera mode. Menu items The available menu items vary depending on the screen.


