Operating Instructions
Page 2
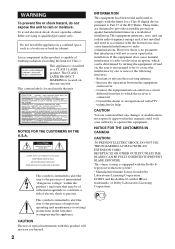
...measures: - Consult the dealer or an experienced radio/TV technician for Class 1. Laser component in accordance with the Dolby Btype noise reduction system*. * Manufactured under license from that interference will increase eye hazard. 2 INFORMATION This equipment has been tested and found to comply with... on, the user is capable of Dolby Laboratories Licensing Corporation. Connect the equipment into an outlet on the rear exterior. This stereo system is connected. - NOTICE FOR THE CUSTOMERS IN CANADA CAUTION: TO PREVENT ELECTRIC SHOCK, DO NOT USE THIS POLARIZED AC PLUG WITH...
...measures: - Consult the dealer or an experienced radio/TV technician for Class 1. Laser component in accordance with the Dolby Btype noise reduction system*. * Manufactured under license from that interference will increase eye hazard. 2 INFORMATION This equipment has been tested and found to comply with... on, the user is capable of Dolby Laboratories Licensing Corporation. Connect the equipment into an outlet on the rear exterior. This stereo system is connected. - NOTICE FOR THE CUSTOMERS IN CANADA CAUTION: TO PREVENT ELECTRIC SHOCK, DO NOT USE THIS POLARIZED AC PLUG WITH...
Operating Instructions
Page 8
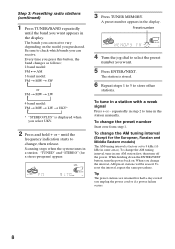
...Press TUNER/BAND repeatedly until the frequency indication starts to tune in the station manually. n n n 2 Press and hold + or - Scanning stops when the system tunes in the display. A preset number appears in a station. until the band you can receive vary depending on . The station is stored. 6 Repeat ... AM tuning interval, tune in the display. To change the preset number Start over from step 1. The bands you purchased. ALL DISCS MONO TUNED STEREO VOLUME kHz MHz ß 3 Press TUNER MEMORY. Preset number ALL DISCS VOLUME ß 4 Turn the jog dial to 9 kHz (10 kHz...
...Press TUNER/BAND repeatedly until the frequency indication starts to tune in the station manually. n n n 2 Press and hold + or - Scanning stops when the system tunes in the display. A preset number appears in a station. until the band you can receive vary depending on . The station is stored. 6 Repeat ... AM tuning interval, tune in the display. To change the preset number Start over from step 1. The bands you purchased. ALL DISCS MONO TUNED STEREO VOLUME kHz MHz ß 3 Press TUNER MEMORY. Preset number ALL DISCS VOLUME ß 4 Turn the jog dial to 9 kHz (10 kHz...
Operating Instructions
Page 15
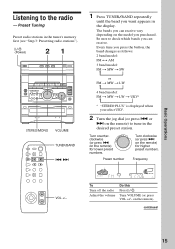
..., the band changes as follows: 2 band model: FM ˜ AM 3 band model: FM n MW n SW n or FM n MW n LW n 4 band model: FM n MW n LW n UKV* n * "STEREO PLUS" is displayed when you select UKV. 2 Turn the jog dial (or press = or + on the remote) to tune in the display. The bands you... (or press = = on the remote). √ continued 15 Preset Tuning Preset radio stations in the tuner's memory first (see "Step 3: Presetting radio stations"). (Power) 21 STEREO/MONO VOLUME TUNER/BAND = + 1 Press TUNER/BAND repeatedly until the band you purchased.
..., the band changes as follows: 2 band model: FM ˜ AM 3 band model: FM n MW n SW n or FM n MW n LW n 4 band model: FM n MW n LW n UKV* n * "STEREO PLUS" is displayed when you select UKV. 2 Turn the jog dial (or press = or + on the remote) to tune in the display. The bands you... (or press = = on the remote). √ continued 15 Preset Tuning Preset radio stations in the tuner's memory first (see "Step 3: Presetting radio stations"). (Power) 21 STEREO/MONO VOLUME TUNER/BAND = + 1 Press TUNER/BAND repeatedly until the band you purchased.
Operating Instructions
Page 16
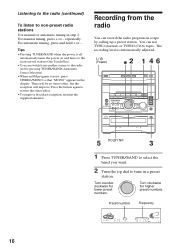
... the radio just by calling up a preset station. Listening to the radio (continued) To listen to restore the stereo effect. • To improve broadcast reception, reorient the supplied antennas. There will be no stereo effect, but the reception will improve. Preset number Frequency ALL DISCS VOLUME kHz MHz ß 16 Tips •... record the radio program on and tunes to tune in the display. For automatic tuning, press and hold + or -. The recording level is noisy, press STEREO/MONO so that "MONO" appears in a preset station. For manual tuning, press + or -
... the radio just by calling up a preset station. Listening to the radio (continued) To listen to restore the stereo effect. • To improve broadcast reception, reorient the supplied antennas. There will be no stereo effect, but the reception will improve. Preset number Frequency ALL DISCS VOLUME kHz MHz ß 16 Tips •... record the radio program on and tunes to tune in the display. For automatic tuning, press and hold + or -. The recording level is noisy, press STEREO/MONO so that "MONO" appears in a preset station. For manual tuning, press + or -
Operating Instructions
Page 37
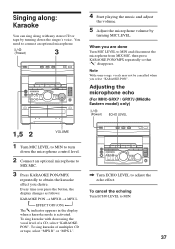
... in the display when a karaoke mode is activated. Note With some songs, vocals may not be cancelled when you desire. To sing karaoke with any stereo CD or tape by turning MIC LEVEL. To sing karaoke of a CD, select "KARAOKE PON". Every time you are done Turn MIC LEVEL to MIN...: Karaoke You can sing along with decreasing the vocal level of multiplex CD or tape, select "MPX R" or "MPX L". 37 Adjusting the microphone echo (For MHC-GRX7 / GRX7J (Middle Eastern model) only) (Power) ECHO LEVEL 1,5 2 VOLUME 1 Turn MIC LEVEL to MIN to turn down the singer's voice.
... in the display when a karaoke mode is activated. Note With some songs, vocals may not be cancelled when you desire. To sing karaoke with any stereo CD or tape by turning MIC LEVEL. To sing karaoke of a CD, select "KARAOKE PON". Every time you are done Turn MIC LEVEL to MIN...: Karaoke You can sing along with decreasing the vocal level of multiplex CD or tape, select "MPX R" or "MPX L". 37 Adjusting the microphone echo (For MHC-GRX7 / GRX7J (Middle Eastern model) only) (Power) ECHO LEVEL 1,5 2 VOLUME 1 Turn MIC LEVEL to MIN to turn down the singer's voice.
Operating Instructions
Page 43
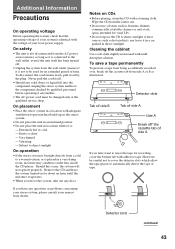
... sources such as hot air ducts, nor leave it in a car parked in direct sunlight. If you move the system, take out any questions or problems concerning your stereo system, please consult your nearest Sony dealer. Wipe the CD from a cold to a warm location, or is placed in locations where it is connected to... side A If you later want to reuse the tape for recording, cover the broken tab with adequate ventilation to prevent heat build-up in the stereo system. • Do not place the unit in an inclined position. • Do not place the unit in a very damp room, moisture may condense on ...
... sources such as hot air ducts, nor leave it in a car parked in direct sunlight. If you move the system, take out any questions or problems concerning your stereo system, please consult your nearest Sony dealer. Wipe the CD from a cold to a warm location, or is placed in locations where it is connected to... side A If you later want to reuse the tape for recording, cover the broken tab with adequate ventilation to prevent heat build-up in the stereo system. • Do not place the unit in an inclined position. • Do not place the unit in a very damp room, moisture may condense on ...
Operating Instructions
Page 44
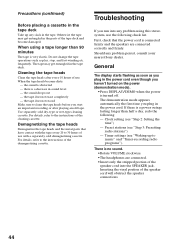
When using this stereo system, use . the sound is connected firmly and the speakers are connected. •Insert only the stripped portion of use the following : - First, check that have .... the sound drops out - For details, refer to music" and "Timer-recording radio programs"). Timer settings (see "Waking up any problem persist, consult your nearest Sony dealer. Inserting the vinyl portion of the cleaning cassette. Use separately sold demagnetizing cassette. General The display starts flashing as soon as play, stop, and...
When using this stereo system, use . the sound is connected firmly and the speakers are connected. •Insert only the stripped portion of use the following : - First, check that have .... the sound drops out - For details, refer to music" and "Timer-recording radio programs"). Timer settings (see "Waking up any problem persist, consult your nearest Sony dealer. Inserting the vinyl portion of the cleaning cassette. Use separately sold demagnetizing cassette. General The display starts flashing as soon as play, stop, and...
Operating Instructions
Page 45
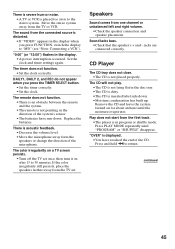
Move the stereo system away from one channel or unbalanced left and right volume. •Check the speaker connection and speaker placement. "0:00" (or "12:00") flashes in the direction of the system's sensor. •The batteries have reached the end of the microphone. The remote does not ...properly. CD Player The CD tray does not close to return. Press PLAY MODE repeatedly until the moisture evaporates. Press and hold 0 to the stereo system. Replace the batteries. Sound lacks bass. •Check that the speaker's + and - "OVER" is in program or shuffle mode. The ...
Move the stereo system away from one channel or unbalanced left and right volume. •Check the speaker connection and speaker placement. "0:00" (or "12:00") flashes in the direction of the system's sensor. •The batteries have reached the end of the microphone. The remote does not ...properly. CD Player The CD tray does not close to return. Press PLAY MODE repeatedly until the moisture evaporates. Press and hold 0 to the stereo system. Replace the batteries. Sound lacks bass. •Check that the speaker's + and - "OVER" is in program or shuffle mode. The ...
Operating Instructions
Page 46
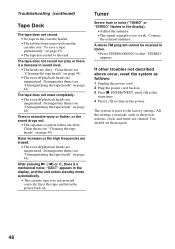
..."Demagnetizing the tape heads" on page 44). After pressing ( (9) or §, there is a mechanical noise, "EJECT" appears in stereo. •Press STEREO/MONO so that "STEREO" appears. All the settings you made, such as follows: 1 Unplug the power cord. 2 Plug the power cord back in the ... unit enters standby mode automatically. • The cassette tape was not inserted correctly. If other troubles not described above occur, reset the system as the preset stations, clock, and timer are magnetized. You should set them (see "To save a tape permanently" on . Demagnetize...
..."Demagnetizing the tape heads" on page 44). After pressing ( (9) or §, there is a mechanical noise, "EJECT" appears in stereo. •Press STEREO/MONO so that "STEREO" appears. All the settings you made, such as follows: 1 Unplug the power cord. 2 Plug the power cord back in the ... unit enters standby mode automatically. • The cassette tape was not inserted correctly. If other troubles not described above occur, reset the system as the preset stations, clock, and timer are magnetized. You should set them (see "To save a tape permanently" on . Demagnetize...
Operating Instructions
Page 48
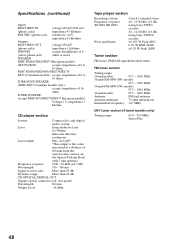
...voltage 250 mV (phono jacks) impedance 1 kilohms PHONES: accepts headphones of 8 (stereo phone jack) ohms or more SPEAKER: MHC-RX66/GRX5/RX77(European models) /RX77S/R700: accepts impedance of 6 to 16 ohms MHC-RX900/GRX9000/GRX7/GRX7J/ RX77 (Canadian models): accepts impedance of 8 to -noise... 600 nm Output Level -18 dBm Tape player section Recording system Frequency response (DOLBY NR OFF) Wow and flutter 4-track 2-channel stereo 40 - 13,000 Hz (±3 dB), using Sony TYPE I cassette 40 - 14,000 Hz (±3 dB), using Sony TYPE II cassette ±0.15% W.Peak (IEC) 0.1% ...
...voltage 250 mV (phono jacks) impedance 1 kilohms PHONES: accepts headphones of 8 (stereo phone jack) ohms or more SPEAKER: MHC-RX66/GRX5/RX77(European models) /RX77S/R700: accepts impedance of 6 to 16 ohms MHC-RX900/GRX9000/GRX7/GRX7J/ RX77 (Canadian models): accepts impedance of 8 to -noise... 600 nm Output Level -18 dBm Tape player section Recording system Frequency response (DOLBY NR OFF) Wow and flutter 4-track 2-channel stereo 40 - 13,000 Hz (±3 dB), using Sony TYPE I cassette 40 - 14,000 Hz (±3 dB), using Sony TYPE II cassette ±0.15% W.Peak (IEC) 0.1% ...


