Operating Instructions
Page 6
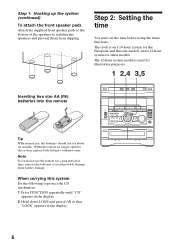
... possible damage from slipping. The clock is used for illustration purposes. 1 2,4 3,5 Inserting two size AA (R6) batteries into the remote ] }} ] Tip With normal use the remote for about six months. When carrying this system Do the following to stabilize the speakers and prevent them from battery leakage. Note If you do not use...
... possible damage from slipping. The clock is used for illustration purposes. 1 2,4 3,5 Inserting two size AA (R6) batteries into the remote ] }} ] Tip With normal use the remote for about six months. When carrying this system Do the following to stabilize the speakers and prevent them from battery leakage. Note If you do not use...
Operating Instructions
Page 9
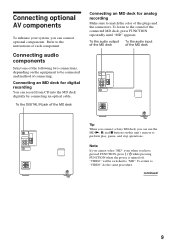
... be connected and method of the following two connections, depending on this unit's remote to match the color of the connected MD deck, press FUNCTION repeatedly until "MD... plugs and the connectors. To return to the instructions of the MD deck Tip When you connect a Sony MD deck, you have pressed FUNCTION, press while pressing FUNCTION when the power is turned off. To ...audio input of the MD deck of each component. Connecting optional AV components To enhance your system, you can record from CD into the MD deck digitally by connecting an optical cable. Refer to "VIDEO...
... be connected and method of the following two connections, depending on this unit's remote to match the color of the connected MD deck, press FUNCTION repeatedly until "MD... plugs and the connectors. To return to the instructions of the MD deck Tip When you connect a Sony MD deck, you have pressed FUNCTION, press while pressing FUNCTION when the power is turned off. To ...audio input of the MD deck of each component. Connecting optional AV components To enhance your system, you can record from CD into the MD deck digitally by connecting an optical cable. Refer to "VIDEO...
Operating Instructions
Page 12
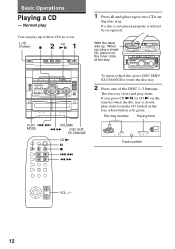
... 1 DISCS PROGRAM SHUFFLE REPEAT 1 Track number VOLUME STEP ß ◊ VOL +/- √ 12 Normal play You can play starts from the CD loaded on the remote) when the disc tray is not placed properly it on the disc tray. If a disc is closed, play up to three CDs in a row. (Power...
... 1 DISCS PROGRAM SHUFFLE REPEAT 1 Track number VOLUME STEP ß ◊ VOL +/- √ 12 Normal play You can play starts from the CD loaded on the remote) when the disc tray is not placed properly it on the disc tray. If a disc is closed, play up to three CDs in a row. (Power...
Operating Instructions
Page 13
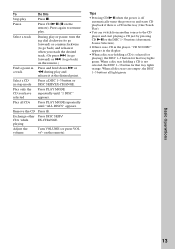
... • Pressing CD (P when the power is off automatically turns the power on the remote). Select a CD in a track Press and hold down ) or 0 during play and release it when you have selected Press PLAY MODE repeatedly until "ALL DISCS" ... (or playing), the DISC 1~3 button for that tray lights green. Remove the CD Press §. To Do this Stop play . Pause Press CD (P (P on the remote.) Find a point in stop mode Press a DISC 1~3 button or DISC SKIP/EX-CHANGE. Exchange other Press DISC SKIP/ CDs while EX-CHANGE. playing Adjust the...
... • Pressing CD (P when the power is off automatically turns the power on the remote). Select a CD in a track Press and hold down ) or 0 during play and release it when you have selected Press PLAY MODE repeatedly until "ALL DISCS" ... (or playing), the DISC 1~3 button for that tray lights green. Remove the CD Press §. To Do this Stop play . Pause Press CD (P (P on the remote.) Find a point in stop mode Press a DISC 1~3 button or DISC SKIP/EX-CHANGE. Exchange other Press DISC SKIP/ CDs while EX-CHANGE. playing Adjust the...
Operating Instructions
Page 15
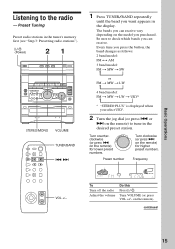
... want appears in the display. Turn counter- + clockwise (or press = = on the remote) for lower preset numbers. Preset Tuning Preset radio stations in the desired preset station. VOL +/- on the remote) to tune in the tuner's memory first (see "Step 3: Presetting radio stations"). (Power... = + 1 Press TUNER/BAND repeatedly until the band you purchased. The bands you can receive. Preset number Turn clockwise (or press + on the remote) for higher preset numbers. Every time you press the button, the band changes as follows: 2 band model: FM ˜ AM 3 band model:...
... want appears in the display. Turn counter- + clockwise (or press = = on the remote) for lower preset numbers. Preset Tuning Preset radio stations in the desired preset station. VOL +/- on the remote) to tune in the tuner's memory first (see "Step 3: Presetting radio stations"). (Power... = + 1 Press TUNER/BAND repeatedly until the band you purchased. The bands you can receive. Preset number Turn clockwise (or press + on the remote) for higher preset numbers. Every time you press the button, the band changes as follows: 2 band model: FM ˜ AM 3 band model:...

Operating Instructions
Page 17
... step 2 to tune in lowlevel high-frequency signals, press DOLBY NR so that "DOLBY NR" appears after pressing r REC. • When you record on the remote. (Power) 3 p = + P PAUSE To stop recording Press p. Select ß (or RELAY) to record facing forward 4 Press r REC. Playing a tape You can also use any type of...
... step 2 to tune in lowlevel high-frequency signals, press DOLBY NR so that "DOLBY NR" appears after pressing r REC. • When you record on the remote. (Power) 3 p = + P PAUSE To stop recording Press p. Select ß (or RELAY) to record facing forward 4 Press r REC. Playing a tape You can also use any type of...
Operating Instructions
Page 18
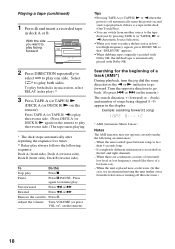
...- With the side you want to play facing forward 2 Press DIRECTION repeatedly to select A to go back. (Or press = or + on the remote.) The search direction, + (forward) or - (back), and number of a baritone sax). - When there are continuous sections of extremely low level or... B. Select ß* to go forward. Press TAPE A (or TAPE B) 9 to play the reverse side. (Press DECK A (or DECK B) ( again on the remote). Fast-forward Press 0 or ). If completely different information is less than 4 seconds long. - Playing a tape (continued) 1 Press § and insert a recorded tape...
...- With the side you want to play facing forward 2 Press DIRECTION repeatedly to select A to go back. (Or press = or + on the remote.) The search direction, + (forward) or - (back), and number of a baritone sax). - When there are continuous sections of extremely low level or... B. Select ß* to go forward. Press TAPE A (or TAPE B) 9 to play the reverse side. (Press DECK A (or DECK B) ( again on the remote). Fast-forward Press 0 or ). If completely different information is less than 4 seconds long. - Playing a tape (continued) 1 Press § and insert a recorded tape...
Operating Instructions
Page 22
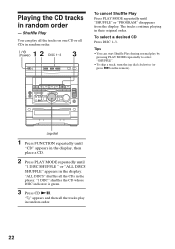
"J" appears and then all the tracks on the remote). The tracks continue playing in random order. 22 Tips • You can play all the tracks play by pressing PLAY MODE repeatedly to select "SHUFFLE". &#...
"J" appears and then all the tracks on the remote). The tracks continue playing in random order. 22 Tips • You can play all the tracks play by pressing PLAY MODE repeatedly to select "SHUFFLE". &#...
Operating Instructions
Page 24
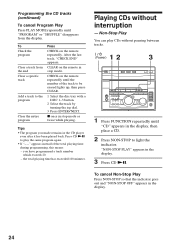
CHECK on the remote repeatedly until the number of the total playing time during programming, this means: - Tips • The program you have programmed a ...2 Select the track by turning the jog dial. 3 Press ENTER/NEXT. To Check the program Clear a track from the display. CLEAR on the remote repeatedly. After the last track, "CHECK END" appears. p once in stop mode or twice while playing. To cancel Non-Stop Play Press NON... total playing time has exceeded 100 minutes. Press CD (P to the program Clear the entire program Press CHECK on the remote in stop mode.
CHECK on the remote repeatedly until the number of the total playing time during programming, this means: - Tips • The program you have programmed a ...2 Select the track by turning the jog dial. 3 Press ENTER/NEXT. To Check the program Clear a track from the display. CLEAR on the remote repeatedly. After the last track, "CHECK END" appears. p once in stop mode or twice while playing. To cancel Non-Stop Play Press NON... total playing time has exceeded 100 minutes. Press CD (P to the program Clear the entire program Press CHECK on the remote in stop mode.
Operating Instructions
Page 26
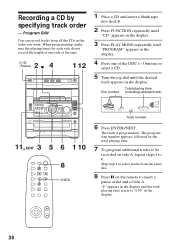
... from all the CDs in the order you want. Recording a CD by the total playing time. 7 To program additional tracks to be recorded on the remote to insert a pause at the end of the DISC 1~3 buttons to select a CD. 5 Turn the jog dial until the desired track appears in the display...
... from all the CDs in the order you want. Recording a CD by the total playing time. 7 To program additional tracks to be recorded on the remote to insert a pause at the end of the DISC 1~3 buttons to select a CD. 5 Turn the jog dial until the desired track appears in the display...
Operating Instructions
Page 27
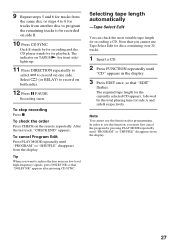
... record on side B. 10 Press CD SYNC. In order to use this function after pressing CD SYNC. Select ß (or RELAY) to record on the remote repeatedly. Selecting tape length automatically -Tape Select Edit You can check the most suitable tape length for discs containing over 20 tracks. 1 Insert a CD. 2 Press...
... record on side B. 10 Press CD SYNC. In order to use this function after pressing CD SYNC. Select ß (or RELAY) to record on the remote repeatedly. Selecting tape length automatically -Tape Select Edit You can check the most suitable tape length for discs containing over 20 tracks. 1 Insert a CD. 2 Press...
Operating Instructions
Page 28
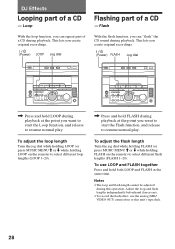
...lengths (FLASH 1~20). To adjust the flash length Turn the jog dial while holding LOOP (or press MUSIC MENU > or . while holding LOOP on the remote) to resume normal play . Flash With the flash function, you want to start the Flash function, and release to resume normal play . To use the...MENU > or . This lets you can "flash" the CD sound during playback. DJ Effects Looping part of a CD during playback. while holding FLASH on the remote) to select different loop lengths (LOOP 1~20). / Press and hold both LOOP and FLASH at the point you can repeat part of a CD -
...lengths (FLASH 1~20). To adjust the flash length Turn the jog dial while holding LOOP (or press MUSIC MENU > or . while holding LOOP on the remote) to resume normal play . Flash With the flash function, you want to start the Flash function, and release to resume normal play . To use the...MENU > or . This lets you can "flash" the CD sound during playback. DJ Effects Looping part of a CD during playback. while holding FLASH on the remote) to select different loop lengths (LOOP 1~20). / Press and hold both LOOP and FLASH at the point you can repeat part of a CD -
Operating Instructions
Page 31
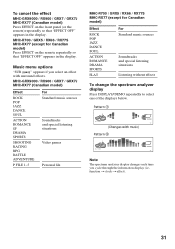
... RPG BATTLE ADVENTURE P FILE 1~5 For Standard music sources Soundtracks and special listening situations Video games Personal file MHC-R700 / GRX5 / RX66 / RX77S MHC-RX77 (except for Canadian model) Press EFFECT on the front panel (or the remote) repeatedly so that "EFFECT OFF" appears in the display. Pattern 1 ALL DISCS (Changes with surround effects. To...
... RPG BATTLE ADVENTURE P FILE 1~5 For Standard music sources Soundtracks and special listening situations Video games Personal file MHC-R700 / GRX5 / RX66 / RX77S MHC-RX77 (except for Canadian model) Press EFFECT on the front panel (or the remote) repeatedly so that "EFFECT OFF" appears in the display. Pattern 1 ALL DISCS (Changes with surround effects. To...
Operating Instructions
Page 45
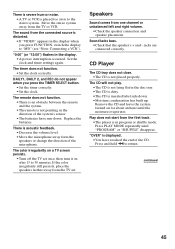
Set the clock and timer settings again. The remote does not function. •There is an obstacle between the remote and the system. •The remote is not pointing in the direction of the system's sensor. •The batteries have reached the end of the microphone. Speakers Sound comes from... is displayed. •You have run down . •Moisture condensation has built up. Remove the CD and leave the system turned on after 15 to the stereo system. Replace the batteries. There is acoustic feedback. •Decrease the volume level. •Move the microphone away form the ...
Set the clock and timer settings again. The remote does not function. •There is an obstacle between the remote and the system. •The remote is not pointing in the direction of the system's sensor. •The batteries have reached the end of the microphone. Speakers Sound comes from... is displayed. •You have run down . •Moisture condensation has built up. Remove the CD and leave the system turned on after 15 to the stereo system. Replace the batteries. There is acoustic feedback. •Decrease the volume level. •Move the microphone away form the ...
Operating Instructions
Page 50
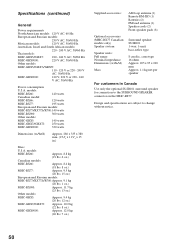
... antenna (1) Remote RM-SR5 (1) Batteries (2) FM lead antenna (1) Speaker cords (2) Front speaker pads (8) Surround speaker SS-SR101 1-way, 1-unit, bass-reflex type 8 cm dia., cone type 16 ohms Approx. 205 x 95 x 240 mm Approx. 1.1 kg net per speaker For customers in .) Mass U.S.A. models: MHC-RX66: 140 watts Canadian model: MHC-RX66: 120 watts MHC-RX77: 195...
... antenna (1) Remote RM-SR5 (1) Batteries (2) FM lead antenna (1) Speaker cords (2) Front speaker pads (8) Surround speaker SS-SR101 1-way, 1-unit, bass-reflex type 8 cm dia., cone type 16 ohms Approx. 205 x 95 x 240 mm Approx. 1.1 kg net per speaker For customers in .) Mass U.S.A. models: MHC-RX66: 140 watts Canadian model: MHC-RX66: 120 watts MHC-RX77: 195...


