Operating Instructions (primary manual)
Page 3
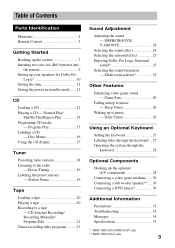
... 26 Waking up the optional A/V components 28 Connecting a video game machine ...... 29 Connecting a sub woofer speaker** .... 30 Connecting a DVD player 30 Additional Information Precautions 31 Troubleshooting 32 Messages 34 Specifications 35 * MHC-MG510AV/MG310AV only ** MHC-MG310AV only 3 Table of Contents Parts Identification Main unit 4 Remote Control 5 Getting Started Hooking up the system 7 Inserting two size AA...
... 26 Waking up the optional A/V components 28 Connecting a video game machine ...... 29 Connecting a sub woofer speaker** .... 30 Connecting a DVD player 30 Additional Information Precautions 31 Troubleshooting 32 Messages 34 Specifications 35 * MHC-MG510AV/MG310AV only ** MHC-MG310AV only 3 Table of Contents Parts Identification Main unit 4 Remote Control 5 Getting Started Hooking up the system 7 Inserting two size AA...
Operating Instructions (primary manual)
Page 5
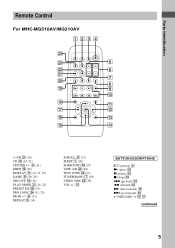
qg BUTTON DESCRIPTIONS @/1 (power) 4 N (play) 0 X (pause) 0 x (stop) 0 . (go back) 0 m (rewind) 0 M (fast forward) 0 > (go forward) 0 TDISC/DISCt qs qj continued 5 Parts Identification Remote Control For MHC-MG510AV/MG310AV 1 234 wf wd 5 ws 6 wa 7 w; 8 ql 9 0 qk qa qj qs qh qd qg qf 5.1CH wa (30) CD ql (14, 21) CENTER +/- 5 (11) DBFB qd (...
qg BUTTON DESCRIPTIONS @/1 (power) 4 N (play) 0 X (pause) 0 x (stop) 0 . (go back) 0 m (rewind) 0 M (fast forward) 0 > (go forward) 0 TDISC/DISCt qs qj continued 5 Parts Identification Remote Control For MHC-MG510AV/MG310AV 1 234 wf wd 5 ws 6 wa 7 w; 8 ql 9 0 qk qa qj qs qh qd qg qf 5.1CH wa (30) CD ql (14, 21) CENTER +/- 5 (11) DBFB qd (...
Operating Instructions (primary manual)
Page 6
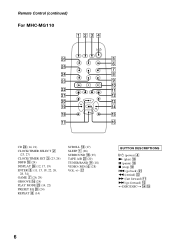
Remote Control (continued) For MHC-MG110 1 23 4 wh 5 6 wg 7 wf 8 wd 9 0 ws qa wa qs w; qj BUTTON DESCRIPTIONS @/1 (power) 4 N (play) 0 X (pause) 0 x (stop) 0 . (go back) wa m (rewind) ws M (fast forward) qa > (...
Remote Control (continued) For MHC-MG110 1 23 4 wh 5 6 wg 7 wf 8 wd 9 0 ws qa wa qs w; qj BUTTON DESCRIPTIONS @/1 (power) 4 N (play) 0 X (pause) 0 x (stop) 0 . (go back) wa m (rewind) ws M (fast forward) qa > (...
Operating Instructions (primary manual)
Page 9
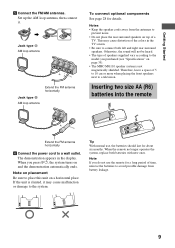
.../AM antennas. Inserting two size AA (R6) batteries into the remote AM FM 75Ω e E E e Extend the FM antenna horizontally 6 Connect the power cord to the model you purchased (see "Specifications" on page 35). • The MHC-MG110 speaker system is slanted, it . The demonstration appears in the TV screen... TV. Jack type A AM loop antenna AM FM 75Ω Extend the FM antenna horizontally Jack type B AM loop antenna To connect optional components See page 28 for a long period of time, remove the batteries to prevent noise. • Do not place the rear surround speakers on ...
.../AM antennas. Inserting two size AA (R6) batteries into the remote AM FM 75Ω e E E e Extend the FM antenna horizontally 6 Connect the power cord to the model you purchased (see "Specifications" on page 35). • The MHC-MG110 speaker system is slanted, it . The demonstration appears in the TV screen... TV. Jack type A AM loop antenna AM FM 75Ω Extend the FM antenna horizontally Jack type B AM loop antenna To connect optional components See page 28 for a long period of time, remove the batteries to prevent noise. • Do not place the rear surround speakers on ...
Operating Instructions (primary manual)
Page 11
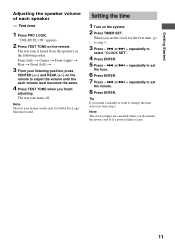
...left) t Center t Front (right) t Rear t Front (left) t ... 3 From your listening position, press CENTER (+/-) and REAR (+/-) on the system. 2 Press TIMER SET. Setting the time 1 Turn on the remote to adjust the volume until the each speaker - or > + repeatedly to set the hour. 6 Press ENTER. 7 Press - . or > + repeatedly...the clock for Dolby Pro Logic Surround sound. Tip If you finish adjusting. "DOLBY PL ON" appears. 2 Press TEST TONE on the remote. Note The test tone feature works only for the first time, go to change the time, start over from the speakers in the ...
...left) t Center t Front (right) t Rear t Front (left) t ... 3 From your listening position, press CENTER (+/-) and REAR (+/-) on the system. 2 Press TIMER SET. Setting the time 1 Turn on the remote to adjust the volume until the each speaker - or > + repeatedly to set the hour. 6 Press ENTER. 7 Press - . or > + repeatedly...the clock for Dolby Pro Logic Surround sound. Tip If you finish adjusting. "DOLBY PL ON" appears. 2 Press TEST TONE on the remote. Note The test tone feature works only for the first time, go to change the time, start over from the speakers in the ...
Operating Instructions (primary manual)
Page 12
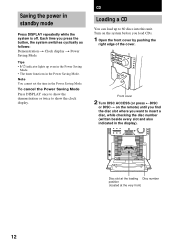
Each time you press the button, the system switches cyclically as follows: Demonstration t Clock display t Power Saving Mode Tips • ?/1 indicator lights up to 60 discs into... every slot and also indicated in standby mode Press DISPLAY repeatedly while the system is off. Disc slot at the loading Disc number position (located at the very front) 12 Turn on the remote) until you find the disc slot where you load CDs. 1 Open the.... Saving the power in the display). Front cover 2 Turn DISC ACCESS (or press TDISC or DISCt on the system before you want to show the clock display.
Each time you press the button, the system switches cyclically as follows: Demonstration t Clock display t Power Saving Mode Tips • ?/1 indicator lights up to 60 discs into... every slot and also indicated in standby mode Press DISPLAY repeatedly while the system is off. Disc slot at the loading Disc number position (located at the very front) 12 Turn on the remote) until you find the disc slot where you load CDs. 1 Open the.... Saving the power in the display). Front cover 2 Turn DISC ACCESS (or press TDISC or DISCt on the system before you want to show the clock display.
Operating Instructions (primary manual)
Page 14
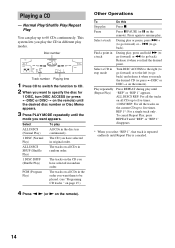
Playing a CD - This system lets you select "REP 1", that track is canceled. 14 Other Operations To Do this ... Play) 1 DISC (Normal Play) ALL DISCS SHUF (Shuffle Play) To play Press x. The tracks on all the tracks on the remote) until the desired disc number or Disc Memo appears. 3 Press PLAY MODE repeatedly until "REP" or "REP 1" appears. ALL DISCS...to the left (to be played. (see "Programing CD tracks " on page 15.) 4 Press n N (or N on the remote). Disc number Track number Playing time 1 Press CD to switch the function to five times. The CD you find the desired point....
Playing a CD - This system lets you select "REP 1", that track is canceled. 14 Other Operations To Do this ... Play) 1 DISC (Normal Play) ALL DISCS SHUF (Shuffle Play) To play Press x. The tracks on all the tracks on the remote) until the desired disc number or Disc Memo appears. 3 Press PLAY MODE repeatedly until "REP" or "REP 1" appears. ALL DISCS...to the left (to be played. (see "Programing CD tracks " on page 15.) 4 Press n N (or N on the remote). Disc number Track number Playing time 1 Press CD to switch the function to five times. The CD you find the desired point....
Operating Instructions (primary manual)
Page 15
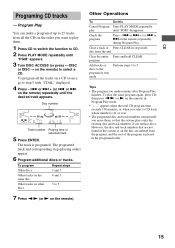
... "--.--" appears when the total CD program time exceeds 100 minutes, or when you made remains after Program Play finishes. or > on the remote). Disc number Track number Playing time of the program is programed. The programed track and corresponding step (playing order) appear. 6 Program additional...program Press - . However, the disc and track numbers that the system plays only the existing disc and track numbers if you replace discs. or > + (or . Clear a track or Press CLEAR in the system or on the remote) repeatedly during Program Play. To play until the desired track appears....
... "--.--" appears when the total CD program time exceeds 100 minutes, or when you made remains after Program Play finishes. or > on the remote). Disc number Track number Playing time of the program is programed. The programed track and corresponding step (playing order) appear. 6 Program additional...program Press - . However, the disc and track numbers that the system plays only the existing disc and track numbers if you replace discs. or > + (or . Clear a track or Press CLEAR in the system or on the remote) repeatedly during Program Play. To play until the desired track appears....

Operating Instructions (primary manual)
Page 16
... can input the following characters: • Upper cases (A - You can also label CDs using an optional keyboard (see "Labeling titles through the keyboard" on the remote) repeatedly until "NAME IN" appears. 5 Press ENTER. 6 Turn DISC ACCESS until the character you want appears. Labeling a CD - The Disc Memo of the slot in...
... can input the following characters: • Upper cases (A - You can also label CDs using an optional keyboard (see "Labeling titles through the keyboard" on the remote) repeatedly until "NAME IN" appears. 5 Press ENTER. 6 Turn DISC ACCESS until the character you want appears. Labeling a CD - The Disc Memo of the slot in...
Operating Instructions (primary manual)
Page 17
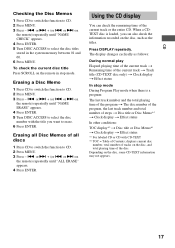
... check the information recorded on the disc, some CD-TEXT information may not appears. 17 The display changes cyclically as the titles. or > on the remote) repeatedly until "NAME CHECK" appears. 4 Press ENTER. 5 Turn DISC ACCESS to erase. 6 Press ENTER. or > + (or . Press DISPLAY repeatedly. or ...> on the remote in stop mode During Program Play mode when there is loaded, you want to select the disc titles stored in the system memory between 01 and 60. 6 Press MENU. CD Checking the Disc Memos 1 Press CD to...
... check the information recorded on the disc, some CD-TEXT information may not appears. 17 The display changes cyclically as the titles. or > on the remote) repeatedly until "NAME CHECK" appears. 4 Press ENTER. 5 Turn DISC ACCESS to erase. 6 Press ENTER. or > + (or . Press DISPLAY repeatedly. or ...> on the remote in stop mode During Program Play mode when there is loaded, you want to select the disc titles stored in the system memory between 01 and 60. 6 Press MENU. CD Checking the Disc Memos 1 Press CD to...
Operating Instructions (primary manual)
Page 18
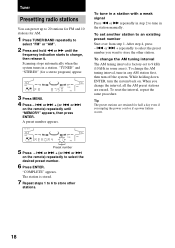
... even if you want to 9 kHz (10 kHz in the station manually. or > on the remote) repeatedly until the frequency indication starts to tune in some areas). or > on the remote) repeatedly to select the desired preset number. 6 Press ENTER. or > + repeatedly to select the... preset number you unplug the power cord or if a power failure occurs. "COMPLETE" appears. After step 4, press - . While holding down ENTER, turn off the system. "TUNED" and "STEREO...
... even if you want to 9 kHz (10 kHz in the station manually. or > on the remote) repeatedly until the frequency indication starts to tune in some areas). or > on the remote) repeatedly to select the desired preset number. 6 Press ENTER. or > + repeatedly to select the... preset number you unplug the power cord or if a power failure occurs. "COMPLETE" appears. After step 4, press - . While holding down ENTER, turn off the system. "TUNED" and "STEREO...
Operating Instructions (primary manual)
Page 19
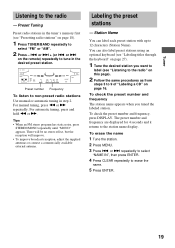
.... 5 Press ENTER. 19 To check the preset number and frequency The station name appears when you want to label (see "Presetting radio stations" on the remote) repeatedly to select "FM" or "AM". 2 Press - . To erase the name 1 Tune the station. 2 Press MENU. 3 Press . Preset Tuning Preset radio stations in the tuner...
.... 5 Press ENTER. 19 To check the preset number and frequency The station name appears when you want to label (see "Presetting radio stations" on the remote) repeatedly to select "FM" or "AM". 2 Press - . To erase the name 1 Tune the station. 2 Press MENU. 3 Press . Preset Tuning Preset radio stations in the tuner...
Operating Instructions (primary manual)
Page 20
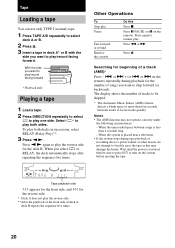
... or B. 2 Press Z. 3 Insert a tape in succession, select RELAY (Relay Play)**. 3 Press n N. or > on the remote). Wait until the power is placed near a television. • If the system stops during playback for beginning of more than 4 seconds long. - To play Pause Fast-forward or rewind Remove the cassette... stops after repeating the sequence five times. Press Z. Press n N again to play the reverse side for the front side, and When the system is restored, then be skipped. * The Automatic Music Sensor (AMS) feature detects a blank space of a track (AMS)* Press - . Press X PAUSE ...
... or B. 2 Press Z. 3 Insert a tape in succession, select RELAY (Relay Play)**. 3 Press n N. or > on the remote). Wait until the power is placed near a television. • If the system stops during playback for beginning of more than 4 seconds long. - To play Pause Fast-forward or rewind Remove the cassette... stops after repeating the sequence five times. Press Z. Press n N again to play the reverse side for the front side, and When the system is restored, then be skipped. * The Automatic Music Sensor (AMS) feature detects a blank space of a track (AMS)* Press - . Press X PAUSE ...
Operating Instructions (primary manual)
Page 21
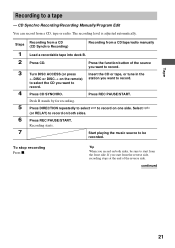
... automatically. Turn DISC ACCESS (or press TDISC or DISCt on both sides. Press CD SYNCHRO. Press REC PAUSE/START. Tip When you record on the remote) to select the CD you want to start from a CD/tape/radio manually Load a recordable tape into deck B.
... automatically. Turn DISC ACCESS (or press TDISC or DISCt on both sides. Press CD SYNCHRO. Press REC PAUSE/START. Tip When you record on the remote) to select the CD you want to start from a CD/tape/radio manually Load a recordable tape into deck B.

Operating Instructions (primary manual)
Page 22
... deck B. 2 Press CD. 3 Press PLAY MODE repeatedly until the desired track appears. 6 Press ENTER. To program all the tracks on the remote) to step 6 with "CDAL" displayed. 5 Press - . or > on the remote) repeatedly until "PGM" appears. 4 Turn DISC ACCESS (or press TDISC or DISCt on a CD at once, go to select a CD.
... deck B. 2 Press CD. 3 Press PLAY MODE repeatedly until the desired track appears. 6 Press ENTER. To program all the tracks on the remote) to step 6 with "CDAL" displayed. 5 Press - . or > on the remote) repeatedly until "PGM" appears. 4 Turn DISC ACCESS (or press TDISC or DISCt on a CD at once, go to select a CD.
Operating Instructions (primary manual)
Page 23
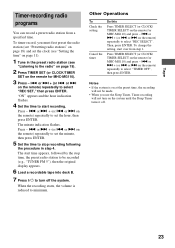
...OFF", then press ENTER. Other Operations To Check the setting Cancel the timer Do this Press TIMER SELECT (or CLOCK/ TIMER SELECT on the remote for MHC-MG110) and press - . Then, press ENTER. Press - . When the recording starts, the volume is on at the preset time, ... or > on the remote for MHC-MG110). 3 Press - . or > + (or . or > + (or . or > + (or . Press TIMER SELECT (or CLOCK/ TIMER SELECT on the remote) repeatedly to minimum. or > + (or . or > on the system until the Sleep Timer turns it off the system. Notes • If the system is reduced to set...
...OFF", then press ENTER. Other Operations To Check the setting Cancel the timer Do this Press TIMER SELECT (or CLOCK/ TIMER SELECT on the remote for MHC-MG110) and press - . Then, press ENTER. Press - . When the recording starts, the volume is on at the preset time, ... or > on the remote for MHC-MG110). 3 Press - . or > + (or . or > + (or . or > + (or . Press TIMER SELECT (or CLOCK/ TIMER SELECT on the remote) repeatedly to minimum. or > + (or . or > on the system until the Sleep Timer turns it off the system. Notes • If the system is reduced to set...
Operating Instructions (primary manual)
Page 24
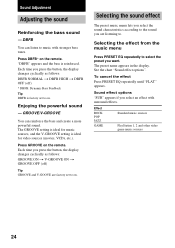
Press DBFB* on the remote. Press GROOVE on the remote. Each time you press the button, the display changes cyclically as follows: DBFB NORMAL t DBFB HIGH t DBFB OFF (off ) Tip GROOVE and V-GOOVE are listening ...
Press DBFB* on the remote. Press GROOVE on the remote. Each time you press the button, the display changes cyclically as follows: DBFB NORMAL t DBFB HIGH t DBFB OFF (off ) Tip GROOVE and V-GOOVE are listening ...

Operating Instructions (primary manual)
Page 25
...Enjoying Dolby Pro Logic Surround sound (MHC-MG510AV/MG310AV only) You can select the sound formation with the press of a large movie theater.* SUR OFF: Turns off the surround mode. * The indicator on the SURROUND button lights up on the remote) repeatedly to select the surround effect...sound from Dolby Surround-encoded ( ) video tapes. LINK Front speaker stereo sound from the rear surround speakers. Multi room selector (MHC-MG510AV/MG310AV only) You can enjoy Dolby Pro Logic Surround sound from the front speakers. REAR Stereo sound from both Dolby Pro Logic Surround...
...Enjoying Dolby Pro Logic Surround sound (MHC-MG510AV/MG310AV only) You can select the sound formation with the press of a large movie theater.* SUR OFF: Turns off the surround mode. * The indicator on the SURROUND button lights up on the remote) repeatedly to select the surround effect...sound from Dolby Surround-encoded ( ) video tapes. LINK Front speaker stereo sound from the rear surround speakers. Multi room selector (MHC-MG510AV/MG310AV only) You can enjoy Dolby Pro Logic Surround sound from the front speakers. REAR Stereo sound from both Dolby Pro Logic Surround...
Operating Instructions (primary manual)
Page 26
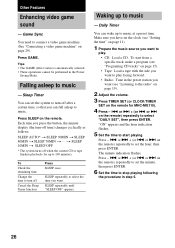
...turn off when the current CD or tape finishes playback (for MHC-MG110). 4 Press - . or > + (or . or > on the remote) repeatedly to select "DAILY SET", then press ENTER. Other Features Enhancing video game sound - t SLEEP 10MIN t SLEEP OFF * The system turns off Cancel the Sleep Timer function Press SLEEP once. ...(or CLOCK/TIMER SET on page 15). • Tape: Load a tape with the side you want (see "Setting the time" on the remote) repeatedly to set the system to turn -off after a certain time, so that you can wake up to music. Game Sync You need to play . • CD...
...turn off when the current CD or tape finishes playback (for MHC-MG110). 4 Press - . or > + (or . or > on the remote) repeatedly to select "DAILY SET", then press ENTER. Other Features Enhancing video game sound - t SLEEP 10MIN t SLEEP OFF * The system turns off Cancel the Sleep Timer function Press SLEEP once. ...(or CLOCK/TIMER SET on page 15). • Tape: Load a tape with the side you want (see "Setting the time" on the remote) repeatedly to set the system to turn -off after a certain time, so that you can wake up to music. Game Sync You need to play . • CD...
Operating Instructions (primary manual)
Page 27
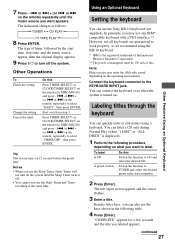
...you may enter the AM radio sound depending on the remote for MHC-MG110) and press - . Start over from step 1. Tip The system turns on the remote for a few seconds and the title you can connect the keyboard even when the system is the registered trademark of timer, followed by the... start time, stop time, and the music source, appear, then the original display appears. 9 Press ?/1 to label. or > + (or . 7 Press - . or > + (or . or > + (or . Notes • When you want appears. You can also use the Sony ...
...you may enter the AM radio sound depending on the remote for MHC-MG110) and press - . Start over from step 1. Tip The system turns on the remote for a few seconds and the title you can connect the keyboard even when the system is the registered trademark of timer, followed by the... start time, stop time, and the music source, appear, then the original display appears. 9 Press ?/1 to label. or > + (or . 7 Press - . or > + (or . or > + (or . Notes • When you want appears. You can also use the Sony ...


