Operating Instructions (primary manual)
Page 3
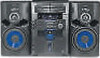
... Main unit 4 Remote Control 5 Getting Started Hooking up the system 7 Inserting two size AA (R6) batteries into the remote 9 Setting up ... the keyboard ... 27 Operating the system through the keyboard 28 Optional Components Hooking up the optional A/V components 28 Connecting a video game machine ......... 29 Connecting a sub woofer speaker** .... 30 Connecting a DVD player 30 Additional Information Precautions 31 Troubleshooting 32 Messages 34 Specifications 35 * MHC-MG510AV/MG310AV only ** MHC...
... Main unit 4 Remote Control 5 Getting Started Hooking up the system 7 Inserting two size AA (R6) batteries into the remote 9 Setting up ... the keyboard ... 27 Operating the system through the keyboard 28 Optional Components Hooking up the optional A/V components 28 Connecting a video game machine ......... 29 Connecting a sub woofer speaker** .... 30 Connecting a DVD player 30 Additional Information Precautions 31 Troubleshooting 32 Messages 34 Specifications 35 * MHC-MG510AV/MG310AV only ** MHC...
Operating Instructions (primary manual)
Page 5
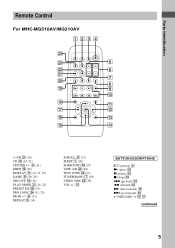
Parts Identification Remote Control For MHC-MG510AV/MG310AV 1 234 wf wd 5 ws 6 wa 7 w; 8 ql 9 0 qk qa qj qs qh qd qg qf 5.1CH wa (30) CD ql (14, 21) CENTER +/- 5 (11) ...
Parts Identification Remote Control For MHC-MG510AV/MG310AV 1 234 wf wd 5 ws 6 wa 7 w; 8 ql 9 0 qk qa qj qs qh qd qg qf 5.1CH wa (30) CD ql (14, 21) CENTER +/- 5 (11) ...
Operating Instructions (primary manual)
Page 6
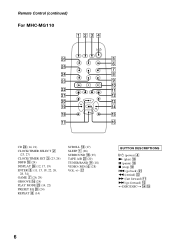
..., 22) PRESET EQ w; (24) REPEAT 8 (14) SCROLL qd (17) SLEEP 1 (26) SURROUND qk (25) TAPE A/B wd (20) TUNER/BAND 9 (18) VIDEO (MD) 6 (28) VOL +/- Remote Control (continued) For MHC-MG110 1 23 4 wh 5 6 wg 7 wf 8 wd 9 0 ws qa wa qs w; qj BUTTON DESCRIPTIONS @/1 (power) 4 N (play) 0 X (pause) 0 x (stop) 0 . (go back) wa m (rewind) ws M (fast forward...
..., 22) PRESET EQ w; (24) REPEAT 8 (14) SCROLL qd (17) SLEEP 1 (26) SURROUND qk (25) TAPE A/B wd (20) TUNER/BAND 9 (18) VIDEO (MD) 6 (28) VOL +/- Remote Control (continued) For MHC-MG110 1 23 4 wh 5 6 wg 7 wf 8 wd 9 0 ws qa wa qs w; qj BUTTON DESCRIPTIONS @/1 (power) 4 N (play) 0 X (pause) 0 x (stop) 0 . (go back) wa m (rewind) ws M (fast forward...
Operating Instructions (primary manual)
Page 9
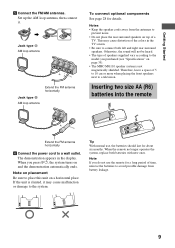
...prevent noise. • Do not place the rear surround speakers on page 35). • The MHC-MG110 speaker system is slanted, it . If the unit is not magnetically shielded. Tip With normal use the remote for a long period of time, remove the batteries to avoid possible damage from the antennas to ...connect both batteries with new ones. Jack type A AM loop antenna AM FM 75Ω Extend the FM antenna horizontally Jack type B AM loop antenna To connect optional components See ...
...prevent noise. • Do not place the rear surround speakers on page 35). • The MHC-MG110 speaker system is slanted, it . If the unit is not magnetically shielded. Tip With normal use the remote for a long period of time, remove the batteries to avoid possible damage from the antennas to ...connect both batteries with new ones. Jack type A AM loop antenna AM FM 75Ω Extend the FM antenna horizontally Jack type B AM loop antenna To connect optional components See ...
Operating Instructions (primary manual)
Page 11
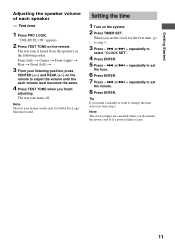
... Front (right) t Rear t Front (left) t ... 3 From your listening position, press CENTER (+/-) and REAR (+/-) on the remote to adjust the volume until the each speaker - Setting the time 1 Turn on the remote. or > + repeatedly to set the hour. 6 Press ENTER. 7 Press - . or > + repeatedly to change the time..., start over from the speakers in the following order. "DOLBY PL ON" appears. 2 Press TEST TONE on the system. 2 Press TIMER SET. or > ...
... Front (right) t Rear t Front (left) t ... 3 From your listening position, press CENTER (+/-) and REAR (+/-) on the remote to adjust the volume until the each speaker - Setting the time 1 Turn on the remote. or > + repeatedly to set the hour. 6 Press ENTER. 7 Press - . or > + repeatedly to change the time..., start over from the speakers in the following order. "DOLBY PL ON" appears. 2 Press TEST TONE on the system. 2 Press TIMER SET. or > ...
Operating Instructions (primary manual)
Page 12
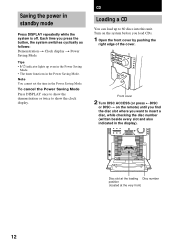
... functions in the display). Disc slot at the loading Disc number position (located at the very front) 12 Each time you press the button, the system switches cyclically as follows: Demonstration t Clock display t Power Saving Mode Tips • ?/1 indicator lights up to 60 discs into this unit. Front cover 2 ... twice to insert a disc, while checking the disc number (written beside every slot and also indicated in the Power Saving Mode. Turn on the remote) until you find the disc slot where you load CDs. 1 Open the front cover by pushing the right edge of the cover. To cancel...
... functions in the display). Disc slot at the loading Disc number position (located at the very front) 12 Each time you press the button, the system switches cyclically as follows: Demonstration t Clock display t Power Saving Mode Tips • ?/1 indicator lights up to 60 discs into this unit. Front cover 2 ... twice to insert a disc, while checking the disc number (written beside every slot and also indicated in the Power Saving Mode. Turn on the remote) until you find the disc slot where you load CDs. 1 Open the front cover by pushing the right edge of the cover. To cancel...
Operating Instructions (primary manual)
Page 14
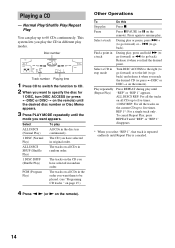
... The tracks on all CDs in different play up to specify the disc for 1 DISC, turn DISC ACCESS (or press TDISC or DISCt on the remote). Select a track During play , press and hold M (to go forward) or m (to go back). REP 1*: For a single track only. Disc number Track number Playing... when you have selected in random order. 1 DISC SHUF (Shuffle Play) PGM (Program Play) The tracks on the remote). Normal Play/Shuffle Play/Repeat Play You can play modes. This system lets you select "REP 1", that track is repeated endlessly until the mode you want to 60 CDs continuously. The tracks...
... The tracks on all CDs in different play up to specify the disc for 1 DISC, turn DISC ACCESS (or press TDISC or DISCt on the remote). Select a track During play , press and hold M (to go forward) or m (to go back). REP 1*: For a single track only. Disc number Track number Playing... when you have selected in random order. 1 DISC SHUF (Shuffle Play) PGM (Program Play) The tracks on the remote). Normal Play/Shuffle Play/Repeat Play You can play modes. This system lets you select "REP 1", that track is repeated endlessly until the mode you want to 60 CDs continuously. The tracks...
Operating Instructions (primary manual)
Page 15
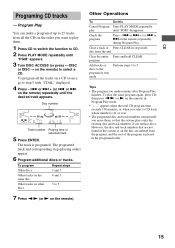
...8226; The program you replace discs. or > on the remote) repeatedly during Program Play. Other Operations To Do this Cancel Program Press PLAY MODE repeatedly play until you erase them, so that are not found in the system or on the disc are deleted from the program, and ...Programing CD tracks - or > + (or . The programed track and corresponding step (playing order) appear. 6 Program additional discs or tracks. or > on the remote) repeatedly until the desired track appears. To play them. 1 Press CD to switch the function to CD. 2 Press PLAY MODE repeatedly until "PGM" appears. ...
...8226; The program you replace discs. or > on the remote) repeatedly during Program Play. Other Operations To Do this Cancel Program Press PLAY MODE repeatedly play until you erase them, so that are not found in the system or on the disc are deleted from the program, and ...Programing CD tracks - or > + (or . The programed track and corresponding step (playing order) appear. 6 Program additional discs or tracks. or > on the remote) repeatedly until the desired track appears. To play them. 1 Press CD to switch the function to CD. 2 Press PLAY MODE repeatedly until "PGM" appears. ...

Operating Instructions (primary manual)
Page 16
Disc Memo You can also label CDs using an optional keyboard (see "Labeling titles through the keyboard" on the remote) repeatedly until "NAME IN" appears. 5 Press ENTER. 6 Turn DISC ACCESS until the character you want to 20 characters. Whenever you want to complete the entire ...
Disc Memo You can also label CDs using an optional keyboard (see "Labeling titles through the keyboard" on the remote) repeatedly until "NAME IN" appears. 5 Press ENTER. 6 Turn DISC ACCESS until the character you want to 20 characters. Whenever you want to complete the entire ...
Operating Instructions (primary manual)
Page 17
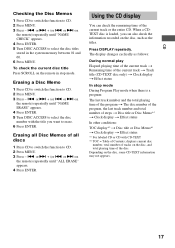
...disc, and total playing time of the current track or the entire CD. or > on the remote in the system memory between 01 and 60. 6 Press MENU. To check the current disc title Press SCROLL on the remote) repeatedly until "NAME ERASE" appears. 4 Press ENTER. 5 Turn DISC ACCESS to select the... disc number with CD-TEXT *2 TOC = Table of all Disc Memos of Contents; or > on the remote) repeatedly...
...disc, and total playing time of the current track or the entire CD. or > on the remote in the system memory between 01 and 60. 6 Press MENU. To check the current disc title Press SCROLL on the remote) repeatedly until "NAME ERASE" appears. 4 Press ENTER. 5 Turn DISC ACCESS to select the... disc number with CD-TEXT *2 TOC = Table of all Disc Memos of Contents; or > on the remote) repeatedly...
Operating Instructions (primary manual)
Page 18
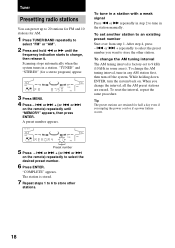
... in some areas). Tip The preset stations are erased. Preset number 5 Press - . To change , then release it. Scanning stops automatically when the system tunes in the station manually. A preset number appears. The station is factory-set another station to an existing preset number Start over from step 1. "... Repeat steps 1 to 6 to store other station. To set to 9 kHz (10 kHz in any AM station first, then turn the system back on the remote) repeatedly to select the desired preset number. 6 Press ENTER. Tuner Presetting radio stations You can preset up to 20 stations for FM and 10...
... in some areas). Tip The preset stations are erased. Preset number 5 Press - . To change , then release it. Scanning stops automatically when the system tunes in the station manually. A preset number appears. The station is factory-set another station to an existing preset number Start over from step 1. "... Repeat steps 1 to 6 to store other station. To set to 9 kHz (10 kHz in any AM station first, then turn the system back on the remote) repeatedly to select the desired preset number. 6 Press ENTER. Tuner Presetting radio stations You can preset up to 20 stations for FM and 10...
Operating Instructions (primary manual)
Page 19
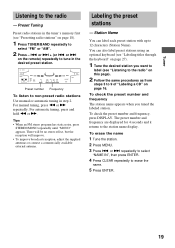
... using an optional keyboard (see "Labeling titles through the keyboard" on page 27). 1 Tune the desired station you tuned the labeled station. or > on the remote) repeatedly to tune in the tuner's memory first (see "Listening to the radio" on this page). 2 Follow the same procedures as from steps 3 to 9 of...
... using an optional keyboard (see "Labeling titles through the keyboard" on page 27). 1 Tune the desired station you tuned the labeled station. or > on the remote) repeatedly to tune in the tuner's memory first (see "Listening to the radio" on this page). 2 Follow the same procedures as from steps 3 to 9 of...
Operating Instructions (primary manual)
Page 20
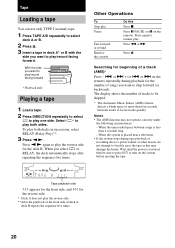
... both decks in deck A* or B with the side you want to play the reverse side for the deck B. When the system is placed near a television. • If the system stops during playback for the number of songs you want to skip forward (or backward). Tape Loading a tape You can use ... select j or RELAY, the deck automatically stops after repeating the sequence five times. Select j* to turn on the system before ejecting the tape. To play . Press X PAUSE (or X on the remote) repeatedly during tape playback or recording due to a power failure or other reason, do not attempt to resume play ...
... both decks in deck A* or B with the side you want to play the reverse side for the deck B. When the system is placed near a television. • If the system stops during playback for the number of songs you want to skip forward (or backward). Tape Loading a tape You can use ... select j or RELAY, the deck automatically stops after repeating the sequence five times. Select j* to turn on the system before ejecting the tape. To play . Press X PAUSE (or X on the remote) repeatedly during tape playback or recording due to a power failure or other reason, do not attempt to resume play ...
Operating Instructions (primary manual)
Page 21
... reverse side. Turn DISC ACCESS (or press TDISC or DISCt on one side. Start playing the music source to be sure to record on the remote) to record.
... reverse side. Turn DISC ACCESS (or press TDISC or DISCt on one side. Start playing the music source to be sure to record on the remote) to record.

Operating Instructions (primary manual)
Page 22
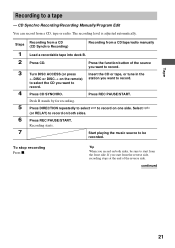
... PLAY MODE repeatedly until the desired track appears. 6 Press ENTER. The CD player pauses for play. 9 Press DIRECTION repeatedly to select g to record on the remote) repeatedly until "PGM" appears. 4 Turn DISC ACCESS (or press TDISC or DISCt on a CD at once, go to step 6 with "CDAL" displayed. 5 Press -... tape reaches the end of the indication. The track is recorded again from another disc to select a CD. To program all the tracks on the remote) to program additional discs or tracks. 8 Press CD SYNCHRO. Select j (or RELAY) to a tape (continued) Recording a CD by to 6 for each ...
... PLAY MODE repeatedly until the desired track appears. 6 Press ENTER. The CD player pauses for play. 9 Press DIRECTION repeatedly to select g to record on the remote) repeatedly until "PGM" appears. 4 Turn DISC ACCESS (or press TDISC or DISCt on a CD at once, go to step 6 with "CDAL" displayed. 5 Press -... tape reaches the end of the indication. The track is recorded again from another disc to select a CD. To program all the tracks on the remote) to program additional discs or tracks. 8 Press CD SYNCHRO. Select j (or RELAY) to a tape (continued) Recording a CD by to 6 for each ...
Operating Instructions (primary manual)
Page 23
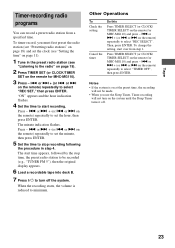
... in step 4. or > + (or . or > + (or . or > + (or . Press TIMER SELECT (or CLOCK/ TIMER SELECT on the remote for MHC-MG110) and press - . To timer-record, you use the Sleep Timer, Timer-recording will not turn off . 23 or > + (or . Tape Timer-recording... radio programs You can record a preset radio station from step 1. Notes • If the system is reduced to turn on the system until the Sleep Timer turns it off the system...
... in step 4. or > + (or . or > + (or . or > + (or . Press TIMER SELECT (or CLOCK/ TIMER SELECT on the remote for MHC-MG110) and press - . To timer-record, you use the Sleep Timer, Timer-recording will not turn off . 23 or > + (or . Tape Timer-recording... radio programs You can record a preset radio station from step 1. Notes • If the system is reduced to turn on the system until the Sleep Timer turns it off the system...
Operating Instructions (primary manual)
Page 24
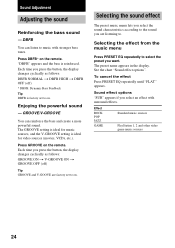
... follows: DBFB NORMAL t DBFB HIGH t DBFB OFF (off) * DBFB: Dynamic Bass Feedback Tip DBFB is factory set to . Press GROOVE on the remote. See the chart "Sound effect options". "DBFB" appears and the bass is ideal for video sources (movies, VCDs, etc.). Effect ROCK POP JAZZ GAME... Standard music sources PlayStation 1, 2 and other video game music sources 24 Press DBFB* on the remote. To cancel the effect Press PRESET EQ repeatedly until "FLAT" appears. Each time you want. The preset name appears in the display. GROOVE/V-GROOVE ...
... follows: DBFB NORMAL t DBFB HIGH t DBFB OFF (off) * DBFB: Dynamic Bass Feedback Tip DBFB is factory set to . Press GROOVE on the remote. See the chart "Sound effect options". "DBFB" appears and the bass is ideal for video sources (movies, VCDs, etc.). Effect ROCK POP JAZZ GAME... Standard music sources PlayStation 1, 2 and other video game music sources 24 Press DBFB* on the remote. To cancel the effect Press PRESET EQ repeatedly until "FLAT" appears. Each time you want. The preset name appears in the display. GROOVE/V-GROOVE ...

Operating Instructions (primary manual)
Page 25
...hall.* THEATER: Reproduces the acoustics of a movie theater.* E THEATER: Reproduces the acoustics of a button. Enjoying Dolby Pro Logic Surround sound (MHC-MG510AV/MG310AV only) You can select the sound formation with the press of a large movie theater.* SUR OFF: Turns off Dolby Pro Logic Surround...Notes • You cannot use both the front and rear surround speakers. 25 Selecting the sound formation - For MHC-MG110 Press SURROUND MODE (or SURROUND on the remote) repeatedly to turn the surround mode on the display. LINK Front speaker stereo sound from the front speakers. ...
...hall.* THEATER: Reproduces the acoustics of a movie theater.* E THEATER: Reproduces the acoustics of a button. Enjoying Dolby Pro Logic Surround sound (MHC-MG510AV/MG310AV only) You can select the sound formation with the press of a large movie theater.* SUR OFF: Turns off Dolby Pro Logic Surround...Notes • You cannot use both the front and rear surround speakers. 25 Selecting the sound formation - For MHC-MG110 Press SURROUND MODE (or SURROUND on the remote) repeatedly to turn the surround mode on the display. LINK Front speaker stereo sound from the front speakers. ...
Operating Instructions (primary manual)
Page 26
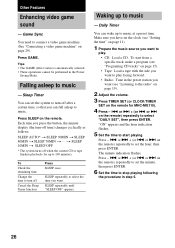
... - . Press GAME. Falling asleep to connect a video game machine (See "Connecting a video game machine" on page 29). t SLEEP 10MIN t SLEEP OFF * The system turns off after a certain time, so that you want to play . • CD: Load a CD. To start playing. or > on page 15). • Tape... the remaining time Change the time to start from a specific track, make a program (see "Programing CD tracks" on the remote) repeatedly to set the system to turn off when the current CD or tape finishes playback (for MHC-MG110). 4 Press - . Waking up to 100 minutes). or > + (or .
... - . Press GAME. Falling asleep to connect a video game machine (See "Connecting a video game machine" on page 29). t SLEEP 10MIN t SLEEP OFF * The system turns off after a certain time, so that you want to play . • CD: Load a CD. To start playing. or > on page 15). • Tape... the remaining time Change the time to start from a specific track, make a program (see "Programing CD tracks" on the remote) repeatedly to set the system to turn off when the current CD or tape finishes playback (for MHC-MG110). 4 Press - . Waking up to 100 minutes). or > + (or .
Operating Instructions (primary manual)
Page 27
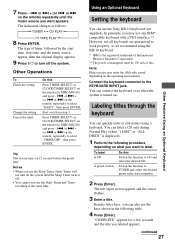
...Sony KB-10 keyboard (not supplied). To label A CD A preset station Do this Press TIMER SELECT (or CLOCK/TIMER SELECT on the system until the music source you labeled appears. Switch the function to the KEYBOARD INPUT jack. continued 27 Other Features/Using an Optional Keyboard or > on the remote for MHC-MG110...) and press - . In principle, you can connect the keyboard even when the system is displayed). 1 Perform the following table. 4 Press [Enter]. The text input ...
...Sony KB-10 keyboard (not supplied). To label A CD A preset station Do this Press TIMER SELECT (or CLOCK/TIMER SELECT on the system until the music source you labeled appears. Switch the function to the KEYBOARD INPUT jack. continued 27 Other Features/Using an Optional Keyboard or > on the remote for MHC-MG110...) and press - . In principle, you can connect the keyboard even when the system is displayed). 1 Perform the following table. 4 Press [Enter]. The text input ...


