
Operating Instructions
Page 2
... apparatus with battery-installed to provide reasonable protection against harmful interference in a particular installation. Record these numbers in accordance with the instructions, may not comply with FCC technical regulations. These limits are located on the rear of the unit. Should you call upon your Sony dealer regarding this model manufactured for a Class B digital device, pursuant to radio or television reception...
... apparatus with battery-installed to provide reasonable protection against harmful interference in a particular installation. Record these numbers in accordance with the instructions, may not comply with FCC technical regulations. These limits are located on the rear of the unit. Should you call upon your Sony dealer regarding this model manufactured for a Class B digital device, pursuant to radio or television reception...
Operating Instructions
Page 6
Program Play Presetting radio stations 35 Using the Radio Data System (RDS 36 Recording onto a tape 36 Creating your own program....... 33 - X-TRANCE Changing the display 31 Viewing information in the display 32 Other Operations Creating your own sound effect 38 Singing along 39 Using the timer 39 Additional Information Troubleshooting 41 Messages 48 Precautions 50 Specifications 51 Compatible USB devices with this manual 5 Guide to parts and controls.......... 7 Getting Started Hooking up the...
Program Play Presetting radio stations 35 Using the Radio Data System (RDS 36 Recording onto a tape 36 Creating your own program....... 33 - X-TRANCE Changing the display 31 Viewing information in the display 32 Other Operations Creating your own sound effect 38 Singing along 39 Using the timer 39 Additional Information Troubleshooting 41 Messages 48 Precautions 50 Specifications 51 Compatible USB devices with this manual 5 Guide to parts and controls.......... 7 Getting Started Hooking up the...
Operating Instructions
Page 9
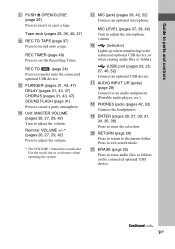
... an audio component (Portable audio player, etc.). Q AUDIO INPUT L/R (jacks) (page 29) Connect to exit search mode. U ERASE (page 25) Press to set the Recording Timer. REC TIMER (page 40) Press to erase audio files or folders on the connected optional USB device. MIC LEVEL (pages 37, 39, 42) Turn to insert or eject a tape. Guide to parts and controls K PUSH Z OPEN/CLOSE (page 29) Press to adjust the microphone volume. N Unit: MASTER VOLUME...
... an audio component (Portable audio player, etc.). Q AUDIO INPUT L/R (jacks) (page 29) Connect to exit search mode. U ERASE (page 25) Press to set the Recording Timer. REC TIMER (page 40) Press to erase audio files or folders on the connected optional USB device. MIC LEVEL (pages 37, 39, 42) Turn to insert or eject a tape. Guide to parts and controls K PUSH Z OPEN/CLOSE (page 29) Press to adjust the microphone volume. N Unit: MASTER VOLUME...
Operating Instructions
Page 14
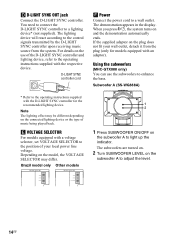
... the connected lighting device or the type of the D-LIGHT SYNC controller and lighting device, refer to the operating instructions supplied with a voltage selector, set VOLTAGE SELECTOR to light up the indicator. Using the subwoofers (MHC-GTX888 only) You can use of music being played back. The lighting device will react according to enhance the bass. For details on and the demonstration automatically ends. When you press "/1, the system turns...
... the connected lighting device or the type of the D-LIGHT SYNC controller and lighting device, refer to the operating instructions supplied with a voltage selector, set VOLTAGE SELECTOR to light up the indicator. Using the subwoofers (MHC-GTX888 only) You can use of music being played back. The lighting device will react according to enhance the bass. For details on and the demonstration automatically ends. When you press "/1, the system turns...
Operating Instructions
Page 22
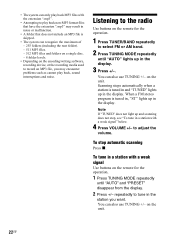
... files. - 512 MP3 files and folders on a single disc. - 8 folder levels. • Depending on the remote for the operation. 1 Press TUNING MODE repeatedly until "AUTO" lights up in the display. To tune in a station with a weak signal Use buttons on the remote for the operation. 1 Press TUNER/BAND repeatedly to tune in a station with the extension ".mp3". • Attempting to play back non-MP3 format files that does not include...
... files. - 512 MP3 files and folders on a single disc. - 8 folder levels. • Depending on the remote for the operation. 1 Press TUNING MODE repeatedly until "AUTO" lights up in the display. To tune in a station with a weak signal Use buttons on the remote for the operation. 1 Press TUNER/BAND repeatedly to tune in a station with the extension ".mp3". • Attempting to play back non-MP3 format files that does not include...
Operating Instructions
Page 23
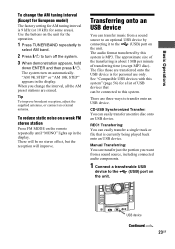
... European model) The factory setting for the operation. 1 Press TUNER/BAND repeatedly to select AM band. 2 Press "/1 to the (USB) port on the unit. Tip To improve broadcast reception, adjust the supplied antennas, or connect an external antenna. There will be connected to this system" (page 56) for personal use only. The files those are erased. Manual Transferring: You can transfer music from a sound source, including connected audio components. 1 Connect a transferable...
... European model) The factory setting for the operation. 1 Press TUNER/BAND repeatedly to select AM band. 2 Press "/1 to the (USB) port on the unit. Tip To improve broadcast reception, adjust the supplied antennas, or connect an external antenna. There will be connected to this system" (page 56) for personal use only. The files those are erased. Manual Transferring: You can transfer music from a sound source, including connected audio components. 1 Connect a transferable...
Operating Instructions
Page 27
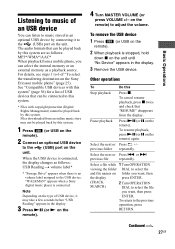
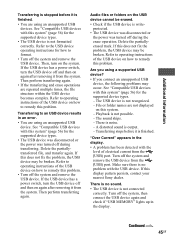
.... Other operations To Do this system" (page 56) for a list of USB devices that "RESUME" disappears from a mobile phone, you want, then press ENTER. Select the next or Press . The audio formats that can be played back by this system. When the USB device is connected, the display changes as a playback source. "WALKMAN" appears when a Sony digital music player is no volume label assigned to the...
.... Other operations To Do this system" (page 56) for a list of USB devices that "RESUME" disappears from a mobile phone, you want, then press ENTER. Select the next or Press . The audio formats that can be played back by this system. When the USB device is connected, the display changes as a playback source. "WALKMAN" appears when a Sony digital music player is no volume label assigned to the...

Operating Instructions
Page 30
... remote) repeatedly to select "FLAT". * The volume switches to select "AUTO", then press ENTER. Press SURROUND SPEAKER MODE repeatedly. "MATRIX SUR 1" lights up in the display. The surround sound is automatically activated if you want. Enhancing the sound quality You can enjoy different sounds by using the MP3 BOOSTER+ function. 1 Press OPTIONS. 2 Turn OPERATION DIAL to select "MP3 BOOSTER+", then press ENTER. 3 Turn OPERATION DIAL to power mode and the equalizer curve changes. Note When an audio...
... remote) repeatedly to select "FLAT". * The volume switches to select "AUTO", then press ENTER. Press SURROUND SPEAKER MODE repeatedly. "MATRIX SUR 1" lights up in the display. The surround sound is automatically activated if you want. Enhancing the sound quality You can enjoy different sounds by using the MP3 BOOSTER+ function. 1 Press OPTIONS. 2 Turn OPERATION DIAL to select "MP3 BOOSTER+", then press ENTER. 3 Turn OPERATION DIAL to power mode and the equalizer curve changes. Note When an audio...
Operating Instructions
Page 32
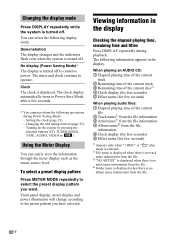
... time and titles Press DISPLAY repeatedly during Power Saving Mode: - Setting the clock (page 19). - Front panel display, meter display and power illuminator will change according to the preset pattern you want. The timer and clock continue to operate. Clock The clock is turned off . Changing the AM tuning interval (page 23). - Using the Meter Display You can select the following display mode. Turning on the system by pressing the function buttons (CD, TUNER/BAND, TAPE, AUDIO, VIDEO...
... time and titles Press DISPLAY repeatedly during Power Saving Mode: - Setting the clock (page 19). - Front panel display, meter display and power illuminator will change according to the preset pattern you want. The timer and clock continue to operate. Clock The clock is turned off . Changing the AM tuning interval (page 23). - Using the Meter Display You can select the following display mode. Turning on the system by pressing the function buttons (CD, TUNER/BAND, TAPE, AUDIO, VIDEO...
Operating Instructions
Page 35
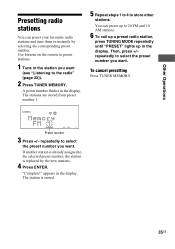
... assigned to the selected preset number, the station is stored. 35GB Use buttons on the remote to preset stations. 1 Tune in the station you want . A preset number flashes in the display. repeatedly to select the preset number you want . "Complete!" The station is replaced by selecting the corresponding preset number. You can preset your favourite radio stations and tune them in instantly by the new stations. 4 Press ENTER. To cancel presetting Press TUNER MEMORY. Preset number 3 Press +/- appears in the display. Other Operations Presetting radio stations You can preset...
... assigned to the selected preset number, the station is stored. 35GB Use buttons on the remote to preset stations. 1 Tune in the station you want . A preset number flashes in the display. repeatedly to select the preset number you want . "Complete!" The station is replaced by selecting the corresponding preset number. You can preset your favourite radio stations and tune them in instantly by the new stations. 4 Press ENTER. To cancel presetting Press TUNER MEMORY. Preset number 3 Press +/- appears in the display. Other Operations Presetting radio stations You can preset...
Operating Instructions
Page 36
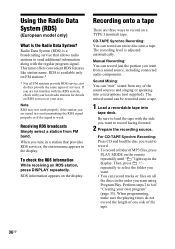
...) tape. The recording level is the Radio Data System? Receiving RDS broadcasts Simply select a station from any of the tape. 36GB Using the Radio Data System (RDS) (European model only) What is adjusted automatically. Perform steps 2 to record. • To record a folder of services. When programming, make sure the playing times do they provide the same types of MP3 files, press PLAY MODE on the display. When you tune in the display.
...) tape. The recording level is the Radio Data System? Receiving RDS broadcasts Simply select a station from any of the tape. 36GB Using the Radio Data System (RDS) (European model only) What is adjusted automatically. Perform steps 2 to record. • To record a folder of services. When programming, make sure the playing times do they provide the same types of MP3 files, press PLAY MODE on the display. When you tune in the display.
Operating Instructions
Page 37
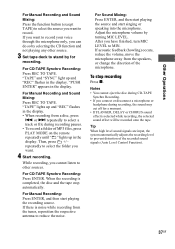
... the volume, move the microphone away from the tuner, reposition the respective antenna to reduce the noise. For Manual Recording: Press ENTER, and then start singing or speaking into the microphone. To stop automatically. Tip When high level sound signals are input, the system automatically adjusts the recording level to prevent distortion of MP3 files, press PLAY MODE on the remote repeatedly until " " lights up in the display...
... the volume, move the microphone away from the tuner, reposition the respective antenna to reduce the noise. For Manual Recording: Press ENTER, and then start singing or speaking into the microphone. To stop automatically. Tip When high level sound signals are input, the system automatically adjusts the recording level to prevent distortion of MP3 files, press PLAY MODE on the remote repeatedly until " " lights up in the display...
Operating Instructions
Page 38
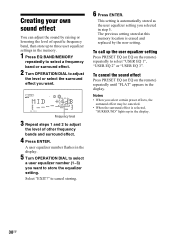
A user equalizer number flashes in the display. 5 Turn OPERATION DIAL to select a user equalizer number (1~3) you want to select "USER EQ 1", "USER EQ 2" or "USER EQ 3". The previous setting stored at this memory location is selected, "SURROUND" lights up in the memory. 1 Press EQ BAND/MEMORY repeatedly to select a frequency band or surround effect. 2 Turn OPERATION DIAL to cancel storing. 6 Press ENTER. to adjust the level or select the surround effect you want . To cancel the sound effect Press PRESET EQ...
A user equalizer number flashes in the display. 5 Turn OPERATION DIAL to select a user equalizer number (1~3) you want to select "USER EQ 1", "USER EQ 2" or "USER EQ 3". The previous setting stored at this memory location is selected, "SURROUND" lights up in the memory. 1 Press EQ BAND/MEMORY repeatedly to select a frequency band or surround effect. 2 Turn OPERATION DIAL to cancel storing. 6 Press ENTER. to adjust the level or select the surround effect you want . To cancel the sound effect Press PRESET EQ...

Operating Instructions
Page 39
... direction of the microphone. Continued l 39GB Play Timer/Recording Timer You cannot activate both the Play Timer and the Recording Timer at the same time. If you use either with any audio source that play back on this system. 1 Turn MIC LEVEL to MIN to reduce the microphone volume. 2 Connect an optional microphone to MIC jack. 3 Start playing the music and adjust the volume. 4 Turn MIC LEVEL to turn -off after a certain time, so that you select "AUTO", the system automatically turns...
... direction of the microphone. Continued l 39GB Play Timer/Recording Timer You cannot activate both the Play Timer and the Recording Timer at the same time. If you use either with any audio source that play back on this system. 1 Turn MIC LEVEL to MIN to reduce the microphone volume. 2 Connect an optional microphone to MIC jack. 3 Start playing the music and adjust the volume. 4 Turn MIC LEVEL to turn -off after a certain time, so that you select "AUTO", the system automatically turns...
Operating Instructions
Page 40
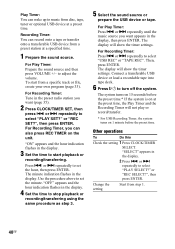
... settings. The system turns on 15 seconds before the preset time.* If the system is on at a specified time. 1 Prepare the sound source. Use the procedure above to set the hour, then press ENTER. Connect a transferable USB device or load a recordable tape into tape deck. 6 Press "/1 to select "PLAY SELECT?" For Play Timer: Prepare the sound source and then press VOLUME +/- or > repeatedly to set the minute. The minute indication flashes in the display. 4 Set the time...
... settings. The system turns on 15 seconds before the preset time.* If the system is on at a specified time. 1 Prepare the sound source. Use the procedure above to set the hour, then press ENTER. Connect a transferable USB device or load a recordable tape into tape deck. 6 Press "/1 to select "PLAY SELECT?" For Play Timer: Prepare the sound source and then press VOLUME +/- or > repeatedly to set the minute. The minute indication flashes in the display. 4 Set the time...
Operating Instructions
Page 41
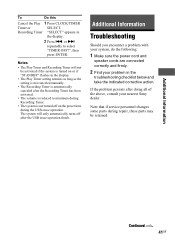
... reduced to select "TIMER OFF?", then press ENTER. Additional Information Continued l 41GB Additional Information Troubleshooting Should you encounter a problem with your system, do the following: 1 Make sure the power cord and speaker cords are connected correctly and firmly. 2 Find your nearest Sony dealer. Note that if service personnel changes some parts during repair, these parts may be activated if the system is turned on the preset time during Recording...
... reduced to select "TIMER OFF?", then press ENTER. Additional Information Continued l 41GB Additional Information Troubleshooting Should you encounter a problem with your system, do the following: 1 Make sure the power cord and speaker cords are connected correctly and firmly. 2 Find your nearest Sony dealer. Note that if service personnel changes some parts during repair, these parts may be activated if the system is turned on the preset time during Recording...
Operating Instructions
Page 42
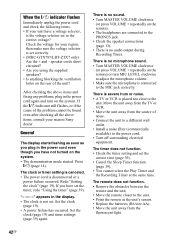
... in the power cord again and turn MIC LEVEL clockwise to the unit. • Point the remote at the same time. The remote does not function. • Remove the obstacles between the remote and the unit. • Move the remote closer to adjust the microphone volume. • Make sure the microphone is no microphone sound. • Turn MASTER VOLUME clockwise (or press VOLUME + repeatedly on the system. • The demonstration mode started. Check...
... in the power cord again and turn MIC LEVEL clockwise to the unit. • Point the remote at the same time. The remote does not function. • Remove the obstacles between the remote and the unit. • Move the remote closer to adjust the microphone volume. • Make sure the microphone is no microphone sound. • Turn MASTER VOLUME clockwise (or press VOLUME + repeatedly on the system. • The demonstration mode started. Check...
Operating Instructions
Page 45
... in an error. • You are using a supported USB device? • If you using an unsupported USB device. If this problem. Refer to operating instructions of the USB device on how to format. • Turn off the system, then connect the USB device again and check if "USB MEMORY" lights up in the display. • A problem has been detected with the level of the...
... in an error. • You are using a supported USB device? • If you using an unsupported USB device. If this problem. Refer to operating instructions of the USB device on how to format. • Turn off the system, then connect the USB device again and check if "USB MEMORY" lights up in the display. • A problem has been detected with the level of the...
Operating Instructions
Page 47
..." flashes in the display) • Set the proper band and frequency (page 22). • Connect the antenna properly (page 12). • Find a place and an orientation that you connect a commercially available external antenna. • The supplied FM lead antenna receives signals along its entire length, so make sure you start recording, press FLANGER, DELAY or CHORUS repeatedly until "MONO" disappears from the tape...
..." flashes in the display) • Set the proper band and frequency (page 22). • Connect the antenna properly (page 12). • Find a place and an orientation that you connect a commercially available external antenna. • The supplied FM lead antenna receives signals along its entire length, so make sure you start recording, press FLANGER, DELAY or CHORUS repeatedly until "MONO" disappears from the tape...
Operating Instructions
Page 48
...; Turn on this system. Disc/ Tape/ Timer No Disc There is no disc on the remote during playback or pause. PUSH SELECT! Not in Use You have loaded a disc that time. if the cords are not available. "COLD RESET" appears in the display. You tried to set the clock or timer during operation. Messages One of the disc while pressing M during playback. You have pressed PLAY MODE on the disc...
...; Turn on this system. Disc/ Tape/ Timer No Disc There is no disc on the remote during playback or pause. PUSH SELECT! Not in Use You have loaded a disc that time. if the cords are not available. "COLD RESET" appears in the display. You tried to set the clock or timer during operation. Messages One of the disc while pressing M during playback. You have pressed PLAY MODE on the disc...


