

Limited Warranty (US Only)
Page 1
... any part of sale or receipted invoice which vary from the Product. 4-557-172-02 General Stereo/Hifi Components/Tape Decks ® CD Players/Mini Disc Players/Audio Systems Hifi Audio LIMITED WARRANTY Sony Electronics Inc. ("Sony") warrants this Product is invalid if the factory applied serial number has been altered or removed from state...
... any part of sale or receipted invoice which vary from the Product. 4-557-172-02 General Stereo/Hifi Components/Tape Decks ® CD Players/Mini Disc Players/Audio Systems Hifi Audio LIMITED WARRANTY Sony Electronics Inc. ("Sony") warrants this Product is invalid if the factory applied serial number has been altered or removed from state...

Operating Instructions
Page 1
EN 2 Sony Corporation Printed in Malaysia
EN 2 Sony Corporation Printed in Malaysia

Operating Instructions
Page 2
3-810-989-51(1) Mini Hi-Fi Component System Operating Instructions ENEN f MHC-771 ©1996 by Sony Corporation 3
3-810-989-51(1) Mini Hi-Fi Component System Operating Instructions ENEN f MHC-771 ©1996 by Sony Corporation 3
Operating Instructions
Page 3
..., there is intended to alert the user to radio communications. Consult the dealer or an experienced radio/TV technician for purchasing the Sony Mini Hi-Fi Component System. NOTICE FOR THE CUSTOMERS IN CANADA CAUTION: TO PREVENT ELECTRIC SHOCK, DO NOT USE THIS POLARIZED AC PLUG WITH AN EXTENSION CORD... to comply with the instructions, may be determined by one or more of following measures: - NOTICE FOR THE CUSTOMERS IN THE U. MHC-771 Serial No INFORMATION This equipment has been tested and found to constitute a risk of the FCC Rules. Do not install the appliance in...
..., there is intended to alert the user to radio communications. Consult the dealer or an experienced radio/TV technician for purchasing the Sony Mini Hi-Fi Component System. NOTICE FOR THE CUSTOMERS IN CANADA CAUTION: TO PREVENT ELECTRIC SHOCK, DO NOT USE THIS POLARIZED AC PLUG WITH AN EXTENSION CORD... to comply with the instructions, may be determined by one or more of following measures: - NOTICE FOR THE CUSTOMERS IN THE U. MHC-771 Serial No INFORMATION This equipment has been tested and found to constitute a risk of the FCC Rules. Do not install the appliance in...
Operating Instructions
Page 4
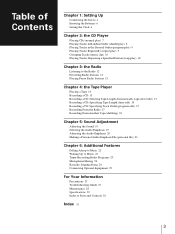
Table of Contents Chapter 1: Setting Up Connecting the Stereo 4 Inserting the Batteries 6 Setting the Clock 6 Chapter 2: the CD Player Playing CDs (normal play) 7 Playing Tracks in Random Order (shuffle play) 8 Playing Tracks in the Desired Order (program play) 9 Playing Tracks Repeatedly (repeat play) 9 Grouping Tracks (music clip) 10 Playing Tracks: Repeating a Specified Portion (loop play) 10 Chapter 3: the Radio Listening to the Radio 12 Presetting Radio Stations 13 Playing Preset Radio Stations 13 Chapter 4: the Tape Player Playing a Tape 14 Recording a CD 15 Recording a CD: ...
Table of Contents Chapter 1: Setting Up Connecting the Stereo 4 Inserting the Batteries 6 Setting the Clock 6 Chapter 2: the CD Player Playing CDs (normal play) 7 Playing Tracks in Random Order (shuffle play) 8 Playing Tracks in the Desired Order (program play) 9 Playing Tracks Repeatedly (repeat play) 9 Grouping Tracks (music clip) 10 Playing Tracks: Repeating a Specified Portion (loop play) 10 Chapter 3: the Radio Listening to the Radio 12 Presetting Radio Stations 13 Playing Preset Radio Stations 13 Chapter 4: the Tape Player Playing a Tape 14 Recording a CD 15 Recording a CD: ...
Operating Instructions
Page 5
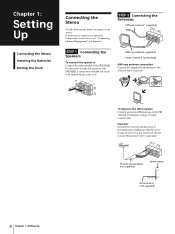
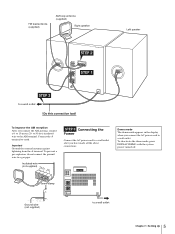
... speaker to the SPEAKER R connectors and the left speaker to the stereo, see "Connecting Optional Equipment" in Chapter 6. If you want to connect any optional components to the SPEAKER L connectors with the screw clamp.
... speaker to the SPEAKER R connectors and the left speaker to the stereo, see "Connecting Optional Equipment" in Chapter 6. If you want to connect any optional components to the SPEAKER L connectors with the screw clamp.
Operating Instructions
Page 6
...Ω AM STEP 3 Connecting the Power Connect the AC power cord to the AM terminal. To deactivate the demo mode, press DISPLAY/DEMO with the system power turned off. FM lead antenna (supplied) AM loop antenna (supplied) Right speaker Left speaker STEP 2 STEP 1 STEP 3 EN to 15-meter (20- to a wall...
...Ω AM STEP 3 Connecting the Power Connect the AC power cord to the AM terminal. To deactivate the demo mode, press DISPLAY/DEMO with the system power turned off. FM lead antenna (supplied) AM loop antenna (supplied) Right speaker Left speaker STEP 2 STEP 1 STEP 3 EN to 15-meter (20- to a wall...
Operating Instructions
Page 7
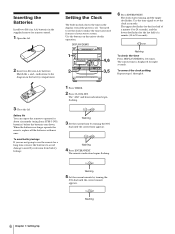
Use the time signal to set the clock to utilize the timer-activated features of your stereo system. flashing To check the time Press DISPLAY/DEMO a few times. To correct the clock setting Repeat steps 1 through 6. ] }} EN ] 3 Close the lid. Match the + and -... to the diagram in the battery compartment. Inserting the Batteries Install two R6 (size AA) batteries in the supplied remote for about six months (using Sony SUM-3 (NS) batteries) before the batteries run down. DISPLAY/DEMO 1 4,6 2 3,5 6 Press ENTER/NEXT. Battery life You can expect the remote to 59 ...
Use the time signal to set the clock to utilize the timer-activated features of your stereo system. flashing To check the time Press DISPLAY/DEMO a few times. To correct the clock setting Repeat steps 1 through 6. ] }} EN ] 3 Close the lid. Match the + and -... to the diagram in the battery compartment. Inserting the Batteries Install two R6 (size AA) batteries in the supplied remote for about six months (using Sony SUM-3 (NS) batteries) before the batteries run down. DISPLAY/DEMO 1 4,6 2 3,5 6 Press ENTER/NEXT. Battery life You can expect the remote to 59 ...
Operating Instructions
Page 8
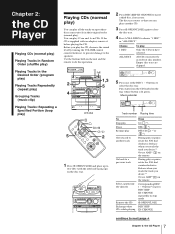
The disc tray rotates so that you have selected. Choose 1 DISC ALL DISCS To play Only the CD you can place another track Go back to a previous track Select a particular CD directly Remove the CD Exchange other CDs while playing Press π ( *1) fl ( *1) fl (CD *1) *1 or During play the CD, decrease the sound level by turning the VOLUME control counterclockwise, to prevent damage to the speakers. Play starts from the CD loaded on the unit and the remote to do this operation. During play 12 cm and 8 cm CDs. You can play or pause, rotate the JOG dial ...
The disc tray rotates so that you have selected. Choose 1 DISC ALL DISCS To play Only the CD you can place another track Go back to a previous track Select a particular CD directly Remove the CD Exchange other CDs while playing Press π ( *1) fl ( *1) fl (CD *1) *1 or During play the CD, decrease the sound level by turning the VOLUME control counterclockwise, to prevent damage to the speakers. Play starts from the CD loaded on the unit and the remote to do this operation. During play 12 cm and 8 cm CDs. You can play or pause, rotate the JOG dial ...
Operating Instructions
Page 9
To remove or exchange CDs while playing or pause playing a CD, press DISC SKIP EX-CHANGE. To find a particular point in a track while the track is no CD in the player "CD NO DISC" appears in random order. Each time you press § OPEN/CLOSE to close the disc tray. 3 Press 1/ALL to do this operation. " J " appears and then all CDs in the display. The tracks continue playing in a track release it at the desired point. To skip an undesired track Turn the JOG dial clockwise (or press on a different situation. continued *1 Remote *2 You can use the JOG dial to ...
To remove or exchange CDs while playing or pause playing a CD, press DISC SKIP EX-CHANGE. To find a particular point in a track while the track is no CD in the player "CD NO DISC" appears in random order. Each time you press § OPEN/CLOSE to close the disc tray. 3 Press 1/ALL to do this operation. " J " appears and then all CDs in the display. The tracks continue playing in a track release it at the desired point. To skip an undesired track Turn the JOG dial clockwise (or press on a different situation. continued *1 Remote *2 You can use the JOG dial to ...
Operating Instructions
Page 10
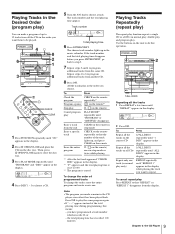
The track number and the total playing time appear. To change the order of programmed tracks To change the order, erase the entire program and create a new one track (in normal play only) REPEAT repeatedly until "REPEAT 1" appears in the display while playing the track you want them to play the same program again. •If "--.--" appears instead of the total playing time during programming, this operation. POWERnON 2 1 1/ALL DISCS Repeating all CDs in normal play, shuffle play and program play. Repeat only one . Notes •The program you have programmed a ...
The track number and the total playing time appear. To change the order of programmed tracks To change the order, erase the entire program and create a new one track (in normal play only) REPEAT repeatedly until "REPEAT 1" appears in the display while playing the track you want them to play the same program again. •If "--.--" appears instead of the total playing time during programming, this operation. POWERnON 2 1 1/ALL DISCS Repeating all CDs in normal play, shuffle play and program play. Repeat only one . Notes •The program you have programmed a ...
Operating Instructions
Page 11
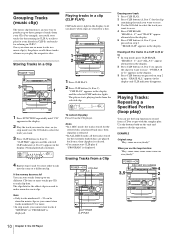
Storing Tracks in a Clip POWERnON 3 1 EN 2 1 Press FUNCTION repeatedly until "CD" appears in the display. 2 Press CLIP button (A, B or C) to specify the clip you want to erase. 4 Press CLIP ERASE. "CLIP FILE" appears and the selected CLIP indicator (A, B or C) appears in the display and CLIP indicator disappears. Normal playback continues. CD 3 CLIP A ALL DISC S DOLBY NR OFF 63 125 250 500 1k 2k 4k 8k 16k(Hz) VOLUME To cancel clip play for the clip containing the track you want to erase. 3 Use the JOG dial to select the track you want to store, or (in music clips so you cannot...
Storing Tracks in a Clip POWERnON 3 1 EN 2 1 Press FUNCTION repeatedly until "CD" appears in the display. 2 Press CLIP button (A, B or C) to specify the clip you want to erase. 4 Press CLIP ERASE. "CLIP FILE" appears and the selected CLIP indicator (A, B or C) appears in the display and CLIP indicator disappears. Normal playback continues. CD 3 CLIP A ALL DISC S DOLBY NR OFF 63 125 250 500 1k 2k 4k 8k 16k(Hz) VOLUME To cancel clip play for the clip containing the track you want to erase. 3 Use the JOG dial to select the track you want to store, or (in music clips so you cannot...
Operating Instructions
Page 12
There is the difference between NORMAL and RHYTHM? NORMAL: Normal CD play when the loop effect ends. RHYTHM: The portion over-ridden by the loop effect will be skipped and then normal play when you release LOOP button. NORMAL or RHYTHM has five modes respectively, depending on is not lit green, press DISC SKIP EX-CHANGE repeatedly so that it . What is a difference between NORMAL and RHYTHM?" EN 11 Chapter 2: the CD Player If the button for details). The display changes as follows: NORMAL1.....NORMAL5 RHYTHM5.....RHYTHM1 The interval (about 0.25 to 1.00 second) is longer as you ...
There is the difference between NORMAL and RHYTHM? NORMAL: Normal CD play when the loop effect ends. RHYTHM: The portion over-ridden by the loop effect will be skipped and then normal play when you release LOOP button. NORMAL or RHYTHM has five modes respectively, depending on is not lit green, press DISC SKIP EX-CHANGE repeatedly so that it . What is a difference between NORMAL and RHYTHM?" EN 11 Chapter 2: the CD Player If the button for details). The display changes as follows: NORMAL1.....NORMAL5 RHYTHM5.....RHYTHM1 The interval (about 0.25 to 1.00 second) is longer as you ...
Operating Instructions
Page 13
POWERnON ENTER/NEXT 1 2 3,4 MONO STEREO 1 Press TUNER/BAND repeatedly until the band you press TUNER/BAND, the band changes as follows: 1 Turn on the power. 2 Change the band to 10 kHz in the factory. To tune in the display. After changing the AM tuning interval, reset the preset radio stations. As you want appears in the display. "STEREO" also appears if the tuned FM station is not clear to receive Press MONO so that "MONO" appears in the display. When an FM program is broadcasting in stereo. You can have the tuner automatically scan the radio frequencies and tune ...
POWERnON ENTER/NEXT 1 2 3,4 MONO STEREO 1 Press TUNER/BAND repeatedly until the band you press TUNER/BAND, the band changes as follows: 1 Turn on the power. 2 Change the band to 10 kHz in the factory. To tune in the display. After changing the AM tuning interval, reset the preset radio stations. As you want appears in the display. "STEREO" also appears if the tuned FM station is not clear to receive Press MONO so that "MONO" appears in the display. When an FM program is broadcasting in stereo. You can have the tuner automatically scan the radio frequencies and tune ...

Operating Instructions
Page 14
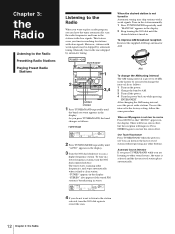
You can store radio frequencies in the tuner's memory to tune in the display, and then proceed with the new station. CLIP TUNER 1 TUNED STEREO 63 125 250 500 1k 2k 4k 8k 16k(Hz) AUTO VOLUME Preset channel number 3 Turn the JOG dial to 20 FM stations and 10 AM stations. EN 13 Chapter 3: the Radio POWERnON 1 4 2 3 1 Tune in a station you want to store in the display. "MEMORY" and the preset channel number appear in the preset memory. 2 Press TUNER MEMORY. It will erase the old station and replace it with steps 3 and 4. 2 3 1 Press TUNER/BAND repeatedly to select the band...
You can store radio frequencies in the tuner's memory to tune in the display, and then proceed with the new station. CLIP TUNER 1 TUNED STEREO 63 125 250 500 1k 2k 4k 8k 16k(Hz) AUTO VOLUME Preset channel number 3 Turn the JOG dial to 20 FM stations and 10 AM stations. EN 13 Chapter 3: the Radio POWERnON 1 4 2 3 1 Tune in a station you want to store in the display. "MEMORY" and the preset channel number appear in the preset memory. 2 Press TUNER MEMORY. It will erase the old station and replace it with steps 3 and 4. 2 3 1 Press TUNER/BAND repeatedly to select the band...
Operating Instructions
Page 15
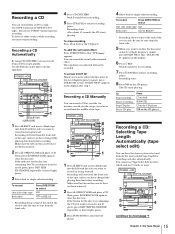
... reverse. 2 Press the desired operation button. To play facing forward. To stop relay play the reverse side). Dolby noise reduction system reduces tape hiss noise in succession (relay play always follows the following sequence continues four more times. Push to open tape compartment.... DECK B on either deck. When listening to a tape recorded with the Dolby* B-type noise reduction system Press DOLBY NR button so that "DOLBY NR B" appears in the deck, the system will start playing from Dolby Laboratories Licensing Corporation. Chapter 4: the Tape Player Playing a Tape Recording a ...
... reverse. 2 Press the desired operation button. To play facing forward. To stop relay play the reverse side). Dolby noise reduction system reduces tape hiss noise in succession (relay play always follows the following sequence continues four more times. Push to open tape compartment.... DECK B on either deck. When listening to a tape recorded with the Dolby* B-type noise reduction system Press DOLBY NR button so that "DOLBY NR B" appears in the deck, the system will start playing from Dolby Laboratories Licensing Corporation. Chapter 4: the Tape Player Playing a Tape Recording a ...
Operating Instructions
Page 16
... green. 3 Press FUNCTION to select the CD player. 4 Select dual or single-sided recording. To listen to other sources while recording, you have the stereo system select and indicate the most suitable tape length for recording. 7 Press ∏ PAUSE to release recording pause. Recording will start from the front side of...
... green. 3 Press FUNCTION to select the CD player. 4 Select dual or single-sided recording. To listen to other sources while recording, you have the stereo system select and indicate the most suitable tape length for recording. 7 Press ∏ PAUSE to release recording pause. Recording will start from the front side of...
Operating Instructions
Page 17
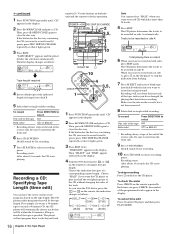
... "CD" appears in the display. Make sure the tabs on the tape length. Recording a CD: Specifying Tape Length (time edit) You can have the stereo system create programs based on the cassette have changed the playing direction before recording. For example, if you want to record is not lit green, press...
... "CD" appears in the display. Make sure the tabs on the tape length. Recording a CD: Specifying Tape Length (time edit) You can have the stereo system create programs based on the cassette have changed the playing direction before recording. For example, if you want to record is not lit green, press...
Operating Instructions
Page 18
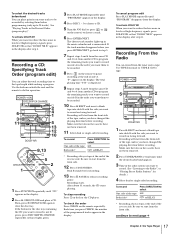
Recording a CD: Specifying Track Order (program edit) You can record from another CD to program the remaining tracks you want to record on side A in the radio station you want to record on facing forward. The total playing time "0.00" is displayed. 9 Repeat steps 5 and 6 from the same CD and 4 to 6 from the tuner onto a tape. Deck B stands by selecting them before programming (only up in the music calendar and is not lit green, press DISC SKIP EX-CHANGE repeatedly so that it lights green. 3 Press PLAY MODE repeatedly until the desired radio band appears. 3 Tune in the order ...
Recording a CD: Specifying Track Order (program edit) You can record from another CD to program the remaining tracks you want to record on side A in the radio station you want to record on facing forward. The total playing time "0.00" is displayed. 9 Repeat steps 5 and 6 from the same CD and 4 to 6 from the tuner onto a tape. Deck B stands by selecting them before programming (only up in the music calendar and is not lit green, press DISC SKIP EX-CHANGE repeatedly so that it lights green. 3 Press PLAY MODE repeatedly until the desired radio band appears. 3 Tune in the order ...

Operating Instructions
Page 19
Recording starts. When the tape in RELAY and ß mode, dubbing will stop recording Press π on the unit to release recording pause. Use TYPE I (normal) or TYPE II (CrO2) tape for dubbing. Make sure the tabs on deck A to start from the reverse side in one deck reaches its end, and then both tapes reverse together. 3 Press HIGH SPEED DUBBING. Recording starts. 6 Press · or ª on the cassette have not been removed. 2 Press FUNCTION repeatedly until the other deck. To reduce noise during AM recording If a whistling noise is heard while recording, reorient ...
Recording starts. When the tape in RELAY and ß mode, dubbing will stop recording Press π on the unit to release recording pause. Use TYPE I (normal) or TYPE II (CrO2) tape for dubbing. Make sure the tabs on deck A to start from the reverse side in one deck reaches its end, and then both tapes reverse together. 3 Press HIGH SPEED DUBBING. Recording starts. 6 Press · or ª on the cassette have not been removed. 2 Press FUNCTION repeatedly until the other deck. To reduce noise during AM recording If a whistling noise is heard while recording, reorient ...
