

Limited Warranty (US Only)
Page 1
..., if this Product (including any part of the Product, including the antenna. 4-557-172-02 General Stereo/Hifi Components/Tape Decks ® CD Players/Mini Disc Players/Audio Systems Hifi Audio LIMITED WARRANTY Sony Electronics Inc. ("Sony") warrants this Product is within 90 days of the date of incidental or consequential damages, or allow limitations on...
..., if this Product (including any part of the Product, including the antenna. 4-557-172-02 General Stereo/Hifi Components/Tape Decks ® CD Players/Mini Disc Players/Audio Systems Hifi Audio LIMITED WARRANTY Sony Electronics Inc. ("Sony") warrants this Product is within 90 days of the date of incidental or consequential damages, or allow limitations on...
Operating Instructions
Page 3
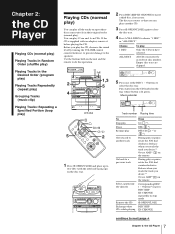
...a row and seamlessly advance (or reverse) through all the tracks on all the discs on the rear panel. CAUTION The use of optical instruments with this equipment does cause.... Consult the dealer or an experienced radio/TV technician for purchasing the Sony Mini Hi-Fi Component System. Do not install the appliance in cabinet. NO USER-SERVICEABLE PARTS INSIDE. Record ... provide reasonable protection against harmful interference in particular, specifies that to operate this product. MHC-771 Serial No INFORMATION This equipment has been tested and found to comply with fun features....
...a row and seamlessly advance (or reverse) through all the tracks on all the discs on the rear panel. CAUTION The use of optical instruments with this equipment does cause.... Consult the dealer or an experienced radio/TV technician for purchasing the Sony Mini Hi-Fi Component System. Do not install the appliance in cabinet. NO USER-SERVICEABLE PARTS INSIDE. Record ... provide reasonable protection against harmful interference in particular, specifies that to operate this product. MHC-771 Serial No INFORMATION This equipment has been tested and found to comply with fun features....
Operating Instructions
Page 8
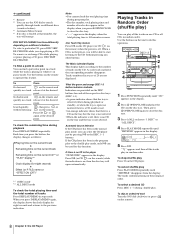
... Playing time To Stop play Pause Resume play Go forward to another CD. 3 Press § OPEN/CLOSE again to close the disc tray. 4 Press 1/ALL DISCS to do this operation. During play the CD, decrease the sound level by turning the VOLUME control counterclockwise, to prevent damage to ...the CD Exchange other CDs while playing Press π ( *1) fl ( *1) fl (CD *1) *1 or During play 12 cm and 8 cm CDs. Choose 1 DISC ALL DISCS To play Only the CD you play or pause, rotate the JOG dial counterclockwise. Use the buttons both on the remote. All CDs consecutively in...
... Playing time To Stop play Pause Resume play Go forward to another CD. 3 Press § OPEN/CLOSE again to close the disc tray. 4 Press 1/ALL DISCS to do this operation. During play the CD, decrease the sound level by turning the VOLUME control counterclockwise, to prevent damage to ...the CD Exchange other CDs while playing Press π ( *1) fl ( *1) fl (CD *1) *1 or During play 12 cm and 8 cm CDs. Choose 1 DISC ALL DISCS To play Only the CD you play or pause, rotate the JOG dial counterclockwise. Use the buttons both on the remote. All CDs consecutively in...
Operating Instructions
Page 9
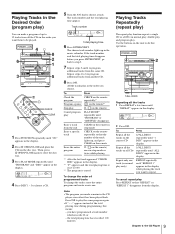
...to start listening to the CD without listening , then press or on the remote. If the CD player has been in random order. POWERnON π DISC 1-3 5 2 1 3 4 1 Press FUNCTION repeatedly until "SHUFFLE" disappears from the display. To cancel shuffle play . To check the remaining time during... tray is not selected. " J " appears and then all the tracks on the CD. To stop mode. What the green and orange DISC 1-3 button indicators indicate Indicators are not displayed. Tracks numbered in the display. continued *1 Remote *2 You can use the JOG dial to search...
...to start listening to the CD without listening , then press or on the remote. If the CD player has been in random order. POWERnON π DISC 1-3 5 2 1 3 4 1 Press FUNCTION repeatedly until "SHUFFLE" disappears from the display. To cancel shuffle play . To check the remaining time during... tray is not selected. " J " appears and then all the tracks on the CD. To stop mode. What the green and orange DISC 1-3 button indicators indicate Indicators are not displayed. Tracks numbered in the display. continued *1 Remote *2 You can use the JOG dial to search...
Operating Instructions
Page 10
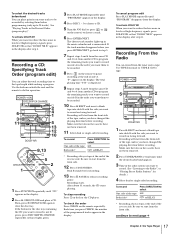
...2 Press § OPEN/CLOSE and place the CDs on the unit to program additional tracks from all the tracks on the current CD 1/ALL DISCS repeatedly until "1 DISC" appears in the display. *2 "P" appears and the total playing time is reset to 0.00. *3 The program is erased. Repeat all the ...time during programming, this operation. Playing Tracks Repeatedly (repeat play) The repeat play function repeats a single CD or all CDs 1/ALL DISCS repeatedly until "PROGRAM" and "DISC" appear in the CD player even after it has been played back. EN 9 Chapter 2: the CD Player If the track number ...
...2 Press § OPEN/CLOSE and place the CDs on the unit to program additional tracks from all the tracks on the current CD 1/ALL DISCS repeatedly until "1 DISC" appears in the display. *2 "P" appears and the total playing time is reset to 0.00. *3 The program is erased. Repeat all the ...time during programming, this operation. Playing Tracks Repeatedly (repeat play) The repeat play function repeats a single CD or all CDs 1/ALL DISCS repeatedly until "PROGRAM" and "DISC" appear in the CD player even after it has been played back. EN 9 Chapter 2: the CD Player If the track number ...
Operating Instructions
Page 11
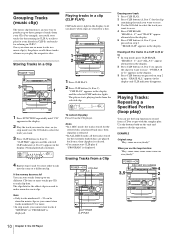
... record from your friends in CLIP B, and tracks for the clip containing the track you want to erase. 3 Use the JOG dial to erase. POWERnON 3,5 DISC SKIP EX-CHANGE 4 2 1 10 Chapter 2: the CD Player Grouping Tracks (music clip) The music clip function is displayed. Once you pressed on everybody!" "...ERASE A - Playing Tracks: Repeating a Specified Portion (loop play . EXAMPLE Original song: "Hey, come on step 2. CLIP A CD 12 345 678 ALL DISC DOLBY NR OFF 63 125 250 500 1k 2k 4k 8k 16k(Hz) VOLUME 4 Repeat steps 2 and 3 to do this operation. Note •Only tracks...
... record from your friends in CLIP B, and tracks for the clip containing the track you want to erase. 3 Use the JOG dial to erase. POWERnON 3,5 DISC SKIP EX-CHANGE 4 2 1 10 Chapter 2: the CD Player Grouping Tracks (music clip) The music clip function is displayed. Once you pressed on everybody!" "...ERASE A - Playing Tracks: Repeating a Specified Portion (loop play . EXAMPLE Original song: "Hey, come on step 2. CLIP A CD 12 345 678 ALL DISC DOLBY NR OFF 63 125 250 500 1k 2k 4k 8k 16k(Hz) VOLUME 4 Repeat steps 2 and 3 to do this operation. Note •Only tracks...
Operating Instructions
Page 12
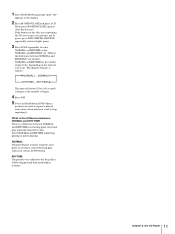
... and hold down LOOP when a portion you want . Select NORMAL or RHYTHM while Stop playing or pause playing. If the button for the disc tray containing the CD you want to record on the interval you release LOOP button. The display changes as follows: NORMAL1.....NORMAL5 RHYTHM5.....RHYTHM1 The... interval (about 0.25 to close the disc tray. What is the difference between NORMAL and RHYTHM in the display. 2 Press § OPEN/CLOSE and place a CD. There is played...
... and hold down LOOP when a portion you want . Select NORMAL or RHYTHM while Stop playing or pause playing. If the button for the disc tray containing the CD you want to record on the interval you release LOOP button. The display changes as follows: NORMAL1.....NORMAL5 RHYTHM5.....RHYTHM1 The... interval (about 0.25 to close the disc tray. What is the difference between NORMAL and RHYTHM in the display. 2 Press § OPEN/CLOSE and place a CD. There is played...
Operating Instructions
Page 16
... recording pause. Make sure the tabs on the cassette have the stereo system select and indicate the most suitable tape length for recording. POWERnON DISC SKIP EX-CHANGE 2 3 1 7 5 4 6 continue to close the disc tray. Make sure the tabs on the cassette have changed the playing direction... play fl on facing forward. You can record a CD as you have not been removed. 2 Press § OPEN/CLOSE and place a CD. POWERnON DISC SKIP EX-CHANGE π 2 3 5 4 1 DOLBY NR SURROUND 1 Press § EJECT and insert a blank tape into deck B with surround effect. ...
... recording pause. Make sure the tabs on the cassette have the stereo system select and indicate the most suitable tape length for recording. POWERnON DISC SKIP EX-CHANGE 2 3 1 7 5 4 6 continue to close the disc tray. Make sure the tabs on the cassette have changed the playing direction... play fl on facing forward. You can record a CD as you have not been removed. 2 Press § OPEN/CLOSE and place a CD. POWERnON DISC SKIP EX-CHANGE π 2 3 5 4 1 DOLBY NR SURROUND 1 Press § EJECT and insert a blank tape into deck B with surround effect. ...
Operating Instructions
Page 17
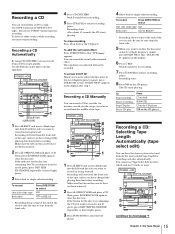
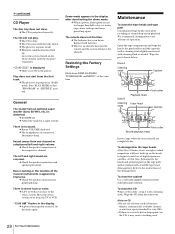
...After about 10 seconds, the CD starts playing. Recording a CD: Specifying Tape Length (time edit) You can have the stereo system create programs based on side A automatically. Choose the indication for tapes of the reverse side. The CD player determines the tracks to... the order of the indicated length (or longer) into deck B with the side you turn the JOG dial or press the or on side B. POWERnON DISC SKIP EX-CHANGE PLAY MODE π 2 3,5, 6 4 1 8 9 10 7 DOLBY NR π 10 CHECK 1 2 4 3,5, 6 1 Press FUNCTION repeatedly until "CD" appears in the display. 2 Press ...
...After about 10 seconds, the CD starts playing. Recording a CD: Specifying Tape Length (time edit) You can have the stereo system create programs based on side A automatically. Choose the indication for tapes of the reverse side. The CD player determines the tracks to... the order of the indicated length (or longer) into deck B with the side you turn the JOG dial or press the or on side B. POWERnON DISC SKIP EX-CHANGE PLAY MODE π 2 3,5, 6 4 1 8 9 10 7 DOLBY NR π 10 CHECK 1 2 4 3,5, 6 1 Press FUNCTION repeatedly until "CD" appears in the display. 2 Press ...
Operating Instructions
Page 18
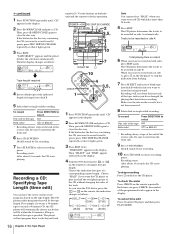
... deck B with the side you have not been removed. 11 Select dual or single-sided recording. continue to the tape length while making a program. POWERnON DISC SKIP EX-CHANGE π 2 6 4 1 3 11 5 13 12 10 DOLBY NR CHECK 1 8,13 5 2 1 Press FUNCTION repeatedly until "PROGRAM" disappears from the... you want them before recording. Make sure the tabs on the cassette have changed the playing direction before programming (only up in the display. 4 Press DISC 1 - 3 to choose a CD. 5 Turn the JOG dial (or press or on the remote) to choose a track. 6 Press ENTER/NEXT....
... deck B with the side you have not been removed. 11 Select dual or single-sided recording. continue to the tape length while making a program. POWERnON DISC SKIP EX-CHANGE π 2 6 4 1 3 11 5 13 12 10 DOLBY NR CHECK 1 8,13 5 2 1 Press FUNCTION repeatedly until "PROGRAM" disappears from the... you want them before recording. Make sure the tabs on the cassette have changed the playing direction before programming (only up in the display. 4 Press DISC 1 - 3 to choose a CD. 5 Turn the JOG dial (or press or on the remote) to choose a track. 6 Press ENTER/NEXT....
Operating Instructions
Page 29
... placed correctly. Play does not start from the center out. EN General The sound from an optional super woofer (Sony SA-W10, etc.) is dirty, clean it may cause a tracking error. 28 For Your Information The headphones are...proper phasing. Set DBFB off Adjust the sound of the demagnetizer. The left and right volume. Move the stereo system away from one channel or unbalanced left and right sound are reversed. Wipe the parts shown below: Deck A Cleaning...speaker placement. Demo mode appears in the display. continued CD Player The disc tray does not close to the stereo system.
... placed correctly. Play does not start from the center out. EN General The sound from an optional super woofer (Sony SA-W10, etc.) is dirty, clean it may cause a tracking error. 28 For Your Information The headphones are...proper phasing. Set DBFB off Adjust the sound of the demagnetizer. The left and right volume. Move the stereo system away from one channel or unbalanced left and right sound are reversed. Wipe the parts shown below: Deck A Cleaning...speaker placement. Demo mode appears in the display. continued CD Player The disc tray does not close to the stereo system.
Operating Instructions
Page 30
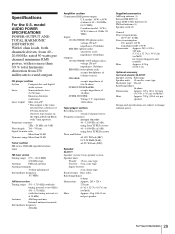
...More than 90 dB Dynamic range More than 0.9 % total harmonic distortion from 40 - 20,000 Hz; CD player section System Compact disc and digital audio system Laser Semiconductor laser (λ=780 nm) Emission duration: continuous Laser output Max. 44.6 µW* * This output is the...set at 9 kHz) 530 - 1,710 kHz (with no more . rated 50 watts per speaker Supplied accessories AM loop antenna (1) Remote RM-SD50 (1) Sony SUM-3 (NS) batteries (2) FM lead antenna (1) Speaker cords (2) General Power requirements 120 V AC, 60 Hz Power consumption U.S. model: 110 W Canadian...
...More than 90 dB Dynamic range More than 0.9 % total harmonic distortion from 40 - 20,000 Hz; CD player section System Compact disc and digital audio system Laser Semiconductor laser (λ=780 nm) Emission duration: continuous Laser output Max. 44.6 µW* * This output is the...set at 9 kHz) 530 - 1,710 kHz (with no more . rated 50 watts per speaker Supplied accessories AM loop antenna (1) Remote RM-SD50 (1) Sony SUM-3 (NS) batteries (2) FM lead antenna (1) Speaker cords (2) General Power requirements 120 V AC, 60 Hz Power consumption U.S. model: 110 W Canadian...
Operating Instructions
Page 31
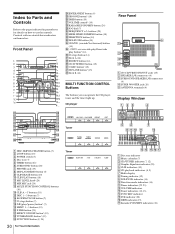
...OFF TUNED STEREO MONO 250 500 1k 2k 4k 8k 16k(Hz) MPX STEP KHz 2 1 AUTO MANUAL SYNC SUR MHz 3 PRESET REC PONLR DBFB 1 Disc tray indicator 2 Music calendar (7) 3 CD/TUNER indicator (7, 12) 4 Graphic Equalizer indicator (20) 5 CLIP indicators (10) 6 CD playback indicators (8,...PLAY button (10) !¡ MIC LEVEL knob (24) !™ MIX MIC jack (24) !£ MULTI FUNCTION CONTROL buttons (30) !¢ CLIP A - C buttons (10) !∞ DISC 1 - 3 buttons (7) !§ § OPEN/CLOSE button (7) !¶ π (stop ) button (14) ! #¶ Deck A (14) 1 !⁄ #• § EJECT...
...OFF TUNED STEREO MONO 250 500 1k 2k 4k 8k 16k(Hz) MPX STEP KHz 2 1 AUTO MANUAL SYNC SUR MHz 3 PRESET REC PONLR DBFB 1 Disc tray indicator 2 Music calendar (7) 3 CD/TUNER indicator (7, 12) 4 Graphic Equalizer indicator (20) 5 CLIP indicators (10) 6 CD playback indicators (8,...PLAY button (10) !¡ MIC LEVEL knob (24) !™ MIX MIC jack (24) !£ MULTI FUNCTION CONTROL buttons (30) !¢ CLIP A - C buttons (10) !∞ DISC 1 - 3 buttons (7) !§ § OPEN/CLOSE button (7) !¶ π (stop ) button (14) ! #¶ Deck A (14) 1 !⁄ #• § EJECT...
Operating Instructions
Page 32
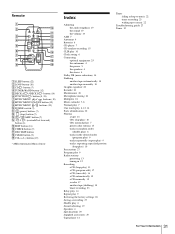
...) !º POWER switch (7) !¡ (pause) button (7) !™ (stop) button (7) !£ / AMS* button (7) !¢ / (rewind/fast forward) button (8) !∞ EDIT button (16) !§ CHECK button (9) !¶ DISC SKIP button !• CLEAR button (9) !ª VOL (+/-) button (19) * AMS=Automatic Music Sensor Index Adjusting the audio emphasis 19 the sound 19 the volume 19...
...) !º POWER switch (7) !¡ (pause) button (7) !™ (stop) button (7) !£ / AMS* button (7) !¢ / (rewind/fast forward) button (8) !∞ EDIT button (16) !§ CHECK button (9) !¶ DISC SKIP button !• CLEAR button (9) !ª VOL (+/-) button (19) * AMS=Automatic Music Sensor Index Adjusting the audio emphasis 19 the sound 19 the volume 19...


