Installation/Connections
Page 1
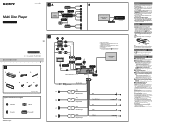
... only passive speakers. 4-296-932-11(1) Multi Disc Player Installation/Connections A VIDEO OUT FRONT AUDIO OUT Monitor (not supplied) REAR / SUB AUDIO OUT B Satellite radio tuner (SiriusXM)* SIRIUSXM IN * not supplied MEX-DV1707U/MEX-DV1700U × 2 * * × 4 * except for safety. The use as hideaway navigation device...
... only passive speakers. 4-296-932-11(1) Multi Disc Player Installation/Connections A VIDEO OUT FRONT AUDIO OUT Monitor (not supplied) REAR / SUB AUDIO OUT B Satellite radio tuner (SiriusXM)* SIRIUSXM IN * not supplied MEX-DV1707U/MEX-DV1700U × 2 * * × 4 * except for safety. The use as hideaway navigation device...
Operating Instructions
Page 9
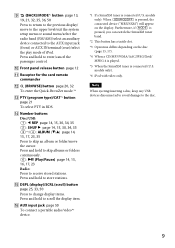
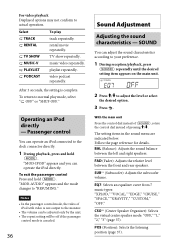
...;*2/: ALBUM (/) page 14, 15, 17, 23, 35 Press to the AUX input jack (front) or AUX IN terminal (rear)/select the play mode of iPod.
...;*2/: ALBUM (/) page 14, 15, 17, 23, 35 Press to the AUX input jack (front) or AUX IN terminal (rear)/select the play mode of iPod.
Operating Instructions
Page 11
...). *3 When a CD/MP3/WMA/AAC/JPEG/Xvid/ MPEG-4 is played. *4 If a SiriusXM tuner is inserted to the AUX input jack (front) or AUX IN terminal (rear)/select the play /pause) button page 14, 15, 16, 17, 23 buttons page 13, 15, 17, 23 Disc*2/USB: Press to enter/cancel the passenger...
...). *3 When a CD/MP3/WMA/AAC/JPEG/Xvid/ MPEG-4 is played. *4 If a SiriusXM tuner is inserted to the AUX input jack (front) or AUX IN terminal (rear)/select the play /pause) button page 14, 15, 16, 17, 23 buttons page 13, 15, 17, 23 Disc*2/USB: Press to enter/cancel the passenger...
Operating Instructions
Page 12
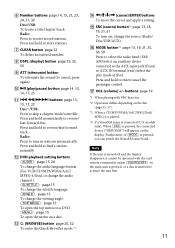
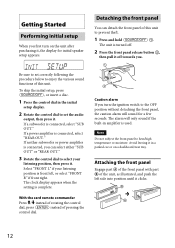
...; of the front panel with part of this unit. If a power amplifier is connected, select "SUB OUT." If a subwoofer is connected, select "REAR OUT." Note Do not subject the front panel to set correctly following the procedure below to the OFF position without detaching the front panel, the... position until it . Avoid leaving it . The alarm will sound for initial speaker setup appears. Caution alarm If you turn on a dashboard/rear tray. The clock display appears when the setting is turned off towards you. Detaching the front panel You can select either "SUB OUT" or...
...; of the front panel with part of this unit. If a power amplifier is connected, select "SUB OUT." If a subwoofer is connected, select "REAR OUT." Note Do not subject the front panel to set correctly following the procedure below to the OFF position without detaching the front panel, the... position until it . Avoid leaving it . The alarm will sound for initial speaker setup appears. Caution alarm If you turn on a dashboard/rear tray. The clock display appears when the setting is turned off towards you. Detaching the front panel You can select either "SUB OUT" or...

Operating Instructions
Page 27
Example: Dolby Digital 5.1 ch Rear component × 2 DOLBY DIGITAL 3 / 2 . 1 Front component × 2 + Center component × 1 LFE component × 1 To hide the play mode menu (page 24). DVD level You ... level for a DVD recorded in the program format display represent the following sound components and its position. : Front (left) : Front (right) : Center : Rear (left) : Rear (right) : Rear (monaural): The rear component of channels and component position on the disc. The options are indicated below. STEREO (ST): Standard stereo sound (default) 1/L (L): Left channel sound...
Example: Dolby Digital 5.1 ch Rear component × 2 DOLBY DIGITAL 3 / 2 . 1 Front component × 2 + Center component × 1 LFE component × 1 To hide the play mode menu (page 24). DVD level You ... level for a DVD recorded in the program format display represent the following sound components and its position. : Front (left) : Front (right) : Center : Rear (left) : Rear (right) : Rear (monaural): The rear component of channels and component position on the disc. The options are indicated below. STEREO (ST): Standard stereo sound (default) 1/L (L): Left channel sound...
Operating Instructions
Page 36
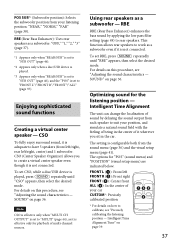
... the desired setting item appears on the main unit. 2 Press / to actual operation. BAL (Balance): Adjusts the sound balance between the front and rear speakers. CSO*2 (Center Speaker Organizer): Selects the virtual center speaker mode: "OFF," "1," "2," "3" (page 37). After 3 seconds, the setting is canceled. 36 Sound Adjustment Adjusting the...
... the desired setting item appears on the main unit. 2 Press / to actual operation. BAL (Balance): Adjusts the sound balance between the front and rear speakers. CSO*2 (Center Speaker Organizer): Selects the virtual center speaker mode: "OFF," "1," "2," "3" (page 37). After 3 seconds, the setting is canceled. 36 Sound Adjustment Adjusting the...
Operating Instructions
Page 37
... "FAR" (page 38). To set to "SUB OUT" (page 46), and the "POS" is adequate to have 5 speakers (front left/right, rear left FRONT R (): Front right FRONT (): Center front ALL (): In the center of multi-channel sources. Note CSO is effective only when...Alignment Tune" on page 36. Enjoying sophisticated sound functions Creating a virtual center speaker - To set to work as a subwoofer - RBE (Rear Bass Enhancer): Uses rear speakers as it is set RBE, press repeatedly until "CSO" appears, then select the desired mode. SOUND" on page 39. 37 FRONT ...
... "FAR" (page 38). To set to "SUB OUT" (page 46), and the "POS" is adequate to have 5 speakers (front left/right, rear left FRONT R (): Front right FRONT (): Center front ALL (): In the center of multi-channel sources. Note CSO is effective only when...Alignment Tune" on page 36. Enjoying sophisticated sound functions Creating a virtual center speaker - To set to work as a subwoofer - RBE (Rear Bass Enhancer): Uses rear speakers as it is set RBE, press repeatedly until "CSO" appears, then select the desired mode. SOUND" on page 39. 37 FRONT ...

Operating Instructions
Page 38
... 37). By the sound menu Press repeatedly until "POS" appears, then select your listening position: "NEAR," "NORM"/"NORMAL" or "FAR." The subwoofer is connected and "REAR/SUB" is available only under the following conditions. 38 - The visual setup menu appears. 2 Press / to select (AUDIO SETUP), then press The audio...
... 37). By the sound menu Press repeatedly until "POS" appears, then select your listening position: "NEAR," "NORM"/"NORMAL" or "FAR." The subwoofer is connected and "REAR/SUB" is available only under the following conditions. 38 - The visual setup menu appears. 2 Press / to select (AUDIO SETUP), then press The audio...

Operating Instructions
Page 39
... desired speaker, then press The speaker switches as follows: FL (Front Left) FR (Front Right) SR (Rear Right) SL (Rear Left) SUB* (Subwoofer) * Appears only when "REAR/SUB" is adjustable in 2 cm (13/16 in ) steps, between 0 and 400 cm (0 and 13 1/10 ft).... the visual setup menu (page 41). Intelligent Time Alignment Tune You can precisely calibrate your listening position and each speaker. FRONT LEFT FRONT RIGHT REAR LEFT REAR RIGHT SUBWOOFER 100cm 100cm 100cm 100cm 0cm 2 Set the distance between 0 and 400 cm (0 and 13 1/10 ft). 6 Press The setting...
... desired speaker, then press The speaker switches as follows: FL (Front Left) FR (Front Right) SR (Rear Right) SL (Rear Left) SUB* (Subwoofer) * Appears only when "REAR/SUB" is adjustable in 2 cm (13/16 in ) steps, between 0 and 400 cm (0 and 13 1/10 ft).... the visual setup menu (page 41). Intelligent Time Alignment Tune You can precisely calibrate your listening position and each speaker. FRONT LEFT FRONT RIGHT REAR LEFT REAR RIGHT SUBWOOFER 100cm 100cm 100cm 100cm 0cm 2 Set the distance between 0 and 400 cm (0 and 13 1/10 ft). 6 Press The setting...

Operating Instructions
Page 40
... adjustable in single steps, between -6 and +6. The speaker switches as follows: FL (Front Left) FR (Front Right) SR (Rear Right) SL (Rear Left) SUB* (Subwoofer) * Appears only when "REAR/SUB" is complete. With the main unit Press and hold the control dial instead of pressing rotate the control dial...
... adjustable in single steps, between -6 and +6. The speaker switches as follows: FL (Front Left) FR (Front Right) SR (Rear Right) SL (Rear Left) SUB* (Subwoofer) * Appears only when "REAR/SUB" is complete. With the main unit Press and hold the control dial instead of pressing rotate the control dial...

Operating Instructions
Page 44
...*2 (page 38) NEAR, NORMAL (), FAR MULTI CH OUTPUT Switches the method of the sound field wherever you sit in VR mode. *2 Available only when "REAR/SUB" is set to front left. To obtain the feeling of being in 4.1 channels. To precisely calibrate the listening position (page 39). Option ON (...
...*2 (page 38) NEAR, NORMAL (), FAR MULTI CH OUTPUT Switches the method of the sound field wherever you sit in VR mode. *2 Available only when "REAR/SUB" is set to front left. To obtain the feeling of being in 4.1 channels. To precisely calibrate the listening position (page 39). Option ON (...

Operating Instructions
Page 46
... ON () To activate the CT function. To select the desired time. To set position. To use in the factory-set to NTSC (U.S. Unit off. REAR/SUB REAR OUT Switches the audio output. NO () 30S, 30M, 60M To set to PAL (Except for U.S. SUB OUT () To set to the power...
... ON () To activate the CT function. To select the desired time. To set position. To use in the factory-set to NTSC (U.S. Unit off. REAR/SUB REAR OUT Switches the audio output. NO () 30S, 30M, 60M To set to PAL (Except for U.S. SUB OUT () To set to the power...

Operating Instructions
Page 49
... 50HZ, 60HZ, 80HZ, 100HZ, 120HZ). During radio reception/ playback. During AUX playback. HPF-FREQ (High Pass Filter Frequency) To select the front/rear speaker cut -off . ADJST-ON ADJST-OFF () To allow for adjusting the output level of Dolby Digital format. POS TUNE To set the ... 400 cm (0 (page 39) and 13 1/10 ft)). *1 Appears and available only when "DVD-LEVEL" is set to "ADJST-ON." *2 Appears only when "REAR/SUB" is set to "SUB OUT" (page 46). 49 Unit off frequency Frequency)*2 (120HZ, 100HZ (), 80HZ, 60HZ, 50HZ). LPF-PHASE To select the ...
... 50HZ, 60HZ, 80HZ, 100HZ, 120HZ). During radio reception/ playback. During AUX playback. HPF-FREQ (High Pass Filter Frequency) To select the front/rear speaker cut -off . ADJST-ON ADJST-OFF () To allow for adjusting the output level of Dolby Digital format. POS TUNE To set the ... 400 cm (0 (page 39) and 13 1/10 ft)). *1 Appears and available only when "DVD-LEVEL" is set to "ADJST-ON." *2 Appears only when "REAR/SUB" is set to "SUB OUT" (page 46). 49 Unit off frequency Frequency)*2 (120HZ, 100HZ (), 80HZ, 60HZ, 50HZ). LPF-PHASE To select the ...
Operating Instructions
Page 50
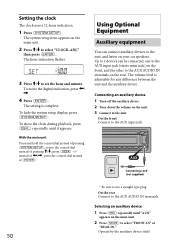
...an auxiliary device 1 Turn off the auxiliary device. 2 Turn down the volume on the unit. 3 Connect to the AUX AUDIO IN terminals. On the rear Connect to the unit. The volume level is complete. Connecting cord* (not supplied) * Be sure to the AUX input jack. Operate by the auxiliary ...," then press The hour indication flashes. 3 Press / to the AUX AUDIO IN terminals on the rear. Up to 2 devices can connect auxiliary devices to select "FRONT-IN" or "REAR-IN." With the main unit Press and hold the control dial instead of pressing rotate the control dial instead...
...an auxiliary device 1 Turn off the auxiliary device. 2 Turn down the volume on the unit. 3 Connect to the AUX AUDIO IN terminals. On the rear Connect to the unit. The volume level is complete. Connecting cord* (not supplied) * Be sure to the AUX input jack. Operate by the auxiliary ...," then press The hour indication flashes. 3 Press / to the AUX AUDIO IN terminals on the rear. Up to 2 devices can connect auxiliary devices to select "FRONT-IN" or "REAR-IN." With the main unit Press and hold the control dial instead of pressing rotate the control dial instead...
Operating Instructions
Page 56
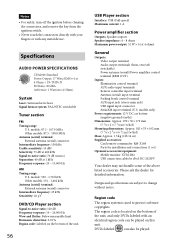
... U.S. Design and specifications are subject to -noise ratio: 70 dB (mono) Separation: 40 dB at 4 ohms) General Outputs: Video output terminal Audio output terminals (front, rear/sub switchable) Power antenna (aerial)/Power amplifier control terminal (REM OUT) Inputs: Illumination control terminal AUX audio input terminals Remote controller input terminal Antenna (aerial...
... U.S. Design and specifications are subject to -noise ratio: 70 dB (mono) Separation: 40 dB at 4 ohms) General Outputs: Video output terminal Audio output terminals (front, rear/sub switchable) Power antenna (aerial)/Power amplifier control terminal (REM OUT) Inputs: Illumination control terminal AUX audio input terminals Remote controller input terminal Antenna (aerial...
Operating Instructions
Page 57
... on the unit. Radio reception The stations cannot be labeled even though playing the DVD is not possible. Store the correct frequency in the rear/ side glass). - Preset tuning is prohibited by area restrictions. If you are not using the fuse and removing the unit from /does not appear in...
... on the unit. Radio reception The stations cannot be labeled even though playing the DVD is not possible. Store the correct frequency in the rear/ side glass). - Preset tuning is prohibited by area restrictions. If you are not using the fuse and removing the unit from /does not appear in...
Marketing Specifications
Page 1
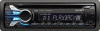
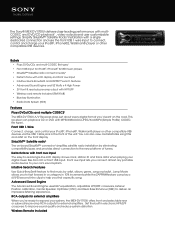
... display shows clock, station ID and track data when playing your digital music files from CD or front USB input. MEX-DV1700U The Sony® MEX-DV1700U delivers class-leading performance with MP3/WMA/AAC/JPEG/Xvid/MP4 (Simple Profile) CODEC file types1. Simplify SiriusXM™ ...Satellite Radio3 installation with front aux input The easy-to your system, the MEX-DV1700U offers front and selectable rear or subwoofer pre-amp RCA outputs ...
... display shows clock, station ID and track data when playing your digital music files from CD or front USB input. MEX-DV1700U The Sony® MEX-DV1700U delivers class-leading performance with MP3/WMA/AAC/JPEG/Xvid/MP4 (Simple Profile) CODEC file types1. Simplify SiriusXM™ ...Satellite Radio3 installation with front aux input The easy-to your system, the MEX-DV1700U offers front and selectable rear or subwoofer pre-amp RCA outputs ...
Marketing Specifications
Page 2
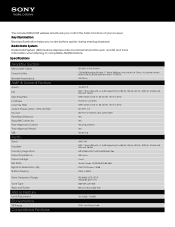
...): 87.5-107.9 AM (kHz): 530-1710 SSIR-EXA with +/- 6 dB adjustment at : 50, 60, 80, 100 or 120 Hz. 52 watts x 4 (2) Front and Rear / Sub switchable Yes Yes Yes (Adjustment) Yes Yes (Front) AM / FM EQ7: 7 band EQ with RDS Below measurable limit Yes (-8dB / +18dB) 0-45° ... Hoc Speaker Impedance AMP & General Feature Aux-In EQ High Pass Filter Loudness Low Pass Filter Output Power (4ohm, 1kHz,16V)(W) Pre Out Rear Bass Enhancer Sirius/XM Connector Time Alignment Custom Time Alignment Preset USB Audio Band Equalizer Format(s) Supported Preout Impedance Preout Voltage S/N Ratio Signal-to-...
...): 87.5-107.9 AM (kHz): 530-1710 SSIR-EXA with +/- 6 dB adjustment at : 50, 60, 80, 100 or 120 Hz. 52 watts x 4 (2) Front and Rear / Sub switchable Yes Yes Yes (Adjustment) Yes Yes (Front) AM / FM EQ7: 7 band EQ with RDS Below measurable limit Yes (-8dB / +18dB) 0-45° ... Hoc Speaker Impedance AMP & General Feature Aux-In EQ High Pass Filter Loudness Low Pass Filter Output Power (4ohm, 1kHz,16V)(W) Pre Out Rear Bass Enhancer Sirius/XM Connector Time Alignment Custom Time Alignment Preset USB Audio Band Equalizer Format(s) Supported Preout Impedance Preout Voltage S/N Ratio Signal-to-...

Marketing Specifications
Page 3
...unit can be connected to the latest software before you have any questions or problems concerning your unit that are compatible. Wireless remote Front and Rear/Subwoofer selectable RCA pre-amp outputs Front Yes depend on AM/FM Antenna Input Terminal Front Aux in the owners manual, consult your iPod ... time, menu and clock 1 line of USB devices may vary as not all devices are not covered in with the USB standard. Update your nearest Sony dealer. iPod Nano 1st - 6th generation iPod Touch 1st - 4th generation iPod Classic iPod with video iPhone iPhone 3G iPhone 3GS iPhone 4 If you...
...unit can be connected to the latest software before you have any questions or problems concerning your unit that are compatible. Wireless remote Front and Rear/Subwoofer selectable RCA pre-amp outputs Front Yes depend on AM/FM Antenna Input Terminal Front Aux in the owners manual, consult your iPod ... time, menu and clock 1 line of USB devices may vary as not all devices are not covered in with the USB standard. Update your nearest Sony dealer. iPod Nano 1st - 6th generation iPod Touch 1st - 4th generation iPod Classic iPod with video iPhone iPhone 3G iPhone 3GS iPhone 4 If you...


