Limited Warranty (U.S. Only)
Page 1
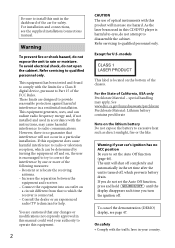
... is required. Printed in material or workmanship during service and Sony will , at its option, repair or replace with a new or refurbished product. 3-272-643-02 SONY® Car Audio LIMITED WARRANTY (U.S. For purposes of protection to any such software is valid only in exchange for the time periods and as fuses or batteries). A dated purchase receipt from the product. This...
... is required. Printed in material or workmanship during service and Sony will , at its option, repair or replace with a new or refurbished product. 3-272-643-02 SONY® Car Audio LIMITED WARRANTY (U.S. For purposes of protection to any such software is valid only in exchange for the time periods and as fuses or batteries). A dated purchase receipt from the product. This...
Installation/Connections
Page 1
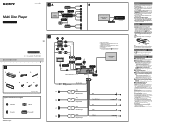
... necessary if you turn the unit off . Connecting active speakers (with those in illustrations (not supplied) Front speaker Subwoofer Rear speaker Power amplifier *1 *1 Monitor (not supplied) REAR / SUB AUDIO OUT*2 *1 FRONT *3 AUDIO OUT AUX AUDIO IN VIDEO OUT SIRIUSXM IN*5 *1 RCA pin cord (not supplied) *2 AUDIO OUT can be higher than the sum of the speaker. Do not attempt to remove the bracket from car antenna (aerial) Fuse (10 A) REM OUT Max. Satellite radio tuner (SiriusXM)*5 Left...
... necessary if you turn the unit off . Connecting active speakers (with those in illustrations (not supplied) Front speaker Subwoofer Rear speaker Power amplifier *1 *1 Monitor (not supplied) REAR / SUB AUDIO OUT*2 *1 FRONT *3 AUDIO OUT AUX AUDIO IN VIDEO OUT SIRIUSXM IN*5 *1 RCA pin cord (not supplied) *2 AUDIO OUT can be higher than the sum of the speaker. Do not attempt to remove the bracket from car antenna (aerial) Fuse (10 A) REM OUT Max. Satellite radio tuner (SiriusXM)*5 Left...
Installation/Connections
Page 2
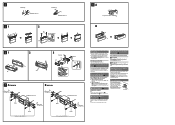
... power connection and replace the fuse. Fuse (10 A) Mounting the unit in the set the Auto Off function, press and hold Press the front panel release button, and pull it off , which prevents battery drain. Mounting angle adjustment Adjust the mounting angle to use one matching the amperage rating stated on the original fuse. In such a case, consult your nearest Sony dealer. Removing the protection collar and the bracket Before installing the unit, remove the protection...
... power connection and replace the fuse. Fuse (10 A) Mounting the unit in the set the Auto Off function, press and hold Press the front panel release button, and pull it off , which prevents battery drain. Mounting angle adjustment Adjust the mounting angle to use one matching the amperage rating stated on the original fuse. In such a case, consult your nearest Sony dealer. Removing the protection collar and the bracket Before installing the unit, remove the protection...
Operating Instructions
Page 2
... receiving antenna. - Warning if your car's ignition has no guarantee that any changes or modifications not expressly approved in the set the Auto Off function (page 46). If this CD/DVD player is encouraged to try to correct the interference by turning the equipment off , which the receiver is turned off and on, the user is harmful to eyes, do not set the Auto Off function...
... receiving antenna. - Warning if your car's ignition has no guarantee that any changes or modifications not expressly approved in the set the Auto Off function (page 46). If this CD/DVD player is encouraged to try to correct the interference by turning the equipment off , which the receiver is turned off and on, the user is harmful to eyes, do not set the Auto Off function...
Operating Instructions
Page 5
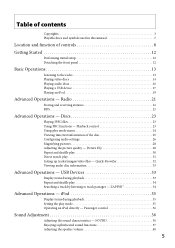
... Direct search play mode 35 Operating an iPod directly - ZAPPIN 34 Advanced Operations - Radio 21 Storing and receiving stations 21 RDS 21 Advanced Operations - Discs 23 Playing JPEG files 23 Using PBC functions - Table of contents Copyrights 3 Playable discs and symbols used in this manual 7 Location and function of the disc 25 Configuring audio settings 26 Magnifying pictures 28 Adjusting the picture quality - Passenger control 36 Sound Adjustment 36 Adjusting the sound characteristics - USB Devices 33 Display items during playback 35 Setting the play...
... Direct search play mode 35 Operating an iPod directly - ZAPPIN 34 Advanced Operations - Radio 21 Storing and receiving stations 21 RDS 21 Advanced Operations - Discs 23 Playing JPEG files 23 Using PBC functions - Table of contents Copyrights 3 Playable discs and symbols used in this manual 7 Location and function of the disc 25 Configuring audio settings 26 Magnifying pictures 28 Adjusting the picture quality - Passenger control 36 Sound Adjustment 36 Adjusting the sound characteristics - USB Devices 33 Display items during playback 35 Setting the play...
Operating Instructions
Page 9
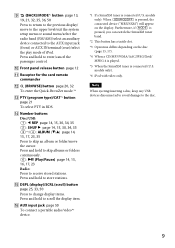
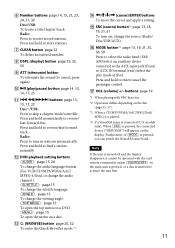
.../move to the upper level/exit the system setup menu or sound menu/select the radio band (FM/AM)/select an auxiliary device connected to the AUX input jack (front) or AUX IN terminal (rear)/select the play mode of iPod. (BACK)/MODE*1 button page 13, 19, 21, 32, 35, 36, 50 Press to return to the previous display/ move the cursor. Note When ejecting/inserting a disc, keep any USB devices disconnected to avoid damage...
.../move to the upper level/exit the system setup menu or sound menu/select the radio band (FM/AM)/select an auxiliary device connected to the AUX input jack (front) or AUX IN terminal (rear)/select the play mode of iPod. (BACK)/MODE*1 button page 13, 19, 21, 32, 35, 36, 50 Press to return to the previous display/ move the cursor. Note When ejecting/inserting a disc, keep any USB devices disconnected to avoid damage...
Operating Instructions
Page 11
...; ATT (attenuate) button To attenuate the sound (to cancel, press again). (play/pause) button page 14, 15, 16, 17, 23 buttons page 13, 15, 17, 23 Disc*2/USB: Press to the AUX input jack (front) or AUX IN terminal (rear)/select the play mode of iPod. models only): When is connected (U.S. buttons page 19 *1 When playing with the card remote commander unless on the display. Note If the unit is turned off...
...; ATT (attenuate) button To attenuate the sound (to cancel, press again). (play/pause) button page 14, 15, 16, 17, 23 buttons page 13, 15, 17, 23 Disc*2/USB: Press to the AUX input jack (front) or AUX IN terminal (rear)/select the play mode of iPod. models only): When is connected (U.S. buttons page 19 *1 When playing with the card remote commander unless on the display. Note If the unit is turned off...
Operating Instructions
Page 19
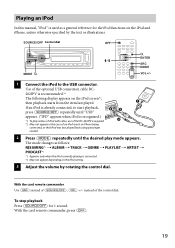
... the iPod setting. 3 Adjust the volume by the text or illustrations. Use of the optional USB connection cable RC202IPV is required. *2 May not appear in the case of an iPod touch or iPhone being connected, or that iPod was last played back using passenger control. 2 Press repeatedly until the desired play mode appears. With the card remote commander, press 19 SOURCE/OFF Control dial OFF MODE M/m ENTER SRC MODE VOL 1 Connect the iPod to...
... the iPod setting. 3 Adjust the volume by the text or illustrations. Use of the optional USB connection cable RC202IPV is required. *2 May not appear in the case of an iPod touch or iPhone being connected, or that iPod was last played back using passenger control. 2 Press repeatedly until the desired play mode appears. With the card remote commander, press 19 SOURCE/OFF Control dial OFF MODE M/m ENTER SRC MODE VOL 1 Connect the iPod to...
Operating Instructions
Page 20
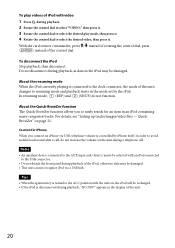
... sound after a call . To play mode, then press it. 4 Rotate the control dial to select the desired video, then press it . 3 Rotate the control dial to select the desired play videos of iPod with video 1 Press during playback of the iPod, otherwise data may be damaged. • This unit cannot recognize iPod via USB, telephone volume is connected to the dock connector, the mode of this unit changes to easily search for iPhone...
... sound after a call . To play mode, then press it. 4 Rotate the control dial to select the desired video, then press it . 3 Rotate the control dial to select the desired play videos of iPod with video 1 Press during playback of the iPod, otherwise data may be damaged. • This unit cannot recognize iPod via USB, telephone volume is connected to the dock connector, the mode of this unit changes to easily search for iPhone...
Operating Instructions
Page 36
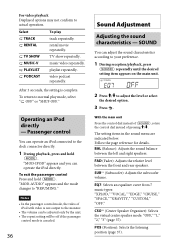
... can operate an iPod connected to the dock connector directly. 1 During playback, press and hold MOD-AUDIO" appears and the mode changes to normal play track repeatedly. Notes • In the passenger control mode, the video of pressing /. SUB*1 (Subwoofer): Adjusts the subwoofer volume. BAL (Balance): Adjusts the sound balance between the front and rear speakers. rental movie repeatedly. video podcast repeatedly. SOUND You can be adjusted only by the unit. • The repeat setting will...
... can operate an iPod connected to the dock connector directly. 1 During playback, press and hold MOD-AUDIO" appears and the mode changes to normal play track repeatedly. Notes • In the passenger control mode, the video of pressing /. SUB*1 (Subwoofer): Adjusts the subwoofer volume. BAL (Balance): Adjusts the sound balance between the front and rear speakers. rental movie repeatedly. video podcast repeatedly. SOUND You can be adjusted only by the unit. • The repeat setting will...
Operating Instructions
Page 37
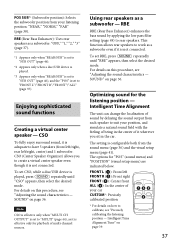
... "REAR/SUB" is set to "SUB OUT" (page 46). *2 Appears only when a disc/USB device is played. *3 Appears only when "REAR/SUB" is played, press repeatedly until "RBE" appears, then select the desired mode. Intelligent Time Alignment The unit can change the localization of being in the car. Intelligent Time Alignment Tune" on page 36. Enjoying sophisticated sound functions Creating a virtual center speaker - FRONT L (): Front left /right, center) and 1 subwoofer. RBE (Rear Bass Enhancer): Uses rear speakers...
... "REAR/SUB" is set to "SUB OUT" (page 46). *2 Appears only when a disc/USB device is played. *3 Appears only when "REAR/SUB" is played, press repeatedly until "RBE" appears, then select the desired mode. Intelligent Time Alignment The unit can change the localization of being in the car. Intelligent Time Alignment Tune" on page 36. Enjoying sophisticated sound functions Creating a virtual center speaker - FRONT L (): Front left /right, center) and 1 subwoofer. RBE (Rear Bass Enhancer): Uses rear speakers...

Operating Instructions
Page 46
...;) To activate the CT function. models only ()). Unit off . To deactivate the CT function. To use on the right side of the rotary commander controls. To activate the operation sound. To set to the subwoofer. To deactivate the Auto Off function. Unit off. To set to the power amplifier. NO () 30S, 30M, 60M To set to the connected monitor. To use in the factory-set to NTSC (U.S. COLOR-SYS (Color System) Changes the video output signal...
...;) To activate the CT function. models only ()). Unit off . To deactivate the CT function. To use on the right side of the rotary commander controls. To activate the operation sound. To set to the subwoofer. To deactivate the Auto Off function. Unit off. To set to the power amplifier. NO () 30S, 30M, 60M To set to the connected monitor. To use in the factory-set to NTSC (U.S. COLOR-SYS (Color System) Changes the video output signal...

Operating Instructions
Page 49
... "REAR/SUB" is set to "SUB OUT" (page 46). 49 During disc playback. (-10 ~ +10) : +8 To select the level. To deactivate the level adjustment. LPF-FREQ To select the subwoofer (Low Pass Filter cut -off frequency Frequency)*2 (120HZ, 100HZ (), 80HZ, 60HZ, 50HZ). Unit off. LPF-PHASE To select the subwoofer (Low Pass Filter phase (NORM (), Phase)*2 REV). SND (Sound) Item EQ7 TUNE (page 40) AUX-LEVEL (page...
... "REAR/SUB" is set to "SUB OUT" (page 46). 49 During disc playback. (-10 ~ +10) : +8 To select the level. To deactivate the level adjustment. LPF-FREQ To select the subwoofer (Low Pass Filter cut -off frequency Frequency)*2 (120HZ, 100HZ (), 80HZ, 60HZ, 50HZ). Unit off. LPF-PHASE To select the subwoofer (Low Pass Filter phase (NORM (), Phase)*2 REV). SND (Sound) Item EQ7 TUNE (page 40) AUX-LEVEL (page...
Operating Instructions
Page 56
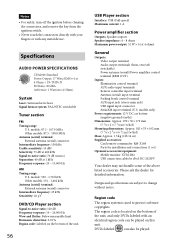
... SPECIFICATIONS CEA2006 Standard Power Output: 17 Watts RMS 4 at 4 ohms) General Outputs: Video output terminal Audio output terminals (front, rear/sub switchable) Power antenna (aerial)/Power amplifier control terminal (REM OUT) Inputs: Illumination control terminal AUX audio input terminals Remote controller input terminal Antenna (aerial) input terminal Parking break control terminal AUX input jack (stereo mini jack) USB signal input connector SiriusXM input terminal (U.S. Region code The region system is located on the bottom of the unit, and only DVDs labeled with any metal device...
... SPECIFICATIONS CEA2006 Standard Power Output: 17 Watts RMS 4 at 4 ohms) General Outputs: Video output terminal Audio output terminals (front, rear/sub switchable) Power antenna (aerial)/Power amplifier control terminal (REM OUT) Inputs: Illumination control terminal AUX audio input terminals Remote controller input terminal Antenna (aerial) input terminal Parking break control terminal AUX input jack (stereo mini jack) USB signal input connector SiriusXM input terminal (U.S. Region code The region system is located on the bottom of the unit, and only DVDs labeled with any metal device...
Operating Instructions
Page 57
... power amplifier is not a malfunction. The display disappears from the dashboard, refer to the installation/connections manual supplied with your car has built-in FM/AM antenna (aerial) in amplifier. The Auto Off function activates after turning the ignition off and the display disappears, it is set "DIM-ON" (page 47). The display disappears if you press and hold Press on using the built-in the rear...
... power amplifier is not a malfunction. The display disappears from the dashboard, refer to the installation/connections manual supplied with your car has built-in FM/AM antenna (aerial) in amplifier. The Auto Off function activates after turning the ignition off and the display disappears, it is set "DIM-ON" (page 47). The display disappears if you press and hold Press on using the built-in the rear...

Operating Instructions
Page 58
... unit is not an RDS station. RDS data has not been received. The station does not specify the program type. Tuning stops too frequently: Set "LOCAL-ON" (page 48). - An FM program broadcast in stereo is heard in a sturdy part of the car. The monitor is connected to the AUDIO/ VIDEO OUT, and the parking cord (light green) is not connected to the connected monitor...
... unit is not an RDS station. RDS data has not been received. The station does not specify the program type. Tuning stops too frequently: Set "LOCAL-ON" (page 48). - An FM program broadcast in stereo is heard in a sturdy part of the car. The monitor is connected to the AUDIO/ VIDEO OUT, and the parking cord (light green) is not connected to the connected monitor...
Operating Instructions
Page 60
... by pressing 60 - A USB device or a USB cable has been disconnected during automatic tuning. For details on this unit. - models only): CH LOCKD (Channel Locked) The selected channel is not supported on the compatibility of order, or an unsupported device is not functioning properly. - CHEK ANT (Check Antenna) The antenna (aerial) is on the disc structure, it again. See the supplied installation/connections manual to a problem. - Wait until reading...
... by pressing 60 - A USB device or a USB cable has been disconnected during automatic tuning. For details on this unit. - models only): CH LOCKD (Channel Locked) The selected channel is not supported on the compatibility of order, or an unsupported device is not functioning properly. - CHEK ANT (Check Antenna) The antenna (aerial) is on the disc structure, it again. See the supplied installation/connections manual to a problem. - Wait until reading...
Operating Instructions
Page 61
On the monitor Cannot play this disc. The disc is incompatible with this unit. The disc is not supported on the compatibility of disc playback trouble, bring the disc that was used at the time the problem began. 61 If these solutions do not help improve the situation, consult your USB device, visit the support site. Hubs not supported. USB hub is not finalized. No playable data...
On the monitor Cannot play this disc. The disc is incompatible with this unit. The disc is not supported on the compatibility of disc playback trouble, bring the disc that was used at the time the problem began. 61 If these solutions do not help improve the situation, consult your USB device, visit the support site. Hubs not supported. USB hub is not finalized. No playable data...
Marketing Specifications
Page 1
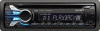
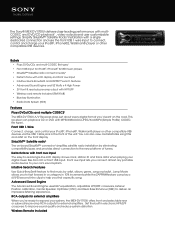
... iPod®2, iPhone®2 & USB music players • SiriusXM™ Satellite radio connector ready3 • Detach face with LCD display and front aux input • Intuitive Quick-BrowZer® and ZAPPIN™ search features • Advanced Sound Engine and 52 Watts x 4 High Power • 2V front & rear/sub pre-amp output with HPF/LPF • Wireless card remote included (RM-X168) • Blue key illumination • Radio Data System (RDS) Features Plays DVDs...
... iPod®2, iPhone®2 & USB music players • SiriusXM™ Satellite radio connector ready3 • Detach face with LCD display and front aux input • Intuitive Quick-BrowZer® and ZAPPIN™ search features • Advanced Sound Engine and 52 Watts x 4 High Power • 2V front & rear/sub pre-amp output with HPF/LPF • Wireless card remote included (RM-X168) • Blue key illumination • Radio Data System (RDS) Features Plays DVDs...

Marketing Specifications
Page 3
... remote Front and Rear/Subwoofer selectable RCA pre-amp outputs Front Yes depend on AM/FM Antenna Input Terminal Front Aux in the owners manual, consult your nearest Sony dealer. CD Text Display Dimmer Adjust Key Illumination On-Screen Clock Display Display Technology Text Displayed Text Lines Display Panel Dimmer Adjust Panel Design Display color (Color Variation/Nega or Posi) Display Device (LCD/FL/OEL/TFT) Key Illumination Panel finish color Feature CODEC (for USB) Jump Mode List Browsing (Folders/Files) Inputs and Outputs 12V Trigger Output(s) Antenna...
... remote Front and Rear/Subwoofer selectable RCA pre-amp outputs Front Yes depend on AM/FM Antenna Input Terminal Front Aux in the owners manual, consult your nearest Sony dealer. CD Text Display Dimmer Adjust Key Illumination On-Screen Clock Display Display Technology Text Displayed Text Lines Display Panel Dimmer Adjust Panel Design Display color (Color Variation/Nega or Posi) Display Device (LCD/FL/OEL/TFT) Key Illumination Panel finish color Feature CODEC (for USB) Jump Mode List Browsing (Folders/Files) Inputs and Outputs 12V Trigger Output(s) Antenna...


