
Operating Instructions
Page 3
... a part of a track (A-B ERASE function 23 Erasing recordings (ERASE EN function 24 Printing MD labels 25 Operation 11 Names and functions of screen ........ 11 MD operation screen 12 CD operation screen 14 Playing an MD 16 Playing an MD 16 Assigning names to CDs (NAME function 26 Recording from a CD to an MD ....... 27 Programming the CD tracks 28 Changing the disc icons 30 Quitting 30 Selecting a track for playback .. 16 Locating a specific track...
... a part of a track (A-B ERASE function 23 Erasing recordings (ERASE EN function 24 Printing MD labels 25 Operation 11 Names and functions of screen ........ 11 MD operation screen 12 CD operation screen 14 Playing an MD 16 Playing an MD 16 Assigning names to CDs (NAME function 26 Recording from a CD to an MD ....... 27 Programming the CD tracks 28 Changing the disc icons 30 Quitting 30 Selecting a track for playback .. 16 Locating a specific track...
Operating Instructions
Page 4
... a Sony CD player to an MD deck. * Only compatible with CD players that you should know before actually operating this unit. About this manual This manual explains preparations and operation methods for this function. Please refer to deal with problems when they occur, etc.. Viewing the latest information concerning this software The latest information about this software can be operated using the computer's display...
... a Sony CD player to an MD deck. * Only compatible with CD players that you should know before actually operating this unit. About this manual This manual explains preparations and operation methods for this function. Please refer to deal with problems when they occur, etc.. Viewing the latest information concerning this software The latest information about this software can be operated using the computer's display...
Operating Instructions
Page 5
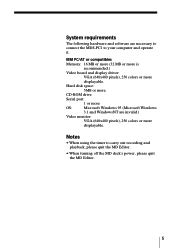
... are necessary to connect the MDS-PC1 to carry out recording and playback, please quit the MD Editor. • When turning off the MD deck's power, please quit the MD Editor. 5 Notes • When using the timer to your computer and operate it. IBM PC/AT or compatibles Memory: 16 MB or more (32 MB or more is recommended.) Video board and display driver: VGA (640x480...
... are necessary to connect the MDS-PC1 to carry out recording and playback, please quit the MD Editor. • When turning off the MD deck's power, please quit the MD Editor. 5 Notes • When using the timer to your computer and operate it. IBM PC/AT or compatibles Memory: 16 MB or more (32 MB or more is recommended.) Video board and display driver: VGA (640x480...
Operating Instructions
Page 6
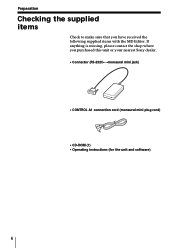
If anything is missing, please contact the shop where you have received the following supplied items with the MD Editor. Preparation Checking the supplied items Check to make sure that you purchased this unit or your nearest Sony dealer. • Connector (RS-232C˜monaural mini jack) • CONTROL A1 connection cord (monaural mini plug cord) • CD-ROM (1) • Operating instructions (for the unit and software) 6
If anything is missing, please contact the shop where you have received the following supplied items with the MD Editor. Preparation Checking the supplied items Check to make sure that you purchased this unit or your nearest Sony dealer. • Connector (RS-232C˜monaural mini jack) • CONTROL A1 connection cord (monaural mini plug cord) • CD-ROM (1) • Operating instructions (for the unit and software) 6
Operating Instructions
Page 8
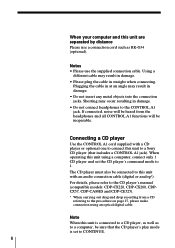
... headphones and all CONTROL A1 functions will be sure that includes a CONTROL A1 jack). Shorting may result in straight when connecting. When operating this unit with a CD player or optional one to connect this unit to a Sony CD player (that the CD player's play mode is connected to a CD player, as well as RK-G34 (optional). Connecting a CD player Use the CONTROL A1 cord supplied with an audio connection cable (digital or analog*). When your...
... headphones and all CONTROL A1 functions will be sure that includes a CONTROL A1 jack). Shorting may result in straight when connecting. When operating this unit with a CD player or optional one to connect this unit to a Sony CD player (that the CD player's play mode is connected to a CD player, as well as RK-G34 (optional). Connecting a CD player Use the CONTROL A1 cord supplied with an audio connection cable (digital or analog*). When your...
Operating Instructions
Page 9
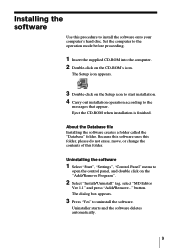
... software onto your computer's hard disc. Because this software uses this folder, please do not erase, move, or change the contents of this procedure to uninstall the software. Uninstalling the software 1 Select "Start", "Settings", "Control Panel" menu to open the control panel, and double click on the Setup icon to start installation. 4 Carry out installation operation according to the operation mode before proceeding. 1 Insert the supplied...
... software onto your computer's hard disc. Because this software uses this folder, please do not erase, move, or change the contents of this procedure to uninstall the software. Uninstalling the software 1 Select "Start", "Settings", "Control Panel" menu to open the control panel, and double click on the Setup icon to start installation. 4 Carry out installation operation according to the operation mode before proceeding. 1 Insert the supplied...
Operating Instructions
Page 10
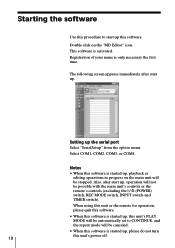
... software is only necessary the first time. The following screen appears immediately after start up . Notes • When this software is started up, this unit's PLAY MODE will be automatically set to start up, operation will not be possible with the main unit's controls or the remote's controls (excluding the (POWER) switch, REC MODE switch, INPUT switch and TIMER switch). Double click on the main unit...
... software is only necessary the first time. The following screen appears immediately after start up . Notes • When this software is started up, this unit's PLAY MODE will be automatically set to start up, operation will not be possible with the main unit's controls or the remote's controls (excluding the (POWER) switch, REC MODE switch, INPUT switch and TIMER switch). Double click on the main unit...
Operating Instructions
Page 12
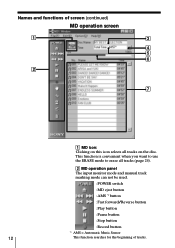
Names and functions of screen (continued) MD operation screen 1 3 4 5 6 2 7 1 MD icon: Clicking on this icon selects all tracks (page 24). 2 MD operation panel The input monitor mode and manual track marking mode can not be used. : POWER switch : MD eject button : AMS *1 button : Fast forward/Reverse button : Play button : Pause button : Stop button : Record button *1 AMS = Automatic Music Sensor 12 This function searches for the beginning of tracks. This function is convenient when you want to use the ERASE mode to erase all tracks on the disc.
Names and functions of screen (continued) MD operation screen 1 3 4 5 6 2 7 1 MD icon: Clicking on this icon selects all tracks (page 24). 2 MD operation panel The input monitor mode and manual track marking mode can not be used. : POWER switch : MD eject button : AMS *1 button : Fast forward/Reverse button : Play button : Pause button : Stop button : Record button *1 AMS = Automatic Music Sensor 12 This function searches for the beginning of tracks. This function is convenient when you want to use the ERASE mode to erase all tracks on the disc.

Operating Instructions
Page 14
... dropping this icon onto the MD operation screen selects all tracks for the beginning of screen (continued) CD operation screen 1 3 4 5 2 6 7 1 CD icon: Clicking on this icon selects all tracks. Names and functions of tracks. buttons (The number is the disc presently selected.) : AMS *1 button : Fast forward/Reverse button : Play button : Pause button : Stop button *1 AMS = Automatic Music Sensor 14 This function searches for recording. 2 CD operation buttons The input monitor mode and manual track marking mode cannot be used. : DISC+/-
... dropping this icon onto the MD operation screen selects all tracks for the beginning of screen (continued) CD operation screen 1 3 4 5 2 6 7 1 CD icon: Clicking on this icon selects all tracks. Names and functions of tracks. buttons (The number is the disc presently selected.) : AMS *1 button : Fast forward/Reverse button : Play button : Pause button : Stop button *1 AMS = Automatic Music Sensor 14 This function searches for recording. 2 CD operation buttons The input monitor mode and manual track marking mode cannot be used. : DISC+/-

Operating Instructions
Page 15
3 Disc Name display 4 Artist Name display 5 Time display switching button Used to switch between the Remain Time, Total Time, Track Elapsed and Track Remain displays. 6 Time display 7 Track number, Track name, Time display Note When this unit is connected to a CD player as well as to a computer, be sure to set the CD player's play mode to CONTINUE. 15
3 Disc Name display 4 Artist Name display 5 Time display switching button Used to switch between the Remain Time, Total Time, Track Elapsed and Track Remain displays. 6 Time display 7 Track number, Track name, Time display Note When this unit is connected to a CD player as well as to a computer, be sure to set the CD player's play mode to CONTINUE. 15
Operating Instructions
Page 16
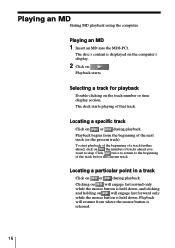
Playing an MD Stating MD playback using the computer. Locating a particular point in a track Click on will resume from the beginning of that track. Playing an MD 1 Insert an MD into the MDS-PC1. The deck starts playing of the next track (or the present track). Playback will engage fast forward only while the mouse button is held down . Playback starts. Selecting a track for...
Playing an MD Stating MD playback using the computer. Locating a particular point in a track Click on will resume from the beginning of that track. Playing an MD 1 Insert an MD into the MDS-PC1. The deck starts playing of the next track (or the present track). Playback will engage fast forward only while the mouse button is held down . Playback starts. Selecting a track for...
Operating Instructions
Page 18
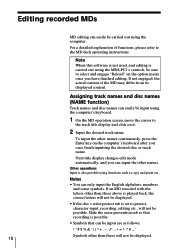
Assigning track names and disc names (NAME function) Track names and disc names can easily be sure to the track title display and click on the computer's keyboard after you can only input the English alphabets, numbers and some symbols. Other operations Input is carried out using the MDS-PC1's controls, be input using the computer's keyboard. 1 On the MD operation screen, move the cursor to select and engage "Reload...
Assigning track names and disc names (NAME function) Track names and disc names can easily be sure to the track title display and click on the computer's keyboard after you can only input the English alphabets, numbers and some symbols. Other operations Input is carried out using the MDS-PC1's controls, be input using the computer's keyboard. 1 On the MD operation screen, move the cursor to select and engage "Reload...

Operating Instructions
Page 19
... using memorandum or other text editing softwares, you input disc or track names by using memorandum or other text editing softwares. To use the text data input by other application (FLOW function) Before you can assign all texts and copy it on the clipboard. 3 Click the disc name or 1st track name display to enter edit mode. 4 Select "Paste" from the beginning display...
... using memorandum or other text editing softwares, you input disc or track names by using memorandum or other text editing softwares. To use the text data input by other application (FLOW function) Before you can assign all texts and copy it on the clipboard. 3 Click the disc name or 1st track name display to enter edit mode. 4 Select "Paste" from the beginning display...

Operating Instructions
Page 23
... A point*. Erasing a part of a track (A-B ERASE function) 1 During playback, click on on the operation panel at any time: Click "Cancel". * Shifting is erased. can also be dragged left or right for adjustment. 3 Click "OK" when the point A is temporarily set. can also be dragged left or right for adjustment. 6 Click "OK" when the point B is playing back correctly. The...
... A point*. Erasing a part of a track (A-B ERASE function) 1 During playback, click on on the operation panel at any time: Click "Cancel". * Shifting is erased. can also be dragged left or right for adjustment. 3 Click "OK" when the point A is temporarily set. can also be dragged left or right for adjustment. 6 Click "OK" when the point B is playing back correctly. The...
Operating Instructions
Page 24
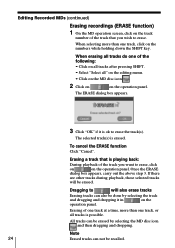
... during playback, those selected tracks will also erase tracks Erasing tracks can be erased. All tracks can also be recalled. The ERASE dialog box appears. 3 Click "OK" if it in operation panel. To cancel the ERASE function Click "Cancel". Editing Recorded MDs (continued) Erasing recordings (ERASE function) 1 On the MD operation screen, click on the track number of the track...
... during playback, those selected tracks will also erase tracks Erasing tracks can be erased. All tracks can also be recalled. The ERASE dialog box appears. 3 Click "OK" if it in operation panel. To cancel the ERASE function Click "Cancel". Editing Recorded MDs (continued) Erasing recordings (ERASE function) 1 On the MD operation screen, click on the track number of the track...

Operating Instructions
Page 25
...MY BEST SELECTION Label for disc 1 Load paper for disc's side MY BEST SELECTION MY BEST SELECTION 1. Note Printing is not possible on labels included with 11 to your computer. ARISA and YUKI 3. ENDLESS SUM... 8. FAN CLUB 11. Printing MD labels The disc and track name lists on the MD operation screen can ...Select "Label Print" on the file menu. The printing dialog box appears. 3 Follow the procedure for regular printing. The track list for a disc with 10 tracks or less will be printed out as one column, and the list for a disc with discs. 25 VACATION 6. Please use...
...MY BEST SELECTION Label for disc 1 Load paper for disc's side MY BEST SELECTION MY BEST SELECTION 1. Note Printing is not possible on labels included with 11 to your computer. ARISA and YUKI 3. ENDLESS SUM... 8. FAN CLUB 11. Printing MD labels The disc and track name lists on the MD operation screen can ...Select "Label Print" on the file menu. The printing dialog box appears. 3 Follow the procedure for regular printing. The track list for a disc with 10 tracks or less will be printed out as one column, and the list for a disc with discs. 25 VACATION 6. Please use...

Operating Instructions
Page 26
... is replaced, please be displayed. CD text data can be assigned to engage "Reload" on it. 2 Input the desired name. Track and disc names are not input directly onto the CD itself. 1 On the CD operation screen, move the cursor to the disc name or track name display column and click on the option menu after replacement. 26 Assigning names to CDs (NAME function) Disc names...
... is replaced, please be displayed. CD text data can be assigned to engage "Reload" on it. 2 Input the desired name. Track and disc names are not input directly onto the CD itself. 1 On the CD operation screen, move the cursor to the disc name or track name display column and click on the option menu after replacement. 26 Assigning names to CDs (NAME function) Disc names...
Operating Instructions
Page 27
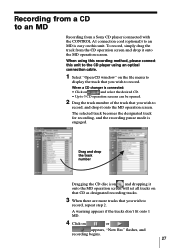
... MD operation screen will set all tracks on the file menu to display the track that you wish to record. To record, simply drag the track from a Sony CD player (connected with the CONTROL A1 connection cord (optional)) to an MD is engaged. The selected track becomes the designated track for recording, and the recording pause mode is easy on this unit to the CD player using...
... MD operation screen will set all tracks on the file menu to display the track that you wish to record. To record, simply drag the track from a Sony CD player (connected with the CONTROL A1 connection cord (optional)) to an MD is engaged. The selected track becomes the designated track for recording, and the recording pause mode is easy on this unit to the CD player using...
Operating Instructions
Page 31
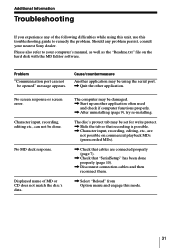
... experience any problem persist, consult your computer's manual, as well as the "Readme.txt" file on commercial playback MDs (prerecorded MDs). / Check that cables are connected properly (page 7). / Check that "SerialSetup" has been done properly (page 10). / Disconnect connection cables and then reconnect them. / Select "Reload" from Option menu and engage this troubleshooting guide to your nearest Sony dealer. No screen response or screen error. Displayed name...
... experience any problem persist, consult your computer's manual, as well as the "Readme.txt" file on commercial playback MDs (prerecorded MDs). / Check that cables are connected properly (page 7). / Check that "SerialSetup" has been done properly (page 10). / Disconnect connection cables and then reconnect them. / Select "Reload" from Option menu and engage this troubleshooting guide to your nearest Sony dealer. No screen response or screen error. Displayed name...

Operating Instructions
Page 32
... Assigning track and disc names (NAME function) (MD 18 C Cables For audio connection ... 8 For optical digital connection 8, 27 CD operation screen .... 11, 14 CD-ROM 6, 9 COMBINE function 22 Connections Computer 7 CD player 8 Connector 6, 7 CONTROL A1 connection cord 6, 7, 8 D Database folder 9, 26 DIVIDE function 21 E Erasing tracks (ERASE function) Erasing all tracks on an MD 24 Erasing a section within 1 track (A-B ERASE function 23 Erasing one track at a time 24 F, G, H Fast forward 16 Fast rewind 16 I, J, K, L Installing...
... Assigning track and disc names (NAME function) (MD 18 C Cables For audio connection ... 8 For optical digital connection 8, 27 CD operation screen .... 11, 14 CD-ROM 6, 9 COMBINE function 22 Connections Computer 7 CD player 8 Connector 6, 7 CONTROL A1 connection cord 6, 7, 8 D Database folder 9, 26 DIVIDE function 21 E Erasing tracks (ERASE function) Erasing all tracks on an MD 24 Erasing a section within 1 track (A-B ERASE function 23 Erasing one track at a time 24 F, G, H Fast forward 16 Fast rewind 16 I, J, K, L Installing...


