Operating Instructions
Page 1
2-650-483-11(1) Digital Surround Headphone System Operating Instructions GB Mode d'emploi FR Manual de instrucciones ES KR MDR-DS1000 © 2006 Sony Corporation
2-650-483-11(1) Digital Surround Headphone System Operating Instructions GB Mode d'emploi FR Manual de instrucciones ES KR MDR-DS1000 © 2006 Sony Corporation
Operating Instructions
Page 2
... for a Class B digital device, pursuant to provide reasonable protection against harmful interference in a particular installation. Reorient or relocate the receiving antenna. - Increase the separation between the equipment and receiver. - Connect the equipment into an outlet on , the user is no guarantee that to which can radiate radio frequency energy and, if not installed and used in this manual could void your...
... for a Class B digital device, pursuant to provide reasonable protection against harmful interference in a particular installation. Reorient or relocate the receiving antenna. - Increase the separation between the equipment and receiver. - Connect the equipment into an outlet on , the user is no guarantee that to which can radiate radio frequency energy and, if not installed and used in this manual could void your...

Operating Instructions
Page 3
... power adaptor to the processor .... 11 Disposal of Old Electrical & Electronic Equipment (Applicable in the USA and Canada RECYCLING NICKEL METAL HYDRIDE BATTERIES Table Of Contents Main Features 4 Nickel Metal Hydride batteries are recyclable. Precautions 19 Specifications 20 3GB For more information regarding recycling of materials will help to a Connected Component 12 Using Additional Headphones .. 15 Replacing the Ear Pads 16 Troubleshooting...
... power adaptor to the processor .... 11 Disposal of Old Electrical & Electronic Equipment (Applicable in the USA and Canada RECYCLING NICKEL METAL HYDRIDE BATTERIES Table Of Contents Main Features 4 Nickel Metal Hydride batteries are recyclable. Precautions 19 Specifications 20 3GB For more information regarding recycling of materials will help to a Connected Component 12 Using Additional Headphones .. 15 Replacing the Ear Pads 16 Troubleshooting...
Operating Instructions
Page 4
... and Digital Theater Systems, Inc. You can enjoy multi-channel surround sound with headphones by reducing pressure and weight on the ears. The digital surround processor for long-term viewing and listening by simply connecting the digital surround processor to only those countries where it is restricted to a DVD device etc., with the supplied optical digital connecting cable. • Compatibility of MDR-DS1000 with a wide variety of audio...
... and Digital Theater Systems, Inc. You can enjoy multi-channel surround sound with headphones by reducing pressure and weight on the ears. The digital surround processor for long-term viewing and listening by simply connecting the digital surround processor to only those countries where it is restricted to a DVD device etc., with the supplied optical digital connecting cable. • Compatibility of MDR-DS1000 with a wide variety of audio...
Operating Instructions
Page 5
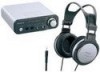
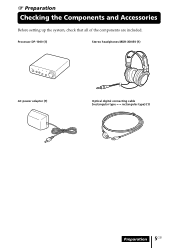
1 Preparation Checking the Components and Accessories Before setting up the system, check that all of the components are included. Processor DP-1000 (1) Stereo headphones MDR-XD050 (1) AC power adaptor (1) Optical digital connecting cable (rectangular type y rectangular type) (1) Preparation 5GB
1 Preparation Checking the Components and Accessories Before setting up the system, check that all of the components are included. Processor DP-1000 (1) Stereo headphones MDR-XD050 (1) AC power adaptor (1) Optical digital connecting cable (rectangular type y rectangular type) (1) Preparation 5GB

Operating Instructions
Page 6
... MIN MAX 1 DECODE MODE indicators (See page 14 for details.) Slide to select the sound field (CINEMA/ OFF/MUSIC). 6 Volume control Adjusts the volume of the headphones connected to select the input source (ANALOG/DIGITAL). 5 EFFECT switch (See page 13 for details.) 2 POWER indicator Lights green when the processor is turned on /off. 3 PHONES jack Connect the supplied headphones. 4 INPUT SELECT switch Slide to the PHONES jack. 6GB Preparation
... MIN MAX 1 DECODE MODE indicators (See page 14 for details.) Slide to select the sound field (CINEMA/ OFF/MUSIC). 6 Volume control Adjusts the volume of the headphones connected to select the input source (ANALOG/DIGITAL). 5 EFFECT switch (See page 13 for details.) 2 POWER indicator Lights green when the processor is turned on /off. 3 PHONES jack Connect the supplied headphones. 4 INPUT SELECT switch Slide to the PHONES jack. 6GB Preparation
Operating Instructions
Page 7
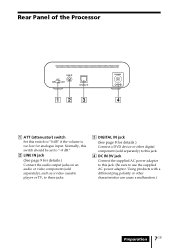
... be set to "-8 dB." 2 LINE IN jack (See page 9 for details.) Connect the audio output jacks on an audio or video component (sold separately) to this jack. 4 DC IN 9V jack Connect the supplied AC power adaptor to this switch to "0 dB" if the volume is too low for details.) Connect a DVD device or other characteristics can cause a malfunction.) Preparation 7GB Using products with a different plug polarity or other digital...
... be set to "-8 dB." 2 LINE IN jack (See page 9 for details.) Connect the audio output jacks on an audio or video component (sold separately) to this jack. 4 DC IN 9V jack Connect the supplied AC power adaptor to this switch to "0 dB" if the volume is too low for details.) Connect a DVD device or other characteristics can cause a malfunction.) Preparation 7GB Using products with a different plug polarity or other digital...

Operating Instructions
Page 8
... connected equipment supports PCM output only, all surround sound effects will be careful when inserting and removing the cable plug. • The digital input for playback of DVDs recorded in DTS audio. (For more details, see the instruction manual of your DVD device.) • When playing CDs recorded in DTS format, noise may be heard when a 96 kHz digital signal is analogue-connected. DTS • A DTS-compatible...
... connected equipment supports PCM output only, all surround sound effects will be careful when inserting and removing the cable plug. • The digital input for playback of DVDs recorded in DTS audio. (For more details, see the instruction manual of your DVD device.) • When playing CDs recorded in DTS format, noise may be heard when a 96 kHz digital signal is analogue-connected. DTS • A DTS-compatible...

Operating Instructions
Page 9
... set the volume on portable DVD players, portable CD players, or other digital components to the LINE IN jack. See "Specifications: Recommended accessories" (page 20) for details about other component LINE IN jack Audio cord (sold separately) Audio right (red) Connecting cables (sold separately). (Continued) Connection 9GB Processor To audio output jacks Audio left (white) VCR, TV, or other connecting cables (sold separately) Use the connecting cable RK-G136 (stereo mini-plug y stereo mini-plug) when connecting a stereo...
... set the volume on portable DVD players, portable CD players, or other digital components to the LINE IN jack. See "Specifications: Recommended accessories" (page 20) for details about other component LINE IN jack Audio cord (sold separately) Audio right (red) Connecting cables (sold separately). (Continued) Connection 9GB Processor To audio output jacks Audio left (white) VCR, TV, or other connecting cables (sold separately) Use the connecting cable RK-G136 (stereo mini-plug y stereo mini-plug) when connecting a stereo...

Operating Instructions
Page 10
ATT 0dB -8dB Setting 0 dB -8 dB Connected components TV, portable components, and other components with a low output level Other components (initial settings) Notes • Be sure to lower the volume before setting the ATT switch. • If audio input to the LINE IN jack is low using the analogue input, set the ATT switch to "0 dB." Setting the input level If the volume is distorted (sometimes, noise can be heard at the same time), set the ATT (attenuator) switch to "-8 dB." 10GB Connection
ATT 0dB -8dB Setting 0 dB -8 dB Connected components TV, portable components, and other components with a low output level Other components (initial settings) Notes • Be sure to lower the volume before setting the ATT switch. • If audio input to the LINE IN jack is low using the analogue input, set the ATT switch to "0 dB." Setting the input level If the volume is distorted (sometimes, noise can be heard at the same time), set the ATT (attenuator) switch to "-8 dB." 10GB Connection

Operating Instructions
Page 11
Using AC adaptors with an on/off switch Notes • Be sure to use the supplied AC power adaptor. On/off switch, set to the correct voltage for your area before connecting it to an AC outlet. • If your AC power adaptor is equipped with a voltage selector, first be sure that it is set it to ON. Connection 11GB Even AC power adaptors having the same...
Using AC adaptors with an on/off switch Notes • Be sure to use the supplied AC power adaptor. On/off switch, set to the correct voltage for your area before connecting it to an AC outlet. • If your AC power adaptor is equipped with a voltage selector, first be sure that it is set it to ON. Connection 11GB Even AC power adaptors having the same...

Operating Instructions
Page 12
DVD device or other audio or video component POWER 2 Connect the headphones to the PHONES jack, and turn on the component connected to 11) and make the proper connections. 1 Turn on the processor. 1 Operation Listening to a Connected Component Before starting, be sure to read "Connecting the Headphone System" (pages 8 to the processor. The DECODE MODE indicator lights up, depending on the headphones. POWER 3 Put on the audio signal input from the connected audio or video...
DVD device or other audio or video component POWER 2 Connect the headphones to the PHONES jack, and turn on the component connected to 11) and make the proper connections. 1 Turn on the processor. 1 Operation Listening to a Connected Component Before starting, be sure to read "Connecting the Headphone System" (pages 8 to the processor. The DECODE MODE indicator lights up, depending on the headphones. POWER 3 Put on the audio signal input from the connected audio or video...
Operating Instructions
Page 13
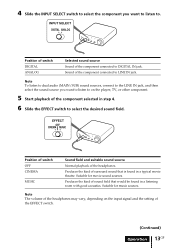
... of surround sound that would be found in a typical movie theatre. Note The volume of the headphones may vary, depending on the player, TV, or other component. 5 Start playback of the component selected in step 4. 6 Slide the EFFECT switch to select the desired sound field. INPUT SELECT DIGITAL ANALOG Position of switch DIGITAL ANALOG Selected sound source Sound of the component connected to...
... of surround sound that would be found in a typical movie theatre. Note The volume of the headphones may vary, depending on the player, TV, or other component. 5 Start playback of the component selected in step 4. 6 Slide the EFFECT switch to select the desired sound field. INPUT SELECT DIGITAL ANALOG Position of switch DIGITAL ANALOG Selected sound source Sound of the component connected to...
Operating Instructions
Page 14
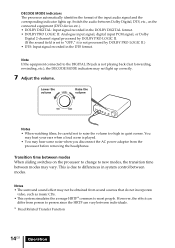
.... Notes • The surround sound effect may hurt your ears when a loud scene is due to raise the volume too high in system control between individuals. * Head Related Transfer Function 14GB Operation DECODE MODE indicators The processor automatically identifies the format of the input audio signal and the corresponding indicator lights up correctly. 7 Adjust the volume. Note If the equipment connected to the DIGITAL IN jack is...
.... Notes • The surround sound effect may hurt your ears when a loud scene is due to raise the volume too high in system control between individuals. * Head Related Transfer Function 14GB Operation DECODE MODE indicators The processor automatically identifies the format of the input audio signal and the corresponding indicator lights up correctly. 7 Adjust the volume. Note If the equipment connected to the DIGITAL IN jack is...

Operating Instructions
Page 15
MDR-XD100 (sold separately), two persons can enjoy the surround sound experience at the same time. Using Additional Headphones In this system, by using additional stereo headphones (MDR-XD100, sold separately) Processor Operation 15GB
MDR-XD100 (sold separately), two persons can enjoy the surround sound experience at the same time. Using Additional Headphones In this system, by using additional stereo headphones (MDR-XD100, sold separately) Processor Operation 15GB

Operating Instructions
Page 16
Replacing the Ear Pads The ear pads are not commercially available. The ear pads are replaceable. You can order replacements from the store where you purchased this system, or at your nearest Sony dealer. 1 Remove the old ear pad by pulling it off. 2 Place the new ear pad around the housing. 16GB Operation If the ear pads become dirty or worn out, replace them as illustrated below.
Replacing the Ear Pads The ear pads are not commercially available. The ear pads are replaceable. You can order replacements from the store where you purchased this system, or at your nearest Sony dealer. 1 Remove the old ear pad by pulling it off. 2 Place the new ear pad around the housing. 16GB Operation If the ear pads become dirty or worn out, replace them as illustrated below.
Operating Instructions
Page 17
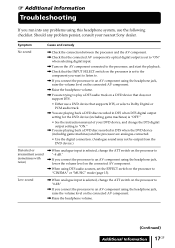
... sound (sometimes with noise) , When analogue input is selected, change the DTS digital output setting to an AV component using the headphone jack, lower the volume level on the connected AV component. , When using the headphone jack, raise the volume level on a DVD device that does not support DTS. • Either use the following checklist. 1 Additional Information Troubleshooting If you run into any problem persist, consult your DVD device, and change...
... sound (sometimes with noise) , When analogue input is selected, change the DTS digital output setting to an AV component using the headphone jack, lower the volume level on the connected AV component. , When using the headphone jack, raise the volume level on a DVD device that does not support DTS. • Either use the following checklist. 1 Additional Information Troubleshooting If you run into any problem persist, consult your DVD device, and change...

Operating Instructions
Page 18
... if the plugs of the connecting cable or headphones are dusty. The DTS indicator does not turn on the DVD device (including game machines) is set to "PCM." • See the instruction manual of your DVD device, and change the DTS digital output setting to "CINEMA" or "MUSIC" mode (page 13). , The audio being played is not input. The surround sound effect is not obtained , Set the EFFECT switch on...
... if the plugs of the connecting cable or headphones are dusty. The DTS indicator does not turn on the DVD device (including game machines) is set to "PCM." • See the instruction manual of your DVD device, and change the DTS digital output setting to "CINEMA" or "MUSIC" mode (page 13). , The audio being played is not input. The surround sound effect is not obtained , Set the EFFECT switch on...
Operating Instructions
Page 19
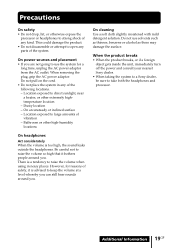
... direct sunlight, near a heater, or other high-humidity locations On headphones Act considerately When the volume is too high, the sound leaks outside the headphones. However, for a long time, unplug the AC power adaptor from the AC outlet. Do not pull on the cord. • Do not place the system in noisy places. This could damage the product. • Do not disassemble...
... direct sunlight, near a heater, or other high-humidity locations On headphones Act considerately When the volume is too high, the sound leaks outside the headphones. However, for a long time, unplug the AC power adaptor from the AC outlet. Do not pull on the cord. • Do not place the system in noisy places. This could damage the product. • Do not disassemble...
Operating Instructions
Page 20
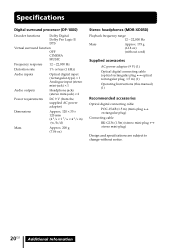
... Approx. 200 g (7.06 oz) Stereo headphones (MDR-XD050) Playback frequency range 12 - 22,000 Hz Mass Approx. 175 g (6.18 oz) (without cord) Supplied accessories AC power adaptor (9 V) (1) Optical digital connecting cable (optical rectangular plug y optical rectangular plug, 1.5 m) (1) Operating Instructions (this manual) (1) Recommended accessories Optical digital connecting cable POC-15AB (1.5 m) (mini-plug y rectangular plug) Connecting cable RK-G136 (1.5m) (stereo mini-plug y stereo mini-plug) Design and specifications are subject to change without notice. 20GB Additional Information
... Approx. 200 g (7.06 oz) Stereo headphones (MDR-XD050) Playback frequency range 12 - 22,000 Hz Mass Approx. 175 g (6.18 oz) (without cord) Supplied accessories AC power adaptor (9 V) (1) Optical digital connecting cable (optical rectangular plug y optical rectangular plug, 1.5 m) (1) Operating Instructions (this manual) (1) Recommended accessories Optical digital connecting cable POC-15AB (1.5 m) (mini-plug y rectangular plug) Connecting cable RK-G136 (1.5m) (stereo mini-plug y stereo mini-plug) Design and specifications are subject to change without notice. 20GB Additional Information


